Transcription
ADP Workforce Nowfor Recruiting & OnboardingEdge Integration Guide
Table of contentsTable of contentsVersion historyOverview123Setup instructions6Process flow11Appendix17PrerequisitesIn ADPIn CornerstoneIn CornerstoneIn ADPA. Create applicant onboard new hire template B. Configuring offer letter fieldsC. Field mappingD. Frequently asked questions368111417202225
Version 28/20184.009/20/2018DESCRIPTION Document creation Changed the GUID to a required field Removed Cornerstone Profile and how to create acustom profile in ADPAdded the required Practitioner permissionsUpdated Setup Instructions In ADP section with details of how to handle subscription failuresIncluded steps to prevent the 403 Forbidden errorAdded extra fields to Field Mapping (Pay Cycle, WageType, Salary)Added FAQs to the Appendix 5.010/8/2018 Process Flow includes optional Offer Letter stepsAppendix updated to include Offer Letter preferences6.009/3/2019 Updated installation process
OverviewADP Workforce Now Recruiting & Onboarding Connector APIintegration creates new hire data in ADP. This is a one-wayintegration from Cornerstone to ADP Workforce Now currentversion (version 2.0 is not supported by API integration). Thisintegration only applies to external new hires, not internalhires. The integration is triggered once the HR Admin saves thenew hire’s user record in Cornerstone after going through theManage Hired Applicants page.Prerequisites1.In ADP Workforce Now (WFN), proceed to SETUP Tools Custom Fields and add a customtext field called “GUID” with Location “Employment Custom Field”. For more details aboutadding custom fields, please refer to ADP WFN’s online help. The GUID field is a requiredshared unique identifier between Cornerstone and ADP WFN. It is used to prevent creationof duplicate user records. See Field #20 in the Field Mapping appendix for further details.2. Navigate to SETUP Security Access Permissions Menu Access Standard Practitionerand verify that the profile has the following permissions: Process HR Hire/Rehire Setup Tools Validation Tables3
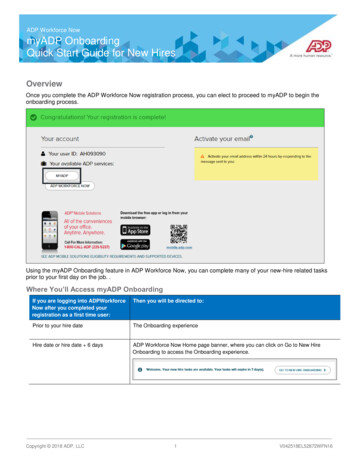
3. Create a Template in ADP WFN named “Applicant Onboard”.Notes: The template must be named exactly as mentioned (case sensitive). For moreinformation on how to create a template, please refer to Create ApplicantOnboard New Hire Template in the appendix The GUID field must also be added to the template as required4. Assign the required profiles and “Practitioner” profile to manage new hires bychecking their corresponding checkboxes in the “Applicant Onboard” Hire/RehireTemplate. This can be accomplished by the following steps:a. Go To: SETUP Template Management Hire/Re-Hireb. Choose “Applicant Onboard”c. Select “Assign Users”d. Check the “Practitioner” checkbox and the required profiles to manage new hires4
e. Verify that “Cornerstone” and your new hire team members are in the list byselecting “View Users in Selected Profiles”.f.Select Next and save the template.5
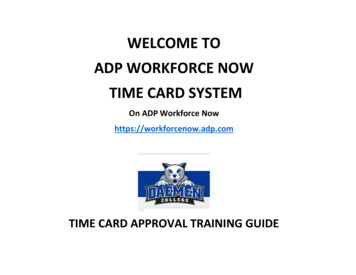
Setup instructionsIn ADP1.Search for “Cornerstone Recruiting & Onboarding Connector” integration App in the ADPMarketplace at https://apps.adp.com.2. Select the App and purchase it by selecting BUY NOW.6
3. Upon purchasing the integration from the ADP Marketplace, you will receive an emailwith the subscription token. Please retain this email, as that value will be required toset up the integration in Cornerstone.Notes: If the subscription email is not received:a. Kindly verify your email address used for notification in ADP WFN underthe communication preferenceb. Check your spam/junkc. Contact Cornerstone GPS team in order to cancel your subscription, thenre- subscribe again in the ADP marketplace4. Navigate to the “MY APPS” section and select Cornerstone Recruiting & OnboardingConnector App. If you cannot access the App, please verify the Client Id and Clientsecret are populated in the previous step.5. You will be asked to provide the consent to ADP to share the data with Cornerstone.7
6. Upon providing the consent, a confirmation notification will be displayed.7. Press “Continue” and you will be brought back to the “MY APPS” section. Thiscompletes the subscription, and consent in the ADP Marketplace. Please note thatonly after the consent is provided, integration between ADP Workforce Now andCornerstone will be enabled.In Cornerstone8. Open Cornerstone’s Edge Marketplace at Admin Tools Edge Marketplace.9. Install "ADP Workforce Now for Recruiting" integration by clicking on "Install".8
10. Review the Terms and Conditions then select the checkbox "I have read, understand,and agree." and click "Install" to proceed. Otherwise, click "Not Now".11. You may configure the integration now by clicking “Configure Now”. This will take youto the Edge Integrate screen of this integration.12. Populate the Subscription Token and Client Email IDs, then press the "Save Settings"button. The integration will populate the Client ID and Client Secret from ADP using theprovided token.9
Subscription Token is the token received by email after purchasing theintegration from ADP’s Marketplace Client Email IDs is the email address where notifications and errors shouldbe sent (Multiple emails should be comma separated)13. Verify that the Client Id and Client secret are populated by viewing the Settings screenagain before enabling the integration10
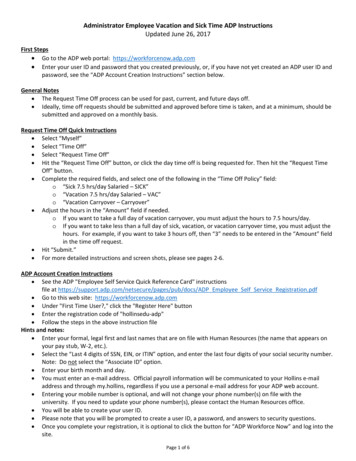
Process flowThe integration is triggered through either Hiring an applicant or Onboarding an applicant.Below is how to trigger the integration via the two processes in Cornerstone and the expectedresults in ADP WFN.In CornerstoneHiring an applicantThe hiring process is triggered when you change the status of an applicant to Hired andcreate the user record from the Manage Hired Applicants. Below are the steps to accomplishthat: Navigate to Manage Requisitions and select Applicants11
Select an applicant and change their status as shown below Set their New Status to “Hired” and submit the applicantNotes:a. In case the Offer letter is selected and it gets accepted by the applicant, makesure to populate the Salary, Currency, Wage Type and Pay Cycle fields in theOffer Details. The integration will not send the user to ADP WFN without thesefields12
b. Refer to Configure Offer Letter Fields in the Appendix on how to configure theOffer Letter with Salary, Currency, Wage Type and Pay Cycle.c. Do not forget to update your Offer Letter Template Navigate to Admin Recruit Recruited Applicants to create a user record Verify and update the user fields: First Name, Last Name, User ID, Username,Original Hire Date, and valid ADP OU values, then click Save This will trigger the integration and send the user record information to ADPWFN13
Onboarding an applicant In Cornerstone, the onboarding process is triggered when you click the StartOnboarding button This will trigger the integration and send the user record information to ADP WFNIn ADP1.Once the onboarding is started or an applicant is Hired in Cornerstone, that applicant/new hire details are created in ADP Workforce Now2. In ADP WFN, the delegated can see the created applicant / new hire details in the Hire/Rehire page under the In-Progress Hires tab. This can be done by the following steps:a. Go To: PROCESS HR Hire/Re-Hire14
b. Selecting the In-Progress Hires tab3. Select the created applicant / new hire details and complete the Hiring processNOTES: If the New hire sync process fails, an email is sent to the subscribedemail(s) with details of the sync failure To reprocess a failed record:1.Proceed to the user record Admin Tools User2. Deactivate the user and save it3. Reopen the user record4. Re-activate the user record and save it to trigger the sync processagain The Process Flow steps could be followed for testing the integrationonce enabled using a new hire test record or start onboarding for a testapplicant in Cornerstone For testing purpose, a new test requisition can be created using an ADPposition, a test requisition template, and other ADP OUs [division, cost15
center etc.]. Rename these OUIDs and mark them inactive after testing isdone. This ensures that existing positions and reporting are not affected.1.Create an ADP position and create a requisition template for thisposition2. Create a requisition for this position. Add ADP division and locationsto the requisition3. Add an applicant to the requisition using Snapshot option. Theapplicant would be in– “In Review” status when created newly4. Navigate to manage applicants page and click on applicant name.This navigates the user to applicant details page5. Click Start Onboarding on this page. Complete the onboardingdetails that appears on the next page using any existing testonboarding workflows and pre- boarding OU configurations.If there are no test workflows available, create one in Admin Onboarding Onboarding Workflows and Admin Onboarding Pre- boarding Organization Unit Configurations using the ADP OUsalready created6. The Integration should be triggered at this point and the applicantshould be reflected on the ADP portal7. Once the testing is complete, rename the OUIDs and markthem inactive. Mark the onboarding workflow and pre-boardingorganization unit inactive. The requisition can be closed as well16
AppendixA. Create applicant onboard new hire template 1.Proceed to SETUP Template Management Hire/ReHire.2. Check the box next to any existing New Hire Template, Click COPY.Note: You may also choose to ADD a new template.3. Enter “Applicant Onboard” in the Name of New Template field, Click YES.17
4. Click “Yes” to activate the Applicant Onboard Template, Click Applicant Onboard.5. Add the “Custom Fields” section to the “Selected Steps”.6. In Select Fields, expand the “Custom Fields” and set the GUID to optional.7. Select Assign Users.18
8. Select “Practitioner” profile and any required profile to manage new hires.9. Verify that “Cornerstone” and your new hire team members are in the list byselecting “View Users in Selected Profiles”.10. Click Confirm Selections, Click DONE.19
B. Configuring offer letter fields1.Navigate to Admin Tools Recruit Offer Letter Preferences.2. Select the OU level needed to apply these settings. The image below selectsthe root Corp to apply changes to the whole organization.20
3. Under the FIELDS section, set the following to Active: Salary, Currency, Pay Cycle,and Wage Type.4. Under the PAY CYCLES section, add the following values and set them to Active:Weekly, Biweekly, Daily, Every 2.6 wks, Every 4 wks, Every 5.2 wks, SemiMonthly, andMonthly. Add only the values that meet your business requirements.Note: Do not forget to update your Offer Letter Template21
C. Field mapping* Pay cycle, Wage Type, Salary and Currency fields are only required to be populated inCornerstone when applicants accept their offer letter.CSOD StandardFieldADP Step1PrefixPersonalSalutationNo2First NamePersonalFirst NameYes3Middle NamePersonalMiddle NameNo4Last NamePersonalLast NameYesADP FieldRequired?5SuffixPersonalGeneration SuffixNo6Original Hire DatePersonalHire DateYes7Address Line 1PersonalPersonal Address 1 Address 1No8Address Line 2PersonalPersonal Address2 Address 2No9CityPersonalPersonal Address 1 CityNoPersonalPersonal Address 1 State/Province/Territory10StateNoCommentsMust match referential value inADP, otherwisewill not load.Must match referential value inADP, otherwisewill not load.Must matchtwo digit referential value inADP, otherwisewill not load.22
CSOD StandardFieldADP StepADP FieldRequired?11ZipPersonalPersonal Address 1 Zip CodeNo12CountryPersonalPersonal Address 1 CountryNo13PhonePersonalHome Phone Phone NumberNoArea code willnot be populated. Full numberwill be in thePhone Numberfield.Area code willnot be populated. Full numberwill be in thePhone Numberfield.14Mobile PhonePersonalPersonal Cell Phone NumberNo15Email AddressPersonalHome EmailNo16171819DivisionPositionCost mentBusiness UnitJob TitleHome DepartmentLocationCommentsNoMust matchreferential OUID value in ADP,otherwise willnot load.NoMust matchreferential OUID value in ADP,otherwise willnot load.NoMust matchreferential OUID value in ADP,otherwise willnot load.NoMust matchreferential OUID value in ADP,otherwise willnot load.23
CSOD Standard Field2021GUIDPay Cycle*ADP StepCustomFieldsPayrollADP FieldGUIDPay FrequencyRequired?CommentsYesThis field will be populatedby the CSOD auto-generatedGUID. The client must createa custom field called “GUID”in their ADP WFN portal priorto enabling the API integration. Do not modify this valueonce in ADP WFN, otherwiseit could create duplicatesonce the user data is sentback to CSOD.See Screenshot below forexample.NoMust match referential value in ADP, otherwise will notload.Possible values are pre-set inADP WFN and are not modifiable: Weekly, Biweekly, Daily,Every 2.6 wks, Every 4 wks,Every 5.2 wks, SemiMonthly,and Monthly.22Wage Type*PayrollRate TypeNoAnnual and Hourly aremapped to ADP WFN valuesSalary and Hourly respectively23Salary*PayrollRegular PayRateNoMust be a numeric value, upto two decimal places.24Currency*PayrollCurrencyNo24
D. Frequently asked questionsQuestion: What should I do if I am receiving a 403 Forbidden error?Answer: Kindly verify the following:1. Consent was provided in ADP Marketplace to Cornerstone. Details are availableunder Setup Instructions under In ADP2. “Cornerstone” is assigned to “Applicant Onboard” template. Refer to thePrerequisites for further instructionsQuestion: Why can’t I update or finalize the process of new hires created by theintegration in ADPWFN?Answer: Kindly verify that you / your team are assigned to “Applicant Onboard” template.Referto the Prerequisites for further instructions.Please note that you will only have access to newly created new hires moving forward. Itis not possible to give you access to existing new hires.25
1. In ADP Workforce Now (WFN), proceed to SETUP Tools Custom Fields and add a custom text field called "GUID" with Location "Employment Custom Field". For more details about adding custom fields, please refer to ADP WFN's online help. The GUID field is a required shared unique identifier between Cornerstone and ADP WFN.