Transcription
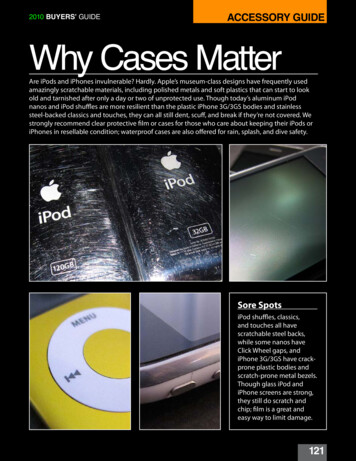
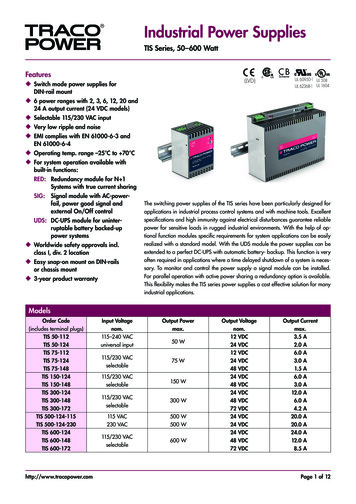
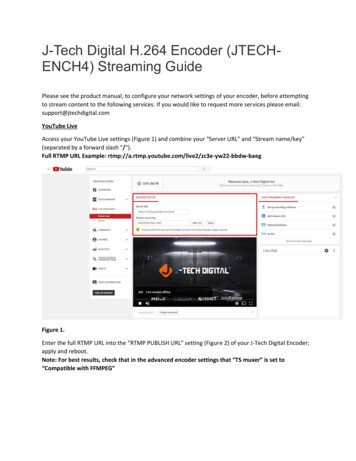
J-Tech Digital H.264 Encoder (JTECHENCH4) Streaming GuidePlease see the product manual, to configure your network settings of your encoder, before attemptingto stream content to the following services. If you would like to request more services please email:support@jtechdigital.comYouTube LiveAccess your YouTube Live settings (Figure 1) and combine your “Server URL” and “Stream name/key”(separated by a forward slash "/").Full RTMP URL Example: gFigure 1.Enter the full RTMP URL into the “RTMP PUBLISH URL” setting (Figure 2) of your J-Tech Digital Encoder;apply and reboot.Note: For best results, check that in the advanced encoder settings that “TS muxer” is set to“Compatible with FFMPEG”
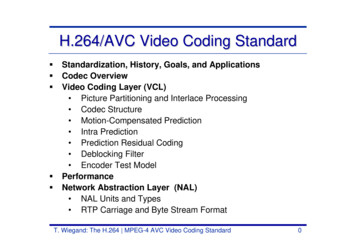
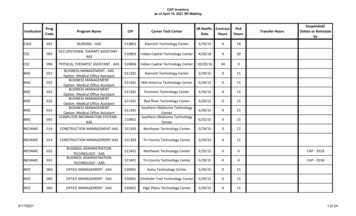
Figure 2.Check “Stream Health” in YouTube (Figure 3) and adjust settings accordingly, per your specific streamrequirements.Note: Use Google’s DNS servers (8.8.8.8 and 8.8.4.4), in your encoder’s network settings for bestresults.Figure 3.Facebook LiveNavigate to your Facebook Live settings and combine your “Server URL” and “Stream name/key” (Figure4)Full RTMP URL Example: 4100?ds 1&a AThBmqbpmbMZ1Wn1
Figure 4.Enter the full RTMP URL into the “RTMP PUBLISH URL” setting (Figure 5) of your J-Tech Digital Encoder;apply and reboot.Note: For best results, check that in the advanced encoder settings that “TS muxer” is set to“Compatible with FFMPEG”Figure 5.Check “Preview” in Facebook Live (Figure 6) and adjust settings accordingly, per your specific streamrequirements.Note: Facebook will not stream any video signal that does not have an audio track.
Figure 6.DaCastAfter creating a live channel, navigate to your "Encoder Setup" settings (Figure 7). Look in section 3 foryour stream URL settings.Example Format: RTMP://(login):(password)@(stream url)/(stream names)
Figure 7.Enter the full RTMP URL into the “RTMP PUBLISH URL” setting (Figure 8) of your J-Tech Digital Encoder;apply and reboot.Note: Use Google’s DNS servers (8.8.8.8 and 8.8.4.4), in your encoder’s network settings, for bestresults.Figure 8.To test the RTMP stream, click on the blue preview button at the bottom of your DaCast settings (Figure9).Note: For best results, check that in the advanced encoder settings that “TS muxer” is set to“Compatible with FFMPEG”Figure 9.IBM Cloud Video/UstreamAccess your Ustream broadcast settings (Figure 10) and combine your “RTMP URL” and “Channel Key”(separated by a forward slash "/").Full RTMP URL deo/23493389/ur84eksfbUCaJZwk77KcGNJB9ReSCGkl
Figure 10.Enter the full RTMP URL into the “RTMP PUBLISH URL” setting (Figure 11) of your J-Tech Digital Encoder;apply and reboot.Note: Use Google’s DNS servers (8.8.8.8 and 8.8.4.4), in your encoder’s network settings, for bestresults.
Figure 11.Check the Ustream Broadcaster (Figure 12) for a video stream.TwitchClick HERE and select an ingest server from Twitch. Then navigate to your Twitch stream keysettings and combine your “Server URL” and “Stream name/key” (Figure 13)Example:rtmp://live-dfw.twitch.tv/app/live 185463631 mUKOBIbkTefAr3ydfL0gLImvAHO2Dk
Figure 13.Note: All images used in this guide are for reference only and may not reflect your exact application.J-Tech Digital Support Team1-888-610-2818support@jtechdigital.comMon-Fri 9AM-5PM (CT)
Figure 7. Enter the full RTMP URL into the "RTMP PULISH URL" setting (Figure 8) of your J-Tech Digital Encoder; apply and reboot. Note: Use Google's DNS servers (8.8.8.8 and 8.8.4.4), in your encoder's network settings, for best