Transcription
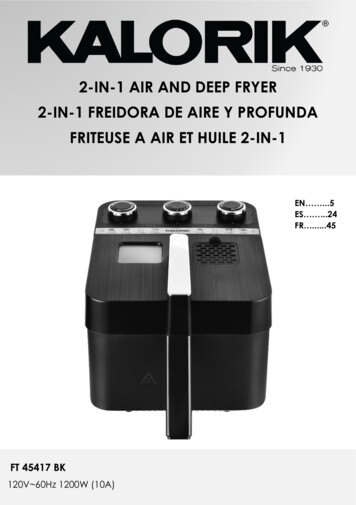
2-IN-1 AIR AND DEEP FRYER2-IN-1 FREIDORA DE AIRE Y PROFUNDAFRITEUSE A AIR ET HUILE 2-IN-1EN .5ES .24FR .45www.KALORIK.comFT 45417BK120V 60Hz 1200W (10A)1FT 45417 - 200605
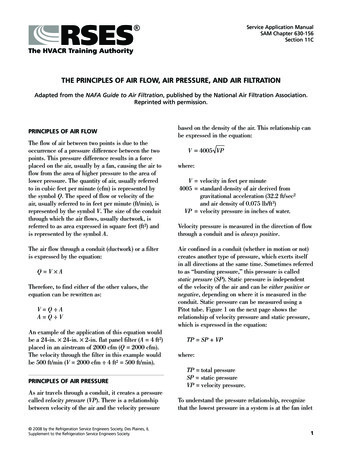
PARTS DESCRIPTION / DESCRIPTION DESÉLÉMENTS12354678910tttwww.KALORIK.com2FT 45417 - 200605
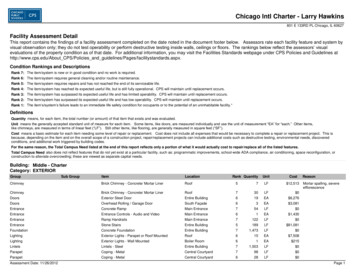
PARTS DESCRIPTION / DESCRIPTION DESÉLÉMENTS1113121514www.KALORIK.com316FT 45417 - 200605
PARTS DESCRIPTION/ DESCRIPTION DESÉLÉMENTSENGLISH:1.2.3.4.5.6.7.8.Lid handleLid filter coverLidFrying basketFrying basket handleDeep fry tank lidAir fry tankDeep fry tank9.10.11.12.13.14.15.16.HousingAnti-slip feetAir Fry Temperature KnobTimer KnobDeep Fry Temperature KnobAir fry ready indicator lightPOWER lightDeep fry ready indicator lightESPAÑOL:1. Manija de la tapa2. Filtro de la tapa3. Tapa4. Cesto de freír5. Asa de la cesta de freír6. Tapa del tanque de freír7. Tanque de freidora de aire8. Tanque de freidora de aireprofundo9. Carcasa10. Pies antideslizantes11. Perilla de temperatura defreidora de aire12. Minutero13. Perilla de temperatura defreidora de aire profundo14. Luz indicadora lista para freíraire15. Luz de encendido16. Luz indicadora lista para freírprofundoFRANÇAIS:1.2.3.4.5.6.7.8.9.10.11. Bouton de réglage de latempérature – Friture à air12. Bouton de réglage du tempsde cuisson13. Bouton de réglage de latempérature – friteuse à huile14. Voyant « prêt » – Friture à air15. Voyant de mise sous tension16. Voyant « prêt » – Friture àhuilePoignée du couvercleCouvercle du filtreCouverclePanier de friturePoignée du panier de fritureCouvercle de la cuve à huileCuve de friture à airCuve de friture à huileCorpsPieds antidérapantswww.KALORIK.com4FT 45417 - 200605
IMPORTANT SAFEGUARDSWhen using electrical appliances, basic safety precautions shouldalways be followed, including the following:1. Read all instructions before use.2. Do not touch hot surfaces. Use handles or knobs.‒ WARNING - to protect against electric shock, fire and personalinjury: do not immerse cord, plug or motor unit in water or otherliquids; Do not rinse under the tap.‒ do not immerse the appliance or any electrical components inwater or any other liquids.‒ always switch off and unplug the appliance before cleaning.3. Close supervision is necessary when any appliance is used by ornear children. Keep the appliance and its cord out of children lessthan 8 years old.4. This appliance can be used by children aged from 8 years andabove and persons with reduced physical, sensory or mentalcapabilities or lack of experience and knowledge if they havebeen given supervision or instruction concerning use of theappliance in a safe way and understand the hazards involved.Children shall not play with the appliance. Cleaning and usermaintenance shall not be made by children without supervision.5. Do not heat over 1 hour continuously, wait approximately 30minutes to cool down the machine before you need to heat again.6. Do not put aluminum foil, parchment paper, paper towel into frybasket or anywhere inside for cooking.7. During frying, hot steam is released through the air outlet openings.Keep your hands and face at a safe distance from the steam andfrom the air outlet openings. Also be careful of hot steam and airwhen you remove the fry basket from the appliance.8. Unplug from wall outlet when not in use and before cleaning. Allowto cool before handling, putting on or taking off parts, and beforecleaning the appliance.9. Do not operate any appliance with a damaged cord or plug, orafter the appliance malfunctions or has been damaged in anymanner.www.KALORIK.com5FT 45417 - 200605
10. The use of accessory attachments not recommended by theappliance manufacturer may result in fire, electric shock or injuriesto persons.11. Do not use outdoors or in a damp area.12. Do not let power cord hang over edge of table or counter or touchhot surfaces. Keep the main cord away from hot surfaces.13. Do not place on or near a hot gas or electric burner or in a heatedoven.14. Extreme caution must be used when moving a fryer containing hotoil or other hot liquids.15. Always attach plug to appliance first, then plug cord in the walloutlet. To disconnect, turn “off”, then remove plug from wall outlet.16. Do not use appliance for other than intended use.17. The appliance is not intended to be operated by means of anexternal timer or a separate remote-control system.18. Be sure handle is properly assembled to basket and locked inplace.19. Never leave the appliance unattended during operation.20. A fire may occur if the appliance is covered or touches flammablematerial, including curtains, draperies, walls, and the like, when inoperation. Do not store any item on top of the appliance when inoperation. Leave at least 10cm free space on the back and sidesand 10cm free space above the appliance.21. In the event of fire, never try to extinguish the flames with water.Unplug the appliance from the wall outlet. Place the lid on theappliance, if it can be done safely. Smother the flames with adamp cloth or use a fire extinguisher.22. Use only heat resistant tools. Do not use metal tools as they maybecome hot.23. Never pull on the power cord to disconnect the appliance from thewall outlet; instead, grasp the plug and pull on the plug.24. Do not clean with metal scouring pads. Pieces can break off thepad and touch electrical parts involving a risk of electric shock.25. WARNING! Always wait 3 to 4 hours until the oil has cooled downcompletely before emptying the oil container or covering it with theoil tank cover.SAVE THESE INSTRUCTIONSwww.KALORIK.com6FT 45417 - 200605
HOUSEHOLD USE ONLYADDITIONAL SAFEGUARDSThis appliance is for HOUSEHOLD USE ONLY. This appliance is not intended for use in environments such asstaff kitchens or ships, offices, farms or other work environments.Nor is it intended to be used by clients in hotels, motels, bed andbreakfasts and other residential environments. Do not useoutdoors. Do not place any food or other items on the heating element. Ifa piece of food falls onto the heating element when theappliance is operating, switch off the appliance and removethe piece of food with a fork or similar utensil immediately. The break-away power cord is for accidental disconnection. Donot remove during normal operation. If the Magnetic Plug isdisconnected, immediately remove the Power Cord with plugfrom the wall outlet. Turn all the knob to the 0 position.Reconnect the Magnetic Plug to the unit and then reconnectthe power cord with plug to the wall outlet. This appliance is designed to be used at ambient temperaturebetween 40 F - 100 F (5 C - 40 C). Empty the fry basket after each batch, especially when you fryfatty or marinated foods. Make sure the ingredients prepared in this appliance come outgolden yellow instead of dark or brown. Remove burntremnants.WARNING:‒ SERIOUS HOT OIL BURNS MAY RESULT FROM A DEEP FRYER BEINGPULLED OFF A COUNTERTOP. DO NOT USE WITH AN EXTENSION CORD. AIR FRY TANK AND OILTANK CAN NOT BE USED TOGETHER DURING COOKING. TO USE ASAN AIR FRYER, USE THE AIR FRYER TANK AND BASKET. TO USE AS ADEEP FRYER, USE THE OIL TANK AND BASKET.www.KALORIK.com7FT 45417 - 200605
WHEN USING AS AN AIR FRYER‒‒‒Always put the ingredients to be fried in the fry basket toprevent them from coming into contact with the heatingelements.Do not fill the air frying tank with oil as this may cause a firehazard.Let the appliance cool down for approx. 30 minutes before youhandle or clean it.WHEN USING AS A DEEP FRYER Lift the basket carefully when placing food inside to avoid oil tospill out. Reduce the food volume if there appears an oil spillmight occur.Remove excess surface moisture from foods prior to cooking toprevent heated oil from foaming out when food is added.Ensure both lid and oil tank are completely dry before use.3-PRONG PLUG INSTRUCTIONSFor your personal safety, this appliance must be grounded. This appliance isequipped with a power supply cord having a 3-prong grounding plug. Tominimize possible shock hazard, the cord must be plugged into a mating 3prong, grounding type, wall receptacle, grounded in accordance with theNational Electrical Code ANSI/NFPA 70 latest edition and all local codesand ordinances. If a mating wall receptacle is not available, it is thepersonal responsibility and obligation of the customer to have a properlygrounded, 3-prong, wall receptacle installed by a qualified electrician. Donot attempt to modify the plug in any way.SHORT CORD INSTRUCTIONSA short power supply cord is provided to reduce the hazards resultingfrom becoming entangled in or tripping over a longer cord.PARTS DESCRIPTIONSee pages 2-4.www.KALORIK.com8FT 45417 - 200605
BEFORE THE FIRST USE Remove all packaging materials and/or other transportationmeans.Check package content to verify it is complete and undamaged.Do not operate the appliance if the content is incomplete orappears damaged.Danger of suffocation!‒ Packaging materials are not toys. Always keep plastic bags, foilsand foam parts away from babies and children. Packagingmaterial could block airways and prevent breathing.NOTE: The appliance may produce an odor and/or emit smoke whenswitched on for the first time, as residues from the productionprocess are eliminated. This is normal and does not indicate adefect or hazard. Ensure ample ventilation.Clean the appliance thoroughly before using for the first time(see Cleaning and Maintenance).ASSEMBLY Place the appliance on a clean, flat and heat resistant surface.The magnetic plug is designed to only fit one way. Ensure the sidestating THIS SIDE UP is facing up and the magnetic plug is properlyattached.Insert the plug into a wall outlet.The blue power light will turn on to show the unit is powered.Never attach the magnetic plug to the device permanently.WARNING: The brake-away power cord is for accidental disconnection. Do notremove during normal operation. If the magnetic plug isdisconnected, immediately remove the plug from the wall outlet.Reconnect the magnetic plug to the unit and then reconnect theplug to the wall outlet.Before using your appliance make sure the basket handle is lockedin place in the cooking basket in the correct position.www.KALORIK.com9FT 45417 - 200605
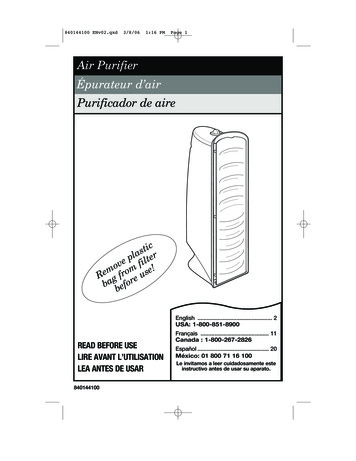
To lock the basket handle in place, press the bars together andslide them between the slots. Insert the ends of the bars into thebracket on the basket and push the handle backwards. Do notassemble any other way.Follow the below instructions to make sure the handle is properlyattached.1231. Place the pegs into the two holes in the basket bracket. (The pegsare the ends of the basket handle bars)2. Rotate the handle towards the basket rim, allowing the handle barto lock into place on the outer sides of the basket’s bracket.3. The handle is now in the locked position.USING THE APPLIANCE This appliance can be used for deep frying and air frying food suchas French fries, chicken and much more (see Recommended FryingTimes and Temperatures).Spread a little oil on the inside of the view window to preventcondensation.During cooking time there will be some steam coming out from theedge of the cover and the holes on the sides, this is normal.www.KALORIK.com10FT 45417 - 200605
USING THE AIR FRYING FUNCTION(Operating Principle: When the air frying tank is placed inside theappliance, the micro switch located at the bottom of the housing is nottouched therefore defaulting it into an air fryer)WARNING: This is an air fryer that is operated on hot air. Do not fill thefrying basket with oil or frying fat. Place the air fryer tank (tank with curved bottom and opening) intothe housing along with the frying basket and close the lid.Preheating:Preheating is not required but it is recommended when the unit iscold.Turn the air fryer temperature knob (left knob) to the maxtemperature and turn the timer knob to 3 minutes to preheat.The orange Ready light will appear on the control panel to indicatethe unit is heating up.The timer will now start to countdown the preparation time.Cooking:The timer will ring once preheating is finished. You can now changethe temperature to accommodate the food you plan to cook.Set your food inside the frying basket, making sure it is not overfilled,and then position the basket back inside the air fryer tank.Place the lid on top to close the housing, ensure the recessed partsof the lid fit properly over the basket handle.The time can now be set for air frying to start. (If the unit was notpreheated, add an extra 3 minutes to your cooking time.)For optimal results, we recommend shaking or turning your foodover at least twice during the cooking time or at regular intervals.Note: If you set the timer to half the cooking time, you will hear thetimer ring and know when to turn over or shake the food.Remember to set the timer again to the remaining cooking timeafter doing so.The timer will ring to announce when cooking is complete.Empty the frying basket into a bowl or onto a plate.www.KALORIK.com11FT 45417 - 200605
If you prepare several batches of fatty ingredients make sure youremove excess oil with a kitchen paper towel from the fry basketand air fry tank after each batch.To remove large or fragile ingredients, use a pair of tongs to lift thefood out of the basket.TIPS: The orange ready light (located by the AIR FRY temperature knob)indicates that the air fryer is ready for cooking. While preheating isrecommended, it is not required, and food can be added beforesetting the temperature and time. The ready light cycles on and off during use. This action is normaland indicates the appliance is heating to ensure the settemperature is maintained. A smaller amount of food requires a slightly shorter preparationtime, a larger amount of food will need longer preparation time. Do not fill the basket beyond ¾ of its capacity. Let the unit cool down if you are cooking several batches of foodone after the other. Do not heat for more than an hour. If you use oven ready snacks do not add oil as they are usually prefried and ready to cook. If you did not preheat before cooking, add 3 minutes when you setthe timer.USING THE DEEP FRYER FUNCTION(Operating Principle: A micro-switch is located at the bottom of thehousing. When the oil tank is placed, one of the legs will touch themicro-switch creating the appliance to default as a deep fryer. Set thetime or temperature and the deep fry function can start.)WARNING: Never refill the oil reservoir during use or while hot. Alwaysallow the appliance to cool down completely. Do not mix new oil withold oil. Place the oil tank (tank with heating elements in the bottom) insidethe housing.Pour oil inside within the range of max and min scale. Do not pourabove the max scale as oil may spill out and it can be dangerous.www.KALORIK.com12FT 45417 - 200605
Cover the housing using the lid.Use the right knob, oil frying knob, to select your desiredtemperature. The time can now be set for the deep frying to start. The oil will start heating up as soon as the temperature and timerknobs are set. When first heating up the oil, we recommend adding 10-12 minutesto the preparation time as the oil will need to reach the settemperature first. When you prepare for another batch of food afterthe first cooking, preheat time is about 3 minutes for the oil to reachthe set temperature. Orange indication READY light will turn on after the desiredtemperature is reached, showing the unit is ready to deep fry thefood Now that the oil has been preheated, remove the lid. Place food inside the frying basket, do not overfill, and carefully setthe basket inside the oil tank. Cover with lid and ensure therecessed parts of the lid fit properly over the basket handle. Pleasenote that when using the deep fryer function, do not place the lidon the appliance when frying fresh cut potatoes or other highmoisture content. For all other food, the lid may be placed back ontop. Do not fry food without the basket. After time has elapsed, the unit will ring, and the heating elementwill turn off. Let the food drain in the basket for a few seconds to remove excessoil and retain crispness. Use the handle to carefully lift the basket and pour the food onto aheat resistant dish that has been covered with a paper towel tocollect remaining oil.Note: The timer will begin to countdown as soon as the unit startsheating up. We recommend setting a starting time of 10 minutes, andthen adjusting the time to your desired cooking time. Approximate time durations until set temperature is reached:Temperature setting ( F / C)285 / 140300 / 150www.KALORIK.comTime (minutes)About 8 minsAbout 10 mins13FT 45417 - 200605
340 / 170375 / 190About 12 minsAbout 14 minsTo store the oil in the oil tank, wait for the oil to completely cool downand use the oil tank lid to close the tank before storage.WARNING: DO NOT OVER OR UNDER FILL. The maximum oil capacity is 1.8 L(MAX). Ensure the oil level always remains below the MAX line. Do not fry food without the basket.‒ Do not fill the basket over halfway. Too much food can causeexcess foaming and could cause the oil to overflow duringoperation.‒ Food added to the appliance must be dry. If frying frozen foodssuch as French fries or chicken wings, remove all ice particles fromthe frozen foods prior to frying to prevent oil from overflowing.Always remove excess moisture from food by patting with papertowel before frying. Even a small amount of water can causesevere splattering of hot oil.‒ After immersing the basket in the oil, it is recommended to placethe lid on top to avoid hot oil splatter. However, for food with highwater content, it is preferable to not place the lid to avoidexcessive steaming, condensation, or overflow.NOTE:‒ When frying fresh cut potatoes and high moisture content food,lower the basket slowly into the oil. If the oil boils or foams toorapidly, raise the basket for a few seconds and lower again. Do thisuntil the basket can be lowered without excess foaming.‒ Do not place the lid on the appliance when frying fresh cutpotatoes or other high moisture content foods.‒ Use oil specifically designed or recommended for deep frying.‒ Make sure battered and breaded items are free from excesscoating.‒ “Blanch” high moisture and long cooking items such as French friesat a lower temperature first (ideally 340-350 F) and crisp in a hotterfryer to finish (360-375 F).‒ Avoid heating the oil to excess (ideally below 375 F).‒ Skim out any particles left behind, between deep frying batches.www.KALORIK.com14FT 45417 - 200605
‒Filter the cooled down oil often.RECOMMENDED FRYING TIMES ANDTEMPERATURESThe frying times in the chart below are approximate and should beadjusted to suit your own tastes, different food quantities and foodmanufacturer’s instructions.Cooking table for AIR FRYING FUNCTION:AIR FRY functionsRecommendedtemperature( )410 Recommendedcooking time15-20 minSteakChicken wings400 410 10-15 min20-25 minVeggies370 10-18 min(2-3 servings)Frozen French fries(Max: 500g /17oz.)Cooking table for DEEP FRYING FUNCTION: (preheat time for oil heating is around10-12 mins)DEEP FRY functions(2 servings)Frozen French friesRecommendedtemperature( )375 Recommendedcooking time8-12 min375 375 375 8-12 min3-5 min4-6 min(Max: 400g / 14oz.)Chicken wingsFishVeggiesCHOOSING THE RIGHT COOKING OILAs a general rule, choose cooking oils with a high smoke point andavoid flavored oils.Suitable: Pure corn oil, blended vegetable oil, soybean oil, sunfloweroil, grape seed oil, peanut oilwww.KALORIK.com15FT 45417 - 200605
Not suitable: Olive oil, walnut oil, lardCOOKING WITH OILCooking oil can enhance the food’s flavor – or spoil its taste. As with anyother food component, freshness and correct handling of the oil is thekey to successful deep-frying results.The quality of the oil decreases with use at high temperatures. Foodparticles, water and other liquids will further lower its quality, therefore: Do not mix different cooking oils. Only use fresh and clean cooking oils:‒ Regularly remove burnt food particles while frying. Always useutensils that are safe to immerse into hot oils without damagingthe utensil or the appliance, and always wear oven mitts whenremoving any burnt food particles.‒ Do not reuse oil that has been used to fry fish or other stronglyflavored food.‒ Some meats, such as chicken wings, will release large amountsof liquids when frying, thus watering down the oil. Do not reusethis oil.Do not use the cooking oil anymore if you notice the following:Before use: oil smells rancid or its color has visibly darkened.While frying: oil is foaming strongly or smoke appears on the oil’s surfaceat normal operating temperature.HINTS AND TIPS Smaller quantities of food normally require a slightly shorter cookingtime than larger quantities of food.To reduce cooking time, defrost food prior to cooking. It isrecommended that some foods should not be thawed/defrostedprior to cooking, such as frozen fish, and frozen French fries.It is recommended to use a meat thermometer to check thecooking progress.In the event of food flare-ups, do not remove the lid, do not removethe basket; unplug the appliance.www.KALORIK.com16FT 45417 - 200605
When the food you are cooking requires shaking, it isrecommended to use a timer set for half of the suggested cookingtime. This way a bell will ring and remind you to shake the basket.It is recommended to only use nylon, heat-proof plastic or woodencooking utensils. Metal utensils may become hot and damage thenon-stick surface. Always remove utensils from the appliance. Donot leave them in the appliance during use.RECIPESAir Fried French Fries [2 servings]Ingredients: 2 large russetpotatoes 1 tbs olive oil½ tsp saltAir Fried Instructions:Peel and slice potatoes into ¼ inch thick fries by hand or using a frypress. Preheat the air fryer to 400 . Place potatoes in a bowl, add oiland salt. Mix well, making sure to coat all fries. Add potatoes to the airfryer basket and cook for 30 minutes. Shake halfway during cooking tomake sure fries are cooked evenly.Deep Fried French Fries [2 servings]:Ingredients: 2 large russet potatoesOil for frying ½ tsp saltDeep Fryer Instructions:Peel and slice potatoes into ¼ inch thick fries by hand or using a frypress. Soak the potato slices in cold water for a minimum of one hour,or overnight. The longer the better as this process removes the starchwhich makes for extra crispy fries. Rinse the fries twice with cold water.Lay the fries on paper towels or a clean cloth and pat them as dry aspossible. Heat oil to 375 . Carefully add the potatoes inside the oilwww.KALORIK.com17FT 45417 - 200605
making sure the basket is not overcrowded. Fry for about 10-12 minutes.Once finished, place the cooked potatoes on a paper towel linedplate. Sprinkle with salt as soon as they come out.GET MORE OUT OF YOUR PRODUCTBrowse Chef-created recipes specifically made for your Kalorikproduct. Visit our website www.kalorik.com to see our extensive recipelibrary and start cooking. Sign up for the Kalorik email mailing list toreceive special offers and recipes and connect with us on social mediafor daily inspiration.Use the link below to access a recipe designed specifically for 17 FT45418 RecipeBook.pdfCLEANING AND MAINTENANCEProper maintenance will ensure many years of service from yourappliance. Clean the appliance after every use. The appliancecontains no user serviceable parts and requires little maintenance.Leave any servicing or repairs to qualified personnel.Always turn off the power, unplug the power plug from the wall outlet,and then remove the magnetic plug from the control panel assemblybefore cleaning. Allow all parts of the appliance to cool completely.Danger of burns!‒ Ensure the basket cooled down completely before touching itssurface and attempting to remove the basket handle.‒ Ensure the oil cooled down completely before emptying the oil. Remove the basket handle from the basket.Open the lid filter cover and remove the metal mesh filter toclean after each use. The metal filter may be washed withsoapy water, make sure to dry the filter properly before placingit back inside the compartment. Clean the appliance housing with a damp cloth.www.KALORIK.com18FT 45417 - 200605
Dry all parts thoroughly after cleaning and before using theappliance again.NOTE:‒ The fry basket, air fry tank, oil tank and oil tank cover aredishwasher-proof.‒ Dry all parts and surfaces thoroughly before use. Make sure that allparts and surfaces are completely dry before connecting theappliance to a wall outlet. Even a small amount of water cancause severe splattering of hot oil.‒ Do not immerse the power cord with its plug, magnetic plug orappliance in water or any other liquid. Do not use abrasivecleaners, wool or scouring pads.STORAGE Before storage, always make sure the appliance is completely cool,clean and dry.It is recommended to store the appliance in a dry place.Store the appliance on a stable shelf or in a cupboard. To avoidaccidents, ensure that both the appliance and its power cord arebeyond reach of children or pets.www.KALORIK.com19FT 45417 - 200605
TROUBLESHOOTINGProblemCauseSolutionThe applianceis not workingMagnetic plug notproperly fittedConnect the magnetic plug to theelectrical outlet before connectingthe plug to the wall outletInsert the plug into the wall outletAppliance notplugged inWall outlet notenergizedMalfunctioningapplianceOil is spillingover the rimYou have set thetimer to a shortertime than 3 minutes.Overfilled oil reservoirOverfilled basketThe POWERindicator lightsup but theappliance doesnot heat upThe basketcannot beremoved fromthe oil reservoirThe applianceproduces anodor and emitssmokeCooking oil isfoamingMalfunctioningapplianceBasket handle notattached properlyOil has beenoverused or oil is notsuitableOverfilled basketExcess moisture inthe foodRemaining iceparticles notwww.KALORIK.comCheck fuses and circuit breakerUnplug the appliance from the walloutlet and contact qualified personnelto check and repair the applianceSet the timer to a time of 3 minutes ormoreUnplug the appliance from the walloutlet and allow the appliance / oil tocool down. Then, remove excess of oilLift out the basket by its handle.Remove excess of food with suitableutensilsUnplug the appliance from the walloutlet and contact qualified personnelto check and repair the applianceRemove fried food using suitableutensils and allow the appliance / oilto cool down completely beforeremoving the basketUnplug the appliance from the walloutlet and allow the appliance / oil tocool down. Then, remove oil andreplace with fresh, new suitable oilLift out the basket by its handle andremove excess of food with suitableutensilsRaise the basket for a few secondsand lower again. Repeat until thebasket can be lowered without excessfoamingRaise the basket for a few secondsand lower again. Repeat until the20FT 45417 - 200605
Oil is leakingfrom theapplianceThe outside ofthe appliancebecomes hotduring use.The lid is fullwith water andthe metal areais discolored.removed from frozenfoodsOverfilled oilcontainerbasket can be lowered without excessfoamingUnplug the appliance from the walloutlet and allow the appliance / oil tocool down. Then, remove oil.Damaged oilcontainerThe outside of theappliance becomeshot because theheat inside radiatesto the outside walls.Contact customer support service.You do notclean the lid well.This is normal. All handles, knobs andbuttons that you need to touch duringuse will stay cool enough to touch.Clean the lid by hand with somewashing-up liquid and a moist clothafter every use. If there is water insidethe lid, try to shake the water out of it.The remaining water in the lid willevaporate during cooking.If additional assistance is needed, please contact our CustomerAssistance at 1-888-521-TEAM.www.KALORIK.com21FT 45417 - 200605
WARRANTYWe suggest that you complete and return the enclosed ProductRegistration Card promptly to facilitate verification of the date oforiginal purchase. However, return of the Product Registration Card isnot a condition of these warranties. You can also fill out this warrantycard online, at the following address: www.KALORIK.comThis KALORIK product is warranted in the U.S.A. and in Canada for 1year from the date of purchase against defects in material andworkmanship. This warranty is not transferable. Keep the original salesreceipt. Proof of purchase is required to obtain warranty performance.During this period, if the KALORIK product, upon inspection by KALORIK,is proven defective, it will be repaired or replaced, at Kalorik’s option,without charge to the customer. If a replacement product is sent, it willcarry the remaining warranty of the original product.This warranty does not apply to any defect arising from a buyer's oruser's misuse of the product, negligence, failure to follow KALORIKinstructions noted in the user’s manual, use on current or voltage otherthan that stamped on the product, wear and tear, alteration or repairnot authorized by KALORIK, or use for commercial purposes. There is nowarranty for glass parts, glass containers, filter basket, blades andagitators, and accessories in general. There is also no warranty for partslost by the user.ANY WARRANTY OF MERCHANTABILITY OR FITNESS WITH RESPECT TO THISPRODUCT IS ALSO LIMITED TO THE ONE YEAR LIMITED WARRANTYPERIOD.Some states do not allow limitation on how long an implied warrantylasts or do not allow the exclusion of incidental or consequentialdamages, so the above limitations may not apply to you. This warrantygives you specific legal rights, and you may also have other rightswhich vary from state to state.If the appliance should become defective within the warranty periodand more than 30 days after date of purchase, do not return theappliance to the store: often, our Customer Service Representativescan help solve the problem without having the product se
11. Air Fry Temperature Knob 12. Timer Knob 13. Deep Fry Temperature Knob 14. Air fry ready indicator light 15. POWER light 16. Deep fry ready indicator light ESPAÑOL: 1. Manija de la tapa 2. Filtro de la tapa 3. Tapa 4. Cesto de freír 5. Asa de la cesta de freír 6. Tapa del tanque de freír 7. Tanque de freidora de aire 8. Tanque de .