Transcription
1/2015Recommended Maintenance Commercial ModelsAlways turn off and unplug the treadmill before performing Maintenance.Once a week1. Wipe down display. Use mild solution of non-phosphate cleaner on damp (notwet!) soft cotton cloth. Once a week or as needed.2. Wipe down handrails and traction strips with soft cotton cloth and mild soap and water.Cloth should be damp not wet. Once a week or as needed.3. Vacuum or wipe down the deck area between treadbelt and frame, including the visible partof the rear roller. Once a week or as needed.4. Clean Treadbelt Walking Surface- Treadbelts should be vacuumed to remove loose dirt. Ifvacuuming doesn’t remove dirt, we recommend the use of a medium stiff nylon bristle brushto remove dirt trapped in treadbelt surface. A damp (not wet!) sponge can be used to finishthe cleaning process.Once a Month1. Take off motor cover and vacuum. Be careful not to touch any of the circuit boards.2. Turn on the treadmill. Elevate treadmill to 15%. Turn off the treadmill. Vacuum under andaround the treadmill. Turn on the treadmill and return to 0% elevation.3. Mark the adjustment bolts on the rear roller and loosen each side two full turns. Examine thedeck and treadbelt for wear and replace if necessary.4. See “When to Lubricate” on Page 9. If lubrication is necessary slide clean towel under thetreadbelt and wipe the deck and under the belt. Rotate belt 180 degrees and repeat.Apply one tube of Slipcoat, the only lubricant recommended by Landice, onto the middle 10”of the deck for the entire length of the deck. Do not put any lubricant on the top of the belt.If any lubricant gets onto the top of the deck wipe off immediately with alcohol. Retightenthe rear roller two full turns on each side. Turn on the treadmill and set speed for 2mph.Check for proper tracking and tension of the treadbelt. Finally walk on the treadmill for a fewminutes to ensure full lubrication of the entire belt.5. Check condition of line cord for any cuts, gouges, or broken prongs on the plug ends.Replace if necessary.Page 1 of 9
1/2015Every Six Months1. Check motor brushes for wear. Clean commutator if needed. See below for instructions.2. Check all nuts and bolts for tightness, especially the upright bolts, handrails and bearingblocks bolts for elevation system(see Bearing Block Maintenance below). Do Not Overtighten!Treadbelts should be vacuumed to remove loose dirt. If vacuuming doesn’t remove dirt, werecommend the use of a medium stiff nylon bristle brush to remove dirt trapped in treadbeltsurface. A damp (not wet!) sponge can be used to finish the cleaning process. The only cleanerwe recommend is Simple Green.Before applying lubricant loosen treadbelt and wipe under the bottom of the belt and deck toremove dirt and debris.Page 2 of 9
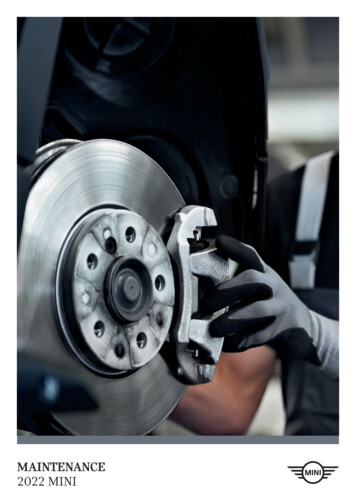
1/2015Maintenance Procedure: Checking the tightness of bearing blocksTools needed: Phillips head screw driver1. Incline the treadmill to 15% grade and follow the elevation leg assembly to the frame.2. The elevation leg assembly connects to the frame with a bearing blocks on each side (seeabove).3. The bearing blocks are held together with two Phillips head screws. Make sure thescrews on each side of the bearing block are tight (as shown above) and do same to theother bearing block on the other side of the leg assembly.*Note: As of 3/12/2015 allbearing blocks will be attached with bolts that should be tensioned to 11 foot pounds oftorque.4. Return the treadmill to 0% grade and turn off the treadmill.Page 3 of 9
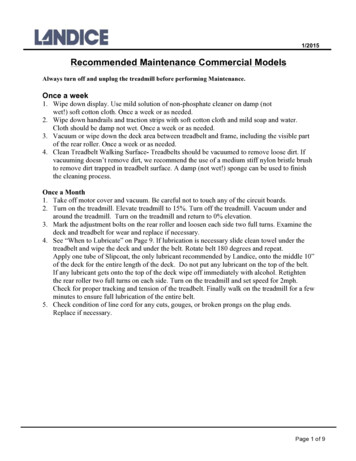
1/2015McMillan Drive Motor Brush Replacement & Commutator Inspection InstructionsTools Required- Flat head screwdriver, needle nose plier, commutator stone.Drive Motor brush inspection and maintenance is important especially for LTD or CommercialMachines. If motor brushes get worn down too low; it is possible it will harm the drive motor as well.Here are simple instructions on how to remove/inspect/replace motor brushes as well as inspect thecommutator on our McMillan Drive Motors.STEP 1STEP 2Remove the cap with a flat headscrewdriver.This exposes the brush holderand brush.STEP 3STEP 4Press down on the metal spring,slide the motor brush holderand take the clip out.A good motor brush will beshiny. Free from scorch marks,chips, and not dull where thecommutator would makecontact.Take a needle nose pliers and usethem to remove the motor brushwires from the connectorSTEP 5The commutator is copper color andshiny. Cleaning the commutatorwith a cleaning stone or piece ofemery cloth may remove the dullappearance & black scorch marks.Page 4 of 9
1/2015STEP 6STEP 7STEP 8Connect the motor brush to theterminal using the needle pliers.Insert the motor brush backInside the brush holder.After the motor brush is seated backin and secured down, just pop thecover back on and repeat theseinstructions for the other side.COMMUTATOR INSPECTION & MAINTENANCE:A normal commutator surface will be shiny and smooth. The commutator will collect brushcarbon as they wear inside the motor. To clean the commutator; slide the commutator cleaningstone or emery cloth thru the brush holder or thru the access cap at the top of the motor by thedrive motor wires. Then rotate the flywheel by hand for a couple of revolutions to clean off thecarbon. After that then remove your cleaning stone or emery cloth and see if the commutator hasa shiny, copper look to it. If you cannot clean the commutator surface so that it’s a shiny, coppercolor then replace the drive motor because the commutator has burnt up.Signs of a failed commutator; deep vertical scratches, pit marks, dull, or completely loses itscopper look. This will be reflected on the tips of the motor brush too (see motor brushinspection #1 for more details) If you find any of these signs exhibited on the commutator thenthe drive motor needs to be replaced.Page 5 of 9
Worldwide Excellence For Over 40 Years1/2015BALDOR DRIVE MOTOR BRUSH MAINTENANCE & REPLACEMENTINSTRUCTIONSThe motor brush is what is used to deliver voltage to the rotating part of the drive motor called thecomutator. The motor brush is generally made from a carbon material and the commutator made ofcopper. The carbon is softer and will wear before the copper commutator. That is why we recommendchecking the brushes annually for home machines (with heavy use) and changing annually for CLUBmodels. A new motor brush measures 1” in length. The motor brush should be replaced if it wears downbelow 3/8th” of an inch.TOOLS NEEDED: Flat head screw driver, pair of pliers.REMOVAL INSTRUCTIONS:1. UNPLUG TREADMILL!2. Take a big flat head screw driver and remove the brush caps (there are two, one on either side ofthe drive motor.a. SERVICE TIP: Sometimes the brush cap may be difficult to take off due to thelower board being in the way. If having trouble taking the cap off, disconnect thewires off the lower board, remove the screws, and move the lower board over so youcan get to the brush cap.3. Remove the motor brush by grabbing the back plate of the brush and slide out.4. Repeat the same step for the other side.MOTOR BRUSH INSPECTION:1. Inspect tips of motor brush. A normal motor brush tip is concaved in shape, shiny and smooth. Ifthe tips of the motor brush have; pit marks, deep vertical scratches, dullness or wear unevenlythen inspect the commtutator for the same signs.Page 6 of 9
1/20151. Measure the length of the motor brush starting from the tip down. If the motor brush isbelow 3/8th of an inch long then it should be replaced. If greater than 3/8th of an inch thenclean commutator and re-install motor brush.COMMUTATOR INSPECTION & MAINTENANCE:A normal commutator surface will be shiny and smooth. The commutator will collect brushcarbon as they wear inside the motor. To clean the commutator; slide the commutator cleaningstone or emery cloth thru the brush holder or thru the access cap at the top of the motor by thedrive motor wires. Then rotate the flywheel by hand for a couple of revolutions to clean off thecarbon. After that then remove your cleaning stone or emery cloth and see if the commutator hasa shiny, copper look to it. If you cannot clean the commutator surface so that it’s a shiny, coppercolor then replace the drive motor because the commutator has burnt up.Signs of a failed commutator; deep vertical scratches, pit marks, dull, or completely lose itscopper look. This will be reflected on the tips of the motor brush too (see motor brushinspection #1 for more details) If you find any of these signs exhibited on the commutator thenthe drive motor needs to be replaced.MOTOR BRUSH INSTALL INSTRUCTIONS:1. Slide the new motor brush thru the brush holder.2. With one hand, press on the back of the brush to push the spring into the motor brushhousing and hold it there. Take your other hand and slide the brush cap over the brushand turn the cap clockwise to tighten the cap back to the motor.Instructions for Lubricating Treadmills with SlipCoatSlipCoat lubricant is designed to reduce friction between the treadbelt and slider deck. It isrequired for all institutional treadmills. Proper and timely application of SlipCoat will preventpremature failures due to excessive wear and load. Items affected by inadequate lubrication arethe treadbelt, slider deck, motor, and motor controller.When to lubricate:The best method to tell if lubrication is necessary is to perform Amperage check.1. Install AC clip-on ampmeter around hot lead on line cord.2. Turn treadmill ON and increase speed to 3.0mph.3. Let speed stabilize and record your AC amperage.4. Decrease speed to 1.0mph and have a person step onto the treadbelt (150lbs ).5. Increase speed back up to 3.0mph.6. Let speed stabilize and record your AC amperage.Page 7 of 9
1/2015Compare the two readings. If the “loaded” amperage draw is substantially greater than the“unloaded” reading then your treadbelt & deck system is wearing and may need lubricationand/or replacementAmp draw maintenance recommendationsIn a new or well maintained 110 volt treadmill (for 220v units cut amp numbers in half) with a150lb load at 3mph 6ampsIf your load is higher than 150lb then adjust the amperage upwards, if load is lighter theamperage draw will be less. Example 200lb load @3mph 8ampsRecommended MaintenanceIf treadmill is pulling under 9amps no lubrication is necessaryIf treadmill is pulling over 10 amps apply lubrication.If treadmill is pulling over 13 amps and/or if the amps do not decrease after applying lubricationreplace the treadbelt and flip the deck.A less conclusive test to check for proper lubrication is by putting your hand under the treadbeltand sliding it between the belt & deck to see if its slick. Your hand should feel greasy if the deckis lubricated properly. If it’s dry then Slipcoat is needed.Landice L-Series institutional treadmills should be checked on a monthly basis.How to lubricate: Only use SlipCoat by Landice. Most standard greases, waxes, and silicon sprays willbuild up on the rollers and effect belt slippage and tracking and could void your warranty. Before lubricating loosen treadbelt and slide clean towel under the treadbelt and wipe thedeck and under the belt to remove dirt and debris. Rotate belt 180 degrees and repeat. Using our SlipCoat packets, empty the entire contents of the packet to the middle 10” ofthe deck for the entire length of the deck in a zig zag pattern. Retension the treadbelt andcheck tracking at 2.0 mph. Walk in the SlipCoat for a few minutes at a speed of 2.0 mph. Be sure to walk in themiddle of the deck where you applied the lubrication and walk from top to bottom. Thiswill work in the lubrication to the treadbelt.Page 8 of 9
1/2015Page 9 of 9
2. Turn on the treadmill. Elevate treadmill to 15%. Turn off the treadmill. Vacuum under and around the treadmill. Turn on the treadmill and return to 0% elevation. 3. Mark the adjustment bolts on the rear roller and loosen each side two full turns. Examine the deck and treadbelt for wear and replace if necessary. 4. See "When to Lubricate .