Transcription
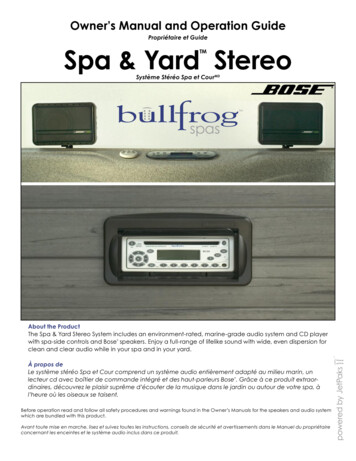
Owner’s Manual and Operation GuidePropriétaire et GuideSpa & Yard StereoTMSystème Stéréo Spa et CourMDAbout the ProductThe Spa & Yard Stereo System includes an environment-rated, marine-grade audio system and CD playerwith spa-side controls and Bose speakers. Enjoy a full-range of lifelike sound with wide, even dispersion forclean and clear audio while in your spa and in your yard. À propos deLe système stéréo Spa et Cour comprend un système audio entièrement adapté au milieu marin, unlecteur cd avec boîtier de commande intégré et des haut-parleurs Bose . Grâce à ce produit extraordinaires, découvrez le plaisir suprême d’écouter de la musique dans le jardin ou autour de votre spa, àl’heure où les oiseaux se taisent. Before operation read and follow all safety procedures and warnings found in the Owner’s Manuals for the speakers and audio systemwhich are bundled with this product.Avant toute mise en marche, lisez et suivez toutes les instructions, conseils de sécurité et avertissements dans le Manuel du propriétaireconcernant les enceintes et le système audio inclus dans ce produit.
General OperationFonctionnement GénéralDeploying Speakers to “Spa” PositionMettre les haut-parleurs en position « Spa »Step 1: While facing the stereo system, hold theleft speaker with the right hand and lightly press ittowards the hot tub until the back of the speakermakes contact with the speaker housing.Étape 1 : Tenez vous face au système stéréo.Poussez légèrement l’enceinte de gauche, avecvotre main droite jusqu’à ce qu’elle entre encontact avec le fond du boîtier.Step 2: While the speaker is pushed back, use theleft index finger to depress the release button.Étape 2 : Maintenez la dans cette position et devotre index gauche pressez le bas le bouton dedéblocage.Step 3: Lift up the left speaker until both speakersare situated in the “spa” position.Étape 3 : Soulevez l’enceinte de gauche jusqu’àce que les deux haut-parleurs soient en position« spa ».WARNING: To avoid pinching, the operator must maintain control of the speaker with the hand indicatedat all times during the deployment and lowering of the speakers.ATTENTION : Pour éviter les accidents, soutenez toujours l’enceinte avec la main indiquée ci-dessus, quece soit pour déployer le haut-parleurs (position « spa ») ou le remettre en position initiale (position « cour »).
Lowering Speakers to “Yard” PositionRemettre les speakers en position « Cour »Step 1: While facing the stereo system, hold theleft speaker with either hand and push the leftspeaker by the grill plate downward.Étape 1 : Tenez vous face au système stéréo.Soutenez l’enceinte de gauche d’une main etpoussez sur la grille de protection vers le bas.Step 2: Continue to push the left speaker downuntil both speakers are returned to the “yard”position and the left speaker is locked securely inplace.Étape 2 : Continuez à pousser jusqu’à ce queles deux enceintes soient retournées dans leurboîtier, position « cour », et que celle de gauchesoit parfaitement barrée.NOTE: The speaker locking mechanism only engages when speakers are situated in the “yard” position andaffects only the left speaker.NOTE : Le système de blocage ne s’enclenche qu’en position « cour » et ne barre que l’enceinte de gauche.General CleaningTMThe robust components and materials of the Spa & Yard Stereo allow for normal care, maintenance, andexposure to water. For normal cleaning, use a mild dishwashing soap or a window cleaner. For stubborn stainsand water deposits, use a mild liquid cleaner or a mild detergent. To apply these cleaners, use a soft, dampcloth or sponge. Rinse well and if desired, dry with a clean cloth.Entretien GénéralMDLe système stéréo Spa & Cour a été conçu avec des composants et matériaux robustes, qui le rendentparfaitement compatible au milieu aquatique. Pour un entretien normal, utilisez un savon léger ou un liquidelave-vitre. Pour les tâches tenaces et les dépôts dus à l’eau, utilisez un liquide vaisselle ou un détergentinoffensif. Pour appliquer le produit, utilisez un chiffon humide et doux. Bien rincez et séchez (optionnel) avecun chiffon propre.
Door Removal and Instructions to Access Spa DrainRetrait de la Porte et Accès au Tuyau D’évacuation D’eauStep 1: Turn off power at the service disconnect.Step 2: Remove the screws from the four cornersof the door.Étape 1 : Débranchez la prise d’alimentation.Étape 2 : Retirez les 4 vis situées aux quatre coinsde la porte.Step 3: Grasp bottom of door and pull outwards.Step 4: Lower door.Step 5: Set door aside.Étape 3 : Empoignez le dessous de la porte et tirezvers l’extérieur.Étape 4 : Laissez descendre la porte.Étape 5 : Retirez la.Step 6: Remove drain from cabinet, unscrewdrain cap to commence draining of spa.Étape 6 : Retirez le tuyau de l’enceinte despa, dévissez le bouchon afin de procéder audrainage du spa.NOTE: Refer to the Bullfrog Spa Owner’s Manualfor additional safety instructions.Wiring DiagramNote : Veuillez consulter également votre ManuelWhite - Antennadu propriétaire concernant les conseils de sécurité.RightSpeakerLeftSpeakerPuple Purple/ Black --BlackRed 12 VGreen Green/ Black -StereoHeadUnitFuse10 AmpIPX5Remote control CableRemote controlPowerSupplyRatings:100-127V .90A 60Hz200-240V 3.15A 50HzOutput: 12V 5A668 West 14600 SouthBluffdale, Utah 84065, U.S.A.BlackWhiteGreenAmp plug to stereo portin control box801.565.8111Fax: com 2006 Bullfrog International, LC. All Rights Reserved.
Spa & Yard Installer SheetTMSpa and Yard Guide d’installation de la télécommandeMDAuthorized Dealer Installation Instructions of the Stereo RemoteInstructions de montage réservées au Représentant AgrééUsing the Stereo Remote Drilling Guide on the back side of this document, follow the steps listed below to properly installthe Spa&Yard stereo system to a Bullfrog Spa.Tout en consultant le guide au dos de ce document qui concerne le perçage de la coque, veuillez suivre les instructionssuivantes afin d’installer correctement le système Spa & Yard au spa Bullfrog.Step 1: Drill a 2 1/8” (54 mm) hole on the topside of the shell by the stereo. Be sure to not drill where the speakers will belocated in the upright “spa” position.Step 2: Clean debris from the hole.Step 3: Feed the remote wire through the hole. Snap the remote pad into place.Step 4: Plug the remote wire in the back of the stereo (see Wiring Diagram).Step 5: Connect stereo power supply amp plug to the appropriate location on the control board (refer to circuit boardphotos on back).Step 6: Close cover on control center.Step 7: Align and mount stereo door assembly into door opening.Étape 1 : Percez un trou de 54mm (2 1/8” ») sur le dessus de la coque près du stéréo. Attention ! Évitez de percer auxendroits réservés pour les haut-parleurs en position « spa ».Étape 2 : Nettoyez la surface de travail.Étape 3 : Faites passer le fil de la télécommande par le trou. Placez le boitier de télécommande.Etape 4 : Branchez le fil de la télécommande au dos du stéréo (voir Diagramme électrique).Étape 5 : Reliez la prise d’alimentation de l’ampli à la place adéquate sur la carte de circuit imprimé (Consultez lesphotos des circuits imprimés au dos de la page).Étape 6 : Refermez la couverture de protection.Étape 7 : Alignez et assemblez la porte stéréo du spa.Wiring DiagramDiagramme électriqueBlanc - AntenneWhite - ut-parleurdroitMauve Mauve/ Noir -Puple Purple/ Black --BlackRed 12 VGreen Green/ Black -StereoHeadUnitFuse10 AmpVert Vert/ Noir NoirRouge 12 V-Fusible10 AmpCâble de la télécommandeRemote control CableTélécommandeRemote controlPowerSupplyRatings:100-127V .90A 60Hz200-240V 3.15A 50HzOutput: 12V 5ABlackWhiteGreenTête StéréoAmp plug to stereo portin control boxSourcede courantClassment:100-127V .90A 60Hz200-240V 3.15A 50HzRendement: 12V 5A668 West 14600 SouthBluffdale, Utah 84065, U.S.A.801.565.8111Fax: comNoirBlancVertPrise de la bougie aucontrôle stéréo
Circuit BoardsCartes de circuits imprimésStereo Remote Drilling GuideGuide de perçage de la Coque(pour télécommande du stéréo)StereoPortJ4Inside of spaIntérieur du spaStereoPortBF01/BF05Outside of spaExtérieur du Spapanneau de contrôles - vue du dessusBullfrog topside controlBF04StereoPort3/4”(19mm)1 7/8”(47.63mm)BF03O 2 1/8”(54mm)Stereo RemotelocationEmplacement dela télécommande
Instructions de montage réservées au Représentant Agréé Using the Stereo Remote Drilling Guide on the back side of this document, follow the steps listed below to properly install the Spa&Yard stereo system to a Bullfrog Spa. Tout en consultant le guide au dos de ce document qui concerne le perçage de la coque, veuillez suivre les .