Transcription
NetScaler deployment guideReplacing Microsoft Forefront TMG with CitrixNetScaler for enterprise authenticationPrepared by: Abhishek RVRK Sharma, Networking and Cloud
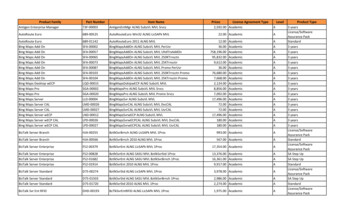
AuthorsThe following authors contributed to the creation of this deliverable.CitrixAbhishek RVRK Sharma#33, Ulsoor RoadBangalore, Karnataka 560042IndiaPhone: 91 80 39541000 Extension 78219Abhishek.sharma@citrix.comRevision HistoryRevisionChange DescriptionUpdated ByDate1Initial DraftAbhishek RVRK Sharma6 May 2015citrix.comth2
Table of ContentsIntroduction .4Configuration details . 5Solution description . 7Section 1: Initial preparation . 7Section 2: Frontend authentication . 12Section 3: Enabling authentication delegation to the backend enterprise service . 16Section 3: Setting up individual authentication schemes . 23Section 4: Enabling single sign-on (SSO) . 34Section 5: SSO with Kerberos Constrained Delegation (KCD) . 37Conclusion .48citrix.com3
IntroductionThis deployment guide focuses on defining solutions for replacing Microsoft Forefront Threat ManagementGateway (TMG) with Citrix NetScaler for various enterprise authentication scenarios. NetScaler is a world-classapplication delivery controller (ADC) with the proven ability to load balance, accelerate, optimize and secureenterprise applications.Forefront TMG offers some useful authentication features:User authentication: TMG supports user authentication (both 401 and form based) with LDAP, RADIUS,RADIUS-OTP and RSA SecurID. It also allows for two-factor authentication.Authentication delegation and SSO: TMG offers authentication delegation so it can authenticate withservices on behalf of the user. Delegated SSO with Kerberos Constrained Delegation (KCD) is alsopossible.In this guide, we describe replicating TMG functionality for various authentication scenarios with NetScaler, andthen highlight the additional possibilities that NetScaler enables.The following TMG features will be replicated with NetScaler in this guide:Secure Application Publishingcitrix.comSecure publishing of web and internal serversSSO (single sign-on)Delegation of basic authenticationSSL bridgingSSL tunneling4
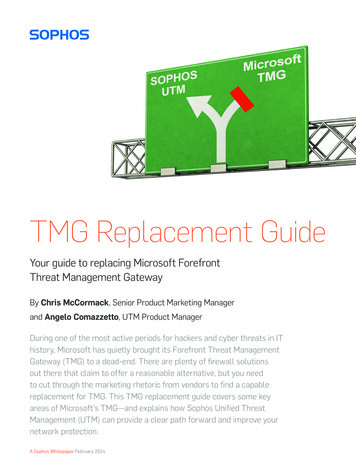
Configuration detailsTo show Forefront TMG administrators the equivalent steps for configuring NetScaler for enterprise authentication,this guide presents step-by-step details for some sample use case. Figure 1 below depicts the setup of the testdeployment.Figure 1. Diagram of test setupProductVersionMicrosoft Forefront TMG2010 SP1NetScaler VPX 10.5 (enterprise license)NetScaler features to be enabledThe essential NetScaler features that need to be enabled are load balancing, content switching, SSL offloadingand AAA authentication, authorization and auditing (AAA).The following NetScaler features are used in this deployment. Please ensure these features are enabled in theNetScaler system.Content switchingLoad balancingSSL offloadingAAA (Authentication, Authorization and Auditing)citrix.com5
Here is a quick explanation of how these features work.Content switchingThe content switching module directs incoming traffic to a matching load balancing virtual server. This logicalswitching of incoming traffic based on content type allows configuration of specific optimization policies.Load balancingNetScaler load balancing evenly distributes requests to backend servers. Multiple algorithms (such asLEASTCONNECTION, ROUNDROBIN, etc.) are supported to provide efficient load balancing logic for everyapplication server.SSL offloadingSSL connections are terminated at the NetScaler appliance, thus allowing NetScaler to conduct advanced trafficmonitoring. Additionally, SSL offloading can significantly reduce the computational overhead of offloadingencrypted user connections on backend servers.AAAThe AAA feature set controls authentication, authorization and auditing policies for NetScaler. These policiesinclude definition and management of various authentication schemas. NetScaler supports a wide range ofauthentication protocols and a strong, policy-driven application firewall capability.Several additional features can help improve the enterprise user experience. Rewrite, responder, HTTPcompression, DoS protection and integrated caching can be enabled. However, the use case described here canbe deployed using the four features described above; this guide will not describe the benefits that can be achievedwith these additional featurescitrix.com6
Solution descriptionSection 1: Initial preparationPart 1: Forefront TMGTMG can be set up as described in the earlier guide, “Replacing Microsoft Forefront TMG with Citrix NetScaler forwebsite publishing.”Since this guide describes a deployment using two different servers, we run the website publishing server asdescribed in Guide 1 for the load balanced websites mailtmg.ctxns.net and sp.ctxns.net.All settings will remain the same as in Guide 1, except for changes that will need to be made from Step 11 inSection 3 of the earlier guide. Step 11 from that guide is repeated below for convenience.Note: If your web listener is already configured (if you previously set up a non-authenticated web listener) youmust use an alternate path to change these settings.Step 11 – Client authentication method definitionOn the next screen, you can define how clients are authenticated with TMG. TMG supports LDAP/Active Directory,RADIUS, client certificates or RSA SecurID-based authentication.citrix.com7
NetScalar advantageNetScalar supports several other alternative authentication mechanisms as well. In addition to Basic/Local,NTLM/AD and RADIUS that are supported by TMG, NetScalar supports CERT (certificate based), TACACS, weband SAML/SAML IDP-based authentication, thus providing significantly improved functionality.Assuming that a web listener has already been configured with the earlier guide but has no authentication defined,you can change the authentication parameters for the web listener by navigating to Toolbox NetworkObjects Web Listeners.Part 2: Initial preparation - NetScalerConfiguring the content switching policyIn the last guide (Steps 6 and 7), we configured the content switching virtual server (CS vserver) to switch betweendifferent load balancing virtual servers based upon the requested URL.For this deployment, we will be using the following websites:mailtmg.ctxns.net – Exchange serversp.ctxns.net – SharePoint serverThe content switching policy defines how a request will be evaluated based on whether the host name in therequest contains mailtmg.ctxns.net for the Exchange server or contains sp.ctxns.net for the SharePoint server.(To reach this prompt, navigate to Traffic Management Content Switching Virtual Servers. Then select theappropriate CS vserver and click Edit. On the screen that follows, click Content Switching Policies under CSPolicy Binding.)citrix.com8
The content switching action essentially delegates the request to the appropriate load balancing virtual server(which hosts the Exchange and SharePoint portal per the client request).The figure above is the prompt shown for configuring the content switching action.(To reach this screen, click on the Edit dropdown, then select Edit Action.)Creating the AAA Virtual ServerThe AAA vserver on NetScaler handles authentication requirements. This versatile feature allows a combination ofmultiple authentication factors in a primary/secondary prioritized setup and policy-driven authenticationmechanisms to be used from a single interface. For this deployment, the TMG authvserver AAA vserver wascreated. To create a new AAA vserver, navigate to Security AAA Application Traffic Virtual Servers and clickthe Add button.Upon clicking on the Add button, the following screen is presented, where settings for the AAA vserver (IPaddress, authentication domain, etc.) can be entered. Context-sensitive help is provided (a small question markshows up next to each text field) if you need assistance with providing details.citrix.com9
Once created, the AAA vserver shows up on the Authentication Virtual Servers listing screen (where the Addbutton was clicked earlier) as shown below. The AAA vserver we will be using is TMG authvserver.Upon selecting the AAA vserver and clicking Edit, the following screen is displayed. This is the configurationscreen for the virtual server. It allows exhaustive changes to the vserver configuration.citrix.com10
This is the screen that can be used for defining backend (NetScaler to backend service) authentication settings asdescribed in Section 2.citrix.com11
Section 2: Frontend authenticationPart 1: Enabling authentication on the front end with TMGThe authentication settings for TMG show up on the Authentication tab in the Properties window for theappropriate listener. In this case, it is the Outlook Web Access (OWA)-https listener, as shown above. To get tothis prompt, go to Firewall Policy Find the appropriate rule and right-click on the listener listed as part of therule. From the menu then presented, choose Properties.citrix.com12
Here, you are presented with the following options. Choose the setting that is appropriate for your environment.For Client Authentication Method –HTML Form Authentication: TMG will present an HTML form to collect credentials from the client.HTTP Authentication: TMG will present a standard 401-based authentication prompt (a popup messagerequesting a username and password).SSL Client Certificate Authentication: TMG will request the user to present a valid client certificate, which willthen be verified by TMG.No Authentication: TMG will not request any authentication and will pass traffic through, allowing the backendservice to handle authentication.NOTE: These settings work in tandem with the Authentication Delegation settings presented in the Propertieswindow for the individual rules in the Firewall Policy window.For Authentication validation method, the options available are Windows and LDAP (both authenticating withActive Directory), RADIUS and RADIUS-OTP, and RSA SecurID.When the Collect additional delegation credentials option in the Client Authentication section is enabled, theonly two options available are RSA SecurID and RADIUS-OTP.The Configure Validation Servers option is available for LDAP, RADIUS and RADIUS-OTP. For RSA SecurIDand Windows Authentication, no server settings are required as they are picked up automatically by TMG. Whenthis option is clicked, the following window pops up, which allows you to configure LDAP and RADIUS servers.citrix.com13
citrix.com14
Part 2: Enabling authentication on the front end with NetScalerFor NetScaler, frontend authentication is set at the LB/CS (traffic management) vserver level.To enable authentication on the NetScaler for the front end (Client to NetScaler authentication), click on theAuthentication subsection on the LB vserver Basic Settings page. Note that this action has to be performed onthe settings screen for the LB vserver, not the AAA vserver.To get to the Authentication section, scroll down on the Basic Settings page or, if you don’t see the section, lookon the right-hand side of the page for the Authentication link and click it.In this section, you have two options –to enable either 401-based authentication, in which case users will bepresented with a standard authentication popup prompt, or Form based authentication, in which case NetScalerwill present an authentication form to the user. In the second case, you will also have to provide the authenticationFQDN (Fully Qualified Domain Name) – which is the domain name for the AAA vserver. This is the host domain forthe form that will be presented to the user.The authentication profile defines settings such as the authentication domain and level. The authentication level isimportant, as it defines the vserver levels that authentication with this profile will allow the user to access. A userauthenticated with an authentication vserver at a certain level cannot access a vserver running at a higher level.The level setting for LB or CS vservers is an optional parameter when access restriction is required.citrix.com15
Section 3: Enabling authentication delegation to the backendenterprise servicePart 1: Backend authentication with TMG authentication delegationThe rules for authentication with the backend service are set in the Properties Authentication Delegationsection in the properties window for the relevant firewall rule. These rules are listed in the Firewall Policysubsection.Note the options available in the screenshot above: they depend upon the settings in the listener that were set inPart 1. When selecting Kerberos constrained delegation, you will be required to present the subject principalname (SPN) to be used by TMG (this is the Kerberos-enabled service that the firewall rule applies to). We willdiscuss more about SSO methods in a separate section.Examples: Basic and NTLM delegationTwo of the more popular delegation schemes are Basic (401-based) and NTLM (Active Directory) authenticationdelegation. Either defines how TMG will interact with the backend service. The Description section under thedropdown menu for selection of delegation methods provides details on the chosen method.citrix.com16
Basic DelegationNTLM DelegationPart 2: Backend authentication with NetScalerNote: For NetScaler, the backend authentication is set at the AAA vserver level.As shown above, we are using an LDAP policy for authenticating users to this AAA vserver as an illustration. Youcan choose another authentication factor such as Local, LDAP, RADIUS, CERT (certificate based), Negotiate (forcitrix.com17
Negotiate method authentication), etc. NetScaler supports both single- and two-factor authentication; a secondfactor can be declared as a Secondary Authentication Policy in the panel above.Note: The AAA vserver can only be defined over SSL; therefore, you will be required to add a server certificate tothe AAA vserver. This can be self-signed or a purchased certificate, depending upon the security level required. Apurchased certificate allows verification with a certified, recognized certificate authority. A self-signed certificatemay be adequate and easier to obtain, but will not be verifiable and most browsers will present errors with such acertificate.To add the LDAP policy as indicated in the AAA vserver configuration snapshot above, the policy needs to bebound to the server by clicking on the icon next to the Basic Authentication Policies section header.After clicking on this button, the following screen is shown:Here, you can select the type of authentication policy you would like to add. The Type parameter defines whetherthe authentication policy defined is primary or secondary. This is useful during dual-factor authentication scenarios.As we are only defining a single authentication policy here, we will keep the Type parameter set as Primary.Upon clicking Continue, you will be presented with the following screen:Here, you can either add a new LDAP policy or select a pre-existing policy.citrix.com18
When you click on Policy binding Select Policy Click to Select, the following screen is displayed:This screen will present a list of all LDAP policies defined on the NetScaler box. You can choose the appropriatepolicy and then click OK. Alternatively, you can choose to add a new LDAP policy here by clicking Add. This leadsto the add new LDAP policy screen, shown below. The screen prompt is similar to other authenticationmechanisms, which provide for adding settings that are appropriate for those schemes.This LDAP policy needs to be bound to an LDAP server; similar to the policy addition, here a server may bechosen from a dropdown menu or a new one may be added. The new server prompt will request the settings thatare necessary for the LDAP server, as shown below. The right-hand and left-hand fields must be filled incompletely to facilitate LDAP authentication. Context-sensitive help (indicated by a question mark icon next to thefield) is available to assist with identifying the values needed.citrix.com19
Left-hand side of the LDAP server configuration screencitrix.com20
Right-hand side of the LDAP server configuration screencitrix.com21
Upon creation of the LDAP policy, the screen below will allow you to bind the policy to the authentication vserverwith the newly created policy already selected.This AAA vserver is bound to the load balancing virtual servers (LB vservers) defined for the SharePoint andOutlook Web Access servers (as described in the first guide). While the AAA vserver can be bound to the CSvserver as well, because each of these services presents individual authentication mechanisms, we will implementauthentication at the LB vserver level.When you look at the basic settings screen for the AAA vserver, it will show the LB or CS vservers in the 401based Virtual Servers or Form-based Virtual Servers section, according to the type of frontend authenticationchosen by you in Step 1.When you click on one of the options in these sections, the following screen is presented. This is a screenshot ofthe 401-based LB vservers. The screen for the form-based vservers is similar; however, it includes informationabout the authentication domain.NOTE: Make sure the FQDNs (fully qualified domain names) for all the vservers and services in use are added intothe DNS records located at Traffic Management DNS Records Address Records.citrix.com22
At this point, we have configured the AAA vserver TMG authvserver.This AAA vserver is bound to the LB vservers defined for SharePoint and OWA mail servers. Alternatively, you canuse a CS vserver for enabling authentication, and use content switching policies to switch between SharePoint andOWA if both of them use the same authentication mechanism.Section 3: Setting up individual authentication schemesPart 1: Implementing authentication on Forefront TMGRADIUS authenticationIn the Client Authentication Method page shown below, set the authentication method for the listener to HTTPAuthentication Basic. This will enable the RADIUS option in the Authentication Validation Method Section.citrix.com23
After selecting RADIUS as the authentication validation method, click Configure Validation Servers and add theconfiguration settings for your RADIUS server.citrix.com24
Whether you choose to Edit or Add a new server, you will be asked to provide the details shown below:LDAP authenticationOn the Listener Settings Authentication tab (as for RADIUS authentication), select HTTP Authentication andselect Basic in the Client Authentication Method section. For the Validation Method, select LDAP (ActiveDirectory). Now click on Configure Validation Servers.First, click Add next to the LDAP Server Set section. Here, you can add your LDAP server details. TMG can querymultiple LDAP servers to verify authentication; enter the list in order of priority. You will also be required to enterthe Active Directory domain name and, optionally, provide a username and password for verification of users.citrix.com25
citrix.com26
After this, you will be required to define a new LDAP server mapping by clicking Add next to the Define Loginexpression section in the first dialog box in this section. This defines the login expression for users as well as thelinked LDAP server set.Client certificate authenticationTMG can also use client certificates to authenticate users. To enable client certificate authentication, go to theAuthentication panel in the OWAPP Properties section for your listener and choose SSL Client Certificateauthentication.citrix.com27
Note that the only authentication method enabled here is Windows (Active Directory). TMG will verify the certificateprovided with the client certificate stored in the Active Directory and confirm access. You can provide a fallbackauthentication method for users in case certificate authentication fails.Part 2: Implementing authentication with NetScalerRADIUS authenticationTo add a new RADIUS authentication policy, in the navigation menu on the left, click through to AAA ApplicationTraffic Policies Authentication Basic Policies RADIUS. Click Add in the pane on the right to add a newpolicy.Before creating a policy, ensure you have defined the settings for your RADIUS server in the Servers tab. If youhaven’t, click on the Servers tab and then click Add to create a new RADIUS server definition.Here, you will see the following window. Enter the appropriate settings for your RADIUS server. (The Details paneis minimized by default; you can expand it when needed, for example, to connect to RSA SecurID, as theconnectivity to SecurID for NetScaler works over RADIUS.)citrix.com28
After adding a new server, you can add the same to your RADIUS authentication policy; go back to the Policiestab and click Add. On the prompt that follows, add the necessary details with the name of the server you have justcreated.The Expression section here lets you add an expression that determines whether or not the user should beauthenticated with the server using parameters such as the certificate issuer or source IP address.citrix.com29
LDAP authenticationTo add a new LDAP authentication policy, in the navigation menu on the left, click through to AAA ApplicationTraffic Policies Authentication Basic Policies LDAP. Here, click Add in the pane on the right to add a newpolicy.Again, make sure the server is defined first. To do so, go to the Servers tab as described earlier, then click Add.This screen will allow you to configure your LDAP server. It also provides other capabilities, such as extracting afield other than the user’s SAN (for example, the UPN). This is defined under the Other Settings section underServer Logon Name Attribute (for server login) and SSO Name Attribute (for an alternate username).After adding the server, you can go back to policies and add the LDAP policy, similar to the RADIUS policy. TheExpression section also holds similar functionality.citrix.com30
citrix.com31
The screen prompt for LDAP authentication servers (left and right halves of the screen)Client certificate authenticationTo enable client certificate authentication with NetScaler, you may choose one of two options. If you would like toenable client certificate authentication without needing to set up an authentication (AAA) virtual server, you canenable Client Authentication in the SSL Parameters section of your LB or CS vserver basic settings window.Here, you also have the option of setting client authentication as Optional or Mandatory; if you choose the latter,NetScaler will terminate the request if the user presents an invalid certificate or does not submit one. If set toOptional, the user will be allowed to proceed further without authentication. Therefore, for enabling certificatebased authentication, the recommended setting here is Mandatory. The validity of the certificate is verified bymatching the root CA for the certificate with the one registered on the NetScaler LB or CS vserver.citrix.com32
Alternatively, you can configure a CERT policy and link it to an AAA vserver, then add it to your LB or CS vserverdefinitions (as with the LDAP and RADIUS policies).The prompt for creating a new CERT authentication policy has the same options as the LDAP and RADIUSpolicies. As with the earlier schemes, you should define a CERT server to enable authentication. The serversettings allow you to define the fields that contain user details such as username, and group name that arerelevant for authentication. These fields can then be extracted by NetScaler and submitted to an authenticationform (when two-factor authentication is enabled).citrix.com33
When two-factor authentication is enabled, you can add a second primary authentication policy to the LB or CSvserver in addition to the cert policy. The policy will then pass the credentials pulled from the certificate to theform. On the form, the username will be locked and a password for the username corresponding to the onepresent in the certificate provided will be requested.NetScaler advantageTMG will accept any certificate from any certificate provider that is linked to the user in Active Directory. TMGperforms no independent verification on the certificate; this can be a security risk when an attacker has gainedaccess to Active Directory and managed to insert a certificate. NetScaler will only accept a certificate that it canindependently verify; however, NetScaler will not match the same with the bound certificate in Active Directory.Section 4: Enabling single sign-on (SSO)Part 1: SSO with Forefront TMGYou can enable SSO for multiple websites in the Listener Properties panel under the SSO tab. Click the checkbox for Enable Single Sign On, then specify the domains that will use the SSO mechanism. This SSO mechanismwill use the authentication parameters specified under the Authentication tab.citrix.com34
Part 2: SSO with NetScalerTo enable SSO to multiple applications with NetScaler, create a session policy, defined here as TMG SP SSO.This session policy defines the SSO parameters and needs to be bound to an AAA vserver.This policy definition process will also allow you to define which authentication parameter to use (primary orsecondary) for enabling SSO. You can create and configure this session profile and session policy by navigating toAAA Application Traffic Policies Session.citrix.com35
When you click Add in the Session Policies tab, the panel shown above will pop up. Enter an appropriate namefor the policy, then add or create a new request profile. You can either edit an existing profile using the pencilshaped icon or add a new one. In either case, the same screen is presented. This is shown below:When you choose to add a profile, the name will be blank. This profile inherits a set of global parameters that youcan override individually using the Override Global option next to each parameter. To enable SSO, set the SingleSign-on to Web Applications drop down to ON.citrix.com36
Section 5: SSO with Kerberos Constrained Delegation (KCD)KCD enables your users to access multiple internal services without needing to log in multiple times with client certificates orenterprise username and password. KCD offers both security as well as flexibility with respect to user authentication and issupported by both TMG and NetScaler. We will now describe how to achieve KCD with both TMG and NetScaler.Part 1: KCD with TMGTo enable KCD on TMG, go to the authentication delegation settings in the TMG rule properties window and selectKerberos constrained delegation.Note: To view a list of delegation options available with different authentication methods, go 5215.aspxHere, you will have to make sure the SPN that you have provided in the window above is added to ActiveDirectory. You have the option to test the rule using the Test Rule button.Your Active Directory should be configured to trust the computers used.Part 2: KCD with NetScalerThere are two processes needed for the configuration of KCD on NetScaler – one on Active Directory and thesecond on the NetScaler appliance itself.The steps on the Active Directory Server are as follows –citrix.com37
Create a KCD user accountTo enable KCD on NetScaler, you need to create a user account on Active Directory for the NetScaler device touse.This account must have the rights to do protocol transition and delegation. This account also needs rights torequest a Kerberos ticket on behalf of a user logging into the NetScaler appliance.Start by creating a new user in Active Directory. In this example, create kcdtest as the account to provideconstrained delegation access to the web server.Enable the Delegation tab for the created userThe Delegation tab is not enabled by default for a user account, so you may need to enable it. This involves theuse of the SETSPN command-line tool. A standard Windows 2003 installation does not include this tool. However,this tool is available in Windows 2008 Server.Check Active Directory user properties to see if the delegation tab is available; if not, install Windows Server 2003support tools from the product CD or from the Microsoft Download Center(http://go.microsoft.com/fwlink/?LinkId 100114).For more information about how to install Windows support tools from the product CD, see Install WindowsSupport Tools (http://go.microsoft.com/fwlink/?LinkId 62270). If these are installed on Windows 2003 Server, theycan be found in the C:\Program Files\Support Tools folder. To get the latest version of the SETSPN tool visithttp://support.microsoft.com/kb/970536.Use the following command to run the SETSPN tool:setspn -A host/kcdvserver.example.com example\kcdtestNote: In the command above, example is the placeholder for the user domain (CTXNS in our example) and kcdtestis the user account (the same is used in our example). In this command, the kcdtest user has the subject principalname SPN): host/kcdvserver.example.com, and kcdvserver.example.com is the fully qualified domain name (FQDN)of the LB or CS vserver (test.ctxns.net in our example).So, for our example, the command would look like:setspn –A host/test.ctxns.net CTXNS\kcdtestcitrix.com38
This command enables the Delegation tab in the [User Account] Properties window for the user accountkcdtest.If the Delegation Tab does not appear, Acti
HTML Form Authentication: TMG will present an HTML form to collect credentials from the client. HTTP Authentication: TMG will present a standard 401-based authentication prompt (a popup message requesting a username and password). SSL Client Certificate Authentication: TMG will request the user to present a valid client certificate, which will