Transcription
Measurewhat is measurableand make measurablethat which is not.Galileo Galilei (1564-1642)Instruction ManualDMA 4100 MDMA 4500 MDMA 5000 Minstrument software version: from 2.70(original instruction)
Instruction ManualDMA 4100 MDMA 4500 MDMA 5000 Minstrument software version: from 2.70(original instruction)
DisclaimerThis document may contain errors and omissions. If you discover any such errors or if you would like to seemore information in this document, please contact us at our address below. Anton Paar assumes no liabilityfor any errors or omissions in this document.Changes, copyright, trademarks etc.This document and its contents may be changed or amended by Anton Paar at any time without prior notice.All rights reserved (including translation). This document, or any part of it, may not be reproduced, changed,copied, or distributed by means of electronic systems in any form (print, photocopy, microfilm or any otherprocess) without prior written permission by Anton Paar GmbH.Trademarks, registered trademarks, trade names, etc. may be used in this document without being markedas such. They are the property of their respective owner.Further informationPublished and printed by Anton Paar GmbH, AustriaCopyright 2015 Anton Paar GmbH, Graz, AustriaAddress of the instrument producer:Anton Paar GmbHAnton-Paar-Str. 20A-8054 Graz / Austria – EuropeTel: 43 (0) 316 257-0Fax: 43 (0) 316 257-257E-Mail: info@anton-paar.comWeb: www.anton-paar.comDate: 04 August 2015Document number: C76IB003EN-N
Contents1 About the Instruction Manual . 72 Safety Instructions. 83 Measuring Principle. 104 The Instrument – Overview . 115 Checking the Supplied Parts . 126 Functional Components. 156.1 View of the Front and Right Side . 156.2 View of the Left Side . 156.3 Rear View . 166.4 Operating Elements on the Main Screen . 176.5 Operating Elements on the Menu Screen. 197 Installing the Instrument . 207.1 The Right Place . 207.2 Mounting the Injection Adapters . 207.3 Checking for Leak Tightness . 217.4 Mounting the Hoses . 217.5 Switching the Instrument On/Off . 227.6 Instrument Settings and First Checks . 228 Checking, Adjusting, and Calibrating . 238.1 Definitions . 238.2 Checks . 238.2.1 Editing the Check Settings. 238.2.2 Performing Density Checks . 248.2.3 Viewing, Printing, or Exporting Current Check Data. 258.3 Adjustments . 268.3.1 Performing an Air/Water Adjustment . 268.3.2 Performing a Temperature Range Adjustment . 278.3.3 Performing a High Density/High Viscosity Adjustment (DMA 5000 M only) . 278.3.4 Performing an Atmospheric Pressure Sensor Adjustment . 288.3.5 Performing Special Adjustments. 288.3.5.1 Special Adjustments . 288.3.5.2 Special Adjustment for the Canadian Excise Alcohol Table . 298.3.6 Viewing, Printing or Exporting Adjustment Data . 298.3.7 Viewing, Printing or Exporting Adjustment History: KB Graph. 308.3.8 Resetting the Adjustment Data to Factory Adjustment . 308.3.9 Adjustment Analysis . 308.4 Calibrating. 319 Defining and Using Methods . 329.1 Measuring Methods . 329.2 Changing Methods. 339.2.1 Defining the Measurement Settings of the Density Module. 339.2.2 Defining the Measurement Mode. 349.2.2.1 Defining Formula Parameters. 36C76IB003EN-N5
10 Measuring . 3710.1 Sample Name . 3710.2 Filling Samples. 3710.3 Performing Measurements. 3910.4 Filling and Measurement Errors . 4010.4.1 Status Messages . 4010.4.2 Error Messages. 4011 Cleaning and Storing the Instrument . 4111.1 Cleaning and Drying the Measuring Cell . 4111.2 Storing the Instrument. 4211.3 Cleaning the Instrument Housing and Touch Screen . 4211.4 Repair . 42Appendix A: Technical Data. 43A.1: Measuring Performance . 43A.2: General Technical Data . 44A.3: Wetted Parts. 45Appendix B: Measuring Special Samples. 46B.1: Degassing Samples. 46B.2: Special Filling Techniques . 46Appendix C: Measuring under Special Conditions. 48C.1: Measuring at High Humidity/Low Temperature Conditions . 48C.2: Measuring at Low/High Temperatures . 49C.3: Measuring at High Pressures . 50Appendix D: Camera Settings. 51D.1: Adjusting the Camera Position . 51D.2: Setting the Camera Illumination . 51D.3: Saving a Camera Picture . 51Appendix E: Trouble Shooting . 52Appendix F: Output Quantities and Live Raw Data . 55F.1: Output Quantities. 55F.2: Live Raw Data . 61Appendix G: List of Quick Settings Parameters . 62Appendix H: Density Tables. 64Appendix I: Instrument Software Versions. 67Appendix J: Calibration Approval . 71Appendix K: Declaration of Conformity. 72Appendix L: Menu Tree . 736C76IB003EN-N
1 About the Instruction Manual1 About the Instruction ManualThis instruction manual informs you about theinstallation and the safe handling and use of theproduct. Pay special attention to the safetyinstructions and warnings in the manual and on theproduct.The instruction manual is a part of the product. Keepthis instruction manual for the complete working lifeof the product and ensure that it is easily accessiblefor all people involved with the product. If youreceive any additions to or revisions of thisinstruction manual from Anton Paar GmbH, thesemust be treated as part of the instruction manual.Conventions for safety messagesTypographical conventionsThe following typographical conventions are usedthroughout this instruction manual:ConventionDescription key The names of keys andbuttons are written betweenangle brackets.menu level 1 menu level 2Menu paths are written initalics. Menu levels areconnected by a closingangle bracket.The following conventions for safety messages areused throughout this instruction manual:DANGERDanger indicates a hazardous situation which, ifnot avoided, will result in death or serious injury.WARNINGWarning indicates a hazardous situation which, ifnot avoided, could result in death or seriousinjury.CAUTIONCaution indicates a hazardous situation which, ifnot avoided, could result in minor or moderateinjury.NOTICENotice indicates a situation which, if not avoided,could result in damage to property.TIP: Tip gives extra information about the situationat hand.C76IB003EN-N7
2 Safety Instructions2 Safety Instructions Read this instruction manual before using theinstrument. Make this instruction manual easily accessibleto all persons working with the instrument. Follow all hints and instructions in this instruction manual to ensure the correct use and safefunctioning of the instrument. In case of damage or malfunction, do notcontinue operating the instrument. Do notoperate the instrument under conditions whichcould result in damage to goods or injuries orloss of life. If liquid has been spilled over the instrument,disconnect the instrument from the mainssupply. Clean and dry the housing of theinstrument. If you have a suspicion that liquidgot into the instrument, have the instrumentcleaned and checked for electrical safety by aservice technician.2.1 Liability This instruction manual does not claim toaddress all safety issues associated with theuse of the instrument and samples. It is yourresponsibility to establish health and safetypractices and to determine the applicability ofregulatory limitations.Anton Paar GmbH warrants the properfunctioning of the instrument only if nomodifications are made to mechanics,electronics, module firmware, or instrumentsoftware.Use the instrument only for the purposedescribed in the instruction manual. Anton PaarGmbH is not liable for damages caused byincorrect use of the instrument.The results delivered by the instrument dependnot only on the correct functioning of theinstrument but also on various other factors. Wetherefore recommend that you have the resultschecked (e.g. plausibility tested) by skilledpersonnel before consequential actions aretaken based on the measured data.2.2 Installation and Use The installation procedure shall be carried outonly by authorized personnel who are familiarwith the installation instructions. Use only accessories or consumables suppliedor approved by Anton Paar GmbH. Ensure that all operators have been trainedbeforehand to use the instrument safely andcorrectly. Ensure that the instrument is sufficientlysupervised during operation.8Operation in areas with risk of explosion The instrument is not explosion-proof andtherefore must not be operated in areas with riskof explosion.General precautions Observe and adhere to your national safetyregulations regarding the handling of allsubstances associated with your measurements(e.g. use safety goggles, gloves, respiratoryprotection, etc.). Before a measurement, check the wetted partsof the instrument for chemical resistance to thesamples and cleaning agents used. Take care that the liquids (samples and cleaningagents) or gases that you use are chemicallycompatible when they come into contact witheach other. They shall not react exothermally orproduce solid particles which might stick to theinner walls of the measuring cells. Before you start a measurement or cleaningprocedure, take care that all parts, especiallythe measuring cells, the injection adapters, thehoses, and the waste vessel, are properlyconnected and in good condition. Before you start a measurement or cleaningprocedure, check the injection adapters for leaktightness. Take measures that spilled liquids cannot getinto plug connections or venting slots ofelectrical appliances. Connect the measuring system to the mainssupply via a safety switch located at a safedistance from the instruments. In an emergency,turn off the power using this switch instead ofthe power switch on the instruments.C76IB003EN-N
2 Safety InstructionsPrecautions for flammable samples andcleaning agents Keep potential sources of ignition, like sparks oropen flames, at a safe distance from theinstrument. Place the instrument on a laboratory benchmade of fireproof material, preferably bricks,ceramics, or stoneware. Store only the minimum required amount ofsample, cleaning agents, and other flammablematerials near the instrument. Do not spill sample/cleaning agents or leavetheir containers uncovered. Immediately removespilled sample/cleaning agents. Ensure that the setup location is sufficientlyventilated. The environment of the instrumentmust be kept free of flammable gases andvapors. Provide fire-extinguishing equipment.2.3 Maintenance, Service, Repairs Service and repair procedures may be carriedout only by authorized personnel or by AntonPaar GmbH. For repairs, contact your local Anton Paarrepresentative. The instrument must not bereturned without the filled out "SafetyDeclaration for Instrument Repairs" and must becleaned before return. You must not return instruments which arecontaminated by radioactive materials,infectious agents, or other harmful substancesthat cause health hazards.2.4 Disposal Concerning the disposal of the instrument,observe the legal requirements in your country.Transport Empty the measuring cell and all hoses beforeyou move or lift the instrument. To move or lift the instrument, grasp the ledgeon top of the instrument’s back side with onehand. Place the other hand under the display onthe front side. There is a hollow for your fingers. Carry the instrument in front of you and keep itclose to your body.C76IB003EN-N9
3 Measuring Principle3 Measuring PrincipleDefinition of density and specific gravityConcentration measurementThe density ρ of a sample is defined as massdivided by volume:In binary mixtures, the density of the mixture is afunction of its composition. Thus, the density valueof a binary mixture can be used to calculate itscomposition with the aid of density/concentrationtables.m ----VThe specific gravity SG is calculated by dividing thedensity of a sample by the density of pure water at20 C: SampleSG ------------------- WaterDensity and Specific Gravity values are highlytemperature-dependent.The oscillating U-tube methodThe sample is introduced into a U-shapedborosilicate glass tube that is being excited tovibrate at its characteristic frequency. Thecharacteristic frequency changes depending on thedensity of the sample. Through a precisedetermination of the characteristic frequency and amathematical conversion, the density of the samplecan be measured.The density is calculated from the quotient of theperiod of oscillations of the U-tube and the referenceoscillator:This is also possible with so-called quasi binarymixtures. These are mixtures containing two majorcomponents and some additional componentswhich are present in very small concentrationscompared to the two main components. Manydecarbonated soft drinks, for example, can beconsidered to be quasi binary solutions of sugar inwater because the concentration of flavors andacids are very small compared to sugar and water.Thus, the sugar concentration can be measuredwith a density meter.Note that the accuracy of the concentrationmeasurement depends not only on the accuracy ofthe instrument, but also on the slope of thedensity/concentration correlation. This means, forexample, that a density measurement with anaccuracy of 0.00001 g/cm3 will be converted intoan ethanol value with a significantly smalleraccuracy of 0.025 % w/w. The accuracy of sometypical concentration measurements is given inappendix A.1.density KA Q 2 f 1 – KB f 2KA, KB . apparatus constantsQ . oscillation period of the U-tube divided bythe oscillation period of the referenceoscillatorf1, f2 . correction factors for temperature,viscosity, and nonlinearity10C76IB003EN-N
4 The Instrument – Overview4 The Instrument – OverviewThe density and concentration meters of the DMA Mseries have been developed to combine highestprecision with easy operation and robust design.Measurement is based on the oscillating U-tubemethod that has been invented at a researchinstitute in Graz, Austria, and first introduced ontothe market by Anton Paar in 1967.Error detectionA major source of measuring errors with densitymeters are gas bubbles in the measuring cell. Thisissue is addressed by Anton Paar with two newfeatures: FillingCheck : The instrument automaticallydetects inhomogeneities and gas bubbles in thewhole measuring cell by an advanced analysisof its oscillation pattern. Where necessary, awarning message is generated in real time forevery single measurement. U-View : Real-time images by a camera withzoom function enable you to visually inspect themeasuring cell.Features and BenefitsAccuracyYour DMA M series instrument is equipped with theworld’s most advanced digital density measurementtechnology: The period of oscillation of the U-tube ismeasured by optical pickups.User interface Two integrated Pt 100 platinum thermometerstogether with Peltier elements provide anextremely precise thermostatting of the sample.The touch screen user interface facilitates easy andintuitive operation in routine applications as well asin demanding scientific research work: ThermoBalance : An additional referenceoscillator provides long-term stability andenables precise measurements over the wholetemperature range of the instrument with onlyone adjustment at 20 C. For the most common applications, 10measuring methods are predefined. Just selectthe method fitting your application, or createyour own methods. Viscosity-related errors are automaticallycorrected over the full viscosity range bymeasuring the damping effect of the viscoussample which is subsequently taken account ofin the calculation of the definitive density value. Density values are automatically converted intoconcentration values for a large number offactory-programmed substances. You can addfurther substances as required by yourself. Optionally operate DMA 4100/4500/5000 M viaexternal keyboard, mouse, or bar code reader. Optionally connect an external monitor or touchscreen (VGA interface). With DMA 5000 M, the precision for sampleswith high viscosity and high density can beincreased by special adjustments withstandards of high viscosity and high density. The built-in atmospheric pressure sensorenables correct air adjustment, as the airdensity is dependent on the atmosphericpressure.C76IB003EN-NCompact and robust designThe instruments of the DMA M series keep up thetradition of the legendary previous DMA generations: Compact design Sealed housing Robust housing materials: coated aluminum(top and sides), aluminum (base and back), andpolystyrene/butadiene (front)11
5 Checking the Supplied Parts5 Checking the Supplied PartsDMA 4100/4500/5000 M has been tested andpacked carefully before shipment. However,damage may occur during transport.1. Keep the packaging material (box, foam piece,transport protection) for possible returns and forfurther questions from the transport or insurancecompany.2. Check the delivery for completeness bycomparing the supplied parts to those listed intable 5-1.3. If a part is missing, contact your Anton Paarrepresentative.4. If a part is damaged, contact the transportcompany and your Anton Paar representative.Table 5-1: Supplied partsSymbolPcs.Article descriptionMat. no.1DMA 4100 MDMA 4500 MDMA 5000 M1530581530591530601Power cordEuropeor USAor UKor Thailand65146526566186579730112Instruction manuals English Instrument General Software FunctionsorInstruction manuals German Instrument General Software Functions80812135322870901353211Density standard ultra-pure water 5x10 mL withcertificate960441Waste vessel 500 mL6210C76IB003EN-N
5 Checking the Supplied PartsTable 5-1: Supplied partsSymbolPcs.1Article descriptionMat. no.Accessory kit DMA / DMA M159958containing:2mHose 3x5 mm silicone (transparent)50814only for pressures up to 0.4 bar rel.7Syringe 2 mL Luer519742Injection adapter Luer black1590262Male Luer plug PTFE638653Adapter Luer cone PTFE63863only for pressures up to 0.4 bar rel.C76IB003EN-N1Adapter UNF 1/4″ Luer male647931Hose clamp215311Phillips screwdriver PH-0x407503013
5 Checking the Supplied PartsTable 5-2: Optional partsArticle descriptionMat. no.Data handlingKeyboard German USB80809Keyboard USA USB80807Printer RS-232C incl. cable 9600N8144737Printer Epson TM-U220D93362RS-232 connection cable D-Sub 9-pin, 3 m70429Gender changer DB9M/DB9M302592AutomatizationSample changer Xsample 12246534Sample filling unit Xsample 2281340Sample changer Xsample 45246535Sample changer Xsample 530105700Filling and rinsing unit Xsample 35281338Sample handling unit Xsample 5281339Heated sample changer Xsample 452 H84806Heated filling and rinsing unit Xsample 352 H84808ProtectionProtecting cover for keyboard13350Protection cap for USB interfaces156194Special funnel protection82448Special application accessoriesAerosol adapter74650Cooling kit DMA M80810Drying cartridge (with silica gel)65085Heating attachment for DMA M83161SyringesSyringe 2 mL Luer (1 pc.)51974Syringes 2 mL Luer (10 pcs.)58802Syringes 2 mL Luer (1000 pcs.)66399Syringes 5 mL Luer (100 pcs.)677214C76IB003EN-N
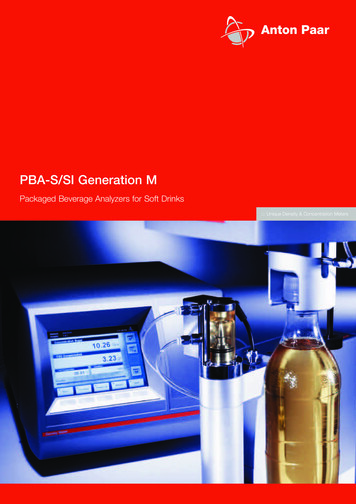
6 Functional Components6 Functional Components6.1 View of the Front and Right Side23415Fig. 6-1: View of the front and right side of the DMA M123Power on LEDColor PCAP touch screenXsample slot cover plate45Sample inlet and outletAir pump outlet6.2 View of the Left Side123Fig. 6-2: View of the left side123C76IB003EN-NBlind covers for inlet and outlet of the optional cooling kitUSB interfacesProtection cover for the USB interfaces15
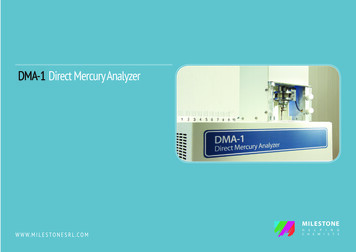
6 Functional Components6.3 Rear View121534567148131211109Fig. 6-3: Rear view12345678S-BUS interfacesUSB interfaceVGA interfaceRS-232 interface (COM)Ethernet interfaceCAN interfacea"DRY AIR IN AIR PUMP" connector"DRY AIR IN BLOCK" connectora169101112131415Power switchFuse holderPower inletUL test markType plate with serial numberFanCarrying ledgefor the connection of further measuring modulesC76IB003EN-N
6 Functional Components6.4 Operating Elements on the Main Screen123645Fig. 6-4: Main screen example123HeaderOutput fieldContent areaHeaderOn the left side of the header, you find the name ofthe currently active method and the sample number.On the right side of the header, you find a clock andthe user indicator. The user indicator indicates thetype of user that is currently logged on.Content areaIn the content area, the measuring values aredisplayed in small, medium, or large output fields.The layout of the content area can be defined in thesettings of the current method according to yourneeds.The progress bar at the bottom of the content areaindicates whether the instrument is currentlymeasuring or whether a measurement has finished.Monitor modeIf you have not started a measurement yet, or if youhave terminated a measurement by tapping Stop ,the instrument is in the monitor mode and shows acontinuous reading of the current measuring values.Measuring mode456Progress barButtons areaQuick access areastay frozen on the screen until the nextmeasurement is started. To unfreeze the screenand change to monitor mode, tapin the quickaccess area.Buttons areaThe buttons on the main screen have the followingfunctions:ButtonFunction Menu Opens the main menu Quick Settings Opens the quick settings list(only available in the "NoSample List" mode insteadof the Sample List button) Sample List Opens the current samplelist Method Opens the method list (toselect a method) Start Starts a measurement Stop Stops and aborts ameasurementIf you have started a measurement, a continuousreading of the current measuring values is shownuntil the measurement is finished. The final valuesC76IB003EN-N17
6 Functional ComponentsQuick access areaFunctionOpens the message list.The general instrument status as well asall measuring errors that have occurredduring the measurements of the currentlyactive sample list are described in this list.The button changes its appearancedepending on the current error status:Green OK sign:The general instrument status and theerror status of all measured samples ofthe current sample list are OK.Fig. 6-5: Expanded quick access area To expand the quick access area, tap
DMA 4500 M DMA 5000 M instrument software version: from 2.70 (original instruction) Instruction Manual DMA 4100 M DMA 4500 M DMA 5000 M instrument software version: from 2.70 (original instruction) Disclaimer This document may contain errors and omissions. If you discover any such errors or if you would like to see