Transcription
OPERATINGMANUALMODELS LT-3 & LT-3K
CAUTIONThe KILN-SITTER control is a valuable tool to helpyou achieve consistent result when firing your kiln. It isengineered to give you years of trouble-freeperformance when it is kept in proper adjustment andmaintained as described in the KILN-SITTER Operating Manual.The KILN-SITTER control is NOT intended toperform as a fail-safe shut-off device and your kilnshould NOT be left unattended beyond the estimatedfiring time. An uncontrollable accident, such asgreenware falling against the end of the KILNSITTER tube, might cause an over-firing which coulddamage your kiln. In this event, the operator should bein attendance to shut off the kiln manually.WARNINGDO NOT FIRE YOUR KILN OVER OR NEAR FLAMMABLEMATERIAL (i.e. wood floor, carpeting, etc.) SEE KILNSITTER Limited Warranty.
KILN-SITTEROPERATING MANUALThank you for choosing the KILN-SITTER control on your ceramic kiln. You, likeceramists the world over, can now enjoy your hobby more because the KILN-SITTER is "watching" your kiln while you do other things. Years of trouble free firing are yours toenjoy if you will take the time to carefully read the kiln operating instructions and KILNSITTER manual.The KILN-SITTER is a mechanical control that fires your kiln by the TIME andTEMPERATURE method of heat treatment using a small cone or bar. The cone or bar,after being exposed to the proper time and temperature, softens and bends to a predetermined angle, shutting off the kiln. Your choice of cone or bar, proper KILNSITTER adjustment and tube position determine when the kiln will shut off.The Models LT-3 and LT-3K also have an electrically driven mechanism, set by theoperator prior to firing, which will trip the lock and shut off the kiln if the normal cone orbar operation does not perform properly. This back-up device is used only as a safetyfeature and should not be used to override the function of the cone or bar.The KILN-SITTER requires very little attention but may need an occasionaladjustment check and replacement of critical parts such as the tube assembly, conesupports or sensing rod. Frequency of replacement depends on the type of firing beingdone, type of clay used, venting and the moisture content of the pieces being fired.To insure that your KILN-SITTER is properly adjusted, we suggestyou follow the instructions on the following pages and test fire yourempty kiln with the KILN-SITTER before you do anything else.1
2
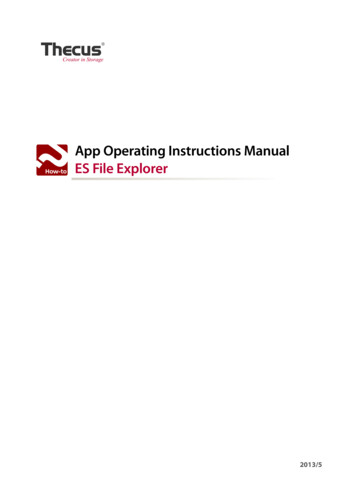
AdjustmentsEven if your KILN-SITTER was adjusted at the factory, it could have been jarred out ofadjustment during shipment or delivery. Let's first be sure the KILN-SITTER is inproper adjustment before using.Here are some simple adjustment checks for you to make before firing your kiln. Weurge you to make them carefully and repeat this check every 30 firings during itslifetime.1. TURN ALL SWITCHES OFF2. INSTALL FIRING GUAGENormally the firing gauge is in positionwhen your kiln is shipped from the factory(held by a rubber band at the end of theKILN-SITTER tube.) If it has beenremoved, it should now be replaced overthe sensing rod and cone supports, asshown in Figure .CAUTION : Remove firing gauge beforeoperating kiln.3. CHECK POSITION OF RELEASE CLAW AND WEIGHT TRIGGERa. With the firing gauge in position, swing the weight up against the guide plate. Pullthe claw forward (against the slight play in the swivel/pivot assembly) and check fora 1/16th-inch clearance between the inside tip of the claw and the face of the triggeras shown in Figure 2. The set screw on top of the claw may be loosened if theadjustment of the claw position is necessary. Retighten the set screw firmly.3
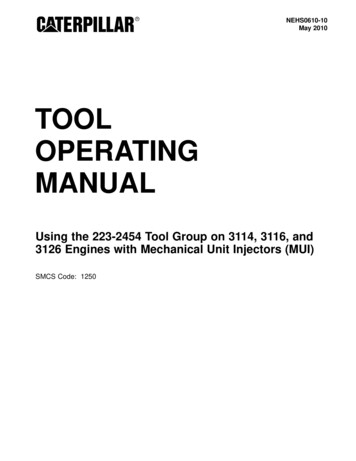
b. When the weight swingsforward, the trigger shouldjust clear the tip of the claw,as shown in Figure 3. Thesetscrew in front of theweight may be loosened toraise or lower the trigger, asshown in Figure 4. Thesetscrew must be firmlytightened or the force ofrepeated falling of theweight may cause thetrigger to creep out ofadjustment.Check your kiln with a level to make sure it is not standing on an uneven floor. If thisshould occur, your weight may not fall when released.WARNING: Do not fire your kiln over or near FLAMMABLE material (i.e. wood floor,carpeting, etc.)4. CHECK THE TRAVEL OF THE SENSING RODTHE FIRING GUAGE SHOULD NOW BE REMOVED BUT KEPT FOR FUTUREPERIODIC ADJUSTMENTS. The sensing rod is now free to travel vertically withinthe tube cavity. It should travel freely in the center of the cavity without touchingthe sides at any point, as shown in Figures 5 and 6.If necessary, the sensing rod maybe centered by loosening the twoguide plate screws in front of theKILN-SITTER and moving theguide plate right or left as required,as shown in Figure 7. Be sure theguide plate screws are firmlytightened.When these adjustments have been made, you are ready to test fire.4
TEST FIRINGFiring tests are made with the kiln empty. Two small size cones, which mature at arelatively low temperature, are provided with the KILN-SITTER for test firing. Thisallows you to complete the test firing in the shortest possible time. Additional cones areavailable from your dealer.1. FIRING GAUGE HAS BEEN RMOVED.2. APPLY KILN WASH(A small nail polish bottle with brush is ideal for this purpose.) Mix Hi-Fire kiln washwith water to a creamy solution. Apply a THIN coat to the cone supports and thesensing rod where they will come in contact with the cone. Do not apply kiln washto the cone or to the end of the porcelain tube. Allow wash to dry thoroughly. Donot allow kiln wash to accumulate.3. RAISE WEIGHT UP AGAINST GUIDE PLATE.4. PRESS CLAW DOWN LIGHTLY UNTIL IT ENGAGES TRIGGER.5. INSERT CONE (SEE PAGE 7, Item 7.)While holding the claw down over the trigger, carefully place one of the test conesflat on the cone supports with the inside edge of the number circle even with theoutside edge of the cone support. See Figure 8. The cone should be back againstthe metal step of the cone support with the center of the cone parallel with the endof the tube.CAUTION: Since the softening and bending of the cone shuts off your kiln, itscorrect positioning is important for proper firing. IF THE CONE IS DISLODGED BYACCIDENT OR ALLOWED TO COME IN CONTACT WITH THE PORCELAINTUBE, AND OVER-FIRING MAY RESULT WHICH COULD CAUSE SERIOUSDAMAGE TO YOUR KILNThe cone now holds the claw engaged so that the weight is supported and your handsare free. You are now ready to close the kiln and begin the test fire.5
6. TURN ALL SWITCHES OFF.7. THE LIMIT TIMER IS USED DURING THE TEST FIRING. TURN THE TIMERKNOB CLOCKWISE TO NUMBER 1-1/2 OR 2 ON THE SCALE.8. INSERT A FINBER INTO THE HOLE IN THE WEIGHT AND PUSH FIRMLY IN ONTHE PLUNGER UNTIL IT LOCKS.9. FIRE THE KILN BY USING THE REGULAR KILN SWITCHES, AS INSTRUCTEDBY THE KILN MANUFACTURER. (For purposes of test firing, when the kiln isempty, the highest temperature setting may be used.)In approximately one hour the KILN-SITTER weight will drop, shutting off the kiln.When the kiln is cool enough to handle you may open it and inspect the cone. If alladjustments have been made correctly, the cone on the KILN-SITTER will be bent toan approximate 90-degree angle shape similar to the illustration in Figure 9. However, ifit is bent similar to the "over-fired" illustration, reduce the kiln switch settings. This willincrease the firing time, reduce the rate of climb and allow the cone to mature properly.The best way to verify that your load is reaching a certain firing treatment is by usingwitness cones. These are valuable and inexpensive instruments that reliably measureactual firing performance. Witness cones are optional but we recommend their useduring test firing and also periodically during normal operations, as a check forconsistent firing performance, For information on witness cones, refer to page 9.You are now ready to begin normal firing operations.6
NORMAL OPERATIONIt is the responsibility of the KILN-SITTER user to become familiar with the properoperation and adjustment of the KILN-SITTER . If the simple steps and precautions,outlined in this manual, are followed with care, it will serve you as a valuable andreliable instrument for greater success and enjoyment in your ceramic firing.When you have assured that the KILN-SITTER is in proper adjustment by test firing,as described in that section, you are ready for normal firing operation.1. CHECK THE SENSING RODBefore each firing check the sensing rod for free and centered travel. In spite ofprecautions, the swivel/pivot of the tube assembly can become corroded orcontaminated and alter the normal shut off. If the sensing rod moves sluggishly,does not fall freely or you have inconsistent firings, immediately replace the tubeassembly. Refer to pages 12 through 14.2. TURN ALL KILN SWITCHES OFFThe life of the KILN-SITTER switch will be increased if kiln switches are offbefore engaging the KILN-SITTER 3. APPLY KILN WASHApply a THIN coat of Hi-Fire kiln wash to the cone supports and sensing rod wherethey will come in contact with the cone. Allow the kiln wash to dry thoroughly. Wesuggest two pair of supports be available. This allows you to prepare a clean pairwhile the other pair is being used in the firing.4. STACK WARE IN THE KILNWhen loading your kiln, care should be taken to keep the KILN-SITTER tube,cone supports, and cone or bar visible from above at all times. If the tube iscovered from view, the cone or bar could accidentally be dislodged from its properposition without being noticed and cause a malfunction of the KILN-SITTER shutoff. Shelves and ware should be positioned at least an inch above or below theKILN-SITTER tube so that the normal shut-off function will not be obstructed.5. RAISE THE WEIGHT UP AGAINST THE GUIDE PLATE6. PRESS THE CLAW DOWN LIGHTLY UNTIL IT ENGAGES THE TRIGGER7. INSERT THE CONE (Small size cones or bars are used on KILN-SITTER )While holding the claw down over the trigger, carefully place the cone or bar,selected for your firing, flat on the metal cone supports with the inside edge of thenumber circle even with the outside edge of the cone supports. See Figure 8. Thecone or bar should be against the metal step with the center of the cone or barparallel with the end of the tube. Consistent placement of the cone or bar in thismanner will lead to consistent firing control. The cone or bar now holds the clawengaged so that the weight is supported and your hands are free.7
8. CHECK THE POSITION OF THE CONE OR BARAs a last step before closing the kiln, always check to see that the cone or bar is inits proper position and free of obstructions. AN IMPROPERLY PLACED CONE ORBAR COULD CAUSE AN OVERFIRING AND DAMAGE YOUR KILN AND WARE.9. CLOSE THE KILN All switches are off at this point.10. SET THE LIMIT TIMER KNOB (1/4 to 1/2-hr beyond firing time)The timing knob will not allow the plunger assembly to engage when in the OFFposition. Always set the timer prior to switch engagement (pushing on the plunger.)How to use the Limit TimerThe limit timer is a safety shut-off device to protect your kiln from over-firing in casethe KILN-SITTER fails, through some malfunction, to shut off the kiln when thepyrometric cone or bar has matured. The numbers on the limit timer control knobindicate 20-hours of firing time. If your firing requires a longer period, the knob maybe reset during firing for this additional time. Since the function of the limit timer isto override the actual firing time, it should always be set for a longer period thanthe estimated firing time. After you have become familiar with the firing of yourparticular kiln, you can set the limit time as low as 1/4-hour longer than theestimated firing time. Until you have reached that degree of familiarity, it is safer toset the limit timer 1/2-hour longer than the estimated firing time.The limit timer may also be used as a timing device to aid you while you arelearning to estimate firing times. For example, if the timer knob is set at "7" beforefiring, and the indicator is on "1" when firing is completed, you know that theelapsed time was 6-hours.Caution: The timing knob should never be set beyone 20-hours. If the timingmotor should be inoperative, such action could jam the switch assembly, possiblycausing an over-firing.11. REMOVE THE TOP PEEP HOLE PLUGVenting of the kiln for the entire firing period will add years of life to your KILNSITTER tube assembly. (On large kilns also remove the bottom peephole plug.)12. INSERT A FINGER INTO THE HOLE IN THE WEIGHT AND PUSH FIRMLY IN ONTHE PLUNGER UNTIL IT LOCKS.13. WEIGHT CLEARANCEThe area outside the kiln should be clear of obstructions so the free fall of theweight is not impeded.14. FIRE THE KILN BY USING THE REGULAR KILN SWITCHES, AS INSTRUCTEDBY THE KILN MANUFACTURER.DO NOT LEAVE THE KILN UNATTENDED BEYOND THE ESTIMATED FIRINGTIME. An uncontrollable accident, such as greenware falling against the end of theKILN-SITTER tube may cause an over-firing, which could damage your kiln.Should this occur, the operator should be in attendance to shut of the kiln manually.8
WITNESS CONESA pyrometric cone is a slender pyramid composed of materials compounded in selectedcombinations to make a cone that will react to time and temperature in the same way asthe ware you place in your kiln. Because different clays and glazes require different heattreatments to mature properly, pyrometric cones are made in a series of cone numbersso that one is available to properly control the firing of the clay or glaze you are using.Even though small cones are always used on the KILN-SITTER , large size cones arerecommended as witness cones when test firing your kiln and KILN-SITTER , andperiodically during normal firing. This will help you determine whether firing shut-off isjust right too soon (temperature too low) or too late (temperature too high.) Duringthe test firing you will also learn your kiln's "personality" or its heat distribution.For this test firing you w
The Models LT-3 and LT-3K also have an electrically driven mechanism, set by the operator prior to firing, which will trip the lock and shut off the kiln if the normal cone or bar operation does not perform properly. This back-up device is used only as a safety feature and should not be used to override the function of the cone or bar. The KILN-SITTER requires very little attention but may .