Transcription
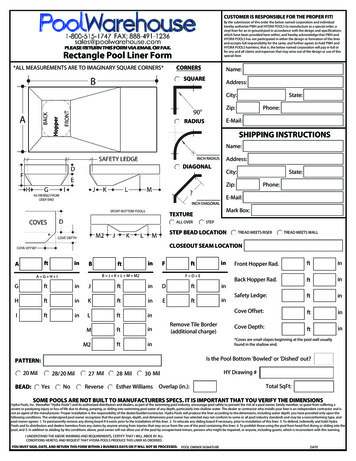
CUSTOMER IS RESPONSIBLE FOR THE PROPER FIT!By the submission of this order the below named corporation and individualhereby authorize PWH and HYDRA POOLS to manufacture as a special order, avinyl liner for an in-ground pool in accordance with the design and specificationswhich have been provided here within, and hereby acknowledge that PWH andHYDRA POOLS has not participated in either the design or formation of this linerand accepts full responsibility for the same, and further agrees to hold PWH andHYDRA POOLS harmless, that is, the below named corporation will pay in full orfor any and all claims and expenses that may arise out of the design or use of thisspecial liner.Rectangle Pool Liner Form*ALL MEASUREMENTS ARE TO IMAGINARY SQUARE rZip:RADIUSPhone:E-Mail:SHIPPING INSTRUCTIONSName:INCH INCH DIAGONALMark Box:TEXTUREALL OVERSTEPSTEP BEAD LOCATION*TREAD MEETS RISERTREAD MEETS WALLCLOSEOUT SEAM LOCATIONftAinBftinB J K L M M2A G H IinftFF D inRemove Tile Border(additional charge)ftinBack Hopper Rad.ftinSafety Ledge:ftinCove Offset:ftinCove Depth:ftin*Coves are small slopes beginning at the pool wall usuallyfound in the shallow end.Is the Pool Bottom 'Bowled' or 'Dished' out?PATTERN:20 MilBEAD:Front Hopper Rad.28/20 MilYesNo27 MilReverse28 MilHY Drawing #30 MilEsther WilliamsOverlap (in.):Total SqFt:SOME POOLS ARE NOT BUILT TO MANUFACTURERS SPECS. IT IS IMPORTANT THAT YOU VERIFY THE DIMENSIONSHydra Pools, Inc. (hereafter “Hydra Pools”) and its authorized distributors and dealers, as part of the swimming pool industry, encourage pool safety to prevent the risk of a pool owner, family member, or guest from suffering asevere or paralyzing injury or loss of life due to diving, jumping, or sliding into swimming pool water of any depth, particularly into shallow water. The dealer or contractor who installs your liner is an independent contractor and isnot an agent of the manufacturer. Proper installation is the responsibility of the dealer/builder/contractor. Hydra Pools will produce the liner according to the dimensions, including water depth, you have provided only upon thefollowing conditions. The undersigned pool owner recognizes that the pool design, depth, and dimensions pool owner has selected may not conform to some or all pool industry standards and may be a nonconforming type, andpool owner agrees: 1. To permanently remove any diving board if it exists prior to the installation of this liner. 2. To relocate any sliding board if necessary, prior to installation of this liner. 3. To defend, indemnify and hold HydraPools and its distributors and dealers harmless from any claims by anyone arising from injuries that may occur from the use of the pool containing this liner; 4. To prohibit those using the pool from head-first diving or sliding into thepool, and 5. In addition to abiding by the conditions above, pool owner will not allow use of the pool by unsupervised minors, persons who might be impaired, or anyone, including guests, which is inconsistent with this warning.I UNDERSTAND THE ABOVE WARNING AND REQUIREMENTS, CERTIFY THAT I WILL ABIDE BY ALLCONDITIONS HERETO, AND REQUEST THAT HYDRA POOLS PRODUCE THIS LINER AS ORDERED.YOU MUST SIGN, DATE, AND RETURN THIS FORM WITHIN 2 BUSINESS DAYS OR IT WILL NOT BE PROCESSED.POOL OWNER SIGNATUREDATE
HOW TO MEASURE YOUR POOL FOR AN INGROUND LINERMeasuring without entering the pool:You will be able to measure horizontally, all of the bottom dimensions without entering or draining thepool. You can create your own simple measuring tool (an extended Plumb Line) that will take about 5minutes to assemble and is used by pool professionals taking liner measurements.Create an extended Plumb Line.You will Need:Follow the instructions below, using anextended Plumb Line to take measurements. Long straight pole (Vac Pole). String attached to end of pole Weight to attach to end of string Measuring tapeLong, straight poleJBeadReceiverHint: Measuring is alwayseasier with someone tohelp. Only measure down tothe nearest 1/4 of an inch.FString underwaterWeightHorizontal Bottom Measurements:You should “Plumb” for points that will achieve the desired measurements based on the bottom contour ofthe pool. To take measurement “F,” you would stand on one side of the pool and “Plumb” for a corner ofthe hopper, measuring the distance from the bead receiver to the end of where the weight is attached. Totake measurement “J,” stand with the pole over the edge of the pool and the string vertical (allow no slackin the string), measure the distance from the edge of the pool to the end of the pole where the string isattached.BEFORE MEASURING, KEEP THESE IN MIND1: Do not ASSUME anything – measure it and check it thoroughly. Often, the pool may have slightvariances from the original manufacturers specifications.2: Not all pools are constructed with straight lines and sharply defined changes of plane. Therefore, pleasenote any abnormalities.3: Always provide exact measurements. The manufacturer will automatically make the liner slightly smallerthan the dimensions you give, in order to allow the liner to stretch into place properly. DO NOT try to makeextra allowances for stretch in your dimensions.4: Actual pool measurements should be made even if the original pool plans are available due to the fact thatslight variances may have occurred during construction.LINER TYPESStandard BeadPool DeckBeadedLow Hung BeadedEsther Williams Bead
CORNER TYPESSquare CornersDiagonal CornersRadius CornersImaginary Lines12290º1Note: If you have more than one type of corner on your pool (such as with a Lazy L) please includea sketch of pool indicating corner type and measurement.2POOL SHAPESRectangleOvalBBshallow enddeep enddeep endAshallow endPAULazy “L” RightLazy “L” LeftdBTenPAMdeep endAI BEAMSSI BEAMdeep endashwlloNdMwlloenashTNPB* Shallow End BreaklineFollows I BeamPerpendicular to B WallTrue “L” RightTrue “L” LeftBTPshallow endAdeep endASdeep endNSNPBReverse CornerTypes:SquareRadiusDiagonalshallow endT
ADDITIONAL POOL SHAPESGrecianJewelBBUPshallow endPshallow endANTAHDSSHopper DiagonalUDouble RomanSingle RomanBBUS2shallow endPTAUNA TS1OctagonRounddeep endshallow endSAABHOPPER PAD S2shallow endS2BackRadiusOvalOvalT
HOPPER TYPESABside viewend viewDFEEStandard HopperJKLHGIMABend viewside viewDFEEWedge Hopper w/Shallow EndJLHMGIABside viewend viewDFEEJWedge Hopper w/Constant SlopeLHGIABside viewend viewDFEEConstant Straight Slope HopperLBAside viewDend viewFEECove HopperKJLGHIBAside viewend viewDFEEM2JKLMSport Bottom HopperHGI
ABside viewend viewEEJKLSafety Ledge HopperMHSafety LedgeGISafety LedgeSafety LedgeVINYL COVERED STEP POSITIONSARight HandStepsKBirds-Eye View of PoolKCenterStepsShallowEndDeepEndAALeft HandStepsKBUse the straight side of the pool todraw an imaginary ‘corners’ on yourpool. Then measure from ‘corner’ tothe steps on each side.Birds-Eye Viewof PoolAVINYL COVERED STEP SHAPEST3T3T2T2SetbackT1T1Step CornerStep WidthR1R2 DR3R4RectangleStepT3SetbackT1Step CornerR1R2DR3R4Step WidthCornerStepT2Step WidthBowedStepR1DR2R3R4
CUSTOM LINER ABMEASURINGAB Measurements are required for freeform pools to match the unique curves of your pool. Start bysketch-ing a diagram of the pool on paper. Include location and detail of your pool deck and any nonremovable obstructions, such as slides, dive stands, grab rails and ladders that lie within 18 inches of thepool edge. Pictures are required as well.1. Using chalk or masking tape to establish your AB plot line: Start from 5' away from the widest pooledge, plot a line along the length of the pool. The line should not interestect the pool in any directionand should be at least 2/3 the length of the pool.4 feetAB2. Mark plot points around the perimeter of the pool approximately every 3 feet: Mark your pool deck inroughly 3 foot intervals around the pool perimeter, and numbering each point around the pool. Number allcorners, rail locations (front and back of rails) or other obstructions within 18 inches of the pool edge. Whentight curves, rocks, waterfalls or similar obstructions are encountered, mark at one foot intervals.3024253126 27 28 57814139121110543215647554854534952A51B50
3. Measure to each plot point from Point A: Attach or have a partner hold one end of a tape measurerat Point A, measure to each point, starting at point one, and record in the corresponding box A1on the measuring form. Continue measuring to each point around the pool perimeter and recordeach measurement. Repeat from Point B to each plot point in numerical order.303126 27 28 29252430323324343536 37 3823223126 27 28 292532333435 174545174646161661575432 1568141211541053Point A Measurements1349515432 1568144852A1547559136747555491211481053495250Point B MeasurementsAB5150B4. Verify pool length and width: Choose a numbered plot point in the shallow end, and a numbered plotpoint in the deep end, and record the measurement between the two points to represent overall poollength. Do the same across the widest point of the pool to represent the pool width. You may want toinclude a few width measurements for curvy pools with varied sections. Once completed, proceed on to theHopper Style and measurements in the standard measurement form.3024253126 27 28 293233343536 37 543215647554854534952A51B50
The undersigned pool owner recognizes that the pool design, depth, and dimensions pool owner has selected may not conform to some or all pool industry standards and may be a nonconforming type, and pool owner agrees: 1. To permanently remove any diving board if it exists prior to the installation of this liner. 2. To relocate any sliding board .
