Transcription
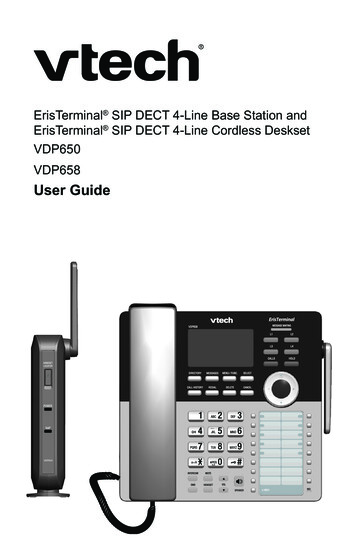
ErisTerminal SIP DECT 4-Line Base Station andErisTerminal SIP DECT 4-Line Cordless DesksetVDP650VDP658User GuideVDP650
2
Congratulationson your purchase of this VTech product. Before using this product, please readImportant Safety Information on page 4 of this manual. Please thoroughlyread this user’s manual for all the feature operations and troubleshootinginformation necessary to install and operate your product. You can also visit ourwebsite at businessphones.vtech.com or call 1 (888) 370-2006.Please note the serial number of your product, which can be found on the bottomof the base station. Save your sales receipt and original packaging in case it isnecessary to return your telephone for warranty service.This user guide contains detailed instructions for using your VDP650ErisTerminal SIP DECT 4-Line Base Station and VDP658 ErisTerminal SIPDECT 4-Line Cordless Deskset with software version 1.0.0.x. See “Viewingdeskset status” on page 48 for instructions how to check the software versionof your VDP650 and VDP658. Please read this manual before using the product.3
Important Safety InformationThis symbol is to alert you to important operating or servicinginstructions that may appear on the product or in this user’s manual.Always follow basic safety precautions when using this product toreduce the risk of injury, fire, or electric shock.Important safety instructionsWhen using your telephone equipment, basic safety precautions should alwaysbe followed to reduce the risk of fire, electric shock and injury, including thefollowing:1. This product should be installed by a qualified technician.2. This product should only be connected to the host equipment and neverdirectly to the network such as Public Switch Telephone Network (PSTN) orPlain Old Telephone Services (POTS).3. Read and understand all instructions.4. Follow all warnings and instructions marked on the product.5. Unplug this product from the wall outlet before cleaning. Do not use liquid oraerosol cleaners. Use a damp cloth for cleaning.6. Do not use this product near water such as near a bath tub, wash bowl,kitchen sink, laundry tub or swimming pool, or in a wet basement or shower.7. Do not place this product on an unstable table, shelf, stand or other unstablesurfaces.8. Slots and openings in the back or bottom of the handset are provided forventilation. To protect them from overheating, these openings must not beblocked by placing the product on a soft surface such as a bed, sofa or rug.This product should never be placed near or over a radiator or heat register.This product should not be placed in any area where proper ventilation is notprovided.9. This product should be operated only from the type of power source indicatedon the marking label. If you are not sure of the type of power supplied at thepremises, consult your dealer or local power company.10. Do not allow anything to rest on the power cord. Do not install this productwhere the cord may be walked on.11. Never push objects of any kind into this product through the slots in thehandset because they may touch dangerous voltage points or create a shortcircuit. Never spill liquid of any kind on the product.4
12. To reduce the risk of electric shock, do not disassemble this product, but takeit to an authorized service facility. Opening or removing parts of the handsetother than specified access doors may expose you to dangerous voltagesor other risks. Incorrect reassembling can cause electric shock when theproduct is subsequently used.13. Do not overload wall outlets and extension cords.14. Unplug this product from the wall outlet and refer servicing to an authorizedservice facility under the following conditions:A. When the power supply cord or plug is damaged or frayed.B. If liquid has been spilled onto the product.C. If the product has been exposed to rain or water.D. If the product does not operate normally by following the operatinginstructions. Adjust only those controls that are covered by theoperation instructions. Improper adjustment of other controls mayresult in damage and often requires extensive work by an authorizedtechnician to restore the product to normal operation.E. If the product has been dropped and the telephone base and/orhandset has been damaged.F.If the product exhibits a distinct change in performance.15. Avoid using a telephone (other than cordless) during an electrical storm.There is a remote risk of electric shock from lightning.16. Do not use the telephone to report a gas leak in the vicinity of the leak. Undercertain circumstances, a spark may be created when the adapter is pluggedinto the power outlet, or when the handset is replaced in its cradle. This is acommon event associated with the closing of any electrical circuit. The usershould not plug the phone into a power outlet, and should not put a chargedhandset into the cradle, if the phone is located in an environment containingconcentrations of flammable or flame-supporting gases, unless there isadequate ventilation. A spark in such an environment could create a fire orexplosion. Such environments might include: medical use of oxygen withoutadequate ventilation; industrial gases (cleaning solvents; gasoline vapors;etc.); a leak of natural gas; etc.17. Only put the handset of your telephone next to your ear when it is in normaltalk mode.18. The power adapters are intended to be correctly oriented in a vertical or floormount position. The prongs are not designed to hold the plug in place if it isplugged into a ceiling, under-the-table or cabinet outlet.19. Use only the power cord indicated in this manual.Power adapter rating: 6.0 Vdc @ 600 mA20. For pluggable equipment, the socket-outlet shall be installed near theequipment and shall be easily accessible.5
21. In wall mounting position, make sure to mount the telephone base on the wallby aligning the eyelets with the mounting studs of the wall plate. Then slidethe telephone base down on both mounting studs until it locks into place.Refer to the full installation instructions in the User Guide.22. CAUTION: Keep small metallic objects such as pins and staples away fromthe handset receiver.SAVE THESE INSTRUCTIONS6
ComplianceFCC part 15This device complies with Part 15 of the FCC rules. Operation is subject to thefollowing two conditions: (1) This device may not cause harmful interference, and(2) this device must accept any interference received, including interference thatmay cause undesired operation.This equipment has been tested and found to comply with the limits for aClass A digital device, pursuant to Part 15 of the FCC Rules. These limits aredesigned to provide reasonable protection against harmful interference when theequipment is operated in a commercial environment. This equipment generates,uses, and can radiate radio frequency energy and, if not installed and used inaccordance with the instruction manual, may cause harmful interference to radiocommunications. Operation of this equipment in a residential area is likely tocause harmful interference in which case the user will be required to correct theinterference at the user’s expense.Privacy of communications may not be ensured when using this phone.Warning: Changes or modifications to this equipment not expressly approved bythe party responsible for compliance could void the user’s authority to operatethe equipment.Caution: To maintain the compliance with the FCC’s RF exposure guideline,place the base unit at least 20 cm from nearby persons.For body-worn operation, this handset has been tested and meets the FCC RFexposure guidelines when used with the accessories supplied or designated forthis product. Use of other accessories may not ensure compliance with FCC RFexposure guidelines.Industry CanadaThis Class A digital apparatus complies with Canadian requirements:CAN ICES-3 (A)/NMB-3(A).Cet appareil numérique de la classe A est conforme à la norme CAN ICES-3 (A)/NMB-3(A) du Canada.This device complies with Industry Canada license-exempt RSS standard(s).Operation is subject to the following two conditions: (1) this device may not causeharmful interference, and (2) this device must accept any interference received,including interference that may cause undesired operation of the device.Privacy of communications may not be ensured when using this telephone.The term ‘’IC:‘’ before the certification/registration number only signifies that theIndustry Canada technical specifications were met.This product meets the applicable Innovation, Science and EconomicDevelopment Canada technical specifications.7
User GuideErisTerminal SIP DECT 4-Line Base Station andErisTerminal SIP DECT Cordless 4-Line DesksetVDP650VDP658Table of ContentsImportant Safety Information Multiple Incoming Calls 29Call Waiting 294Ignoring Calls 30Important safety instructions 4Introduction Dismissing Calls 3010Missed Calls 30About this guide 10Answering Internal Calls 31Product overview 11Quick Reference Guide Putting a call on hold 3112Switching between two calls 32Base station external features 12About Shared Calls 32Cordless deskset external features 13Displaying calls on the Call List 34Cordless deskset external features 14Barging In 34Factory Default Line Key Settings 15Using Key System Emulation 35Directory card 15Base Station Installation 16Deskset Installation 19Transferring a call 38Setting up a conference call 39Listening to messages 41Installing the backup battery 19Using the Directory 41Battery charging 20Using the Call History 43Installing the deskset 21Using Speed Dial 45Wall mounting the deskset 23Configuring the Deskset Adding a corded headset 24Setting Do Not Disturb 46Registering the deskset to the base 25Setting call forwarding 46Deregistering the deskset 26Locating the Deskset 27Screen icons 27Using the Deskset 2846Blocking anonymous calls 47Dialing anonymously 47Setting missed-call alerts 48Setting call waiting 48Idle screen 28Viewing deskset status 48Making calls 28Setting the language 49Answering Incoming calls 29Setting the date and time 498
Setting the deskset name 49Call Settings 59Configuring the programmable keys 50User Preferences 61Programmable Key Types 51Base Directory 62Line key lights 52Blacklist 65Setting the screen contrast 53Remote XML 65Backlight 53Security 65Setting the ringer tone and volume 54Troubleshooting Setting audio mode 54General issues 66Turning low battery tone on or off 54Technical Specifications 67Turning key tones on or off 55Special characters 67Registering or deregistering yourdeskset 55Entering special characters 67WebUI Taking care of your telephone 68Maintenance 56Using the WebUI 56GPL License Information System Status 58666869GPL code requests 69Deskset Status 599
IntroductionAbout this guideThis user guide provides information about the external features of the basestation and deskset, installation and deskset configuration instructions, anddetailed instructions for using the deskset. Please read this user’s manual beforeusing your deskset.Please refer to the VDP650 Administrator and Provisioning Manual for completeconfiguration instructions. You can download the guide frombusinessphones.vtech.com.For customer service or product information, visit our website atbusinessphones.vtech.com or call 1 (888) 370-2006.10
Product overviewThe VTech VDP650 base station and VDP658 cordless deskset is a full-featuredSIP endpoint business phone system designed to work with popular hosted IPPBX services and on-premise SIP PBXs. Once you have ordered and configuredyour PBX service, the deskset enables you to make and receive calls as youwould with any other business phone. Up to 10 cordless devices (VDP658cordless desksets and/or VDP651 cordless handsets) can be registered to thebase station. Each deskset provides calling features such as hold, transfer,conferencing, and speakerphone.The VTech VDP650 base station supports shared calls among multiple cordlesshandsets/desksets with a single SIP account. With Key System Emulation, theline keys (L1 to L4) on handsets/desksets can be configured as KeyLine type,which enables the keys to be used as for making calls, picking up held calls, andbarging in calls.The VDP658 cordless deskset features include: Backlit Liquid Crystal Display Speakerphone, Hold and Mute Up to 8 SIP accounts Up to 4 concurrent calls across all desksets Shared call usage on single SIP account among multiple users Key System Emulation 4 line keys (L1-L4) with LEDs Message waiting alert LED 3-way conferencing Corded headset support 500-entry local directory 1,000-entry base directory with entries shared on all registered handsets anddesksets11
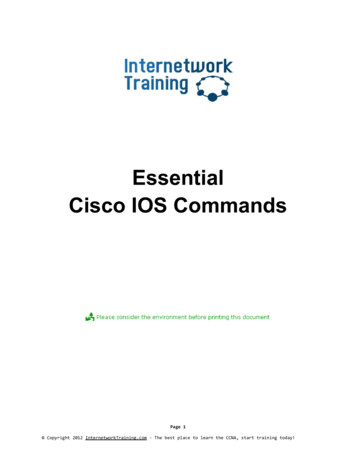
Quick Reference GuideBase station external featuresAntennaWall mount slot(on top)Handset Locator(Page) buttonPress to ring the desksets.Press and hold to registera deskset.Power LEDFlashes when joiningthe network or whenregistering/deregisteringa deskset.Steady when power isconnected and an IPaddress is acquired.VoIP LEDFlashes when registering/deregistering a deskset.Steady when all SIP accountsare registered.Off when a SIP account is notregistered.Use onlySuppliedAdapterDC adapter inputReset buttonDepress for 15seconds to restorefactory defaults.If the reset issuccessful, theVoIP LED will flashslowly.VDP650RESETEthernet portFrontRear12
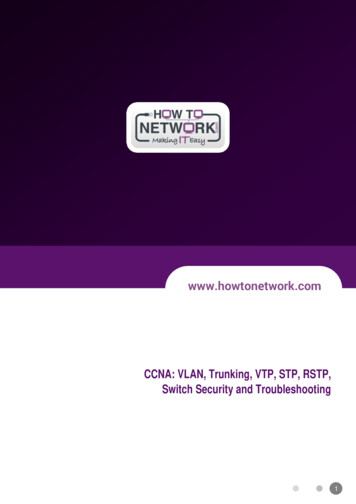
Quick Reference GuideCordless deskset external featuresMENU/FUNCPress to display themain menu or contextmenu, OR to dismissan incoming call.MESSAGESPress to display theMessage menu.SELECTPress to select a menuitem.DIRECTORYPress to view directoryinformation.CANCELPress to cancel anoperation and leave amenu, or to ignore anincoming call.CALL HISTORYPress to view callhistory.REDIALPress to redial anumber.DELETEWhile enteringnumbers or letters,press to deleteprevious character.DIAL PADMUTEDuring a call, pressto prevent your voicefrom being heard.SPEAKERPress to turn on thespeakerphone. Pressagain to turn it off.INTERCOMPress to start makingan intercom call toone device.DND (Do not disturb)Press once to turn thefeature on. Press againto turn off.HEADSETPress to make, answeror hang up a call on acorded headset.13pVOLqDuring a call, pressto adjust the listeningvolume.Press to adjust the ringervolume when in idle mode.
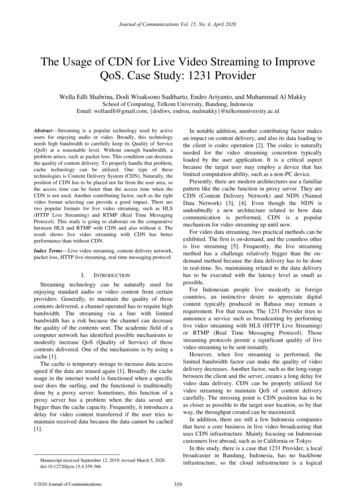
Quick Reference GuideCordless deskset external featuresL1 - L4Line keys with LEDsfor call handling. Canbe reprogrammedas shortcuts to otherfeatures.MESSAGE WAITINGindicatorFlashes when anaccount has a newvoice message.HOLDPress to put the activecall on hold.CALLSPress to manage yourown held calls andshared calls within thesystem.Speed dial keysPress to dial the desiredspeed dial number.LOWERPress to switch to thelower location of a speeddial key.MICNavigation keysWhile in menus, press p or q to scroll through themenus, highlight items or change settings.While entering names or numbers, press t or u tomove the cursor to the left or right.14
Factory Default Line Key SettingsYour base station and desksets have a factory defaultconfiguration where the line keys (L1 to L4) are set upto handle a shared line. All deskset user can use the shared line via theline keys (L1 to L4). The LEDs on the line keys (L1 to L4) will be onor flashing to indicate calls in progress across alldesksets. A deskset user can make a new call, pick up a held shared call, or barge in ashared call by pressing the line keys (L1 to L4).For more information, see “Using Key System Emulation” on page 35.Directory cardUse the directory card to record the names of the speed dial numbers you stored.To write names on the directory card:1. Write the information on the directory cardthat comes with the package.2. Insert the edge of the directory card in theslot at the front of the deskset, under theplastic cover.15
Base Station InstallationThis section assumes that your network infrastructure is established and thatyour IP PBX phone service has been ordered and configured for your location.For more information about IP PBX configuration, see the VDP650 Administratorand Provisioning Manual, available at businessphones.vtech.com.You can power the base station using a compatible VTech power adapter. Installthe base station near a power outlet not controlled by a wall switch. The basestation can be placed on a flat surface or mounted on a wall in a vertical orhorizontal orientation.Avoid placing the base station too close to: Communication devices such as television sets, DVD players, or othercordless telephones Excessive heat sources Noise sources such as a window with traffic outside, motors, microwaveovens, refrigerators, or fluorescent lighting Excessive dust sources such as a workshop or garage Excessive moisture Extremely low temperature Mechanical vibration or shock such as on top of a washing machine or workbench16
To install the base station:1. Plug one end of the Ethernet cable into the Ethernet port on the rear of thebase station (marked by), and plug the other end of the cable into yournetwork router or switch.2. If the base station is not using power from a PoE-capable network router orswitch:a. Connect a compatible VTech power adapter to the power jack.b. Plug the power adapter into an electrical outlet that is not controlled by awall switch.Use onlySuppliedAdapterRESETIMPORTANT INFORMATION1. Use only a compatible VTech power adapter with this product.To order a power adapter, visit our website atbusinessphones.vtech.com or call 1 (888) 370-2006.2. The power adapter is intended to be correctly oriented in a vertical or floormount position. The prongs are not designed to hold the plug in place if it isplugged into a ceiling, under-the-table or cabinet outlet.To mount the base station on a wall:1. Install two mounting screws on the wall. Choosescrews with heads larger than 5 mm (3/16 inch)in diameter (1 cm / 7/16 inch diameter maximum).The screw centers should be 5 cm (1 15/16 inches)apart vertically or horizontally.2. Tighten screws until only 3 mm (1/8 inch) of thescrews are exposed.17
3. Attach the mounting plate to the top of the base station. Insert the tab intothe slot and then push the plate in at the bottom of the base station until themounting plate clicks into place.Insert tab into slot.4. Check to make sure the plate is secure at top and bottom. It should be flushwith the base station body.5. Place the base station over the mounting screws.6. Connect power and the Ethernet cable as described in ”To install the basestation:” on page 1718
Deskset InstallationThis section assumes that your network infrastructure is established and thatyour IP PBX phone service has been ordered and configured for your location.Deskset installation involves both the backup battery and the deskset. The desksetis powered using the supplied power adapter. The deskset can be placed on a flatsurface or mounted on a wall.Avoid placing the deskset too close to: Communication devices such as television sets, DVD players, or othercordless telephones Excessive heat sources Noise sources such as a window with traffic outside, motors, microwaveovens, refrigerators, or fluorescent lighting Excessive dust sources such as a workshop or garage Excessive moisture Extremely low temperature Mechanical vibration or shock such as on top of a washing machine or workbenchInstalling the backup batteryInstall the backup battery, as shown below. In the event of a power failure, thecharged backup battery allows the deskset to operate. The backup battery will becharged when you connect the AC power adapter to a wall outlet not controlledby a wall switch.1. Squeeze the latch tab to open the battery compartment cover.19
2. Plug the battery connector into the port inside the compartment.3. Place the battery in the compartment. Make sure the supplied battery withthe label THIS SIDE UP faces up, as indicated.Battery PackBT166342/BT2633422.4V 300mAh Ni-MHWARNING:DO NOT BURN ORPUNCTURE BATTERIESMADE IN CHINAGY1224Battery PackBT166342/BT2633422.4V 300mAh Ni-MHWARNING:DO NOT BURN ORPUNCTURE BATTERIESMADE IN CHINAGY12244. Insert the battery compartment cover tabs and then press down until thecover clicks into place.IMPORTANT INFORMATION Use only the supplied rechargeable battery or replacement battery(model BT266342). To order a replacement battery, visit our website atbusinessphones.vtech.com or call 1 (888) 370-2006. If you do not use the deskset for a long time, disconnect and remove thebattery to prevent possible leakage.Battery chargingOnce you have installed the battery, the screen indicates the battery status (seethe table below). The backup battery is fully charged after 16 hours of continuouscharging.The following table summarizes the battery charge indicators and actions to take.Battery indicatorsThe screen showsit flashes.Full battery icon ( )appears.andBattery StatusActionBattery has enoughcharge to be used for ashort time.Charge withoutinterruption (at least 30minute).Battery is charged.To keep the batterycharged, place it in thecharger when not in use.20
Installing the deskset1. Install the mounting bracket for tabletop use.Low tabletop position: Insert the fixed tabs of the mounting bracket into slotsA and B . Press the flexible tabs into slots C and D until they click into place.CDBDABCADBLow tabletop positionHigh tabletop position: Insert the fixed tabs of the mounting bracket into slotsA and B . Press the flexible tabs into slots C and D until they click into place.DBCDABHigh tabletop position21
2. Connect the coiled handset and the power cord to the deskset.Plug the large end of thepower adapter into a poweroutlet not controlled by awall switch.Plug the end of thecoiled handset cord intothe jack at the bottom ofthe deskset.Raise the antenna foroptimum wireless rangeand performance.Plug the small end of thepower adapter into thepower jack at the bottom ofthe deskset.Route the power adaptercord through the slot at thebottom of the deskset.IMPORTANT INFORMATION1. Use only the power adapter supplied with this product.To order a replacement power adapter, visit our website atbusinessphones.vtech.com or call 1 (888) 370-2006.2. The power adapter is intended to be correctly oriented in a vertical or floormount position. The prongs are not designed to hold the plug in place if it isplugged into a ceiling, under-the-table or cabinet outlet.22
Wall mounting the desksetThe deskset is ready for tabletop use. If you want to mount the deskset on a wall,make sure you first unplug the power adapter from the electrical outlet.To mount the deskset on the wall:1. Place your corded handset aside. Use a coin to rotate the handset tab 180degrees. The protruding edge holds the corded handset when the deskset ismounted on the wall.Protruding edgeHandset tab2. Press in the direction indicated by the arrows to release and remove themounting bracket from the deskset.3. Place the corded handset back to the deskset. Plug the small end of thepower adapter cord into the power jack on the back of the deskset.Low tabletop positionHigh tabletop position4. Align the wall mounting holes on the back of the deskset with the tabs of thestandard wall plate. Push the deskset down until it clicks securely in place.5. Plug the large end of the power adapter into an electrical outlet not controlledby a wall switch.23
Adding a corded headsetYou can use this deskset hands-free when you install any industry-standard2.5 mm corded telephone headset (purchased separately).Plug a 2.5 mm headset intothe HEADSET jack on theside of the handset.24
Registering the deskset to the baseThe deskset must be registered to the base station in order to make and receivecalls.To register the deskset:1. Make sure the base station is connected to power.2. If the deskset is displaying the following registration instructions, go to step 7.Otherwise, go to step 3.Press and holdHANDSET LOCATORkey at base for4 secondsThen, press the#key at theDeskset.Press MENU/FUNC. on the deskset. The Main Menu appears.Press q to scroll to User settings and press SELECT.Press q to scroll to Registration and press SELECT.With This Deskset highlighted, press SELECT.The deskset screen displays instructions.7. On the base station, press the HANDSET LOCATOR button for at least fourseconds, then release the button. Both LEDs on the base station begin toflash slowly.8. Press the # key on the deskset to begin registration.The screen displays Registering Please wait.The process takes up to 10 seconds to complete. When registration iscomplete, the deskset beeps and displays Deskset Registered.3.4.5.6.If the deskset fails to register, it displays Registration failed. Try again.Wait for a few seconds and repeat the registration procedure.25
Deregistering the desksetBefore using the deskset with a different base station, you must deregister thedeskset from the base station to which it is currently registered.To deregister the deskset:1. Press MENU/FUNC. on the deskset. The Main Menu appears.2. Press q to scroll to User settings and then press SELECT.3. Press q to scroll to Registration and then press SELECT.4. Press q to highlight Deregistration and then press SELECT.The deskset screen displays a list of devices registered to the base.5. Press q to highlight the name of the deskset you want to deregister, and thenpress SELECT.6. Enter the PIN and then press SELECT to begin deregistration.The default PIN is 1592.The deregistration process takes up to 10 seconds to complete. Whenthe deskset deregisters, it beeps and the screen displays Handset isderegistered, followed by the registration instructions:Press and holdHANDSET LOCATORkey at base for4 secondsThen, press the#key at theDeskset.Note: The deskset enters an energy-saving charging mode after beingderegistered. All cordless telephone functions except deskset-battery chargingare disabled. Energy-saving charging mode is deactivated after the desksetregisters to the base station.26
Locating the DesksetYou can determine which desksets are registered by paging them from the base.Press the HANDSET LOCATOR (page) button on the base station to ring alldesksets:â All desksets within range of the base will ring for one minute, even if thevolume is off. To end the locator page, press CANCEL. To silence the locator page on one deskset only, press MUTE.Screen iconsThe following screen icons indicate your phone’s current status:IconStatusIndicates signal strength, from one bar (weak) to four bars (strong). Flasheswhen out of range.Indicates battery strength from 1/3 to 3/3. Flashes when empty.Indicates VDP650the currently displayed call is on hold with your deskset.This icon is visible when displaying the Call List.The ringer is off.Headset—audio is coming through a headset after the HEADSET key waspressed.Speakerphone—the speakerphone is active.Microphone is muted.27
Using the DesksetThis section describes how to use the deskset to make calls and answer calls.This section also describes how to put calls on hold, transfer calls, and createconference calls.Idle screenThe Idle screen appears after the phone is connectedand configured for your SIP PBX service. The Idle screenindicates that you have no active or held calls.From the idle screen, you can press: CALLS to view the Call List.See “Displaying calls on the Call List” on page 34. MENU/FUNC. to view the main menu.See “Configuring the Deskset” on page 46.Making callsYou can make calls to any phone number (an outside call), or you can callanother deskset (an internal call).To make an outside call:1. Use the dial pad to enter the desired number. Press DELETE if you enter an incorrect digit.2. Call the number by lifting the handset, pressing an idle line key (L1 to L4), orpressing SPEAKER.When the call is answered, the active call screen appears.â3. To hang up the call, place the handset on the deskset, or press SPEAKER ifyou are using speakerphone.Note that you can also live dial a number by lifting the handset or pressingSPEAKER to go off hook before entering a phone number. The call will dialautomatically when a valid number is entered.28
To make an internal (intercom) call to another handset or deskset:1. Press INTERCOM.2. Press p or q to select the handset or deskset you wish to call, and thenpress SELECT.When the call is answered, the active call screen appears.SELECTâ3. To use the corded handset ins
3 Congratulations on your purchase of this VTech product. Before using this product, please read Important Safety Information on page 4 of this manual. Please thoroughly read this user's manual for all the feature operations and troubleshooting