Transcription
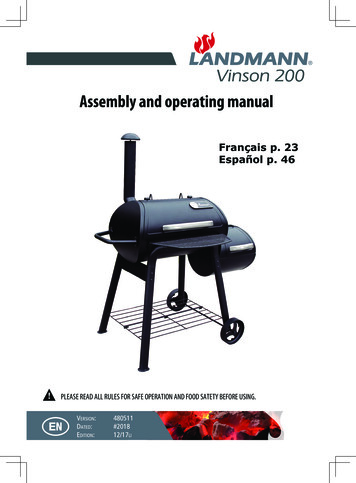
Vinson 200Assembly and operating manualFrançais p. 23Español p. 46!PLEASE READ ALL RULES FOR SAFE OPERATION AND FOOD SATETY BEFORE USING.1EnVersion:Dated:Edition:480511#201812/17li
READ FIRST! RULES FOR HEAVY-DUTYBARREL SMOKER SAFE OPERATION. 2THE SMOKER IS FOR OUTDOOR USE ONLY!DO NOT USE WITHOUT THE ASH TRAY IN PLACE.DO NOT REMOVE THE ASH TRAY IF IT CONTAINS HOT COALS.KEEP THE SMOKER A MINIMUM OF 10 FT. AWAY FROM BUILDINGS,STRUCTURES, ANY FLAMMABLE ITEMS AND VEHICLES.NEVER USE THE SMOKER UNDER COVERED PORCHES, AWNINGS, LOWHANGING TREE BRANCHES, TRELLIS, OR OVERHANGS OF ANY KIND.NEVER USE INSIDE ENCLOSED AREAS SUCH PATIOS, GARAGES,ENCLOSED ROOMS, BUILDINGS OR TENTS.ALWAYS USE THE SMOKER ON A HARD, STABLE AND LEVEL SURFACE.THE SMOKER IS FOR ADULT USE ONLY.WARNING! NEVER USE GASOLINE, ALCOHOL OR VOLATILE FLUIDS TOSTART OR RESTART FIRES. USE CHARCOAL LIGHTER FLUID ONLY TOSTART CHARCOAL. READ AND FOLLOW CHARCOAL LIGHTER FLUIDMANUFACTURER INSTRUCTIONS CLOSELY.KEEP CHILDREN AND PETS AWAY WHILE THE SMOKER IS BEING USED.MITTENS OR GLOVES WILL BE NEEDED TO OPEN THE LIDS AS SURFACESWILL BE HOT.MOST SURFACES OF THIS SMOKER BECOME HOT, USE CAUTION.DO NOT MOVE THE SMOKER WHILE IT IS BEING USED.DO NOT LEAVE UNATTENDED AT ANY TIME WHILE IN USE.DO NOT USE IN WINDY CONDITIONS.USE CAUTION WHEN OPENING THE LID AS HOT STEAM OR A FLARE UPCOULD CAUSE BURNS.BEFORE EACH USE, MAKE SURE THE SMOKER IS IN GOOD WORKINGCONDITION.FOR LONGER PRODUCT LIFE, KEEP THE WOOD FIRES TO A RESPECTABLESIZE, DO NOT OVERLOAD.DO NOT ALLOW CHARCOAL TO COME IN CONTACT WITH THE SMOKERSIDES.ALLOWING THE CHARCOAL TO CONTACT THE SMOKER SIDESWILL GREATLY REDUCE THE LIFE OF THE METAL AND THE FINISH.DO NOT ALTER THE SMOKER IN ANY WAY.DO NOT USE THE SMOKER UNTIL IT IS COMPLETELY ASSEMBLED WITHALL PARTS SECURELY TIGHTENED.DO NOT STORE FLAMMABLE ITEMS ON THE BOTTOM SHELF.DO NOT USE WITHOUT A GREASE CAN IN PLACE.THE FRONT SHELF CAN HOLD 10 LBS. SAFELY, DO NOT PUT MORE THAN10 LBS. ON THE FRONT SHELF.DO NOT LEAN OR PUSH DOWN ON THE SHELVES.USE CAUTION AFTER THE FIRE HAS BEEN EXTINGUISHEDSURFACES WILLREMAIN HOT FOR SOME TIME.BE SURE ALL COALS ARE COLD BEFORE DISPOSING.DISPOSE OF COALS PROPERLY.THE SMOKER MUST BE COMPLETELY COOLED OFF AND ALL EMBERSMUST BE EXTINGUISHED BEFORE ANY COVER CAN BE USED.FOOD SAFETY RAW MEAT AND POULTRY HAS TO BE KEPT SEPARATE FROMREADY TOEAT FOOD. USE CLEAN PLATTERS AND UTENSILS FOR HANDLING COOKED FOODS. COOK POULTRY AND MEATS THOROUGHLY TO KILL BACTERIA. USE INSTANT-READ THERMOMETER TO ENSURE PROPER INTERNALFOOD TEMPERATURES. KEEP PREPARED FOOD AND LEFTOVERS REFRIGERATED. WASH HANDS, UTENSILS AND SURFACES WITH SOAP AND HOT WATERPRIOR TO AND AFTER HANDLING RAW MEAT AND POULTRY.CARBON MONOXIDE HAZARD!BURNING WOOD OR CHARCOALPRODUCES CARBON MONOXIDE,WHICH HAS NO ODOR AND CANCAUSE DEATH IF BURNED IN ENCLOSED AREAS. NEVER BURN WOODOR CHARCOAL INSIDE HOMES,VEHICLES, TENTS OR ANY OTHERENCLOSED AREAS.Fuels used in wood or charcoalburning appliances, and the products of combustion of such fuels,can expose you to chemicalsincluding carbon black, which isknown to the state of the California to cause cancer, and carbonmonoxide, which is known to thestate of the California to causebrith defects or other reproductive harm. For more informationgo to: www.P65Warnings.ca.gov.HARDWARE AND PART LISTINGWhen unpacking the smoker from the carton, make sure you find andbecome familiar with all the parts listed below. Use caution as some partsmay have sharp edges.
8272615251622AB23PACKINGLISTCDE24FGPart No.DescriptionQty.Part No.DescriptionQty.1Warming Net Racks221Leg Connect22Warming Net122Bottom Tables23Cooking Grills323Wheel Axle14M6x16M6x45 GratesCharcoal5M6x12 3 M12Temperature6x Set 27x12x Gauge12x24M6M6Φ6 LegsWheel22537x4xWheels2x2Body Support R16Temperature Gauge1267Smoke Stack Damper127Air Shutter18Smoke Stack128Firebox Side Door19Side Handle129Firebox Down110Grease Cup Holder130Door Holders23
Tools needed:Phillips screwdriverAdjustable wrenchC1.ECM6x12 4xEM6 4x222112142.241512143.2442116
4.22265.AEAM6x45 8xEM6 8x135
6.DM12 2x2523D7.625
8.CM6x12 2xEM6 2x19CE199.AM6x45 4xEM6 4x10.AE19107
11.19CM6x12 4xEM6 4xEC912.7CM6x12 4xEM6 4x8C3819E8
13.30GGΦ6 2xEM6 2x29EE14.BM6x16 6xEM6 6x3129B15.CM6x12 1xEM6 1xC3431E9
16.CM6x12 2x31C1917.311918.C31M6x12 4xC10
19.CM6x12 2xEM6 2x26CE293220.CM6x12 2xC3321.11
622.1823.C5M6x12 2xC1724.191218
25.28FM6 4x27F26.27.3713
28.1129.2030.101411
31.234363515
16
IMPORTANT! CURE PROCESSPrior to the first use, follow these 3 steps to cure the finish as wellas rid the smoker of paint odor.STEP 1:Remove all the cooking grates. Close the air vent and lightly coat ALLINTERIOR surfaces with vegetable oil. This can be done by wiping thevegetable oil on with a clean rag or with vegetable oil spray. Coat allinterior sides of the cooking chamber and offset smoker firebox. It is notnecessary to coat the charcoal or cooking grates for the cure process.STEP 2:Start the first fire with 1.1 lbs. of charcoal in the offset smoker firebox and3.3 lbs. of charcoal in the cooking chamber. NEVER allow any charcoal totouch any of the sides. Charcoal must be used for the curing process. Donot use firewood or wood chunks. Adjust the vent and chimney damper tofull open. After the coals have ashed over, close the lids.STEP 3:Maintain the coals for 1 hour keeping the lids closed as much as possible.The temperature gauge should be above 300 F degrees but not morethan 450 F. After 1 hour of heat, allow the smoker to cool completelyon its own.IMPORTANT!It is important not to scrape or rub any surface during the curing process.The smoker is ready to be used after the cure process has been completed.The smoker is ready to be used after the cure process has beencompleted.GRILL OPERATING INSTRUCTIONSThis grill becomes very hot andpossibly the handles. Use cautionworking around the grill. Use mittens or oven gloves when openingthe lids or adjusting the vent orchimney damper during use.1. Pour the desired amount (3.3 lbs.) of charcoal onto the cookingchamber charcoal grates.2. Do not allow charcoal to come in contact with the sides.3. Adjust the vent and chimney damper to full open and keep the lidopen.4. Light charcoal according to the charcoal manufacturer instructions.5. After the flames have disappeared from the charcoal (about 10-15minutes), check to see that the charcoal has ashed over (turned gray)and the initial starter odors are gone.6. Adjust the charcoal or spread the charcoal evenly across the charcoalgrates if necessary.7. The optimum cooking temperature is 300 350 F degrees. The ventand chimney damper will need to be adjusted more open or moreclosed for the desired temperature. The type charcoal and the climateconditions can affect the grill temperature.8. Carefully wipe the cooking grate surfaces with vegetable oil to keepthe food from sticking.9. Add meat and food as desired to the cooking grates. Cook food to yourpersonal preference.10. Add charcoal or wood as needed.OPTIONAL:If preferred, small wood chunks can be added to the charcoal at this timefor flavor and smoke. The smoke will be heavy at first and after a shortwhile will burn with less smoke. The temperature will spike when thewood is first added. As a general rule, you will need to add more woodor charcoal when the temperature drops below 250 degrees. Do not usemore than 3 or 4 wood chunks at a time. DO NOT ALLOW THE WOODCHUNKS TO TOUCH OR COME IN CONTACT ON ANY SIDE OF THE COOKINGCHAMBER.OFFSET SMOKER FIREBOX OPERATING INSTRUCTIONSThis smoker becomes very hot andpossibly the handles. Use cautionworking around the smoker. Usemittens or oven gloves when opening the lids or adjusting the ventor chimney damper during use.The fire is in the offset smoker firebox and the food is cooked in thesmoker chamber (main barrel). The smoke and indirect heat pass throughthe opening between the offset smoker firebox and the smoker chamber.Follow these steps for cooking with smoke and indirect heat. Note thatmost food needs longer to cook (several hours) with this method. Theseare the basic instructions.1. Pour the desired amount (2.5 lbs.) of charcoal onto the offset smokerfirebox charcoal grate and light the charcoal according to the charcoalmanufacturer instructions. DO NOT ALLOW ANY CHARCOAL TO TOUCHTHE PANEL SIDES.2. Adjust the vent and chimney damper to full open and keep the offsetsmoker firebox lid open.3. Light charcoal according to the charcoal manufacturer instructions.4. After the flames have disappeared from the charcoal (about 10-15minutes), check to see that the charcoal has ashed over (turned gray)and the initial starter odors are gone.5. Adjust the charcoal or spread the charcoal evenly across the charcoalgrates if necessary.6. Now carefully add about 1-2 lbs. of wood chunks to the fire. Note! Keepall wood chunks away from the firebox side panels. DO NOT ALLOWANY WOOD TO TOUCH THE PANEL SIDES. The best types of wood forflavor and smoke are pecan, hickory and mesquite. The smoke will beheavy at first and after a short while will burn with less smoke.7. Carefully wipe the cooking grate surfaces with vegetable oil to keepthe food from sticking.8. When the smoker chamber temperature reaches 220 250 degrees,add meat and food as desired to the cooking grates. Cook food to yourpersonal preference.9. Adjust the vent and chimney damper as needed to control thetemperature in the smoker chamber.10. As a general rule, you will need to add more wood when thetemperature drops below 200 degrees. 1-2 lbs of wood will burn forabout 1 hour. Each pound of meat will take 1 hour to cook. These aregeneral rules and will vary depending on your actual conditions.17
FOOD TEMPERATURESIf you are unsure about when food is done, use this chart as a guide for measuring properly cooked meat temperatures.Use a high quality meat thermometer with probe to measure the meat temperature. Push probe into the thickest part of the meat to get an accuratemeasurement. The temperature gauge on the grill measures the air temperature of the grill cooking chamber, not the food temperature.Steaks & RoastsMedium rare. 145 F (63 C)Medium. 160 F (71 C)Well done. 170 F (77 C)BisonMedium Rare. 145 F (63 C)Medium. 160 F (71 C)Well Done. 170 F (77 C)Lamb:Medium Rare. 145 F (63 C)Medium. 160 F (71 C)Well Done. 170 F (77 C)Ground Meats:Beef, Pork. 160 F (71 C)Turkey. 165 F (74 C)Pork:Medium. 160 F (71 C)Well Done. 165 F (74 C)Poultry:Chicken . 165 F (74 C)Turkey . 165 F (74 C)Fish. 145 F (63 C)Egg Dishes. 160 F (71 C)If you still have questions, please see the USDA contact info below.USDA Meat and Poultry Hotline1-888-674-6854TTY: 1-800-256-7072www.IsItDoneYet.gov18
!!WARNING!!NEVER USE GASOLINE,ALCOHOL OR VOLATILEFLUIDS TO START ORRESTART FIRES.!!!!HOT!!!!WARNING!HOT SURFACES DURINGUSE! USE MITTENS ORGLOVES ON THESE PARTS.AVAILABLEACCESSORIES!HOT SURFACESDURING USE!HANDLES BECOMEWARM TO HOT WITHEXETENDED USE.!!!COVERMODEL 15726This high quality cover keeps out the elements.Please visit our website at:www.landmann-usa.com-ORCall customer service toll free at:1-800-321-3473Congratulations on your purchase ofthe Heavy-Duty Barrel Smoker! AtLandmann USA, we strive to provide youwith an easy to use, easy to assembleproduct. However, in the unlikely eventyour package should have a missing ordefective part, please contact us 57 M-F 8-5 ET.Proof of purchase may be required.Thank you!!!SHELF MAY GET HOT DURING USE.!!!!!!Landmann USA, Inc.7405 Graham Rd, Fairburn, Ga 302130www.landmann-usa.comMade in China19
Replacement 2914282726152516222324PACKING LIST20Part No.DescriptionQty.Part No.DescriptionQty.1Warming Net Racks221Leg Connect22Warming Net122Bottom Tables23Cooking Grills323Wheel Axle14Charcoal Grates324Wheel Legs25Temperature Gauge Set125Wheels26Temperature Gauge126Body Support R1
Part DescriptionQTYPart #Part Description1Warming Rack Bracket2VN0001Parts not shownQTYPart #2Warming Rack1VN00023Main Cooking Grate3VN0003Instruction manual1VN00394Main Charcoal Grate3VN0004Hardware pack1VN00405Logo plate1VN00056Temperature gauge1VN00067Chimney Cap1VN00078Chimney1VN00089Side Handle1VN000910Grease Cup Holder1VN001011Grease Cup1VN001112Cart Leg Corner LR/RF2VN001213Cart Brace Left1VN001314Cart Leg Corner LF/RR2VN001415Cart Leg Left Rear1VN001516Cart Leg Left Front1VN001617Grill Lid Handle1VN001718Grill Lid1VN001819Grill Firebox1VN001920Front Shelf1VN002021Cart Leg Center2VN002122Cart Base Panel2VN002223Axle1VN002324Cart Leg Right2VN002425Wheel2VN002526Cart Brace Right1VN002627Smoker Box Vent Screen1VN002728Smoker Box Vent1VN002829Smoker Box Bottom1VN002930Smoker Box Vent Holder2VN003031Smoker Box Top1VN003132Smoker Box Lid1VN003233Smoker Box Lid Handle1VN003334Smoker Box Lid Stop1VN003435Smoker Box Charcoal Grate2VN003536Smoker Box Cooking Grate2VN003637Smoker Box Ash Shield1VN003738Chimney Gasket1VN003821
LIMITED WARRANTYLandmann USA (“Landmann”) warrants that this product shall be free of defects in material and workmanship to the original purchaser for 2years on all parts. This limited warranty is made exclusively to the original customer presenting proof of purchase. This warranty is limited tonon-commercial residential use only. Any returned goods must be shipped prepaid.This warranty does not cover normal wear of parts or damage resulting from any of the following: negligence, abuse, misuse, alteration,improper installation, improper maintenance or failure to perform normal maintenance, or any use contrary to operating instructions.Furthermore, Landmann does not warrant in any way the finish of the product or cover damage or deterioration due to any normal or severeweather conditions or to any chemical exposure. These warranties do not cover surface scratches, rust or heat damage, which is considered to benormal wear. These warranties exclude liability for any indirect, incidental consequential damages or loss of property of any nature.Do not return product or any parts to the store or ship to the manufacturer without written authorization.Contact Customer Service at: 1-877-3GRILLS (1-877-347-4557) or grills@landmann-usa.com. Any returned products or parts must be returnedpostage prepaid.These warranties are limited to non-commercial residential use only.Product repair or replacement as provided under this warranty is your exclusive remedy. Landmann shall not be liable for any incidental orconsequential damages or breach of any express or implied warranty on this product or any part thereof, except to the extent prohibited byapplicable law. Some states do not allow the exclusion or limitation of incidental or consequential damages, or allow limitation on how long animplied warranty lasts, therefore, the above limitation or exclusion may not apply to you. This warranty gives you specific legal rights, and youmay also have other rights, which vary, from state to state.22
Vinson 200Instructions de montage et de service!LIRE TOUTES LES RÈGLES POUR LE BON FONCTIONNEMENT ET LA SÉCURITÉ ALIMENTAIRE AVANT UTILISATION.1frVersion :Date :Édition :480511#201812/17li
LIRE EN PREMIER LIEU ! RÈGLES POUR LEFONCTIONNEMENT SÛR DU FUMOIRULTRA-RÉSISTANT EN FÛT. LE FUMOIR EST CONÇU POUR UNE UTILISATION EN EXTÉRIEURUNIQUEMENT ! NE PAS UTILISER SANS LE BAC À CENDRES EN PLACE. NE PAS RETIRER LE BAC À CENDRES S'IL CONTIENT DES CHARBONSCHAUDS. TENIR LE FUMOIR À UN MINIMUM DE 10 PIEDS DE DISTANCE DESBÂTIMENTS, STRUCTURES, OBJETS INFLAMMABLES ET VÉHICULES. NE JAMAIS UTILISER LE FUMOIR SOUS DES PORCHES COUVERTS, DESAUVENTS, DES BRANCHES BASSES, DES TREILLIS OU DES SURPLOMBSDE TOUT TYPE. NE JAMAIS UTILISER DANS DES ZONES FERMÉES TELLES QUE DESPATIOS, DES GARAGES, DES PIÈCES FERMÉES, DES BÂTIMENTS OU DESTENTES. TOUJOURS UTILISER LE FUMOIR SUR UNE SURFACE SOLIDE, STABLE ETPLANE. LE FUMOIR EST CONÇU POUR UNE UTILISATION PAR DES ADULTESUNIQUEMENT. AVERTISSEMENT ! NE JAMAIS UTILISER D'ESSENCE, D'ALCOOL OU DEFLUIDES VOLATILS POUR ALLUMER OU RALLUMER UN FEU. UTILISERDE L'ALLUME-FEU LIQUIDE POUR CHARBON UNIQUEMENT POURALLUMER DU CHARBON. LIRE ET RESPECTER RIGOUREUSEMENT LESINSTRUCTIONS DU FABRICANT DE L'ALLUME-FEU LIQUIDE POURCHARBON. TENIR LES ENFANTS ET LES ANIMAUX À L'ÉCART LORSQUE LE FUMOIREST UTILISÉ. DES GANTS OU DES MANIQUES SERONT NÉCESSAIRES POUR OUVRIR LESCOUVERCLES CAR LES SURFACES SERONT CHAUDES. LA PLUPART DES SURFACES DE CE FUMOIR DEVIENNENT BRÛLANTES,RESTER VIGILANT. NE PAS DÉPLACER LE FUMOIR LORSQU'IL EST UTILISÉ. NE LAISSER SANS SURVEILLANCE À AUCUN MOMENT LORS DEL'UTILISATION. NE PAS UTILISER EN CAS DE VENT. RESTER VIGILANT LORS DE L'OUVERTURE DU COUVERCLE CAR DE LAVAPEUR CHAUDE OU UNE FLAMBÉE POURRAIT CAUSER DES BRÛLURES. AVANT CHAQUE UTILISATION, S'ASSURER QUE LE FUMOIR EST EN BONÉTAT DE FONCTIONNEMENT. POUR UNE PLUS LONGUE DURÉE DE VIE DU PRODUIT, MAINTENIR LESFEUX DE BOIS À UNE AMPLEUR RESPECTABLE, NE PAS SURCHARGER. NE PAS LAISSER DU CHARBON ENTRER EN CONTACT AVEC LES PAROISDU FUMOIR. LAISSER DU CHARBON ENTRER EN CONTACT AVEC LES PAROIS DUFUMOIR RÉDUIRA GRANDEMENT LA DURÉE DE VIE DU MÉTAL ET LA FINITION. NE PAS MODIFIER LE FUMOIR DE QUELQUE FAÇON QUE CE SOIT. NE PAS UTILISER LE FUMOIR JUSQU'À CE QU'IL SOIT COMPLÈTEMENTMONTÉ AVEC TOUTES LES PIÈCES FERMEMENT SERRÉES. NE PAS ENTREPOSER D'OJETS INFLAMMABLES SUR LA TABLETTEINFÉRIEURE. NE PAS UTILISER SANS UN BIDON À GRAISSE EN PLACE. LA TABLETTE AVANT PEUT SUPPPORTER 10 LIVRES EN TOUTE SÉCURITÉ,NE PAS PLACER PLUS DE 10 LIVRES SUR LA TABLETTE AVANT. NE PAS SE PENCHER OU S'APPUYER SUR LES TABLETTES. RESTER VIGILANT UNE FOIS QUE LE FEU A ÉTÉ ÉTEINT. DES SURFACESRESTENT CHAUDES PENDANT UN CERTAIN TEMPS. S'ASSURER QUE TOUS LES CHARBONS SONT FROIDS AVANT DE LESÉLIMINER. ÉLIMINER LES CHARBONS CORRECTEMENT. LE FUMOIR DOIT ÊTRE COMPLÈTEMENT REFROIDI ET TOUTES LESBRAISES DOIVENT ËTRE ÉTEINTES AVANT D'UTILISER UNE HOUSSE DEPROTECTION.24SÉCURITÉ ALIMENTAIRE LA VIANDE ET LA VOLAILLE CRUES DOIVENT ÊTRE SÉPARÉES DE LANOURRITURE PRÊTE À ÊTRE MANGÉE. UTILISER DES PLATS ET USTENSILES PROPRES POUR MANIPULER LANOURRITURE CUITE. BIEN CUIRE LA VOLAILLE ET LA VIANDE POUR TUER LES BACTÉRIES. UTILISER UN THERMOMÈTRE À LECTURE INSTANTANÉE POUR ASSURERDES TEMPÉRATURE DE VIANDE INTERNES CORRECTES. GARDER LA NOURRITURE PRÉPARÉE ET LES RESTES AU RÉFRIGÉRATEUR. SE LAVER LES MAINS AINSI QUE LES USTENSILES ET LES SURFACES AUSAVON ET À L'EAU CHAUDE AVANT ET APRÈS LA MANIPULATION DEVIANDE ET VOLAILLE CRUES.RISQUE DE MONOXYDE DE CARBONE !LE BOIS OU LE CHARBON QUIBRÛLE PRODUIT DU MONOXYDEDE CARBONE, QUI EST INODORE ETPEUT ENTRAÎNER LA MORT S'IL ESTBRÛLÉ DANS DES ZONES FERMÉES.NE JAMAIS BRÛLER DE BOIS OU DECHARBON DANS DES MAISONS,DES VÉHICULES, DES TENTES OUD'AUTRES ZONES FERMÉES.Les combustibles utilisés dans lesappareils de combustion de boisou de charbon et les produits decombustion de tels combustiblespeuvent vous exposer à des substances chimiques, y compris lenoir de carbone, qui est reconnuen Californie comme cause decancer, et le monoxyde de carbone, qui est reconnu en Californiecomme cause de malformationscongénitales et d'autres anomalies de l'appareil reproducteur.Pour plus d'informations, consulter : www.P65Warnings.ca.gov.LISTE DU MATÉRIEL ET DES PIÈCESLors du déballage du fumoir du carton, s'assurer de trouver et de sefamiliariser avec toutes les pièces listées ci-dessous. Rester vigilant carcertaines pièces peuvent avoir des bords tranchants.
8272615251622AB23PACKINGLISTCDE24FGPart No.DescriptionQty.Part No.DescriptionQty.1Warming Net Racks221Leg Connect22Warming Net122Bottom Tables23Cooking Grills323Wheel Axle14M6x16M6x45 GratesCharcoal5M6x12 3 M12Temperature6x Set 27x12x Gauge12x24M6M6Φ6 LegsWheel22537x4xWheels2x2Body Support R16Temperature Gauge1267Smoke Stack Damper127Air Shutter18Smoke Stack128Firebox Side Door19Side Handle129Firebox Down110Grease Cup Holder130Door Holders225
Outils requis :Tournevis PhillipsClé à molette réglableC1.ECM6x12 4xEM6 4x222112142.241512143.24262116
4.22265.AEAM6x45 8xEM6 8x1327
6.DM12 2x2523D7.2825
8.CM6x12 2xEM6 2x19CE199.AM6x45 4xEM6 4x10.AE191029
11.19CM6x12 4xEM6 4xEC912.7CM6x12 4xEM6 4x8C3819E30
13.30GGΦ6 2xEM6 2x29EE14.BM6x16 6xEM6 6x3129B15.CM6x12 1xEM6 1xC3431E31
16.CM6x12 2x31C1917.311918.C31M6x12 4xC32
19.CM6x12 2xEM6 2x26CE293220.CM6x12 2xC3321.33
622.1823.C5M6x12 2xC1724.193418
25.28FM6 4x27F26.27.3735
28.1129.2030.103611
31.234363537
38
IMPORTANT ! PROCESSUS DE TRAITEMENTAvant la première utilisation, suivre ces 3 étapes pour traiter lafinition et éliminer l'odeur de peinture du fumoir.ÉTAPE 1 :Retirer toutes les grilles de cuisson. Fermer l'aération et enduirelégèrement TOUTES les surfaces INTÉRIEURES d'huile végétale. Cela peutêtre effectué en appliquant l'huile végétale avec un chiffon propre ou avecun pulvérisateur d'huile végétale. Enduire toutes les parois intérieures dela chambre de cuisson et du foyer décalé du fumoir. Il n'est pas nécessaired'enduire le charbon ou les grilles de cuisson pour le processus detraitement.ÉTAPE 2 :Allumer le premier feu avec 1,1 livres de charbon dans le foyer décalé dufumoir et 3,3 livres de charbon dans la chambre de cuisson. Ne JAMAISlaisser du charbon entrer en contact avec l'une des parois. Du charbon doitêtre utilisé pour le processus de traitement. Ne pas utiliser de bois à brûlerou de morceaux de bois. Régler le clapet de cheminée et d'aération surouverture complète. Une fois les braises brûlées, fermer les couvercles.ÉTAPE 3 :Maintenir les braises pendant 1 heure en gardant les couvercles fermésautant que possible. La jauge de température doit être supérieure à300 F sans toutefois dépasser 450 F. Après 1 heure de chauffe, laisser lefumoir refroidir complètement par lui-même.IMPORTANT !Il est important de ne pas racler ou frotter une surface pendant leprocessus de traitement.Le fumoir est prêt à être utilisé une fois le processus de traitementterminé.Le fumoir est prêt à être utilisé une fois le processus detraitement terminé.INSTRUCTIONS DE SERVICE DU GRIL1.2.3.4.5.6.7.8.Ce gril devient brûlant, ainsiqu'éventuellement les poignées.Rester vigilant lors du travail autourdu gril. Utiliser des gants de cuisineou des maniques lors de l'ouverturedes couvercles ou du réglage duclapet de cheminée ou d'aérationpendant l'utilisation.Verser la quantité de charbon souhaitée (3,3 livres) sur les grilles àcharbon de la chambre de cuisson.Ne pas laisser du charbon entrer en contact avec les parois.Régler le clapet de cheminée et d'aération sur ouverture complète etlaisser le couvercle ouvert.Allumer le charbon selon les instructions du fabricant du charbon.Une fois que les flammes ont disparu du charbon (environ 10 à 15minutes), vérifier que le charbon a brûlé (devenu gris) et que lesodeurs d'allumage initiales sont parties.Ajuster le charbon ou répartir le charbon uniformément sur les grillesà charbon si nécessaire.La température optimale de cuisson est comprise entre 300 et 350 F.Le clapet de cheminée et d'aération doit être réglé plus ouvert ouplus fermé pour la température souhaité. Le type de charbon et lesconditions climatiques peuvent affecter la température du gril.Essuyer minutieusement les surfaces de grille de cuisson avec del'huile végétale pour empêcher la nourriture d'adhérer.9. Ajouter la quantité de viande et de nourriture souhaitée sur les grillesde cuisson. Faire cuire la nourriture à sa convenance personnelle.10. Ajouter du charbon ou du bois si nécessaire.EN OPTION :Si désiré, il est possible d'ajouter des petit morceaux de bois au charbonà ce moment-là pour plus d'arômes et de fumée. La fumée sera épaissedans un premier temps, puis fumera moins après un court moment. Latempérature monte en flèche lorsque le bois est ajouté pour la premièrefois. En général, il est nécessaire d'ajouter plus de bois ou de charbonlorsque la température chute à moins de 250 degrés. Ne pas utiliser plusde 3 ou 4 morceaux de bois à la fois. NE PAS LAISSER LES MORCEAUX DEBOIS TOUCHER OU ENTRER EN CONTACT AVEC UNE PAROI DE LA CHAMBREDE CUISSON.INSTRUCTIONS DE SERVICE DU FOYER DÉCALÉ DU FUMOIRCe fumoir devient brûlant, ainsiqu'éventuellement les poignées.Rester vigilant lors du travail autourdu fumoir. Utiliser des gants decuisine ou des maniques lors del'ouverture des couvercles ou duréglage du clapet de cheminée oud'aération pendant l'utilisation.Le feu se trouve dans le foyer décalé du fumoir et la nourriture est cuitedans la chambre du fumoir (fût principal). La fumée et la chaleur indirectepassent par l'orifice entre le foyer décalé du fumoir et la chambre defumoir. Suivre ces étapes pour la cuisson avec fumée et chaleur indirecte.Noter que la plupart des aliments doivent cuire plus longtemps (plusieursheures) avec cette méthode. Il s'agit des instructions de base.1. Verser la quantité souhaitée de charbon (2,5 livres) sur la grille àcharbon du foyer décalé du fumoir et allumer le charbon selon lesinstructions du fabricant du charbon. NE PAS LAISSER LE CHARBONTOUCHER LES CÔTÉS DES PANNEAUX.2. Régler le clapet de cheminée et d'aération sur ouverture complète etlaisser le couvercle du foyer décalé du fumoir ouvert.3. Allumer le charbon selon les instructions du fabricant du charbon.4. Une fois que les flammes ont disparu du charbon (environ 10 à 15minutes), vérifier que le charbon a brûlé (devenu gris) et que lesodeurs d'allumage initiales sont parties.5. Ajuster le charbon ou répartir le charbon uniformément sur les grillesà charbon si nécessaire.6. Ajouter ensuite avec précaution environ 1 à 2 livres de morceaux debois dans le feu. Remarque ! Tenir tous les morceaux de bois à l'écartdes panneaux latéraux du foyer. NE PAS LAISSER LE BOIS TOUCHER LESCÔTÉS DES PANNEAUX. Les meilleurs types de bois pour les arômeset la fumée sont le pacanier, le caryer et le mesquite. La fumée seraépaisse dans un premier temps, puis fumera moins après un courtmoment.7. Essuyer minutieusement les surfaces de grille de cuisson avec del'huile végétale pour empêcher la nourriture d'adhérer.8. Lorsque la température de la chambre du fumoir atteint 220 à250 degrés, ajouter la quantité de viande et de nourriture souhaitéesur les grilles de cuisson. Faire cuire la nourriture à sa convenancepersonnelle.9. Régler le clapet de cheminée et d'aération comme nécessaire pourgérer la température dans la chambre du fumoir.10. En général, il est nécessaire d'ajouter plus de bois lorsque latempérature chute à moins de 200 degrés. 1 à 2 livres de boisbrûlent pendant environ 1 heure. Chaque livre de viande prend 1heure à cuire. Il s'agit de règles générales qui varient en fonction desconditions réelles.39
TEMPÉRATURES DE LA NOURRITUREEn cas de doute quant à la cuisson de la viande, utiliser ce diagramme comme guide pour mesurer correctement les températures de viande cuite.Utiliser un thermomètre à viande de grande qualité avec une sonde pour mesurer la température de la viande. Enfoncer la sonde dans la partie la plusépaisse de la viande pour obtenir une mesure précise. La jauge de température sur le gril mesure la température de l'air de la chambre de cuisson du gril,et non la température de la nourriture.Steaks et rôtisSaignant.145 F (63 C)À point.160 F (71 C)Bien cuit.170 F (77 C)BisonSaignant.
Vinson 200 Version: 480511 DateD: #2018 eDition: 12/17li 1E n Assembly and operating manual! PLEASE READ ALL RULES FOR SAFE OPERATION AND FOOD SATETY BEFORE USING. Français p. 23 Español p. 46. 2 READ FIRST! RULES FOR HEAVY-DUTY BARREL SMOKER SAFE OPERATION. FOOD SAFETY