Transcription
IT Communication and SupportCASCADE ServerContent Management SystemCreated: 9/29/2014 Revised: 5/28/2020
2Table of ContentsAccessing Cascade . 4Dashboard and Widgets . 5To Add an Item to the Dashboard: . 5To Configure or Remove a Widget: . 6To Move a Widget: . 6To reset the Dashboard: . 6Google Analytics: . 7Workflow and Publishing. 8Author To Start Workflow: . 8Publisher To Publish an Asset: . 9Creating a New Page. 10To Create a Page: . 10Uploading and Using Images . 11To Upload an Image: . 11To Insert an Image on a Page: . 11To Insert a Slideshow (or Banner) on a Page: . 12To Insert a Top Image on a Page: . 12Creating Links and Anchors . 13To Create a Link: . 13To Insert a Hyperlink on a Page: . 13To Insert Hyperlinks Referencing Specific PDF Pages: . 14To Link to an Anchor on a Page: . 15Inserting Tables . 16To insert a Table: . 16To Insert a Table Created in Word: . 16Editing, Moving, and Copying . 17To Edit an Asset: . 17To Move or Rename an Asset: . 17To Copy an Asset: . 18Deleting and Restoring Assets . 19To Delete an Asset:. 19To Restore a Deleted Asset: . 19To Restore an Asset to a Previous Version: . 20
3Locking and Unlocking Assets . 21To Lock an Asset: . 21To View Locked Assets:. 21To Unlock an Asset:. 22Embedding Videos. 23To Embed a YouTube Video: . 23Editing ‘Our-Team’ and ‘ Info Page’ . 24To Edit the our-team Page: . 24To Edit the info Page: . 25Creating and Uploading Forms . 26To Upload a Form: . 26To Edit Contact Us Form: . 27To Create an Interactive Web Form: . 28
4Accessing Cascade1.Open your preferred web browser. (Chrome, Firefox, IE, Safari, etc.)2.Access the server using either of the following URL’s: On-Campus: link.valdosta.edu Off-Campus: https://link.valdosta.edu3.Login using your MyVSU credentials.
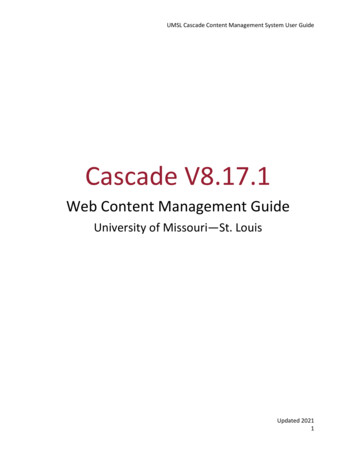
5Dashboard and WidgetsDefault Dashboard ViewCascade provides end-users with a customizableDashboard and useful widgets.To Add an Item to the Dashboard:1.Click the Add Widget button in the upper-left corner of the Dashboard.2.Choose the widget you would like to have appear on the Dashboard.3.Select the ( ) button.4.Click the Save Settings button.
6To Configure or Remove a Widget:1.Select the Edit Icon located in the top right corner of the widget you would like tochange or remove.2.Select the appropriate option from the drop-down menu.3.Click anywhere outside of the widget to exit the drop-down menu. Your changeswill be implemented automatically.To Move a Widget:Hover mouse over the grey box area where the name of the widget appears. Oncethe mouse becomes a four-arrowed icon, drag and drop the widget to move it.To reset the Dashboard:Select the Reset Dashboard button in the upper-left section of the Dashboardscreen. This will return the Dashboard to its default view.
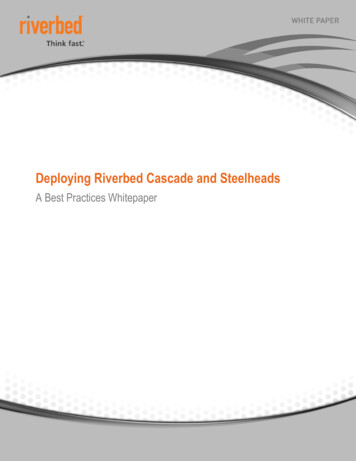
7Google Analytics:The Analytic widget provides a graphical snapshot of the traffic to your site viaUnique Visitors and Pageviews for a day, week, month, or year.Unique visitors refers to the number ofdistinct individuals requesting pagesfrom the website during a given period,regardless of how often they visit. Visitsrefers to the number of times a site isvisited, no matter how many uniquevisitors make up those sessions. Whenan individual goes to a website onTuesday, then again, on Wednesday, thisis recorded as two visits from one visitor.Source: WikipediaA Pageview is an instance of a page/filebeing loaded by a browser. ThePageviews metric is the total number ofpages viewed; repeated views of a singlepage are also counted.Source: Google Analytics
8Workflow and PublishingWhether a user is a Publisher, or an Author willdetermine their workflow options. Authors can create,edit, and submit assets for approval. Authors do nothave the ability to publish assets without first starting aworkflow. Publishers can create, edit, submit, andpublish assets without starting a workflow.Author To Start Workflow:1.Once you are ready to submit your asset or changes to the asset, select PreviewDraft. *The draft will save your changes and allow you to preview them beforeofficially publishing the page.2.Select Submit to overwrite the current version and to save changes.3.If applicable, you can include comments on your changes. When you are doneediting, select Check Content & Submit.4.Click the checkmark once you have checked the entire page for mistakes anderrors.
9Publisher To Publish an Asset:1.Once the asset has been fully saved, click the Publish tab.
10Creating a New PageTo Create a Page:1.Select ( ) Add Content from the top toolbar and choose the appropriatedepartmental folder.2.Select the type of page you wish to create:Create Page with 1 Sidebar creates a page that only includes the left sidebarnavigation. Ad buttons and related resources will not show up on 1 sidebar pages.3.Enter Display Name (web page heading) and Title (end ofweb address).4.Enter Keywords, Description and Start Date.5.Select No if you do now want the page to appear in the leftsidebar navigation.6.Edit the content body and select Preview Draft when youare finished. You can also Update Draft to continueworking on it at later point in time.
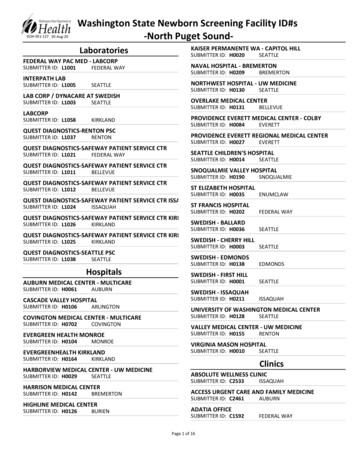
11Uploading and Using ImagesCascade allows users to upload images from external locations, such as acomputer or network drive (i.e. the V: Drive), to use on their web pages.To Upload an Image:1.Select ( ) Add Content from the top toolbar Choose appropriate departmentalfolder Upload Image.2.You can drag and drop the file into designated area or click Choose File tomanually locate it.3.If necessary, you can adjust the image. Please note that Cascade is not a photoeditor, therefore images should be edited appropriately before being uploaded.4.After the image has been uploaded, select Submit.To Insert an Image on a Page:1.In the page content body, place your cursor where you would like the image toappear.2.Select the Insert/Edit Image Icon from the toolbar.3.Choose the image type, thenselect the image or enter theimage address: For Internalimages, select image using the[Choose File] option. ForExternal images, enter the imageaddress in the Image field. *Onlyimages uploaded into Cascadewill be available from the leftfolder structure.4.Enter Image Description andselect Ok.
125.To edit, select the Insert/Edit Image Icon while the image is highlighted. Toremove the image, select the Cut Icon (or CTRL X) instead.To Insert a Slideshow (or Banner) on a Page:1.In the Slideshow section of your page, select Yesfor the Use Slideshow option.2.Click the Slideshow Banner button then selectimage using the [Choose File] option. *Optimalslideshow image dimensions are 964x320.3.Select image using the [Search] option. *Onlyimages that have been uploaded into Cascadewill be available for use.4.Enter Slide Title and Slide Caption, if applicable.To add a slideshow image, select the Plus IconTo remove a slideshow image, select the MinusIcon *For Banners, use one image. ForSlideshows, use multiple images.To Insert a Top Image on a Page:1.Use the [Search] option next to Content Top Image and locate the image you wishto use.2.In the field next to Alt Text Content Top Image, enter a brief description of theimage selected.Note: You can use either a Slideshow/Banner or a Content Top Image, not bothbecause they cannot be displayed simultaneously on the same page.
13Creating Links and AnchorsTo Create a Link:1.Select Add Content from the top toolbar andchoose the appropriate departmental folder.2.Select the link type you wish to create:Create A Common Link creates a link to aweb address. Create An External Link forLeft Navigation creates a link that willappear on left sidebar.3.Enter the Display Name and Link (web address). If youare copying and pasting the link, be sure to delete orpaste over the http:// already present in the Link field.4.Select Yes if the link is external to the VSU website(www.valdosta.edu).5.Once you have filled out the appropriate data fields,select Submit.To Insert a Hyperlink on a Page:1.Highlight the text or image you want to make ahyperlink.2.Select the Insert/Edit Link Icontoolbar.3.Choose the link type, then select the link or enterthe link address: For Internal links, select linkusing the [Choose] option. For External links,enter the link address in the Link field.4.Choose Target: Same Window will open the linkon the same page. New Window will open thelink on a separate window.5.You can use the Title field to enter a brief description of where the Link leads.from the
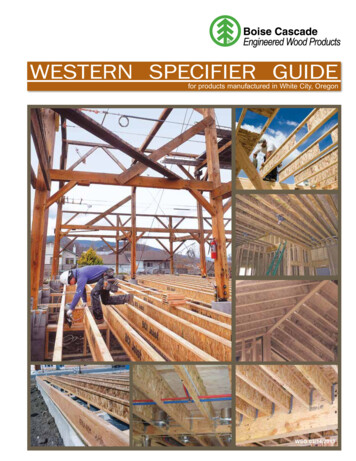
146.Once you are finished editing the linkdetails, select Insert. To edit, selectthe Insert/Edit Link Icon while thehyperlink text or image is highlighted.To remove the hyperlink, select theUnlink Icon instead.To Insert Hyperlinks Referencing Specific PDF Pages:Make sure the PDF document you wish to link has been uploaded into Cascadebefore attempting the following steps 1.Highlight the text or image you want to make a hyperlink.2.Select the Insert/Edit Link Icon3.If not already selected, choose Internal as the link type.4.In the Link field, select the PDF document you would like to reference.5.In the Anchor field, specify the page numberyou would like to link to in the format page followed by the page number with no spacesbetween the characters. For example: If youwant to link to page 4 you would typepage 4.from the toolbar.Note: Whatever page number you specify inthe anchor will correspond to the pageappearing at that number in the PDF. Titlepages and tables of content may not havepage numbers but still affect the pagelocation. For example: If your document hasa title page and table of contents (respectively) followed by the document content,to link to the first page of actual content you would use page 3 instead of page 1(because page 1 would link to the title page which appears first in the PDF).6.Choose Target:Same Window will open the link on the same page. New Window will open the linkon a separate window.7.You can use the Title field to enter a brief description of where the link leads.8.Once you are finished editing the link details, select Insert or Update.
15To Link to an Anchor on a Page:1.In the page content body, place your cursor where you would like the anchor tofrom the toolbar.land. Then select the Anchor Icon2.Enter Anchor Name (without spaces) then click Ok.3.Highlight the text you would like to lead to the anchored text, then select the LinkIcon.4.In the Anchor field, enter the Anchor Name you specified in Step 3 and click Insert.The end result should look something like:
16Inserting TablesYou can create and insert tables into Cascade. Since Cascade has limitedformatting options, you can create tables in Word and insert them into Cascade.However, some formatting features in Word tables may merge when inserted intoCascade.To insert a Table:1.In the page content body, place your cursorwhere you would like the table to appear.2.Click Table from the dropdown menu.3.Highlight the number of Squares and Clickon the end square to insert the table.4.Choose the number of Squares Select Insert.To Insert a Table Created in Word:1.Create a table using Word Highlight andCopy the Table2.On the page where you would like to insertthe table, place your cursor in the contentbody where you wish to have the tableappear.3.Once you are ready to paste the table,select the Paste Icon from the toolbar (orCTRL V).4.After the table has been inserted, highlightthe table and select the Insert/Edit TableIcon.5.Select the Advanced tab Enter description of table in Summary field Update.
17Editing, Moving, and CopyingAssets are the items uploaded or created within Cascade. A few example Cascadeassets include pages, folders, images, common links, and documents.To Edit an Asset:1.Select the asset you wish to edit from the left folder structure.2.Once you have the asset opened, select the Edit tab. Make the necessary changesthen Submit.To Move or Rename an Asset:1.Select the asset you wish to copy from the left folder structure.2.Once you have the asset opened, select the More tab.Then click on the Move option.To move, choose a new Parent Folder location.To rename, enter a new System Name.3.After you have made the appropriate adjustments, click on Move.
18To Copy an Asset:1.Select the asset you wish to copy from the left folder structure.2.Once you have the asset opened, select the More tab.Then click on the Copy option.To move, choose a new Parent Folder location.3.After you have made the appropriate adjustments, click on Copy button.
19Deleting and Restoring AssetsAssets are the items uploaded or created within Cascade. Pages, folders, images,common links, documents, and forms are all considered assets.To Delete an Asset:1.Select the asset you wish to delete from the left folder structure.2.Once you have the asset opened, select the More tab Delete then Delete.Note: Deleted assets can be restored within 30 days of deletion.To Restore a Deleted Asset:1.From the Dashboard, select the Trash tab found on the left sidebar.2.Select the item(s) you wish to restore by clicking on the check mark on their left.3.Select the Gray Arrow Icon located above the asset you wish to restore. The assetwill then appear in its previous file location.
20To Restore an Asset to a Previous Version:1.Select the asset you would like to restore from the left folder structure.2.Once you have the asset opened, select the More tab Versions.3.Select the appropriate version from the list.4.Once the version preview appears select the Gray Restore Arrow Button from thetoolbar. Note: Previous Versions may not be available for every asset.
21Locking and Unlocking AssetsAssets are the items uploaded or created within Cascade. Pages, folders, images,common links, documents, and forms are all considered assets.To Lock an Asset:1.Select the asset you would like to lock.2.Once you have the asset opened, select Check-out/Lock.To View Locked Assets:1.Select My Content from the top toolbar to return to the Dashboard.2.From the Dashboard, select the Locked Assets tab.
22To Unlock an Asset:1.Select the asset you would like to unlock.2.Once you have the asset opened, select Break Lock.3.Click Ok to commit to the changes.
23Embedding VideosDepartment-created videos first must be saved to a University-approved YouTubeaccount. Contact webservices@valdosta.edu for assistance. YouTube supportsthe following file formats: .MOV, .MPEG4, .AVI, .WMV, .MPEGPS, .FLV, 3GPP, WebM.To Embed a YouTube Video:1.Select appropriate page in the folder structure Click the Edit tab.2.Place cursor in the content body at the location where you would like the video toappear.3.Click the Insert/Edit Embedded Media tool.4.Select the Embed code tab.5.In a separate browser window/tab, navigate within YouTube to the desired video.6.Click Share, then Embed.Before moving on the Step 7, make sure “Show suggested videos when the videofinishes” is not selected and “Enable privacy-enhanced mode” is selected.7.Select the embed code text (Ctrl A) Copy the code text (Ctrl C).8.In your browser, navigate back to the open Cascade Server window/tab.9.Paste (Ctrl V) the code in the Embed code box, then select the Insert/Updatebutton.
24Editing ‘Our-Team’ and ‘ Info Page’The our-team page template is used to provide department employee information,such as profile pictures, individual contact numbers and emails, office hours, etc.The info page specifies commonly used information across a department'swebsite, such as the department's name, phone numbers, addresses, etc.To Edit the our-team Page:1.Select the Our-Team page from the folder structure. Once open, select the Edittab.2.Edit the profiles. You can include as much or as little information as you want.Profile TypesDetailed: offers the option to include a profile picture, name, title, department,phone number, email address, office hours and location, web address, a biography,etc.Basic: offers the option to include name, title, phone number, and email addressonly in “cards”To use a profile picture, upload the image into Cascade (Refer to Uploading andUsing Images for details) and use the [Search] option next to Profile Image tolocate it.3.To add profiles, click the Plus Icon under the type of profile you wish to add. Toremove profiles, click the Minus Icon under the profile you wish to remove. Toreorder the list of profiles, use the Arrow Icon.
25To Edit the info Page:1.Select the info page from the folder structure. Once open, select the Edit tab.2.Edit Department Information: Enter Nameand select Header Image. To include adepartmental Contact Us form, use the[Search] option to locate the contact-usform. *Refer to Creating and UploadingForms guide for details.3.Edit Department Phone Numbers: EnterPhone Number using the format 123-4567890. Select the Phone Number Type. Toinclude another number, use the Plus Icon.4.Edit Department Physical Address: Enter thePhysical Address only if different than 1500N. Patterson St., Valdosta, GA 31698.5.Edit Ad Buttons: Enter Button Text Choose Link6.Edit Right Sidebar Links: Enter Link Text Select Link7.After editing, click on Preview Draft then Submit to finalize changes.Note: The info page cannot be published.
26Creating and Uploading FormsImportant! The forms referenced in this guide should not be used for confidentialor sensitive data such as Social Security Numbers or VSU ID (870) numbers. Formore details, refer to the university’s Information Resources Acceptable Use Policy.To Upload a Form:1.Select New from the top toolbar and choose the appropriate departmental folder.2.Select Upload PDF Form or Upload PDF Document.PDF Forms are not just forms saved as PDFs: If your form can not be filled outdirectly from the computer but instead needs to be printed first, then it is a PDFdocument.3.Enter the Display Name and Start Date.4.You can drag and drop the form into designated area or click the Choose Filebutton to manually locate it.5.After the file has been uploaded, Submit.
27To Edit Contact Us Form:1.Select the contact-us form from the folder structure. Once open, select the Edittab.2.Enter Display Name Title Keywords Description Start Date. For optionalGlobal Keywords, select the Tag Icon.3.Enter the Email Subject and Email Address to receiveresults. To include additional email addresses, use thePlus Icon.You can offer users the option to select a specificrecipient to receive their form submission. To add arecipient, use the Plus Icon. To remove a recipient, usethe Minus Icon. To adjust recipient order, use the ArrowIcon.4.Enter Form Instructions in content body.5.Enter the Form Item Field Type and Name.Text: one line for a text response. Text area: multiplelines for a text response. Password: masked text fieldhidden response. Dropdown: selection from a given listof values. Radio: selection from a given list of values.Checkbox: multiple selections from a list of values.Hidden: make response only visible in the results. File:include uploaded files in form submission. To add formitems, use the Plus Icon. To remove a form item, useMinus Icon. To adjust form item order, use Arrow Icon.Select the Required Field option to make form item arequirement. *Users will be unable to submit a formunless all required form items have been completed.6.Edit the Submit Button Text, if necessary, then enter the Form Confirmation Text(message users will receive after successfully submitting the form).
287.When you have finished editing the Interactive Web Form, select Submit. *You canalso select Save Draft to save your work without submitting the form.To Create an Interactive Web Form:1.Select Add Content from the top toolbar and choose the appropriate departmentalfolder.2.Select Create Page with Web Form.3.Enter Display Name Title Keywords Description Start Date.For optional Global Keywords, select the Tag Icon.4.Select No if you do now want the page to appear in the left sidebar navigationmenu.5.Enter the Email Subject and Email Address to receive results.To include additional email addresses, use the Plus Icon.You can offer users the option to select a specific recipient toreceive their form submission.To add a recipient, use Plus Icon. To remove a recipient, useMinus Icon. To adjust recipient order, use Arrow Icon.6.Enter Form Instructions in content body.
297.Enter the Form Item Field Type and Name.Text: one line for a text response.Text area: multiple lines for a text response.Password: masked text field hidden response.Dropdown: selection from a given list of values.Radio: selection from a given list of values.Checkbox: multiple selections from a list of values.Hidden: make response only visible in the results.File: include uploaded files in form submission.To add form items, use the Plus Icon. To remove a formitem, use Minus Icon. To adjust form item order, useArrow Icon.8.Select the Required Field option to make form item a requirement. *Users will beunable to submit a form unless all required form items have been completed.9.Edit the Submit Button Text, if necessary, then enter the Form Confirmation Text(message users will receive after successfully submitting the form).10. When you have finished editing the Interactive Web Form, select Submit. *You canalso select Save Draft to save your work without submitting the form.
You can create and insert tables into Cascade. Since Cascade has limited formatting options, you can create tables in Word and insert them into Cascade. However, some formatting features in Word tables may merge when inserted into Cascade. To insert a Table: 1. In the page content body, place your cursor where you would like the table to appear. 2.