Transcription
UPRIGHT FREEZERUse & Care GuideFor questions about features, operation/performance,parts or service, call: 1-800-253-1301.In Canada, call for assistance 1-800-807-6777,or visit our website at.www.whirlpool.com or www.whirlpool.com/canadaCONGÉLATEURVERTICALGuide d’utilisationet d’entretienAu Canada, pour assistance, composez le 1-800-807-6777.ou visitez notre site web www.whirlpool.com/canadaTable of Contents/Table des matières . 2W10326797A
TABLE OF CONTENTSFREEZER SAFETY. 3Proper Disposal of Your Old Freezer or Refrigerator . 3INSTALLATION INSTRUCTIONS . 4Unpacking. 4Location Requirements. 4Electrical Requirements . 5Freezer Door . 5Adjust the Door . 7FREEZER USE . 8Ensuring Proper Air Circulation . 8Using the Control . 8Key Eject Lock . 8FREEZER FEATURES . 9Refrigerated Shelves. 9Door Bin . 9Storage Basket . 9Storage Gate. 9FREEZER CARE . 9Cleaning Your Frost-Free Freezer . 9Base Grille. 10Defrosting and Cleaning Your Manual Defrost Freezer . 10Changing the Light Bulb. 11Power Interruptions . 11Moving Care . 11TROUBLESHOOTING . 11ASSISTANCE OR SERVICE. 13In the U.S.A. 13In Canada. 13Accessories. 13WARRANTY . 14TABLE DES MATIÈRESSÉCURITÉ DU CONGÉLATEUR. 15Mise au rebut appropriée de votrevieux congélateur ou réfrigérateur. 15INSTRUCTIONS D'INSTALLATION . 16Déballage . 16Emplacement d’installation . 16Spécifications électriques. 17Portes du congélateur . 17Ajustement de porte . 20UTILISATION DU CONGÉLATEUR . 20Pour s’assurer d’une circulation d’air appropriée . 20Utilisation de la commande . 20Serrure à éjection de clé . 21CARACTÉRISTIQUES DU CONGÉLATEUR. 21Clayettes de réfrigération. 21Balconnet de porte . 212Panier d'entreposage . 21Barrière d’entreposage. 21ENTRETIEN DU CONGÉLATEUR . 22Nettoyage du congélateur sans givre . 22Grille de la base . 22Dégivrage et nettoyage du congélateur à dégivrage manuel . 22Remplacement de l'ampoule d’éclairage. 23Pannes de courant électrique. 24Déménagement . 24DÉPANNAGE . 24ASSISTANCE OU SERVICE. 26Accessoires. 26GARANTIE. 27
FREEZER SAFETYYour safety and the safety of others are very important.We have provided many important safety messages in this manual and on your appliance. Always read and obey all safetymessages.This is the safety alert symbol.This symbol alerts you to potential hazards that can kill or hurt you and others.All safety messages will follow the safety alert symbol and either the word “DANGER” or “WARNING.”These words mean:You can be killed or seriously injured if you don't immediatelyfollow instructions.DANGERWARNINGYou can be killed or seriously injured if you don't followinstructions.All safety messages will tell you what the potential hazard is, tell you how to reduce the chance of injury, and tell you what canhappen if the instructions are not followed.IMPORTANT SAFETY INSTRUCTIONSWARNING: To reduce the risk of fire, electric shock, or injury when using your freezer, follow these basic precautions: Plug into a grounded 3 prong outlet.Do not remove ground prong.Do not use an adapter.Do not use an extension cord.Disconnect power before servicing.Replace all parts and panels before operating.Use nonflammable cleaner. Keep flammable materials and vapors, such as gasoline,away from freezer.Use two or more people to move and install freezer.Keep key away from children.Remove doors or lid from your old freezer or refrigerator.Disconnect power before installing ice maker (on ice makerkit ready models only).SAVE THESE INSTRUCTIONSState of California Proposition 65 Warnings:WARNING: This product contains a chemical known to the State of California to cause cancer.WARNING: This product contains a chemical known to the State of California to cause birth defects or other reproductive harm.Proper Disposal ofYour Old Freezer or RefrigeratorWARNINGBefore You Throw Away Your Old Freezer or Refrigerator: Take off the doors or lid. Leave the shelves in place so that children may not easilyclimb inside.Suffocation HazardRemove doors or lid from your old freezer orrefrigerator.Failure to do so can result in death or brain damage.IMPORTANT: Child entrapment and suffocation are not problemsof the past. Junked or abandoned freezers or refrigerators are stilldangerous. even if they will sit for “just a few days.” If you aregetting rid of your old refrigerator or freezer, please follow theseinstructions to help prevent accidents.3
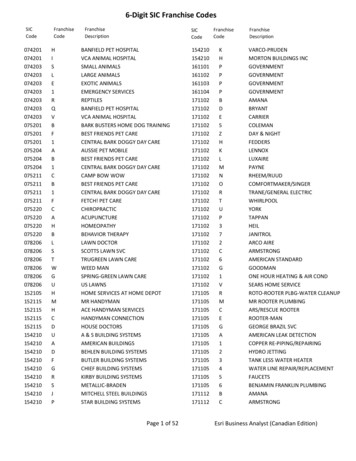
INSTALLATION INSTRUCTIONSUnpackingWARNINGLocation RequirementsWARNINGExcessive Weight HazardUse two or more people to move and install freezer.Failure to do so can result in back or other injury.Remove Packaging Materials Remove tape and glue residue from surfaces before turningon the freezer. Rub a small amount of liquid dish soap over theadhesive with your fingers. Wipe with warm water and dry. Do not use sharp instruments, rubbing alcohol, flammablefluids, or abrasive cleaners to remove tape or glue. Theseproducts can damage the surface of your freezer. For moreinformation, see “Freezer Safety.”When Moving Your Freezer:Your freezer is heavy. When moving the freezer forcleaning or service, be sure to cover the floor with cardboardor hardboard to avoid floor damage. Always pull the freezerstraight out when moving it. Do not wiggle or “walk” thefreezer when trying to move it, as floor damage could occur.Clean Before UsingExplosion HazardKeep flammable materials and vapors, such asgasoline, away from freezer.Failure to do so can result in death, explosion, or fire.IMPORTANT: Do not install the freezer near an oven, radiator, orother heat source, nor in a location where the temperature will fallbelow 40 F (5 C).Check the strength of the floor before installing your freezer. Itshould hold the weight of a freezer fully loaded with food.Allow at least 3" (7.5 cm) of air space at the top and on both sidesof the freezer and 1" (2.5 cm) between the back of the freezer andthe wall. If the freezer is to be against a wall, leave extra space onthe hinge side so the door can open wider.NOTE: This freezer may be installed side by side with anotherrefrigerator or freezer. Allow for a 3" (7.5 cm) clearance at the topand sides and a ¹ ₄" (0.64 cm) clearance between the appliances.After you remove all of the packaging materials, clean the inside ofyour freezer before using it. See the cleaning instructions in“Freezer Care.”Important information to know about glass shelvesand covers:Do not clean glass shelves or covers with warm water whenthey are cold. Shelves and covers may break if exposed tosudden temperature changes or impact, such as bumping.Tempered glass is designed to shatter into many small,pebble-size pieces. This is normal. Glass shelves and coversare heavy. Use both hands when removing them to avoiddropping.3" (7.5 cm)3" (7.5 cm)4
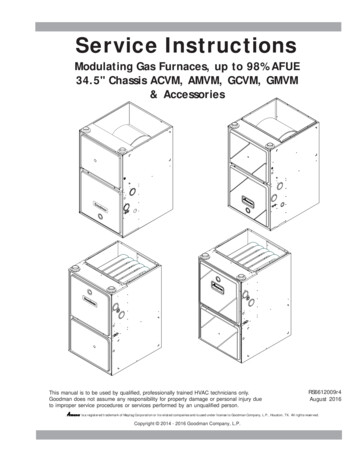
Electrical RequirementsWARNINGElectrical Shock HazardPlug into a grounded 3 prong outlet.Do not remove ground prong.Do not use an adapter.Freezer DoorTOOLS NEEDED: ⁵ ₈" hex-head socket wrench, ¹ ₄" hex-headsocket wrench, ¹ ₂" hex-head socket wrench, ³ ₈" hex-head socketwrench, #2 Phillips screwdriver, flat-blade screwdriver, ⁵ ₁₆" openend wrench, flat 2" putty knife.IMPORTANT: All graphics referenced in the following instructions areincluded later in this section after “Final Steps.” The graphicsshown are for a right-hand swing door (hinges factory installedon the right). If you only want to remove and replace the door, see the“Remove Door and Hinges” and “Replace Door and Hinges.” Before you begin, turn the control OFF, and remove food andadjustable door or utility bins from door.Install and Remove HandleDo not use an extension cord.Failure to follow these instructions can result in death,fire, or electrical shock.Before you move your freezer into its final location, it is importantto make sure you have the proper electrical connection.Recommended grounding methodA 115 Volt, 60 Hz., AC only, 15- or 20-amp fused, groundedelectrical supply is required. It is recommended that a separatecircuit serving only your freezer be provided. Use an outlet thatcannot be turned off by a switch. Do not use an extension cord.NOTE: Before performing any type of installation, cleaning, orremoving a light bulb, turn the Temperature Control to the OFFposition as shown and then disconnect the freezer from theelectrical source.NOTE: If reversing the door swing, move the handle from one sideof the door to the other side.To install handle:1. Place the handle on the door as shown. See Handle graphic.2. Using a flat-blade screwdriver, attach the handle to the doorwith the four handle screws (provided).3. Place the trim pieces on the upper and lower handle ends asshown.4. Apply firm pressure with your hand on the face of the trim.Slide the top trim down and the bottom trim up toward thehandle.To remove handle:1. Remove the top and bottom trim.2. Using a flat-blade screwdriver remove the four handle screwsand lift off the handle.Remove Door and Hinges⁵ ₁₆" Hex-Head Hinge Screw1. Unplug freezer or disconnect power.2. Open freezer door and remove base grille from the bottomfront of the freezer. See Base Grille graphic 1A.3. Close the freezer door and keep it closed until you are readyto lift it free from the cabinet.NOTE: Provide additional support for the door while thehinges are being moved. Do not depend on the door magnetsto hold the door in place while you are working.4. Remove the parts for the top hinge as shown in Top Hingegraphic 1B.5. Lift the freezer door free from the lower hinge and cabinet andset aside.6. Remove three hex head hinge screws and bottom hingeassembly. See Bottom Hinge graphic 1C.5
Reverse Door (optional on some models)IMPORTANT: If you want to reverse your door so that it opens inthe opposite direction, continue with “Reverse Door (optional onsome models)” instructions. If you are not reversing the door, see“Replace Door and Hinges.”Cabinet1. Remove the cabinet hinge hole plugs from the cabinet top andmove them to the opposite side hinge holes as shown inGraphic 2.2. Remove the door stop screws from the Bottom Hinge bracket.See Bottom Hinge graphic 1C3. Remove the Hinge Pin Nut and Hinge Pin from the hingebracket.4. Rotate the hinge bracket for installation on the opposite sideof the cabinet. See Graphic 35. Reinstall the Hinge Pin Nut and Hinge Pin to the hingebracket. Hinge Pin must point “up” when hinge bracket isinstalled to the cabinet.6. Invert the door stop so that the countersunk holes line up withthe screw holes in the hinge assembly. See Graphic 47. Reinstall the door stop screws. See Graphic 3.8. Reinstall the hinge bracket to the cabinet with the three hexhead hinge screws.Replace Door and HingesNOTE: Graphic may be reversed if door swing is reversed.1. Replace the parts for the bottom hinge as shown and tightenscrews. See Bottom Hinge graphic 1C. Replace the freezerdoor.NOTE: Provide additional support for the door while thehinges are being moved. Do not depend on the door magnetsto hold the door in place while you are working.2. Assemble the parts of the top hinge as shown in the TopHinge graphic 1B. Do not tighten the screws completely.3. Line up the door so that the bottom aligns evenly with thecabinet. Tighten all screws.6Final Steps1. Check all holes to make sure that hole plugs and screws are inplace. Reinstall top hinge cover. See Top Hinge graphic 1B.2. Replace the base grille. See Base Grille graphic 1A.WARNINGElectrical Shock HazardPlug into a grounded 3 prong outlet.Do not remove ground prong.Do not use an adapter.Do not use an extension cord.Failure to follow these instructions can result in death,fire, or electrical shock.3. Plug into a grounded 3 prong outlet.4. Reset the control. See “Using the Control.”5. Return all removable door parts to door and food to freezer.
Door Swing Reversal (optional)Door Removal &Replacement2A1ABase GrilleA. Cabinet Hinge Hole PlugsRight Hand HingeDoor StopLeft Hand HingeDoor Stop41BTop Hinge5AB3ABCCDDoor HandleSeal ScrewA. Top Hinge CoverB. 3/8" Hex-Head Hinge ScrewsC. Top HingeEBottom HingeAB1CCDA. Door Stop ScrewsB. Door StopC. Hinge PinD. Hinge Pin NutE. 5/8" Hex-Head HingeScrewsHandle1-1AEBCA. Door Stop ScrewsB. Door StopC. Hinge PinD. Hinge Pin NutE. 5/8" Hex-Head Hinge ScrewsBAA. Handle TrimB. Handle ScrewsC. HandleAdjust the Door1. Locate the two front leveling legs taped among the packingmaterials.2. Screw these legs into the front holes on the bottom of thefreezer. The back of the freezer rests on two fixed supports.3. Adjust the front legs enough to lift the cabinet up off of thefloor.NOTE: If your model is equipped with rollers, the front legsshould be lowered enough to lift the rollers off of the floor toensure the freezer does not roll forward when the door isopened.7
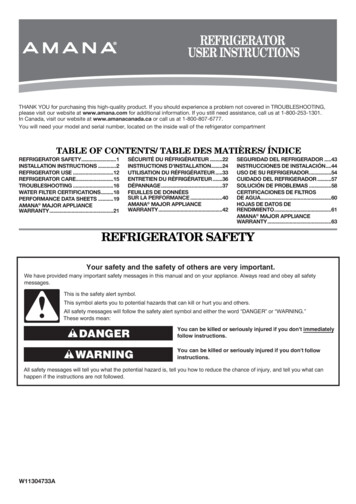
4. Place a leveling tool on top of the freezer first side to side,then front to back. Turn leg counterclockwise to raise a corner.Turn leg clockwise to lower a corner.The outside of your freezer may feel warm. This is normal. Thefreezer’s design and main function is to remove heat frompackages and air space inside the freezer. The heat is transferredto the room air, making the outside of the freezer feel warm.Adjusting Control Turn control to a higher number for colder temperatures. Turn control to a lower number for less cold temperatures.NOTE: The small snowflake icon represents the number 1 orthe least cold setting. The large snowflake icon represents 6 orthe coldest setting.5. Repeat Step 4 until freezer is level.6. After freezer is fully loaded with food, recheck with level as inStep 4.Fast Freeze (on some models)FREEZER USEEnsuring Proper Air CirculationIn order to ensure proper temperature, you need to permit properairflow in the freezer. As shown in the illustration, cool air entersthrough the freezer wall and moves down. The air thenrecirculates through the vent near the bottom.This setting causes the freezer to run continuously, driving thefreezer temperature to the coldest possible temperature. Toactivate, adjust the control knob to the igloo icon, whichrepresents the fast freeze setting. Use this feature just beforeadding large amounts of unfrozen foods. For best food quality, donot exceed 3 lbs (1,350 g) per cubic foot (28.32 L). Return to yournormal setting after 24 to 48 hours.Temperature Alarm (on some models)The temperature monitor alarm is located to the left of thetemperature control and sounds an audible alarm if thetemperature reaches 10 F (-12 C) or more above normal for theselected setting.The alarm is controlled by a three-position switch.Do not block any of these vents with food packages. If the ventsare blocked, airflow will be restricted, and temperature andmoisture problems may occur.IMPORTANT: To avoid odor transfer and drying out of food, wrapor cover foods tightly.Using the ControlTurn the freezer temperature control to 4. This setting is designedto maintain the temperature at or near 0 F (-17.8 C) under normaloperating conditions.Allow the freezer to cool 6 to 8 hours before filling with frozenfood. Let the freezer cool overnight before adding large amountsof unfrozen food. Do not add more than 2 to 3 lbs (907 to 1,350 g)of unfrozen food per cubic foot (28.32 L) of freezer space.NOTE: When the freezer is first started, the compressor will runconstantly until the freezer is cooled. It may take up to 6 or8 hours (or longer), depending on room temperature and thenumber of times the freezer door is opened. After the freezer iscooled, the compressor will turn on and off as needed to keep thefreezer at the proper temperature.8 The proper setting for normal freezer use. The alarmis on, and the amber light will be illuminated.0Keeps the alarm from sounding when the freezer iswarm, such as during start-up or defrosting. Tests the alarm regardless of temperature.Key Eject Lock(on some models)To lock or unlock the freezer, you must hold the key in the lockwhile turning. The lock is spring loaded, so the key cannot be leftin the lock.If the key is lost, contact your dealer for a replacement. Alwaysgive the model and serial number of your freezer when requestinga replacement key.
FREEZER FEATURESThis manual covers several different models. The freezer you havepurchased may have some or all of the items listed. The locationsof the features may not match those of your model.Refrigerated Shelves(on some models)Storage Gate(on some models)To Lower and Raise the Storage Gate:1. Lift the top of the gate up slightly, out of the supports. Pull thegate forward and down.2. Return the gate to the upright position. Lift the top of the gateslightly to clear the supports. Lower the gate into thesupports.Your freezer is equipped with refrigerated interior shelves.Packages in direct contact with the shelves will have the bestrefrigeration. Fresh, unfrozen food packages should be storeddirectly on the shelves and not on top of already frozen foodpackages.When placing the food packages in your freezer, pleaseremember: The cabinet shelves have the best freezing capability. Thedoor shelves and the bottom of the cabinet have a slightly lesscold temperature. Therefore, packages sensitive totemperature (meat, poultry, etc.) should not be placed on thedoor shelves or the freezer bottom. Leave some space between the food packages so that coldair can pass over and around them.FREEZER CARECleaning Your Frost-Free Freezer(some models)WARNINGDoor BinTo remove and replace the bin:1. Remove the bin by tipping the front of the bin forward andsliding out.2. Replace the bin by sliding it in above the desired supporttilting it back into place.Storage Basket(on some models)The slide out basket provides separate storage space for itemsthat are difficult to store on freezer shelves. To remove the basket,pull out and lift up.Explosion HazardUse nonflammable cleaner.Failure to do so can result in death, explosion, or fire.Frost-free means that you will not have to defrost your freezer.Frost is removed by air moving and collecting any moisture anddepositing it on the cooling coil. The cooling coil periodicallywarms up enough to melt the frost, and it then flows down to thedrain pan (located behind the base grille) where it is evaporated.Complete cleaning should be done at least once a year.1. Unplug freezer or disconnect power.2. Remove all frozen food. Wrap frozen food in several layers ofnewspaper and cover with a blanket. Food will stay frozen forseveral hours. You may also store frozen food in a cooler,additional refrigerator-freezer, or in a cool area.3. Wash the inside walls with a solution of mild detergent inwarm water or 2 tbs (26 mg) baking soda to 1 qt (0.95 L) warmwater. Do not use abrasive or harsh cleaners such as windowsprays, scouring cleansers, flammable fluids, cleaningwaxes, concentrated detergents, bleaches or cleanserscontaining petroleum products on plastic parts, interiorand door liners or gaskets. Do not use paper towels,scouring pads, or other harsh cleaning tools. These canscratch or damage materials.4. Rinse well and wipe dry with a clean soft cloth.5. Use the appropriate cleaning method for your exterior finish.Painted metal: Wash exteriors with a clean sponge or softcloth and a mild detergent in warm water. Do not use abrasiveor harsh cleaners, or cleaners designed for stainless steel. Drythoroughly with a soft cloth.9
Stainless steel finish: Wash with a clean sponge or soft clothand a mild detergent in warm water. Do not use abrasive orharsh cleaners. Dry thoroughly with a soft cloth. To keep your stainless steel refrigerator looking like newand to remove minor scuffs or marks, it is suggested thatyou use the manufacturer’s approved Stainless SteelCleaner and Polish.IMPORTANT: This cleaner is for stainless steel parts only! Do not allow the Stainless Steel Cleaner and Polish tocome into contact with any plastic parts such as the trimpieces, dispenser covers or door gaskets. If unintentionalcontact does occur, clean plastic part with a sponge andmild detergent in warm water. Dry thoroughly with a softcloth.3. Remove base grille. See “Base Grille.”4. Style 1–Models with a drain systemReach under the unit and pull the drain hose out through theopening. The drain hose carries defrost water out of thefreezer, and through the area behind the base grille. Place alarge shallow pan under the drain hose. Remove the drain capinside freezer.NOTE: Check the drain pan frequently to avoid wateroverflow. Have a second pan handy for easier emptying.6. Replace all frozen food.7. Plug in freezer or reconnect power.8. See “Using the Control.”Base GrilleTo Remove and Replace the Base Grille:1. Open the freezer door and remove the base grille by pullingdown and out from the top.2. Replace the base grille by putting the clips in the openings inthe refrigerator panel. Push in until the base grille snaps intoplace.Defrosting and CleaningYour Manual Defrost Freezer(some models)WARNINGStyle 2–Models without a drain systemRemove water from the freezer bottom using a sponge orbaster and empty the water into a large pan.5. Place pans of hot water in freezer with door open to speedmelting. Directing air from an electric fan into freezer will alsohelp. Do not place fan or any electrical device in freezer.6. Use a plastic scraper to remove frost.NOTE: Do not use an ice pick, knife, or other sharp-pointedtool to defrost freezer. Damage can occur.7. Wipe water from walls with a towel or sponge.8. Wash the inside walls with a solution of mild detergent inwarm water or 2 tbs (26 mg) baking soda to 1 qt (0.95 L) warmwater. Do not use abrasive or harsh cleaners.9. Rinse well and wipe dry with a clean soft cloth.10. Use the appropriate cleaning method for your exterior finish.Painted metal: Wash exteriors with a clean sponge or softcloth and a mild detergent in warm water. Do not use abrasiveor harsh cleaners, or cleaners designed for stainless steel. Drythoroughly with a soft cloth.Stainless steel finish: Wash with a clean sponge or soft clothand a mild detergent in warm water. Do not use abrasive orharsh cleaners, or cleaners designed for stainless steel. Drythoroughly with a soft cloth. To keep your Stainless Steel refrigerator looking like newand to remove minor scuffs or marks, it is suggested thatyou use the manufacturer’s approved Stainless SteelCleaner and Polish.IMPORTANT: This cleaner is for Stainless Steel parts only!Explosion HazardUse nonflammable cleaner.Failure to do so can result in death, explosion, or fire.Defrost and clean your freezer when frost has built up to about¹ ₄" (6 mm) thickness. Complete defrosting and cleaning should bedone at least once a year. In high humidity areas, a freezer mayneed more frequent defrosting and cleaning.Do not use abrasive cleaners on your freezer. Do not use cleaningwaxes, concentrated detergents, bleaches, or cleaners containingpetroleum on plastic parts. Damage can occur.NOTE: The drain cap must be removed before defrosting thefreezer and replaced securely afterward.1. Unplug freezer or disconnect power.2. Remove all frozen food. Wrap frozen food in several layers ofnewspaper and cover with a blanket. Food will stay frozen forseveral hours. You may also store frozen food in a cooler, anadditional refrigerator or freezer, or a cool area.10 Do not allow the Stainless Steel Cleaner and Polish tocome into contact with any plastic parts such as the trimpieces, dispenser covers or door gaskets. If unintentionalcontact does occur, clean plastic part with a sponge andmild detergent in warm water. Dry thoroughly with a softcloth. To order the cleaner, see “Accessories.”11. For models with a drain system, you should replace the drainhose, drain cap and base grille.12. Replace all frozen food.13. Plug in freezer or reconnect power.14. See “Using the Control.”
Changing the Light BulbNOTE: Not all appliance bulbs will fit your freezer. Be sure toreplace the bulb with one of the same size, shape, and wattage.Style 11. Unplug freezer or disconnect power.Power InterruptionsIf the power will be out for 24 hours or less, keep the door closedto help food stay cold and frozen.If the power will be out for more than 24 hours, do one of thefollowing: Remove all frozen food and store it in a frozen food locker. 2. Replace the light bulb with an appliance bulb of the samewattage.3. Plug in freezer or reconnect power.If a food locker is not available, consume or can perishablefood at once.After the power is restored, unplug the freezer for 30 minutes, toallow the refrigeration system to equalize. During this time keepthe door closed whenever possible.REMEMBER: A full freezer stays cold longer than a partially filledone. A freezer full of meat stays cold longer than a freezer full ofbaked goods. If you see that food contains ice crystals, it may berefrozen, although the quality and flavor may be affected. If thecondition of the food is poor, dispose of it.Style 21. Unplug freezer or disconnect power.2. Remove the light shield. From the front of the light shield,push backward and down.3. Replace the light bulb with an appliance bulb of the samewattage.4. Replace the light shield.5. Plug in freezer or reconnect power.Moving CareWhen you are moving your freezer to a new home, follow thesesteps to prepare it for the move.1. Remove all frozen food.2. Unplug the freezer.3. Take out all removable parts, wrap them well, and tape themtogether so they don’t shift and rattle during the move.4. Clean the freezer thoroughly.5. Tape the freezer shut and tape the electrical cord to thecabinet.When you get to your new home, refer to the “InstallationInstructions” and “Freezer Use” sections for information oninstallation and setting the controls.TROUBLESHOOTINGTry the solutions suggested here first to avoid the cost of an unnecessary s
Check the strength of the floor before installing your freezer. It should hold the weight of a freezer fully loaded with food. Allow at least 3" (7.5 cm) of air space at the top and on both sides of the freezer and 1" (2.5 cm) between the back of the freezer and the wall. If the freezer is to be against a wall, leave extra space on