Transcription
Skip to contentManuals User Manuals Simplified.Dehumidifiers ADEL30 ADEL50, ADEL70 Owner’sManualHome » GE » Dehumidifiers ADEL30 ADEL50, ADEL70 Owner’s Manual
Contents [ hide1 Dehumidifiers ADEL30 ADEL50, ADEL70 Owner’s Manual1.1 SAFETY INFORMATION1.2 OPERATING INSTRUCTIONS1.2.1 Controls1.2.2 Other Features1.2.3 How the Dehumidifier Operates1.2.4 Automatic Defrost1.2.5 Choosing a Location1.2.6 Removing Collected Water1.2.7 Water Level1.2.8 Bucket Operation1.3 CARE AND CLEANING1.3.1 Grille and Case1.3.2 Water Bucket1.3.3 Air Filter1.4 TROUBLESHOOTING TIPS1.5 CONSUMER SUPPORT2 Related Manuals:Dehumidifiers ADEL30 ADEL50, ADEL70 Owner’s ManualSAFETY INFORMATIONIMPORTANT SAFETY INFORMATIONREAD ALL INSTRUCTIONS BEFORE USING THE APPLIANCEFor your safety, the information in this manual must be followed to minimize the risk offire, electric shock or personal injury.Use this appliance only for its intended purpose as described in this Owner’s Manual.This dehumidifier must be properly installed and grounded as described in this manual before it isused.Never operate this dehumidifier in an area that is likely to accumulate standing water. If thiscondition develops, for your safety disconnect the power supply before stepping into the water.Never unplug your dehumidifier by pulling on the power cord. Always grip plug firmly and pullstraight out from the receptacle.Replace immediately all electric service cords that have become frayed or otherwise damaged. Adamaged power supply cord must be replaced with a new power supply cord obtained from themanufacturer and not repaired. Do not use a cord that shows cracks or abrasion damage along itslength or at either the plug or connector end.If the receptacle does not match the plug, the receptacle must be changed out by a qualifiedelectricianTurn the dehumidifier OFF and unplug it before cleaning.GE Appliances does not support any servicing of the dehumidifier. We strongly recommend thatyou do not attempt to service the dehumidifier yourself.For your safety, do not store or use combustible materials, gasoline or other flammable vapors orliquids in the vicinity of this or any other appliance.All dehumidifiers contain refrigerants, which under federal law must be removed prior to productdisposal. If you are getting rid of an old product with refrigerants, check with the companyhandling disposal about what to do.Do not use outdoors.This dehumidifier is intended for indoor residential applications only. This dehumidifier should not
be used for commercial or industrial applications.These R410A Dehumidifier Systems require contractors and technicians to use tools, equipmentand safety standards approved for use with this refrigerant. DO NOT use equipment certified forR22 refrigerant only.USE OF EXTENSION CORDSRISK OF FIRE. Could cause serious injury or death.DO NOT use an extension cord with this Dehumidifier.DO NOT use surge protectors or multi-outlet adaptors with this Dehumidifier.HOW TO CONNECT ELECTRICITYDo not, under any circumstances, cut or remove the third (ground) prong from the power cord. Forpersonal safety, this appliance must be properly grounded.DO NOT use an adapter plug with this appliance.The power cord of this appliance is equipped with a 3-prong (grounding) plug which mates with astandard 3-prong (grounding) wall outlet to minimize the possibility of electric shock hazard from thisappliance.Have the wall outlet and circuit checked by a qualified electrician to make sure the outlet is properlygrounded.Where a 2-prong wall outlet is encountered, it is your personal responsibility and obligation to have itreplaced with a properly grounded 3-prong wall outlet.The dehumidifier should always be plugged into its own individual electrical outlet, which has avoltage rating matching the rating plate.This provides the best performance and also prevents overloading house wiring circuits, which couldcause a fire hazard from overheated wires.RECYCLING INFORMATIONFor appliance recycling information please visit www.geappliances.com/recycling.READ AND SAVE THESE INSTRUCTIONSOPERATING INSTRUCTIONSControls
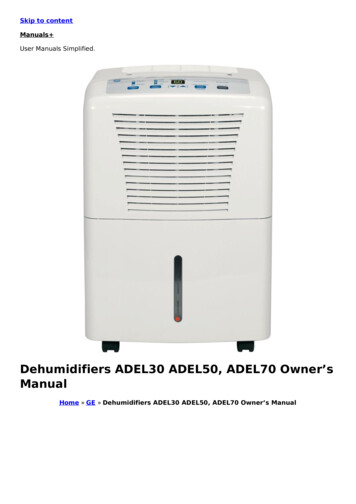
NOTE: When the bucket is full or removed, the controls cannot be set.1. Power PadPress to turn the dehumidifier on and off.2. Filter TimerAfter 250 hours of operation, the Clean the Filter indicator light will glow to remind you to cleanthe filter. Remove the filter and clean it.Press to turn off the Clean the Filter light. See the Care and Cleaning section.3. Humidity Set Control PadsThe humidity level can be set within a range of 35% RH (Relative Humidity) to 80% RH (RelativeHumidity) in 5% increments or at NS for continuous operation. To set the unit for continuousoperation, press the pad until the screen reads NS.NOTE: If NS (Nonstop) is selected, the dehumidifier will operate continuously at its maximumdehumidification settings if attached to a hose to drain or until the bucket is full.For drier air, press the pad and set to a lower percent value (%).For damper air, press the pad and set to a higher percent value (%).When you first use the dehumidifier, set the humidity control to 45% or 50%. Allow at least 24hours for the dehumidifier to achieve the humidity level. If you still have damper air than desired,set the humidity level to a lower setting or select Nonstop for maximum dehumidification.4. DisplayShows the set % humidity level while setting, then shows the actual ( /- 5% accuracy) room %humidity level.5. Fan Speed PadControls the fan speed.Press to select either High, Medium or Low fan speed.Set the fan control to High for maximum moisture removal. When the humidity has been reducedand quiet operation is preferred, set the fan control to Medium or Low.6. Delay OffWhile the dehumidifier is in operation, press this pad to set it to automatically turn off in 2 hoursor 4 hours.Other FeaturesEmpty LightGlows when the bucket is ready to be emptied, or when the bucket is removed or not replaced in theproper position.AlarmIf the bucket is full or missing for more than 3 minutes, an alarm will sound for about 10 seconds toremind you to empty and replace the bucket.Auto Shut Off
The Water Level Control Switch shuts off the dehumidifier when the bucket is full, or when the bucketis removed or not replaced in the proper position. NOTE: Fan will continue to run approximately 3minutes after bucket is removed.Auto DefrostWhen frost builds up on the evaporator coils, the compressor will cycle off and the fan will continue torun until the frost disappears.Power OutageIn the case of a power outage or interruption, the unit will automatically restart, in the settings lastused, after the power is restored.Using the DehumidifierWhen first using the dehumidifier, operate the unit continuously for 24 hours.How the Dehumidifier OperatesMoist, humid air is drawn over a cold refrigerated dehumidifying coil. Moisture in the air condenses onthis coil and drains into a bucket (or through a hose and drain).Dry, clean air is drawn through the condenser where it is heated and discharged out the top grille intothe room.It is normal for the surrounding air to become slightly warmer as the dehumidifier operates.Automatic DefrostWhen frost builds up on the evaporator coils, the compressor will cycle off and the fan will continue torun until the frost disappears.When the coil is defrosted, the compressor or fan will automatically restart and dehumidifying willresume.Choosing a LocationA dehumidifier operating in a basement will have little or no effect in drying an adjacent enclosedstorage area, such as a closet, unless there is adequate circulation of air in and out of the area.Do not use outdoors.This dehumidifier is intended for indoor residential applications only. This dehumidifier should notbe used for commercial or industrial applications.Place the dehumidifier on a smooth, level floor strong enough to support the unit with a fullbucket of water.Allow at least 12-18 inches of air space on all sides of the unit for good air circulation.Place the dehumidifier in an area where the temperature will not fall below 41 F (5 C). The coilscan become covered with frost at temperatures below 41 F, which may reduce performance.Use the dehumidifier in cooking, laundry, bathing and dishwashing areas that have excessivemoisture.NOTE: Place the dehumidifier away from the clothes dryer.Use the dehumidifier to prevent moisture damage anywhere books or valuables are stored.Use the dehumidifier in a basement to help prevent moisture damage.The dehumidifier must be operated in an enclosed area to be most effective.Close all doors, windows and other outside openings to the room.
NOTE: The dehumidifier has rollers to aid placement, but it should only be rolled on smooth, flatsurfaces. Do not attempt to roll the dehumidifier on carpet or over objects.Using the DehumidifierAlways make sure the water bucket is locked into place on the dehumidifierRemoving Collected WaterThere are 2 ways to remove collected water:Use the bucket. When the bucket is removed, the unit will shut off. Empty and replace the bucket.IMPORTANT: Do not use the hose if using the bucket to collect water. When the hose is connected,water will flow through it onto the floor instead of into the bucket.NOTES:Do not remove the bucket while the dehumidifier is operating or if it has just stopped operating.This might cause some water to drip from the drain pan.
The bucket must be in place and securely seated for the dehumidifier to operate.Use a hose. Water can be automatically emptied into a floor drain by attaching a garden water hose(not included).1. Remove the bucket from the front of the unit.2. Open the drain cover on the back of the unit.3. Thread a garden hose (not supplied) onto the nozzle, cut to length, and lead it to the floor drain.4. Replace the bucket in the unit.NOTE: The bucket must be in place and securely seated for the dehumidifier to operate.Water LevelThe dehumidifier will turn off automatically when the bucket is full, or when the bucket is removed ornot replaced in the proper position.The bucket must be replaced in the proper position for the dehumidifier to work. The light will be onand the dehumidifier will not run if the bucket is not in the proper position.Bucket OperationDO NOT remove the foam piece in the bucket assembly. If removed the Dehumidifier will not work
properly.When the coil is defrosted, the compressor or fan will automatically restart and dehumidifying willresume.CARE AND CLEANINGTurn off the dehumidifier and remove the plug from the wall outlet before cleaning.Grille and CaseTo clean the case:Use water and a mild detergent. Do not use bleach or abrasives.To clean the front grille:Use a vacuum attachment or brush.Water BucketTo clean:Every few weeks, clean the bucket to prevent growth of mold, mildew and bacteria. Partially fill thebucket with clean water and add a little mild detergent. Swish it around in the bucket, empty andrinse.NOTE: Do not use a dishwasher to clean the water bucket.To remove:Remove the bucket and pour out any water.To replace:Slide the bucket into the dehumidifier.NOTE: The bucket must be in place and securely seated for the dehumidifier to operate.Air FilterThe air filter behind the front grille should be checked and cleaned at least every 250 hours of
operation or more often if necessary.After 250 hours of operation, the Clean the Filter indicator light will glow to remind you to clean thefilter. Remove the filter and clean it. Replace the filter and press the Filter Timer pad to turn off theClean the Filter light.To remove:Remove the bucket. Grasp the filter edge, and pull it straight down and out.To clean:Clean the filter with warm, soapy water. Rinse and let the filter dry before replacing it.NOTE: DO NOT rinse or put the filter in an automatic dishwasher.DO NOT operate the dehumidifier without a filter because dirt and lint will clog it and reduceperformance.NOTE: Avoid using a dishwasher to clean the filter.TROUBLESHOOTING TIPSBefore you call for serviceSave time and money! Review the charts on the following pages first and you may not need to call forservice.
CONSUMER SUPPORTGE Appliances WebsiteHave a question or need assistance with your appliance? Try the GE Appliances Website 24 hours aday, any day of the year! You can also shop for more great GE Appliances products and takeadvantage of all our on-line support services designed for your convenience. In the US:
GEAppliances.comRegister Your ApplianceRegister your new appliance on-line at your convenience! Timely product registration will allow forenhanced communication and prompt service under the terms of your warranty, should the needarise. You may also mail in the pre-printed registration card included in the packing material. In theUS: GEAppliances.com/registerSchedule ServiceExpert GE Appliances repair service is only one step away from your door. Get on-line and scheduleyour service at your convenience any day of the year. In the US: GEAppliances.com/ge/serviceand-support/service.htm or call 800.432.2737 during normal business hours.Extended WarrantiesPurchase a GE Appliances extended warranty and learn about special discounts that are availablewhile your warranty is still in effect. You can purchase it on-line anytime. GE Appliances Services willstill be there after your warranty expires. In the US: tended-service-plans.htm or call 800.626.2224 during normal businesshours.Remote ConnectivityFor assistance with wireless network connectivity (for models with remote enable),visit our website at GEAppliances.com/ge/connected-appliances/ or call 800.220.6899 in the US.Parts and AccessoriesIndividuals qualified to service their own appliances can have parts or accessories sent directly to theirhomes (VISA, MasterCard and Discover cards are accepted). Order on-line today 24 hours every day.In the US: GEApplianceparts.com or by phone at 877.959.8688 during normal business hours.Instructions contained in this manual cover procedures to be performed by any user. Otherservicing generally should be referred to qualified service personnel. Caution must beexercised, since improper servicing may cause unsafe operation.Contact UsIf you are not satisfied with the service you receive from GE Appliances, contact us on our Websitewith all the details including your phone number, or write to:In the US: General Manager, Customer Relations GE Appliances, Appliance Park Louisville, KY ct.htmDehumidifiers ADEL30 ADEL50, ADEL70 Owner’s Manual – Download [optimized]Dehumidifiers ADEL30 ADEL50, ADEL70 Owner’s Manual – DownloadRelated Manuals:1. Dehumidifiers ADEL20, ADEL30, ADEL45 Owner’s Manual Dehumidifiers ADEL20, ADEL30, ADEL45Write the model and serial numbers.2. Dehumidifiers APEH70, APER70 Owner’s Manual Dehumidifiers APEH70, APER70 Owner’s ManualSAFETY INFORMATION IMPORTANT SAFETY INFORMATION.3. Dehumidifiers ADER30, ADER40, ADER50, ADER65, ADEH50 Owner’s Manual DehumidifiersADER30, ADER40, ADER50, ADER65, ADEH50 Owner’s Manual Safety Instructions.4. Dehumidifiers AHM30, AHW30, AHH40, AHM40, AHM 65* Owner’s Manual DehumidifiersAHM30, AHW30, AHH40, AHM40, AHM65* Safety Instructions IMPORTANT SAFETY.5. 2021 Nissan Rogue Owners Manual 2021 Nissan Rogue Owners Manual – Optimized PDF 2021 Nissan.
6. Hughes DirectV Receiver Owners Manual Hughes DirectV Receiver Owners Manual – Download[optimized] Hughes DirectV.
Manual Home » GE » Dehumidifiers ADEL30 ADEL50, ADEL70 Owner's Manual. Contents [ hide 1 Dehumidifiers ADEL30 ADEL50, ADEL70 Owner's Manual 1.1 SAFETY INFORMATION 1.2 OPERATING INSTRUCTIONS 1.2.1 Controls 1.2.2 Other Features 1.2.3 How the Dehumidifier Operates 1.2.4 Automatic Defrost
