Transcription
NuWave Nutri-Pot 8QDigital Pressure Cooker Owner’s Manual & Complete Recipe Book
NuWave Brio 6QDigital Air FryerSuper-heated air cooksyour food to crispy,tender perfection.The digital touch screengives you precisetemperature control.NuWaveOven Pro PlusCook healthiermeals faster andmore efficientlywith Triple ComboCooking Power.NuWave PIC (Precision InductionCooktop)Cook faster, safer,and more efficientlythan you ever couldon your gas orelectric stovetop.For more about our innovative products, visit:
NuWave Nutri-Pot 6QDigital Pressure CookerEasily cook rice, poultry, vegetables,and more all with the press of abutton! The Nutri-Pot’s safety releasevalve and hinged lid make forconvenient and safe operation.NuWaveElectric SkilletCoated with Duralon HealthyCeramic Non-Stick coatingfor easy cleanup. Includes apremium Tempered Glass Lid.NuWaveNow.com1-877-689-2838
NuWave Flavor-Lockers with Vacuum-Seal TechnologyKeep food fresh for up to 21 days!Slow the growth of mold by removingtrapped oxygen with a few easy pumps.NuWave Duralon HealthyCeramic Non-StickCookwareCoated with Duralon HealthyCeramic Non-Stick coating foreasy cleanup, this versatilecookware is perfect for use inovens or on gas, electric, andeven induction cooktops.For more about our innovative products, visit:
NuWave Nutri-Master Slow JuicerThe Nutri-Master, with a low 48 RPM, is bothincredibly quiet and powerful enough to extractjuice from nuts and hard vegetables.NuWaveNow.com1-877-689-2838
TABLE OF CONTENTSOWNER’S MANUALParts Descriptions.7Important Safeguards.8Additional Safeguards.9Product Features.10Care & Maintenance. 11Silicone Gasket Installation. 11Operating Instructions.12-14Control Panel.14BBQ & MeatsBaby Back Ribs.33BBQ Pulled Pork.34Honey BBQ Meatloaf.35Pork Shoulder with 6Delay.17Warm.17Sear.17Slow Cook.18Veggies, Pastas & SaucesHash Brown Frittata.42Blistered Cherry Tomato StuffedPeppers.43Stuffed Squash.44Classic Chill.45Risotto with Italian Sausage &Parmesan.46Jambalaya.47Garlic Cheddar MashedPotatoes.48Marinara Sauce.49Rice & Beans.50Tortellini.51Troubleshooting Guide.18Limited Warranty.19SoupsAndouille Sausage & CabbageSoup.21Barley Beef Soup.22Chicken & Rice Soup.23PoultryCassoulet Chicken.25Chicken á la King.26Salsa Chicken & Rice.27BeefBeef Mac & Cheese.29Beef Short Ribs.30Spicy Beef & Cabbage.316Owner’s ManualPot Roast.37Swiss Steak.38Braised Lamb Shanks.39Sailor’s Mussels.40BakingBox Cake Mix.53Orange Cheesecake.54Brownies.55Spanish Manual.57-71
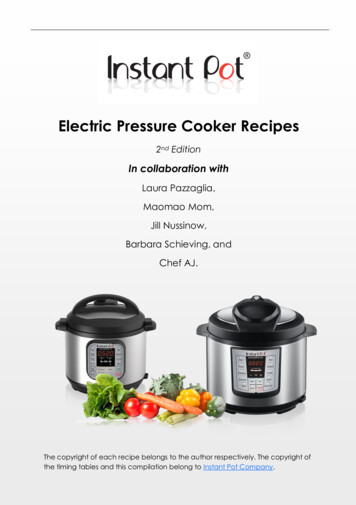
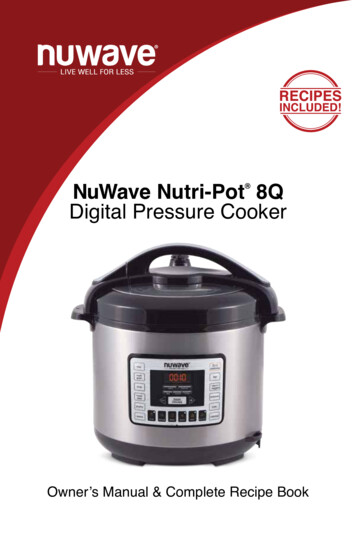
PARTS DESCRIPTION121Lid2Pressure ReleaseValve/Switch3434Inner PotPart #: 342096Base7Control Panel8Silicone GasketPart #: 3421010LID11121386RackPart #: 34205 (optional)595Tempered Glass LidPart #: 34206 (optional)Food Blocking CapPart #: 34208Measuring CupPart #: 34103Water CollectorPart #: 34204Soup LadlePart #: 34102Rice SpoonPart #: 341019710111213Owner’s Manual7
IMPORTANT SAFEGUARDSREAD ALL INSTRUCTIONSWhen using electrical appliances, basic safety precautions should alwaysbe followed, including the following:1. DO NOT TOUCH HOT SURFACES.2. To protect against electrical shock, do not immerse cord, plugs, or theunit in water or other liquid.3. Close supervision is necessary when using the appliance near children.4. Unplug from outlet when not in use and allow unit to cool before cleaning.5. Do not operate if the appliance malfunctions or is damaged in any way.Instead contact Customer Service by phone at 1-877-689-2838 or byemail at help@nuwavenow.com.6. Do not use accessories that are not intended to be used with this appliance.7. THIS APPLIANCE IS NOT INTENDED FOR OUTDOOR USE.8. Do not let cord hang over edge of table or counter, or touch hot surfaces.9. Do not place on or near a hot gas or electric burner or in a heated oven.10. Use caution when moving a pressure cooker containing hot oil or liquid.11. Ensure the pressure release devices are clear of clogging before use.12. DO NOT COVER THE PRESSURE RELEASE VALVE.13. DO NOT USE THE PRESSURE COOKER FOR OTHER THANINTENDED USE.8Owner’s Manual
ADDITIONAL SAFEGUARDS1. If you cook meat with skin, such as sausage, swelling can occur whencooked under pressure. Piercing skin after cooking can lead to burstsof hot liquid.2. Do not lean over the pressure cooker at any time while cooking.3. The Silicone Gasket creates a pressure seal between the Lid and Base.Keep the gasket completely clean and free of cracks or deterioration.4. Fill the pressure cooker with liquid prior to use. Never cook without liquid.5. Make sure all parts of the pressure regulator and ventilated pipe are clean.6. Do not alter the safety mechanisms or attempt to repair pressurecooker as this will void the warranty. Please adhere to the MaintenanceInstructions and other instructions contained in this manual.7. Do not place near flammable materials, heating units, or wet environments.8. Do not overfill the pressure cooker.9. Clean the Food Blocking Cap and Pressure Release Valve regularly toprevent clogging.10. Do not attempt to open the Lid when the Floater Valve is raised.11. Do not cover the Pressure Release Valve.12. The bottom of the Inner Pot and heating plate should be kept clean.Do not put the Inner Pot on other heat sources. Do not replace theInner Pot with other containers.13. Use wood or plastic utensils to prevent damaging the Inner Pot’snon-stick coating.14. Do not move the pressure cooker while in use. Only after the pressurecooker cools down completely should it be moved. Move the pressurecooker by using the Base handles not the Lid handle.15. Make sure pressure is fully released before attempting to open the Lid.16. It is normal for some smoke to escape the appliance during the first fewuses. If the pressure cooker continues emitting smoke please contactCustomer Service.Owner’s Manual9
PRODUCT FEATURESBenefitsThe NuWave Nutri-Pot Digital Pressure Cooker seals steam inside during use,creating pressure and raising the internal temperature above the boiling point ofwater. The result is an expedited cooking process and healthier meals.Easy to CleanThe Inner Pot is non-stick so it’s easy to clean. The stainless steel Lid is durableand detachable for easy cleaning.Innovative DesignThe NuWave Nutri-Pot Digital Pressure Cooker features a user-friendly designthat releases any excess steam away from the unit, ensuring peace of mind.Faster CookingPressure cooking prepares food faster than traditional cooking methods.Tastier MealsPressure cooking allows food to retain its full flavor by cooking quickly andefficiently. With the natural flavor intact, less seasoning is required, enabling youto craft your meals precisely to your taste.Healthier ResultsMore vitamins and minerals are retained in food prepared with the NuWaveNutri-Pot Digital Pressure Cooker compared to conventional stove top cooking.In addition, pressure cooking utilizes water instead of unhealthy oils or fat.MultifunctionalThe NuWave Nutri-Pot Digital Pressure Cooker can be used for steaming,simmering and stewing fresh or even frozen foods. You can even use it forcanning and baking. Prepare everything from delicate soups and desserts tohearty meat dishes.MULTIPLE SAFETY DEVICESLid Safety DeviceIf the Lid does not fasten properly pressure will not build.Pressure ControlIf pressure exceeds maximum level the pressure cooker automatically releasespressure and shuts off to prevent any additional from building.10Owner’s Manual
CARE & MAINTENANCE Unplug the NuWave Nutri-Pot Digital Pressure Cooker and let it coolbefore cleaning. Wipe the base and inside of the Base, if necessary, with a clean cloth.Do not immerse the Base in water or spray any water in it. Remove and clean the Water Collector. Wipe with a wet clothand return to the pressure cooker. The Lid can be detached from the Base. All parts inside the Lid canbe hand washed separately with water and should always be checkedto make sure they are not damaged or cracked. Use a sponge or non-metallic soft brush to clean the Inner Pot,then wipe the surface with a clean cloth.SILICONE GASKET INSTALLATIONMAKE SURE THE SILICONE GASKET HAS NO CRACKS OR IS IN ANYWAYDAMAGED.Removing the Silicone Gasket Open the Lid. With one hand holding the inner Lid down, gently pull the Silicone Gasket up.Installing the Silicone Gasket Line up the Silicone Gasket on top of the metal ring. Gently push the Silicone Gasket down, making sure the metal ring is insidethe Silicone Gasket’s groove.Owner’s Manual11
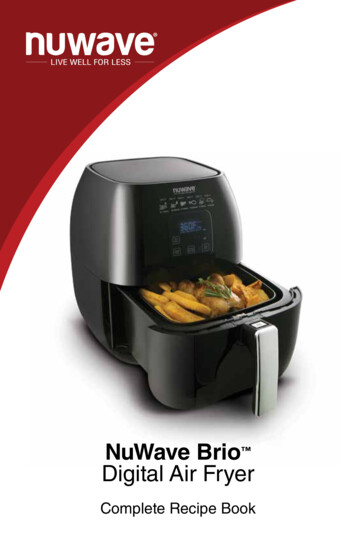
OPERATING INSTRUCTIONSHold451Open Lid: Hold the left2Place ingredients and waterin the Inner Pot. Ingredientsand water should notexceed 4/5th of the heightof the Inner Pot.35If the ingredients expandeasily in water, do notfill beyond 3/5th of theheight of the Inner Pot.The minimum amountof ingredients and waternecessary for proper useis 1/5th of the height of theInner Pot.15312Owner’s Manualhandle. Turn the Lidcounterclockwise to openposition and lift.Clean the outside of theInner Pot and the insideof the Base. Place theInner Pot in the Base.
OPERATING INSTRUCTIONS (Continued)4Closing Lid: Check that the Silicone Gasket is secure before closing. Holding the Lid by the handle, lower the Lid and turn clockwise to close.When the Lid has been closed properly you will hear a “click” sound.Ensure that the arrowsare properly aligned.Slide the Water Collectorinto place.Owner’s Manual13
OPERATING INSTRUCTIONS (Continued)5Once the Lid is locked in place, turnthe Pressure Release Switch to theclosed position.6Plug the NuWave Nutri-Pot DigitalPressure Cooker into an electricpower supply. The LCD display willshow “--:--” and the unit will go intostandby mode.5Releasing the PressureGently turn the Pressure Release Switch to the open position to releasepressure. Do not cover the opening where steam is released. Alwaysuse caution when releasing steam.CONTROL PANELMain Display mFunctionsPressure Cooker UI14Owner’s ManualPress onceto start orstop.searslowcookcanningPresets
PRESETSTextureTime(Hours:Minutes)Presets & ti Bake01:4000:0800:0300:4000:20DelayWarm*04:00Slow 00:0501:0000:05*Only operable in one texture 9:001Select desired preset.2Adjust texture if necessary. The default texture is normal. For instructions onchanging texture see page 16.3Close Lid.4Begin by pressing the “start/stop” button.For all Presets: Pressing the “-” or “ ” buttons will switch to “manual” mode. Press “start/stop” twice to clear. The pressure cooker will clear in 30 seconds if the “start/stop” button is not pressed.ricestart/stophours/minutesPress the “hours/minutes” button to setthe time when using the “time” function orfishto increase or decrease the cooking duration when cooking in “manual” mode. Theblinking digits reflect whether hours or minutes are selected. Pressing the “ ” and “-”steam/soupdelaybuttons will increaseormanualdecrease the turedelaywarmsearslowcookminutescanningOwner’s Manual15
PRESETS (continued)Preheating: While the unit reaches the appropriate temperature for thefunction selected, the display will show “PH” indicating that it is preheating.Once the unit reaches the appropriate pressure, it will shift from preheating tothe selected preset cooking time. Once pressure has built inside the pressurecooker, the PH display will change to P, followed by the amount of time it willremain under pressure.Pressure: The function selected will determine the amount of pressure time.In this example, the display will show “P0:10” (pressure time). The colon or“:” will flash to indicate that the pressure cooker is under pressure and thetimer is counting down.Auto Warm Feature: When cooking is complete, the pressure cookerautomatically switches to the warm function. Default warm time changesdepending on the Preset used.Auto Warm FeaturePresetsIndefinitely*Auto ShutoffRiceMulti FishSteam/VeggiesPotatoesstart/stopBakeWarm (Function)*End by pressing TIONSbaketimeTime(Hours: Minutes)Texture: This is a function to help change the consistency of your foods.“less”, “normal,” and “more” are selected guides that increaseslowcanningor decreasethe cookingtimewhile under pressure.texturesearwarmdelaycook16Owner’s Manual
FUNCTIONS tbutton.The display will default to “normal” time.1(Ex: Press “rice” and the displaywill show 00:10).fish2 To change the consistency of the food (less, normal, more), simply pressThe appropriatelight will display, indicating that the time has beensteam/delay “texture”.manualveggieschanged. The time in the display will automatically adjust accordingly. (Ex:lessnormalmoreFor the “rice” function, “less” is 7 minutes, “normal” is 10 minutes andhours“more”is 21 minutes). potatoesminutes3 Close the Lid and press the “start/stop” button.bakeDelay: This function allows you to delay the cooking start ctions:1 Press the “delay” button. The delay bar will light up and the first set of “00”swill be blinking.slow2 Press the “ ” or “-” button to increase or decrease the hours.3 To change minutes press the “hours/minutes” button. The second set of“00”s will be blinking. This indicates that you can change the minutes.start/stop4 Press the “ ” or “-” button to increase or decrease the minutes.fishbutton to continue your program based on your5 Press the desired functionrecipe.steam/Close the Lid and press6 manualveggies the “start/stop” button.delaylessmoreNote:potatoesof time to delay your pressure cooker is 24 hours.hours The maximum amountminutes The delay function will not work while the pressure cooker is in operation.normalbakeWarm: This function will let you manually adjust the time you would like to keepyour food warm.delaywarmsearslowcookcanningDirections:1 Press the “warm” button, display will show “04:00”.2 Press the “ ” or “-” button to increase or decrease the time. See “hours/minutes” section for instructions on adjusting the time.3 Press the “start/stop” button to start.Note: The default time for the warm function is 4 hours.The pressure cooker will automatically go to this warm function when a desiredpreset has completed.Owner’s Manual17
morepotatoesFUNCTIONS (continued)esarmbakeSear: This function lets you sear food before slow cooking or cookingunder pressure.searslowcookDirections:canning1 Press “sear” button. Display will show 00:05.2 Press “start/stop” button to begin.3 See the “hours/minutes” section for instructions on manually adjustingthe time.Note: Do not close the Lid when using “sear” function. When complete, the display will show “End”.TROUBLESHOOTINGContact Costumer Service if the pressure cooker displaysany of these error codesCodeE1Sensorcircuit isbrokenErrorE2E3Circuit shortOverheatE4Signalswitch isbrokenWARNINGPlease immediately unplug and contact Customer ServiceDepartment if you experience other problems.1-877-689-2838 or help@nuwavenow.com18Owner’s Manual
LIMITED WARRANTYThe NuWave Nutri-Pot Digital Pressure CookerTHE MANUFACTURER WARRANTSThe NuWave Nutri-Pot Digital Pressure Cooker, including the Base, the Lid, thePressure Release Valve/Switch, the Rack, the Inner Pot, the Silicone Gasket, theFood Blocking Cap, and the Water Collector are to be free from manufacturer defects.All electrical components are warranted for 1 year from the date of purchase, undernormal household use, and when operated in accordance with the Manufacturer’swritten instructions.The Manufacturer will provide the necessary parts and labor to repair any part of theNuWave Nutri-Pot Digital Pressure Cooker at NuWave, LLC Service Department. Afterthe expiration of the warranty, the cost of the labor and parts will be the responsibility ofthe owner.THE WARRANTY DOES NOT COVERThe Limited Warranty is voided if repairs are made by an unauthorized dealer and/orthe serial number data plate is removed and/or defaced. Normal deterioration of finishdue to use or exposure is not covered by this Warranty. This Limited Warranty does notcover failure, damages or inadequate performance due to accident, acts of God (suchas lightning), fluctuations in electric power, alterations, abuse, misuse, misapplications,corrosive type atmospheres, improper installation, failure to operate in accordance withthe Manufacturer’s written instructions, abnormal use or commercial use. NuWave, LLCreserves the right to void the Limited Warranty, where allowable by law, for productspurchased from an unauthorized dealer.TO OBTAIN SERVICEThe owner shall have the obligation and responsibility to: Pay for all services and partsnot covered by the warranty; Prepay the freight to and from Service Department forany part or system returned under this warranty; Carefully package the product usingadequate padding material to prevent damage in transit. The original container is idealfor this purpose. Include in the package the owner’s name, address, day time telephonenumber, a detailed description of the problem, and your “RGA number.” Call 1-877689-2838 or e-mail help@nuwavenow.com to obtain the RGA number (Return GoodsAuthorization number). Provide the cooking system model & serial number and proof ofdate of purchase (a copy of the receipt) when making claims under this warranty.MANUFACTURER’S OBLIGATIONThe Manufacturer’s obligation under this Limited Warranty is limited, to the extentallowable by law, to repairing or replacing any part covered by this Limited Warrantywhich upon examination is found to be defective under normal use. The Limited Warrantyis applicable only within the continental United States and only to the original purchaserof the manufacturer’s authorized channels of distribution. THE LIMITED WARRANTYMA Y NOT BE ALTERED, VARIED OR EXTENDED EXCEPT BY A WRITTENINSTRUMENT EXECUTED BY THE MANUFACTURER. THE REMEDY OF REPAIR ORREPLACEMENT AS PROVIDED UNDER THIS LIMITED WARRANTY IS EXCLUSIVE.IN NO EVENT SHALL THE MANUFACTURER BE LIABLE FOR ANY CONSEQUENTIALOR INCIDENTAL DAMAGES TO ANY PERSON, WHETHER OR NOT OCCASIONEDBY NEGLIGENCE OF THE MANUFACTURER, INCLUDING WITHOUT LIMITATION,DAMAGES FOR LOSS OF USE, COSTS OF SUBSTITUTION, PROPERTY DAMAGE,OR OTHER MONEY LOSS.Some states do not allow the exclusion or limitation of incidental or consequentialdamages, so the above limitation exclusions may not apply. This Limited Warranty givesspecific legal rights, and there may also be other rights which vary from state to state.EXCEPT AS OTHERWISE EXPRESSLY PROVIDED ABOVE, THE MANUFACTURERMAKES NO WARRANTIES EXPRESSED OR IMPLIED ARISING BY LAW OROTHERWISE, INCLUDING WITHOUT LIMITATION, THE IMPLIED WARRANTIES OFMERCHANTABILITY AND FITNESS FOR A PARTICULAR PURPOSE TO ANY OTHERPERSON. READ YOUR OWNER’S MANUAL. IF YOU STILL HAVE ANY QUESTIONSABOUT OPERATION OR WARRANTY OF THE PRODUCT, PLEASE CONTACTNUWAVE, LLC.READ YOUR OWNER’S MANUAL: If you still have any questions about operation orwarranty of the product, please contact NuWave, LLC at: 1-877-689-2838 or e-mailhelp@nuwavenow.com.Owner’s Manual19
SOUPS20Recipes
Andouille Sausage and Cabbage Soup Serves: 4-6Ingredients:3 tablespoons olive oil1 pound andouille sausage, diced1 small onion, diced2 carrots, chopped2 ribs celery, chopped½ head green cabbage, chopped½ head napa cabbage, chopped3 cloves garlic, minced½ teaspoon caraway seeds1 teaspoon fennel seeds½ teaspoon mustard powder1 tablespoon tomato paste6 cups low sodium chicken stockSalt and black pepper to taste½ cup chopped fresh parsleyDirections:1. Press “sear” button, set to 3 minutes, then press “start/stop” button.2. Add olive oil and sausage to the pressure cooker and brown sausage.3. Add onions, carrots, celery and cabbage to pressure cooker and mix well.4. Add seasonings and toss to coat well.5. Add stock and tomato paste and mix well.6. Season with salt and pepper.7. Close the Lid and lock in place.8. Press “soup” button, press “texture” once to 20 minutes, then press“start/stop” button.9. Once finished, the pressure cooker will automatically go to the “warm”feature and the pressure will release naturally.10.Once pressure is released, carefully open the Lid, stir in fresh parsley,season with salt and pepper to taste and serve.Recipes21
Barley Beef Soup Serves: 4-6Ingredients:3 tablespoons olive oil, divided1½ pounds beef, cubedSalt and black pepper to taste1 onion, medium diced2 carrots, medium diced4 ribs celery, medium diced2 medium parsnips, chopped8 ounces cremini mushrooms, chopped2 cloves garlic, chopped1 teaspoon dried rosemary2 tablespoons tomato paste1 cup red wine1 cup uncooked pearl barley6 cups low sodium beef broth1 tablespoon chopped fresh thymeDirections:1. Press the “sear” button, set to 10 minutes, then press the “start/stop”button.2. Rub 1 tablespoon oil onto beef and season with salt and pepper.3. Working in small batches, brown beef on all sides in pressure cooker,adding additional oil between batches.4. Transfer browned beef to paper towel-lined dish and set aside.5. Add onions, carrots, celery, parsnips, mushrooms, garlic, rosemary topressure cooker, and sauté for 5-7 minutes.6. Stir in tomato paste and return beef to pressure cooker.7. Close the Lid and lock in place.8. Press the “soup” button, press the “texture” once for 20 minutes, thenpress the “start/stop” button.9. Once finished, the pressure cooker will automatically go to the “warm”feature and the pressure will release naturally.10.Carefully open the Lid, stir in fresh thyme, season with salt and pepper totaste and serve.Tip: Use grape juice or beef stock in place of red wine.22Recipes
Chicken and Rice Soup Serves: 6-8Ingredients:1 tablespoon olive oil3 boneless skinless chickenbreasts, small diced1 onion, finely chopped3 carrots, peeled and sliced2 ribs celery, sliced3 cloves garlic, minced1 teaspoon dried thyme1 cup long-grain rice4 cups chicken stock1 (28-ounce) can diced tomatoes1½ teaspoons saltFreshly ground black pepper totaste¼ cup chopped fresh parsleyDirections:1. Press the “sear” button, ensure it is set to 5 minutes, then pressthe “start/stop” button.2. Add olive oil and chicken to pressure cooker and brown chicken(min. 5 minutes).3. Add onions, carrots, celery, garlic and thyme and sauté for 2 minutes.4. Add rice, chicken stock and tomatoes and season with salt and pepper.5. Close the Lid and lock in place.6. Press the “soup” button, set to 8 minutes, then press the “start/stop”button.7. Once finished, the pressure cooker will automatically go to the “warm”feature and the pressure will release naturally.8. Season with salt and pepper, garnish with celery and serve.Recipes23
POULTRY24Recipes
Cassoulet Chicken Serves: 4-6Ingredients:6-8 chicken legs or thighsSalt and black pepper to taste3 tablespoons olive oil½ pound diced pancetta1 cup white wine½ onion, chopped¼ cup celery1 cup carrots1 tablespoon Dijon mustard1 clove garlic, chopped2 cups low sodium chicken stock2 (15-ounce) cans navy beans,drained1 teaspoon fresh thyme, choppedDirections:1. Press the “sear” button, set to 13 minutes, then press the “start/stop”button.2. Coat chicken in olive oil and season with salt and pepper.3. Working in batches, brown chicken on both sides in pressure cooker andset chicken aside on a covered plate.4. Add pancetta and wine to deglaze chicken pieces stuck to bottom.5. Return chicken to pressure cooker, add all remaining ingredients andcontinue to sear for 3 minutes.6. Close the Lid and lock in place.7. Press the “poultry” button, press the “texture” once for to 25 minutes,then press the “start/stop” button.8. Once finished, the pressure cooker will automatically go to the “warm”feature and the pressure will release naturally.9. Season with salt and pepper to taste and serve.Tip: Use white grape juice or chicken stock in place of white wine.Recipes25
Chicken á la King Serves: 6Ingredients:1 tablespoon olive oil3 shallots, chopped3 carrots, diced3 ribs celery, diced1 tablespoon chopped garlic1 cup mushrooms1½ teaspoons fresh thyme6 boneless skinless chicken breasts2 cups low sodium chicken stock1½ cup rice2 tablespoons parsley2 teaspoons salt1 teaspoon white pepper1 tablespoon butter3 tablespoon flour16 ounces frozen peas1 cup half and halfDirections:1. Press the “sear” button and press the “start/stop” button.2. Add olive oil, shallots, carrots, celery, garlic to pressure cooker, and cookfor 4 minutes.3. Add mushrooms, thyme, chicken, chicken stock, rice, parsley, salt, andpepper to pressure cooker, and mix until combined.4. Close the Lid and lock in place.5. Press the “poultry” button, press the “texture” twice for 15 minutes, thenpress the “start/stop” button.6. Once finished, the pressure cooker will automatically go to the “warm”feature and the pressure will release naturally.7. Remove the chicken, press the “sear” button. Add butter, flour, peas, half& half, and stir until sauce begins to thicken.8. Season with salt and pepper to taste and serve chicken with rice mixture.26Recipes
Salsa Chicken & Rice Serves: 4Ingredients:2 teaspoons olive oil1 (4-pound) chicken, cut into 8 pieces1 cup basmati rice2 cups chicken stock½ cup dry white wine1 (8-ounce) jar prepared salsa1 (10-ounce) can diced tomatoes1 (4-ounce) can green chilies1 tablespoon chili powder2 cloves garlic, choppedSalt and pepper to taste½ cup cilantro, chopped (optional)Directions:1. Press the “sear” button, set to 10 minutes, then press the “start/stop”button.2. Add oil to pressure cooker, and working in batches, brown chicken onall sides.3. Transfer browned chicken to dish lined with paper towels and set aside.4. Add all remaining ingredients, except cilantro, to pressure cooker, andstir well.5. Return all chicken to pressure cooker.6. Close the Lid and lock in place.7. Press the “poultry” button, press the “texture” once for 25 minutes, thenpress the “start/stop” button.8. Once finished, the pressure cooker will automatically go to the “warm”feature and the pressure will release naturally.9. Season with salt and pepper, garnish with cilantro and serve.Tip: Use white grape juice or chicken stock in place of white wine.Recipes27
BEEF28Recipes
Beef Mac & Cheese Serves: 6-8Ingredients:1 tablespoon vegetable oil1 pound lean ground beef1 onion, finely chopped1 green pepper, small dice1 red pepper, small dice1½ teaspoon dried oregano1½ teaspoons dried basil1 teaspoon salt1 teaspoon paprikaFreshly ground black pepper to taste1 can (28-ounces) diced tomatoes injuice1 cup beef stock¼ cup ketchup½ pound dried elbow macaroni1½ cups grated Parmesan or CheddarcheeseDirections:1. Press the “sear” button, set to 8 minutes, then press the “start/stop”button.2. Add olive oil and ground beef to pressure cooker.3. Break beef into large chunks and brown.4. Add onions, peppers, and seasonings. Cook until fragrant, stirring well.5. Add tomatoes, stock, ketchup, and macaroni to pressure cooker.6. Close the Lid and lock in place.7. Press the “time” button, set to 5 minutes, then press the “start/stop”button.8. Once finished, the pressure cooker will automatically go to the “warm”feature and the pressure will release naturally.9. Stir in grated cheese and season with salt and pepper before serving.Recipes29
Beef Short Ribs Serves: 4-6Ingredients:2 tablespoons olive oil4 pounds beef short ribsSalt and freshly ground black pepperto taste1 onion, chopped1 rib celery, chopped2 cloves garlic, minced3 sprigs fresh thyme1 bay leaf½ cup white wine1½ cups orange juice2 tablespoons soy sauce2 tablespoons chopped fresh chivesDirections:1. Press the “sear” button, set to 20 minutes, then press the “start/stop”button.2. Add olive oil to pressure cooker.3. Season ribs with salt and pepper.4. Working in batches, sear ribs for about 5 minutes per side, transfer tocovered dish and set aside.5. Add onions, celery, garlic, thyme, and bay leaf to pressure cooker andsauté for 3-4 minutes.6. Pour wine into pressure cooker to deglaze any brown bits from the bottom.Continue to simmer until nearly dissipated.7. Add orange juice, soy sauce, and ribs to pressure cooker.8. Close the Lid and lock in place.9. Press the “meat/stew” button,
cooked under pressure. Piercing skin after cooking can lead to bursts of hot liquid. 2. Do not lean over the pressure cooker at any time while cooking. 3. The Silicone Gasket creates a pressure seal between the Lid and Base. Keep the gasket completely clean and free of cracks or deteriorati