Transcription
HOUSE WRAPS, TAPES,AND FLASHING.INSTALLATION GUIDETABLE OF CONTENTSPRODUCTS &SPECIFICATIONS23BARRICADE PRODUCTSPRODUCT SPECIFICATIONSHOUSE WRAP4INSTALLATIONFLASHING TAPE578-9INSTALLATIONFLASHING CORNERSFLASHING PENETRATIONSOTHER10OTHER DETAILS
BARRICADE INSTALLATION GUIDE: HOUSE WRAP / FLASHINGBARRICADE PRODUCTSBARRICADEBP.COM 2020 BARRICADE BUILDING PRODUCTSHOUSE WRAPSFLASHINGBARRICADE WRAPBARRICADE FLASH RIGHTBARRICADE WRAP PLUSBARRICADE FLASH ULTIBARRICADE R-WRAP BARRICADE FLASH CONFORMAn economical builder-grade perforated wrap.Produced in our Virginia plant so it can meet ourhigh-quality control standards.A high-performance, non-perforated, non-wovenpermeable membrane. Building wraps made ofnon-perforated membranes offer the highest levelof performance against wind, air, and moisture.A high-perm, non-perforated, non-wovenpermeable membrane. Building wraps made ofnon-perforated membranes offer the highest levelof performance against wind, air, and moisture.A high-performance, asphalt-based window and door flashingtape designed to provide a permanent, weather-tight seal toprotect from moisture, leaks, and air penetration.Our top-of-the-line flashing tape offers the ultimate protectionfor windows and doors. The 100% butyl rubber adhesivecreates a permanent, flexible, weatherproof seal, while the UVinhibitors protect against the sun’s harmful rays.ADDITIONAL MATERIALSBARRICADE FLASH EXTREMEExtremely aggressive, self-adhering flashing membranedesigned to protect windows and doors from moisturepenetration.BARRICADE FLASH CORNERSPrecut Barricade Sill Corners provide a quick, easy, andeconomical seal at transitions between building envelopecomponents.BARRICADE SEAM TAPEA thin, strong film-coated tape with a cold-weather adhesivesystem for added protection against energy-robbing airinfiltration and exterior moisture penetration.BARRICADE BEAR CAULKThe perfect partner to Barricade tapes — a flexible,waterproof, door and window caulk for framework and joints.A highly stretchable flashing tape with an aggressive,slower-acting butyl rubber adhesive that conforms aroundradii and corners while providing maximum protection fromwater intrusion.BARRICADE WRAP PLUS DRAINAGEA non-perforated, non-woven permeablemembrane. Creates a non-directional drainagepath by maintaining an airspace between thesheathing and exterior cladding, allowing waterto drain down and out.2
BARRICADE INSTALLATION GUIDE: HOUSE WRAP / FLASHINGSPECIFICATION OVERVIEWBARRICADE WRAPBARRICADE WRAP PLUSBARRICADE R-WRAP BARRICADEBP.COMBARRICADE WRAP PLUSDRAINAGEConstruction SpecialInstitute IdentificationCodesCompositionStandard SizesOptionalSizesAir Barriers – 07270Perforatedwoven polyolefin108" x 100' 120" x 100'108" x 150' 120" x 150'108" x 195' 120" x 195'54" x 100'54" x 150'36" x 150'Air Barriers – 07270Non-perforatednon-wovenpolyolefin108" x 100' 120" x 100'108" x 150' 120" x 150'108" x 195' 120" x 195'54" x 100'54" x 150'36" x 150'Air Barriers – 07270Non-perforatednon-wovenpolyolefin108" x 100' 120" x 100'108" x 150' 120" x 150'108" x 195' 120" x 195'54" x 100'54" x 150'36" x 150'Air Barriers – 07270Non-perforatednon-wovenpolyolefin withnon-directionaldrainage pattern60" x 200' 120" x 100'108" x 100' 120" x 150'108" x 150'Permeability(ASTM E-96A)TensileStrength11 US PermsASTM D-88263.3 lbs/in. MD51.4 lbs/in. CD16 US PermsASTM D-503459 lbs/in. MD51 lbs/in. CD50 US PermsASTM D-503459 lbs/in. MD51 lbs/in. CD18 US PermsASTM D-88256 lbs/in. MD44 lbs/in. CDAir PenetrationResistance(TAPPI T-460)Water PenetrationResistancePass(ASTM D779)Class A325(AATCC-127) 1800 1800325(AATCC-127) 1800325(AATCC-127) 2020 BARRICADE BUILDING PRODUCTSCompositionRollLengthRollWidthsRollsPer atureRangeOperatingTemperatureRangeBARRICADE FLASH ULTIPolyolefin faced, peel-and-stickflashing tape using butyl rubberadhesive75'4"6"9"12"663420 mils60 lb/in0 F–150 FBARRICADE FLASH CONFORMPolyolefin film backing, butyl-basedadhesive, polyethylene liner75'6"8"150 mils 400psi40 F–180 FBARRICADE FLASH RIGHTWhite polyolefin-faced, using SBSasphalt adhesive75'4"6"9"12"18"9643220 mils12 lb/in(ASTM D412)BARRICADE FLASH EXTREMENon-asphaltic, copolymer flashingtape using DE FLASH CORNERSNon-asphaltic, copolymer flashingtape using pressure-sensitiveadhesiveN/AN/ABARRICADE SEAM TAPEPolypropylene film coated with acold-weather acrylic adhesive system165'BARRICADE BEAR CAULKOne-component, solvent-free SilylModified Polyether (hybrid) sealantN/AFlame Spread(ASTM E-84)Class AClass AClass AUV ExposureRatingApplicableStandardsWarranty12 monthsManufactured tomeet the full intentof all major buildingcodes. Meets Fed.Spec. UU-B-790aGrade D10-YearLimitedSystemWarranty9 monthsManufactured tomeet the full intentof all major buildingcodes. Meets Fed.Spec. UU-B-790aGrade D10-YearLimitedSystemWarranty9 monthsManufactured tomeet the full intentof all major buildingcodes. Meets Fed.Spec. UU-B-790aGrade D10-YearLimitedSystemWarranty9 monthsManufactured tomeet the full intentof all major buildingcodes. Meets Fed.Spec. UU-B-790aGrade tyShelf LifeUV ExposureRating-30 F–200 F10-YearLimitedWarrantyPass12 MonthsUp to 365 days-30 F–200 F10-YearLimitedWarrantyPass12 MonthsUp to 365 days40 F–160 F10-YearLimitedWarrantyPass12 Months180 days15 mils-30 F–150 F10-YearLimitedWarrantyPass18 Months180 daysN/A15 mils-30 F–150 F10-YearLimitedWarrantyPass18 Months180 days1 7 8"3"163 mils30 lb/in14 F–122 F-40 F–212 F10-YearLimitedWarrantyPass12 Months180 daysN/A24N/AN/AN/AN/A1-year LimitedWarrantyPass12 Months3
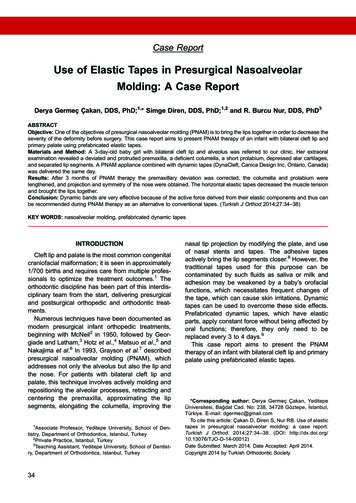
BARRICADE INSTALLATION GUIDE: HOUSE WRAP / FLASHINGCONSIDERATIONSBarricade wrap can be installed overwood-based, foam insulative, orfiberboard sheathing and exterior gypsumboard.12Install building wrap in “shingle-lap”fashion, with the higher piece lapped overthe outside of the piece below.All horizontal overlaps of building wrapmust be at least 2" (4" is recommended)and vertical overlaps must be at least 6".HOUSE WRAPINSTALLATIONBARRICADEBP.COMFORBARRICADE WRAPBARRICADE WRAP PLUSBARRICADE R-WRAP BARRICADE WRAP PLUS DRAINAGE3At roof sections, be careful to lap thebuilding wrap over the entire top of anystep flashed areas against the wall.We recommend using Barricade flashingproducts minimum 6" in width.4Start by placing the roll 2-3' (feet) fromthe corner and fasten using staples,large-headed nails, or roofing nailsspaced a maximum of 18" (inches)on center. Unroll the wrap around the building andfasten with nails or staples, spaced amaximum of 32"' on center.When used over foam insulation boards, the sheet mustbe fastened with roofing nails or other large-headed nailslong enough to penetrate through the insulation, into theframing studs. 2020 BARRICADE BUILDING PRODUCTSBARRICADE BUILDING WRAPAPPLICATION WITH EXISTING WINDOWS1. Create a top flap so that the headflashing can be installed under thewrap and over the flange.2. Leave the bottom unflashed, allowingmoisture to escape.3. On both sides, trim the wrap close tothe window flange and secure it tothe flange with tape or caulk, theninstall side flashing.Make an inverted Y-cut in the wrap atwindow rough opening. Make diagonalcuts at the top of the rough openingcorners. Windows must be installedaccording to the manufacturer’srecommended installation process.Fold the three flaps in through theopening, fastening them inside withstaples set about every 6". Fold top flapup and tape temporarily as shown.Proceed to flashing installation (page 5).4. Install head flashing and extend out3-4" to each side, then tape flap over.(Note: Tape and caulk should only be used forsecuring purposes and should not be used asprimary flashing material.)4
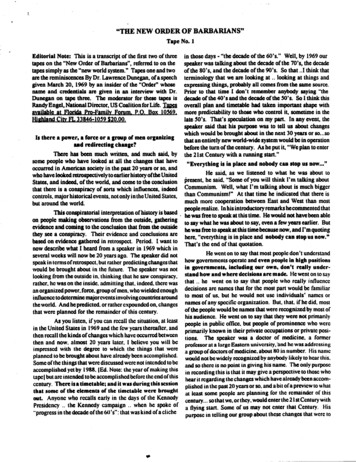
BARRICADE INSTALLATION GUIDE: HOUSE WRAP / FLASHING1NOTE:If a WRB will be applied after thewindow and flashing have alreadybeen installed, be sure not to fastenthe lower edge of the flashing so thatthe WRB may be slipped underneaththe flashing in weatherboard orshingle lap fashion (i.e., top layeroverlapping bottom layer).FLASHING TAPEINSTALLATIONBARRICADEBP.COMFORBARRICADE FLASH RIGHTBARRICADE FLASH ULTIBARRICADE FLASH CONFORMBARRICADE FLASH EXTREMEBARRICADE FLASHINGPrepare sill flashing by cutting Barricade Flash Conform at least 12" longer than the width of the rough opening. Install sill flashingby removing the release paper, centering sill flashing on sill framing stud, and adhering into rough opening. The back edge of FlashConform should extend to inside edge of sill framing stud and at least 6" up each jamb framing stud. (Sill flashing should not wraponto the inside of wall.) DO NOT stretch material along the sill or jamb. When house wrap or conventional building paper is used asa weather-resistive barrier (WRB) over wall sheathing prior to window and flashing installation, Flash Conform should be appliedover the WRB after it has been properly cut and folded in and around the window rough opening.2 2020 BARRICADE BUILDING PRODUCTSWINDOW AND DOOR INSTALLATIONBefore installing the window, either (A) apply a continuous bead of sealant to the backside (interior) of the mounting flange nearthe outer edge, or (B) apply a continuous seal to the rough window opening at a point to assure contact with the backside(interior) of the mounting flange. DO NOT caulk along bottom. Install window according to manufacturer’s installationprocedures. Use of Barricade Bear Caulk is recommended.(CONTINUED ON NEXT PAGE)5
BARRICADE INSTALLATION GUIDE: HOUSE WRAP / FLASHING3BARRICADEBP.COMSIDE JAM FLASHINGUtilizing a roller to provide firm, consistent pressure, apply Barricade windowflashing along vertical sides of the opening. Flash over the side window flanges.Extend the flashing a minimum of 3" beyond the sill flashing already in place andextend the flashing you’re using a minimum of 3" beyond the top of the opening,so that it projects beyond the head flashing to be applied later.4HEAD FLASHINGAffix the bottom of the head flashing over the mounting flange. Be sure to extend theflashing beyond each jamb flashing. Secure in place by applying pressure. Unattachhouse wrap and apply over head flashing as shown. Tape all seams and joints. 2020 BARRICADE BUILDING PRODUCTSCIRCULAR WINDOWSFollow above instructions for proper installation pro to head flashing installation.Install circular-top windows according to window manufacturers installationguidelines, then follow instructions below to complete the process.Measure the circular portion of the window and add 12" to this number. Cutflashing to this length for the head flashing. Remove approximately 20" ofrelease paper and position flashing tightly along the first edge of round window;press firmly into place.Continue removing release paper and conform Barricade Flash Conform alongentire circular portion of window. Use Barricade Seam Tape or mechanicalfasteners (i.e. nails, staples, or screws) to temporarily hold top edge of headflashing to wall. Flash Conform’s adhesive bond will strengthen over time.Both ends of head flashing should overlap jamb flashings by at least 6".Note:This recommendation refers to the most commonly used types of windows (surface mounted). Forother types of frames, special attention should be paid to window manufacturer instructions.6
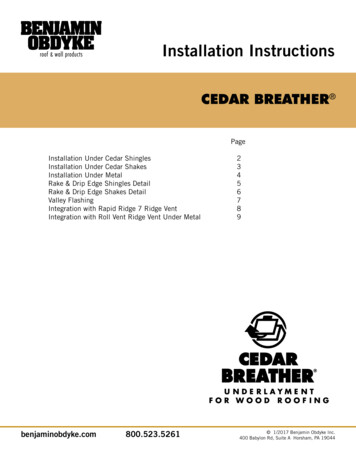
BARRICADE INSTALLATION GUIDE: HOUSE WRAP / FLASHINGPREPARATORY WORK1A spray adhesive, such as Nashua357, is recommended whenBarricade Flash Corners areapplied directly to OrientedStrand Board (OSB) or othersurfaces where additionaladhesion is needed or required.PressedBARRICADEBP.COMPeel back paper-release liner anddiscard. Adhere square-edged sideof Barricade Flash Corners to a front,inside sill corner. Ensure the frontedge of the material is flush with thefront edge of the window opening.FLASHINGCORNERSFORBARRICADE FLASH CORNERS32FlatSmooth the dove-tailed edge of theFlash Corners over the sill and adhere tothe vertical wall face. Make certain anybubbles or wrinkles are smoothed out.IMPORTANT TO NOTE 2020 BARRICADE BUILDING PRODUCTSAvoid contact with residualasphaltic products (mastics orprimers), such as coatings andother roofing products. 15-poundfelt paper or building paper may beused with Barricade Flash Corners.Make sure overlaps are in thedirection of moisture drainageRepeat Steps 1-3 for the other corner ofthe window. Overlap the horizontalflanges of Barricade Flash Corners with ameasured piece of Barricade Flash Ulti orBarricade Flash Extreme window flashing.Flash remaining portion of window perthe building code.7
BARRICADE INSTALLATION GUIDE: HOUSE WRAP / FLASHINGSQUARE N INSTALLEDUNDER THE HOUSE WRAPApply flashing to the bottom of thepenetration. We recommend usingBarricade Flash Ulti, Barricade FlashExtreme, or Barricade Flash Right.2Apply flashing along the sides and thenthe top, shingling each layer.3Use a roller to apply even pressure alongthe flashing, being sure to push out any airpockets that may have appeared. Barricadesuggests finishing with Barricade BearCaulk commercial sealant to ensure a tightseal around the edges of the penetration.ROUND PENETRATION1 2020 BARRICADE BUILDING PRODUCTSCut two 45 angles and peel back housewrap above the penetration.Tip: Use Barricade Seam Tape to hold the flap upwhile not in use.2Apply Barricade Flash Conform to theunderside of penetration, shingling theabove side after. Use a roller to applyeven pressure along the flashing.3Replace house wrap flap over theflashing and tape across usingBarricade Seam Tape.4Tape over the 45 cuts using BarricadeSeam Tape.8
BARRICADE INSTALLATION GUIDE: HOUSE WRAP / FLASHINGSQUARE N INSTALLEDOVER THE HOUSE WRAPApply flashing along the sides first,leaving the bottom unflashed.We recommend using Barricade FlashUlti, Barricade Flash Extreme, orBarricade Flash Right.2Next apply flashing over the top,shingling the side flashing.3Use a roller to apply even pressure alongthe flashing, being sure to push out any airpockets that may have appeared. Barricadesuggests finishing with Barricade BearCaulk commercial sealant to ensure a tightseal around the edges of the penetration. 2020 BARRICADE BUILDING PRODUCTS9
BARRICADE INSTALLATION GUIDE: HOUSE WRAP / FLASHINGOTHER DETAILS:All installation instructions andprocedures contained within thisbrochure are recommended byBarricade Building Products and shouldbe followed. Failure to follow theseinstructions and procedures maycompromise the integrity of the buildingwrap and impact its performance.Barricade house wraps are backed by a10-year limited warranty. Please contactBarricade Building Products for moreinformation.BARRICADEBP.COMAll Barricade Building Products buildingwrap is manufactured to meet the fullintent of all applicable building codesand their governing bodies.Barricade is a weather-resistive barrier(WRB) designed to provide a secondaryline of defense against bulk waterpenetration. It is not designed orintended for use as a primarywaterproofing membrane. 2020 BARRICADE BUILDING PRODUCTSWind-driven rain can penetrate exteriorsidings/cladding such as vinyl, wood,brick, aluminum, hardboard,cementitious, etc. Vinyl and aluminumsiding are manufactured with built-inweep holes to allow proper drainage ofwater that gets past it. Wood, hardboard,and brick exteriors are porous, allowingwater to be absorbed into them. Mostbrick facades also have weep holes builtinto the wall system to promote waterdrainage.form of spacer reduces the quantity andtime liquid phase for any water that istrapped in the exterior wall assembly,thereby reducing the potential forsurfactant movement.Contamination of Barricade BuildingProducts building wrap and variousbuilding site chemicals or various sugarsand saps found in wood sidings (e.g.cedar) which increase its wettability (e.g.surfactants), will adversely affect thehouse wrap’s water-resistive capabilityand its contribution to the overall waterresistance of the wall system. Surfactantscan be defined as substances whichadversely impact and contaminate thesurface tension of a given house wrap orbuilding paper by raising their surfaceenergy which allows liquid to “wet” thesurface more easily. Where wood sidings,such as cedar, are concerned, it isstrongly recommended that both primingor back coating of the siding beperformed. This helps isolate thesurfactants in the wood from the housewrap or building paper surface. Inaddition to back priming/coating, anairspace should also be created betweenthe siding and house wrap. Providingsome form of airspace between the woodtrim, siding, and clapboards and thehouse wrap using furring or some otherAny rips, tears, breaks, holes, etc. thathappen during normal constructionshould be repaired by taping or patching.Other holes, gaps, or cracks created inthe exterior wall around items such asfaucets, dryer vents, electrical outlets,etc. should also be properly taped,flashed, and sealed. Any of theseoccurrences that go unrepaired willdiminish the building wrap’s performanceand contribution to the overallwater-resistance of the wall system.Standard fasteners, such as nails andstaples, used to apply Barricade canreduce the building wraps water-resistivecharacteristics. Barricade BuildingProducts encourages the use of plasticcap nails to improve the seal around thefastener and enhance the protectionagainst water penetration at thefastener location.All horizontal overlaps of building wrapmust be at least 2" and vertical overlapsmust at least be 6". Porous sidings suchas brick, wood, hardboard and someothers allow water penetration and havethe ability to store water due to theirhygroscopic nature.It’s always a wise construction practice touse and integrate properly installedflashings around all window and dooropenings as well as other exteriorpenetrations as part of an overall designstrategy to control moisture movementand transport. Please contact yourbuilder or Barricade Building Productsfor more details.The information contained in thisinstallation guide is to the best of ourknowledge, true and accurate and ispresented in good faith. BarricadeBuilding Products assumes no liability,expressed or implied as to thearchitecture, engineering, orworkmanship of any project. Thisinformation may be concurrent with,or superseded by other applicabledocuments.Contact Barricade Building Products forfurther information or technical supportat 877-832-0333.10
recommended installation process. Fold the three flaps in through the opening, fastening them inside with staples set about every 6". Fold top flap up and tape temporarily as shown. Proceed to flashing installation (page 5). Start by placing the roll 2-3' (feet) from the corner and fasten using staples, large-headed nails, or roofing nails