Transcription
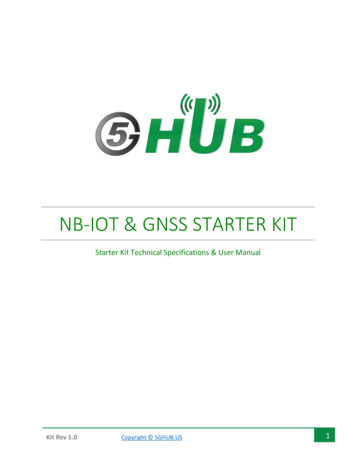
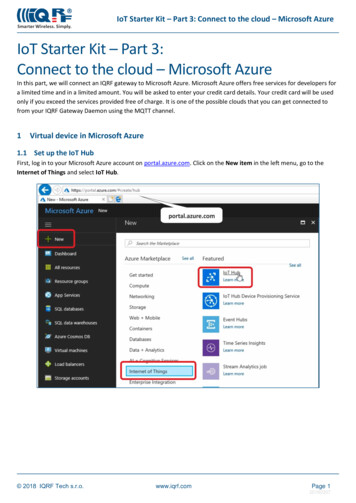
IoT Starter Kit – Part 3: Connect to the cloud – Microsoft AzureIoT Starter Kit – Part 3:Connect to the cloud – Microsoft AzureIn this part, we will connect an IQRF gateway to Microsoft Azure. Microsoft Azure offers free services for developers fora limited time and in a limited amount. You will be asked to enter your credit card details. Your credit card will be usedonly if you exceed the services provided free of charge. It is one of the possible clouds that you can get connected tofrom your IQRF Gateway Daemon using the MQTT channel.1Virtual device in Microsoft Azure1.1 Set up the IoT HubFirst, log in to your Microsoft Azure account on portal.azure.com. Click on the New item in the left menu, go to theInternet of Things and select IoT Hub. 2018 IQRF Tech s.r.o.www.iqrf.comPage 120180307
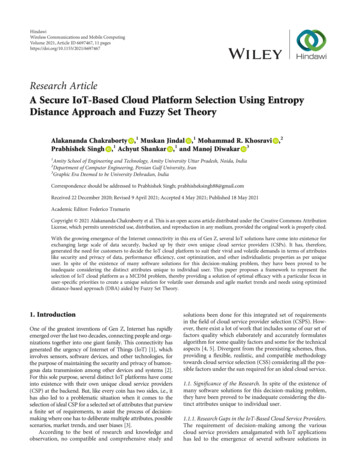
IoT Starter Kit – Part 3: Connect to the cloud – Microsoft AzureSetup the IoT Hub name and your pricing model. As a developer you can create one IoT Hub for free.Set up a name of your Resource group. Click on the Create button. 2018 IQRF Tech s.r.o.www.iqrf.comPage 220180307
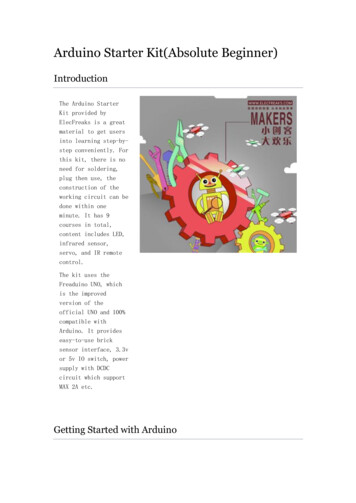
IoT Starter Kit – Part 3: Connect to the cloud – Microsoft Azure1.2 Create a virtual deviceIn the IoT Hub find the IoT Devices item. Click on the Add button and create your new IoT device. This virtual devicerepresents your UP board.Copy the Connection string primary key. It will be used in the MQTT interface configuration. 2018 IQRF Tech s.r.o.www.iqrf.comPage 320180307
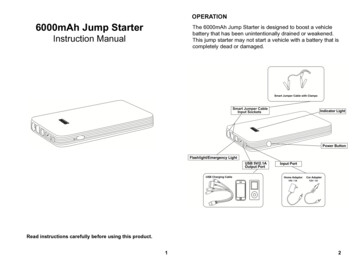
IoT Starter Kit – Part 3: Connect to the cloud – Microsoft Azure2Set up the MQTT interface in the IQRF Gateway2.1 Create a new MQTT interfaceIn the web browser on your computer, insert the IP address of your UP board, and login to it as admin with passwordiqrf. In the IQRF Gateway Daemon web application, click on the Microsoft Azure item in the Clouds menu.Add a new MQTT interface. Paste here the connection string which you copied before and save the configuration. 2018 IQRF Tech s.r.o.www.iqrf.comPage 420180307
IoT Starter Kit – Part 3: Connect to the cloud – Microsoft Azure2.2 Restart the serviceRestart the IQRF Gateway Daemon service.3Test the connection using Device Explorer3.1 Copy credentials from IoT HubIn the IoT Hub find the Shared access policies menu. Copy the Connection string primary key for the iothubowner. 2018 IQRF Tech s.r.o.www.iqrf.comPage 520180307
IoT Starter Kit – Part 3: Connect to the cloud – Microsoft Azure3.2 Set up the Device ExplorerInsert this string into the connection information in the Device Explorer application. We will use this application forsending DPA packets to our IQRF network. Click on the Update button.In the Management tab we can see our virtual device that we’ve just set up. 2018 IQRF Tech s.r.o.www.iqrf.comPage 620180307
IoT Starter Kit – Part 3: Connect to the cloud – Microsoft Azure3.3 Inspect the communicationIn the Data tab, click on Monitor. This will enable you to read received events.Go to the Messages To Device tab, insert a DPA packet in JSON format into the Message textbox and click on Send.We’ve just sent a command for turning on the red LED on the IQRF coordinator.{"ctype": "dpa","type": "raw","msgid": "1510754980","request": "00.00.06.01.FF.FF","request ts": "","confirmation": "","confirmation ts": "","response": "","response ts": ""} 2018 IQRF Tech s.r.o.www.iqrf.comPage 720180307
IoT Starter Kit – Part 3: Connect to the cloud – Microsoft AzureIn the Data tab, you can see the incoming communication from the UP board. You can easily double check that thecommand has been executed.In the same way, you can turn the red LED off as well as send any other DPA command to your network.4SummaryThe bidirectional communication between IQRF network and the Microsoft Azure is up and running. Now it’s just up toyou to use it for your own IoT solution. 2018 IQRF Tech s.r.o.www.iqrf.comPage 820180307
IoT Starter Kit - Part 3: Connect to the cloud - Microsoft Azure 1.2 Create a virtual device In the IoT Hub find the IoT Devices item. Click on the Add button and create your new IoT device. This virtual device represents your UP board. Copy the Connection string primary key. It will be used in the MQTT interface configuration.