Transcription
Deltek Costpoint Mobile Time and Expense1.0User GuideAugust 10, 2020
While Deltek has attempted to verify that the information in this document is accurate and complete,some typographical or technical errors may exist. The recipient of this document is solely responsible forall decisions relating to or use of the information provided herein.The information contained in this publication is effective as of the publication date below and is subject tochange without notice.This publication contains proprietary information that is protected by copyright. All rights are reserved. Nopart of this document may be reproduced or transmitted in any form or by any means, electronic ormechanical, or translated into another language, without the prior written consent of Deltek, Inc.This edition published August 2020. Deltek, Inc.Deltek’s software is also protected by copyright law and constitutes valuable confidential and proprietaryinformation of Deltek, Inc. and its licensors. The Deltek software, and all related documentation, isprovided for use only in accordance with the terms of the license agreement. Unauthorized reproductionor distribution of the program or any portion thereof could result in severe civil or criminal penalties.All trademarks are the property of their respective owners.User Guideii
ContentsOverview . 1Features Not Supported . 1Mobile Devices Requirements . 2Getting Started . 3Install Costpoint Mobile T&E . 3Log Into Costpoint Mobile T&E . 3Log Into Costpoint Mobile T&E using SAML Identity Provider Authentication . 4Biometric Authentication . 7Biometric Authentication Behavior on an iOS Device. 8Biometric Authentication and Two-Factor Authentication (2FA) . 8Biometric Authentication and SAML Identity Provider Authentication . 8Create Security PIN . 8One-Time Passcode Screen . 9Log Out of Costpoint Mobile T&E . 9Change User . 10Switching Between Screens in Costpoint Mobile T&E . 10Switching Between Applications on the Device . 10Screen Display . 11Time . 11Leave . 12Tasks . 12Settings . 12Help . 12Logout . 12Field Indicators . 12Timesheet. 13View Calendar . 13Change Timesheet Period . 14View Timesheet . 14Timesheet Status . 14Add or Edit Timesheet Entries . 15Add Charge/Edit Charge Screen . 15Add a Charge to your Timesheet . 16User Guideiii
Enter Time on a Timesheet (Quick Entry) . 16Enter Time on Timesheet Line (Detailed Entry) . 17Copy a Timesheet Charge from the Timesheet Screen . 17Delete a Timesheet Charge from the Timesheet Screen . 17Favorites . 18Add a Charge to Favorites . 18Delete a Favorite. 18Favorite and Autopopulate Fields . 18Save a Timesheet. 19Error and Warning Indicators . 19Enter or Select Revision Explanations. 19Sign a Timesheet on the Timesheet Screen . 20Summary View . 20View Calendar on the Summary View . 20Sign a Timesheet on the Summary View. 21View Timesheet Summary . 21View Audit Information . 22Timesheet Search . 22Search Timesheets . 23Leave. 24View Leave Balances . 25Tasks . 26Review Screen . 27Approve a Timesheet . 28Reject a Timesheet. 28Sign a Timesheet (on the Tasks Screen) . 29Update a Timesheet . 29Settings Screen . 31Configure Costpoint Mobile T&E Settings . 32Enable or Disable Usage Tracking . 34Change PIN . 35Delete Information from the Application . 35Help . 36Log Out. 37Appendix A: If You Need Assistance . 38Customer Services . 38User Guideiv
Deltek Support Center . 38Access Deltek Support Center . 39Additional Documentation. 39User Guidev
OverviewOverviewCostpoint Mobile Time and Expense by Deltek, the native mobile version of the standard timesheetapplication, enables you to enter, view, and sign timesheet information.Note: The official name of the application is Costpoint Mobile Time and Expense. This document onlyuses it at first mention. The succeeding instances of the application name display Costpoint MobileT&E.In addition, the application name in the Apple App Store displays Costpoint Time and Expense.This document contains detailed information and instructions on how to use various features of theapplication.Note: Costpoint Mobile T&E server must be installed and configured using the guidelines in theDeltek Costpoint Mobile Time and Expense Technical Installation and Configuration Guide.Note: This version does not yet include the expense application, which is currently scheduled forrelease in the third quarter of 2020.Features Not SupportedThe following Costpoint Time timesheet features are not available in Costpoint Mobile T&E: Interim Charges: Interim charges cannot be created in Costpoint Mobile T&E. However, interimcharges already in timesheets can be charged. Interim charge edit does occur upon timesheetsigning. Hours Proration: Hours proration is supported but the Day view is limited to entered hoursdisplay only. Prorated hours after signing the timesheet will display in the Summary view. Correct Timesheet: Users will not be able to reverse timesheets within Costpoint Mobile T&E. Ifa timesheet class requires a reverse timesheet, a user must perform timesheet corrections in abrowser-based timesheet. Line Level Approval: Approvals should be performed in a browser-based timesheet screen. Timesheet Printing: Users will not be able to print timesheets. They will need to use browserbased timesheets. Timesheet Comments: Users will not be able to enter/view OVERALL timesheetcomments/notes. Subcontractor Time Entry: Users who are subcontractors will not be able to use WorkAssignment charges during time entry.Specific users will not be able to use Costpoint Mobile T&E based on their timesheet class business rulesfor the following Costpoint Time & Expense features: Time In/Out: Users with timesheet classes will not be allowed to use Costpoint Mobile T&E if thisfeature is enabled. This is checked at login. Start/Stop Time: Users with timesheet classes with this feature will not be allowed to useCostpoint Mobile T&E if this feature is enabled. This is checked at login.User Guide1
Overview Subcontractor Time Entry: Users who are subcontractors will not be able to use WorkAssignment charges during time entry.Mobile Devices RequirementsThe Costpoint Mobile T&E application supports mobile devices that run on the following operatingsystems: Apple iOS 11 and higherUser Guide2
Getting StartedGetting StartedInstall Costpoint Mobile T&E1. In the Apple App Store, search for the application (Costpoint Time and Expense).2. Download and install the application by tapping the appropriate buttons.3. Tap the installed application, and follow the screen prompts to accept the terms of agreement andusage tracking.Note: Costpoint Mobile T&E supports Lightweight Directory Access Protocol (LDAP)authentication.Log Into Costpoint Mobile T&E1. Tap.2. In the Server URL field, enter your organization's Costpoint Mobile T&E URL using the formathttps:// server /DeltekTouch/Costpoint/TE, where server refers to the host name of yourCostpoint Mobile T&E server.Note: If you receive the Costpoint Mobile T&E API URL via email, click the second hyperlinkto populate the Costpoint Mobile T&E URL in the Server URL field automatically. For moreinformation, see “Appendix A: Costpoint Mobile T&E URL in Email” in the Deltek CostpointMobile Time and Expense Technical Installation and Configuration Guide.3. Tap Connect.4. If Costpoint Mobile T&E is configured to allow Single Sign-On (SSO) through a Security AssertionMarkup Language (SAML) Service Provider authentication, tap SAML/3rd Party Authenticationto On. See “Log Into Costpoint Mobile T&E using SAML Identity Provider Authentication” for moreinformation.Otherwise, tap the Username, Password, and System fields to enter corresponding values, andtap Login.5. The application prompts you to review and accept Terms and Use of Service. Tap the Termsand Use of Service button to review.User Guide3
Getting Started6. Tap the I accept these terms button to continue.7. The application prompts you to review and accept Usage Statistics Tracking. Toggle the usagetracking off to not allow user tracking in the application. Tap the I accept these terms button tocontinue.Note: Costpoint Mobile T&E tracks the number of times you access the application and howoften you use certain features. It does not track any personal or confidential data, such asuser name and companies.8. The application prompts you select between using PIN or biometric authentication. You canchange the setting at any time on the Settings screen.9. If you choose to login using biometric authentication, the application prompts you to allow accessof your face ID or fingerprint.10. If you choose to cancel, the Costpoint Mobile T&E application displays the PIN screen. Enter aPIN code, which you will use on your succeeding logins. For more information, see CreateSecurity PIN.Note: Costpoint Mobile T&E remembers your user ID and selected database (and domain, ifWindows Authentication is used) on your next login. To log in using a different user ID anddatabase, tap Change User / Reset PIN. All your user settings and favorites will be lost.11. If Two-Factor Authentication (2FA) is enabled, the One-Time Passcode screen displays. Enteryour credentials. For more information, see “Biometric Authentication and Two-FactorAuthentication (2FA)” and “One-Time Passcode Screen” for more information.If SAML Identity Provider Authentication is enabled, enter your login credentials. For moreinformation, see “Log Into Costpoint Mobile T&E using SAML Identity Provider Authentication”and “Biometric Authentication and SAML Identity Provider Authentication”.Log Into Costpoint Mobile T&E using SAML Identity ProviderAuthenticationThe following table outlines the steps to log into Costpoint Mobile T&E if SAML SSO is configured.StepDescription1On the Costpoint Mobile T&E Login screen, tap SAML/3rd Party Authentication to Onand tap Username and System fields to enter corresponding values.User Guide4
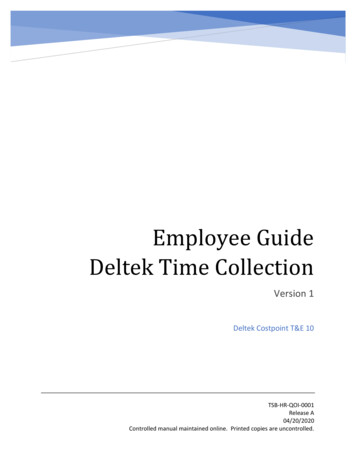
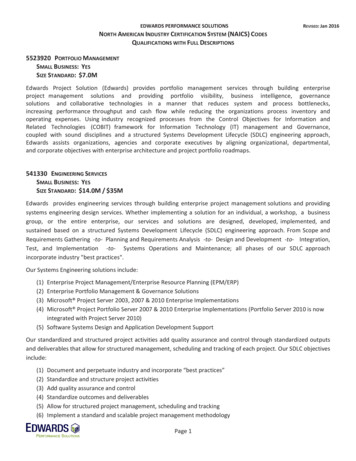
Getting StartedStepDescription2Costpoint Mobile T&E redirects you to the SAML Service Provider (ADFS, Azure, Okta, orPing) Login page where you provide credentials such as user name, passwords,biometrics, certificates, and so on.Microsoft ADFS Login screenOkta Login ScreenUser Guide5
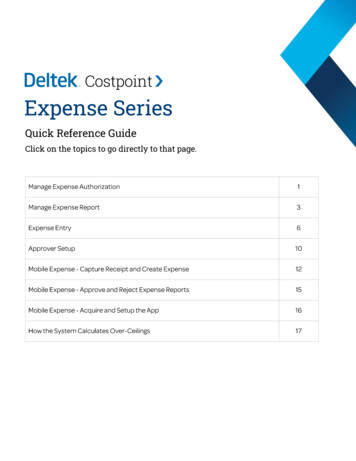
Getting StartedStepDescriptionPing Login ScreenMS Azure Login Screen3User GuideThe SAML provider verifies your identity and issues SAML authentication token. You aredirected back to Costpoint Mobile T&E, where it verifies your SAML authentication token.If your token is valid, you are allowed to continue with your login and the PIN screendisplays.6
Getting StartedStepDescriptionNote: See the "User Authentication using SAML Single Sign-On (SAML SSO) Mode" section in theDeltek Costpoint Mobile Time and Expense Technical Installation and Configuration Guide for moreinformation.Biometric AuthenticationYou can log in to Costpoint Mobile T&E using the biometric authentication feature. This functionality iscontrolled by a server setting, which, if enabled, allows you to enable or disable the biometric login on theSettings screen in Costpoint Mobile T&E.Note: For more information on how to enable the biometrics login, refer to the Settings Screen of theDeltek Costpoint Mobile Time and Expense User Guide.You can use the Biometric authentication feature under the following conditions: The ALLOW BIOMETRICS setting in the configuration.ini file is set to true. The Costpoint MobileT&E version 1.0.9 installer will automatically update this setting.Note: For more information on how to enable the biometric authentication setting, refer to the DeltekCostpoint Mobile Time and Expense Technical Installation and Configuration Guide. The Costpoint Mobile T&E Server version 1.0.9 or above and the Costpoint Mobile T&Eapplication version is at 1.0.9 or above. You are using a device that support biometric authentication:User Guide7
Getting Started Touch ID on all supported Apple devices Face ID on all supported Apple devicesThe device has at least one fingerprint or a face ID registered. This implies that the device isencrypted and has a passcode, which are required.Once you upgrade to Costpoint Mobile T&E version 1.0.9 on a device that supports biometricauthentication, the application displays a message that biometric authentication is supported and that youcan enable it on the Settings screen.Biometric authentication identifies you using your unique body measurements or characteristics, such asyour fingerprint, or your face. Use the fingerprint sensor or face recognition function of your device to setup the biometric authentication. The next time you log into the application, Costpoint Mobile T&E promptsyou to use your fingerprint or face. If biometric authentication fails, Costpoint Mobile T&E prompts you tologin using your PIN.Biometric Authentication Behavior on an iOS DeviceWhen you log out from an iOS device and then launch Costpoint Mobile T&E again, the applicationdisplays the "Login using Face ID (or Touch ID)" screen. When you completely closes out application,Costpoint Mobile T&E displays the Biometric Login screen.Biometric Authentication and Two-Factor Authentication (2FA)You can use biometric authentication with 2FA. If both enabled, the Costpoint Mobile T&E application willvalidate you using the biometric authentication, followed by your One-Time Passcode login credentials.Biometric Authentication and SAML Identity Provider AuthenticationYou can use biometric authentication with SAML Identity Provider Authentication. If both enabled, theCostpoint Mobile T&E application will validate you using the biometric authentication, followed by yourSAML Identity Provider login credentials.Create Security PINFor initial login, Costpoint Mobile T&E requires you to create a PIN. Instead of entering your user nameand password on your next login, you need to enter your PIN.Note: By default, PIN length is 6 digits, but you can configure it from 4 digits (minimum length) up to12 digits (maximum length). For more information, see “Step 5: Configure PIN Settings” section of theDeltek Costpoint Mobile Time and Expense Technical Installation and Configuration Guide.1. On the Login screen, enter a PIN and tap.Note: The minimum number of digits is displayed.2. Re-enter the PIN to confirm and tapUser Guide.8
Getting StartedNote: If you enter an incorrect PIN three times, you will be asked to log in using your username and password.One-Time Passcode ScreenIf your Costpoint login is configured for two-factor authentication and Costpoint PIN, the One-TimePasscode screen displays before the PIN screen.Two-factor authentication (2FA) is an extra layer of security that verifies the identification of users using acombination of two different components, such as the user name/password component and the one-timepasscode component. One-time Passcode: The one-time, 6-digit random number passcode is either generated byCostpoint and securely emailed to a user’s email address or generated separately by a user on amobile device through one of the available 2FA mobile applications, such as Duo Security orGoogle Authenticator. Permanent PIN: In addition to a one-time passcode, a user may be asked to verify their identitythrough a personal four-digit PIN. This PIN is stored in User Preferences and may be required onthe login page based on the Costpoint System Settings.Note: For information on how to set up two-factor authentication using email or mobile applicationand how to configure the Costpoint PIN, see the “Two-Factor Authentication” section in the DeltekCostpoint 7.1.1 Security Guide and the Authentication Tab topic in the Costpoint Online Help.Log Out of Costpoint Mobile T&ETapand tap. Costpoint Mobile T&E prompts you for your PIN or biometric data on your nextlogin regardless of the timeout period.If you are using a SAML/3rd party authentication provider, Costpoint Mobile T&E follows the followingbehavior: When you log into Costpoint Mobile T&E on an iOS device using a SAML/3rd party authenticationprovider, and then you log out, the PIN screen or the Biometric screen displays on your nextlogin. When you log into Costpoint Mobile T&E on an iOS device using a SAML/3rd party authenticationprovider, and then you tap Forget Me On This Device or close the application, the SAML/3rdUser Guide9
Getting Startedparty authentication provider login page displays after the Costpoint Mobile T&E Login screen onyour next login.Note: You should not dismiss or close applications on an iOS device. Apple iOS manages theapplications and removes them from memory as needed. When you close an application, it isremoved completely from memory, including any active login token you may have with yourSAML/3rd party authentication provider. Deltek recommends that you logout from the application (tapLogout) when you are done using it.Change UserUse the Change User feature to log into the application using a different username.To change a user:1. Tapand tap.2. On the PIN screen, tap Change User.3. Tap the Username, Password, and System fields to enter corresponding values.4. Tap Log In.5. Enter a PIN and tap.Note: By default, the PIN is 6 digits.Switching Between Screens in Costpoint Mobile T&ECostpoint Mobile T&E prompts you to save the timesheet when there is an unsaved timesheet and youperform any of the following actions: Navigate to a new timesheet by tapping Navigate to a new timesheet by tapping Tap.when you are not in the timesheet with today’s date.and tap any other menu.Switching Between Applications on the DeviceIf you switch between applications on the device, Costpoint Mobile T&E keeps any unsaved changes inthe memory as long as the application is still active on your device. If you close the application from thetask list or if you turn off your device, changes will be lost.Note: Changes are only saved in memory with the packaged application and not when accessedthrough the device browser via a URL.User Guide10
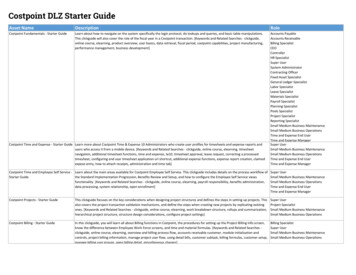
Screen DisplayScreen DisplayThe Costpoint Mobile T&E user interface has the following menus, which you access by tapping.TimeTapto display the Timesheet screen, which allows you to perform several tasks for your timesheet.The Timesheet screen contains the following buttons:Timesheet ButtonsDescriptionTap to display the calendar.Tap to sign a timesheet.Tap to save a timesheet.Tap to display the Add Charge screen.Tap to display the following:User Guide Summary View Timesheet Search11
Screen DisplayLeaveTapto display the Leave screen, which shows your leave balances by type.TasksTapto display the Tasks screen, which shows the tasks you need to perform.SettingsTapto display the Settings screen, which helps you configure the Costpoint Mobile T&E settings.HelpTapto display the user guide for this application.LogoutTapto log out of the application.Field IndicatorsSeveral indicators mark the fields on the screen when you add, edit, or configure settings. Theseindicators are as follows: Required: You must enter a value in this field in order to continue a task. This field is marked withan asterisk (*). Editable: This field allows you to enter or select a value. This field is marked withyou to enter or select a value. Read Only: Fields without a forward arrow are defined by your company, or set by using presaved Favorites and are non-editable.User Guideand allows12
TimesheetTimesheetThe Timesheet screen allows you to view and change timesheet periods, and create, revise, and submittimesheets.Note: If you are a new user, you may want to go to Costpoint Time & Expense and load the previoustimesheets from Favorites. This way, you can start off with some projects in your first timesheet thatyou know are valid and you can use on mobile. This makes your first time of using the CostpointMobile T&E more convenient.View CalendarYou use the Calendar screen to quickly select a specific date for which you want to enter or update time.To view the calendar:1. On the Timesheet screen, tap.2. On the Calendar screen, tap Today to display the current date and its timesheet entries. Today’sdate is underlined.User Guide13
TimesheetNote: You can also display the Calendar screen using the Summary view.Change Timesheet PeriodTo change the timesheet period:1. On the Calendar screen, tap the date for which you want to enter or update time.The timesheet period that contains the date you selected is displayed on the Timesheet screen.By default, the Timesheet screen displays the date of the current timesheet.2. To view periods or weeks for the previous month, tapmonth, tap.3. To view periods or weeks for the previous year, tapyear, tap. To view periods or weeks for the next. To view periods/weeks for the next.View TimesheetThe current status and total hours of a timesheet period (in Day view) are displayed on the header of theTimesheet screen.To view a timesheet:1. On the Timesheet screen, take one of the following actions: Tap Tap Today to display the timesheet containing the current date and its timesheet entries.Today’s date is underlined.and tap a date.2. You can perform any of the following tasks: Switch between different days of a timesheet period by swiping the date carousel or tapping adate (for example, if you are on Mon 1, tapping Thu 4 moves the calendar to Thu 4). Taporat either end of the date carousel to go back to the previous period or move tothe next (for example, if you are on Mon 13–Sun 19, tapping the next button moves theperiod to Mon 20–Sun 26).The selected day is underlined.Timesheet StatusThe status of the selected timesheet and time period is displ
Getting Started User Guide 3 Getting Started Install Costpoint Mobile T&E 1. In the Apple App Store, search for the application (Costpoint Time and Expense). 2. Download and install the application by tapping the appropriate buttons.