Transcription
Configuring SNMP & RMONCHAPTERS1. SNMP2. SNMP Configurations3. Notification Configurations4. RMON5. RMON Configurations6. Configuration Example7. Appendix: Default Parameters
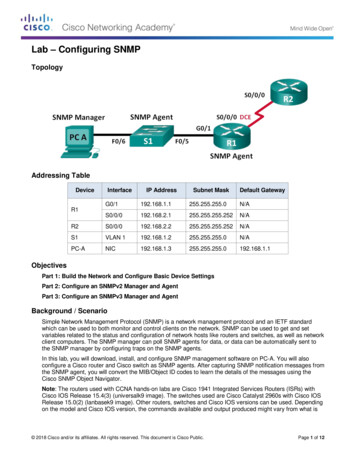
Configuring SNMP & RMONSNMPThis guide applies to:T1500G-10PS v2 or above, T1500G-8T v2 or above, T1500G-10MPS v2 or above, T1500-28PCT v3 or above,T1600G-52TS v3 or above, T1600G-52PS v3 or above, T1600G-28PS v3 or above, T1600G-28TS v3 orabove, T1600G-18TS v2 or above, T2600G-52TS v3 or above, T2600G-28TS v3 or above, T2600G-28MPSv3 or above, T2600G-28SQ v1 or above.1SNMP1.1OverviewSNMP (Simple Network Management Protocol) is a standard network managementprotocol, widely used on TCP/IP networks. It facilitates device management using NMS(Network Management System) software. With SNMP, network managers can view ormodify network device information, and troubleshoot according to notifications sent bythose devices in a timely manner.As the following figure shows, the SNMP system consists of an SNMP manager, an SNMPagent, and a MIB (Management Information Base). The SNMP manager can be part of anNMS such as tpNMS. The agent and MIB reside on the managed device such as the switch,router, host or printer. To configure SNMP on the switch, you define the relationshipbetween the manager and the agent.Figure 1-1SNMP SystemNMSManaged DeviceGet or set MIB objects valuesResponse and send notificationsSNMP Manager1.2MIBSNMP AgentBasic ConceptsThe following basic concepts of SNMP will be introduced: SNMP manager, SNMP agent,MIB (Management Information Base), SNMP entity, SNMP engine, and SNMP version.SNMP ManagerThe SNMP manager uses SNMP to monitor and control SNMP agents, providing a friendlymanagement interface for the administrator to manage network devices conveniently. Itcan get an MIB objects values from an agent or store a value of MIB object into the agent.Also, it receives notifications from the agents so as to learn the condition of the network.Configuration Guide1
Configuring SNMP & RMONSNMPSNMP AgentAn SNMP agent is a process running on the managed device. It contains MIB objects whosevalues can be requested or changed by the SNMP manager. An agent can send unsolicitedtrap messages to notify the SNMP manager that a significant event has occurred on theagent.MIBA MIB is a collection of managed objects that is organized hierarchically. The objects definethe attributes of the managed device, including the names, status, access rights, and datatypes. Each object can be addressed through an object identifier (OID).As the following figure shows, the MIB hierarchy can be depicted as a tree with a namelessroot, the levels of which are assigned by different organizations. The top-level MIB objectIDs belong to different standards organizations, while lower-level object IDs are allocatedby associated organizations. Vendors can define private branches that include managedobjects for their own products.Figure 1-2MIB Treeroot ()itu-t (0)iso (1)standard registrationauthority (1)(0)iso-itu-t (2)memberbody (2)identifiedorganization (3)dod (6)internet (1)directory(1)mgmt experimental(3)(2)mib-2 (1)private security(4)(5)snmpv2(6)enterprise (1)tplink (11863)1.3.6.1.4.1.11863TP-Link switches provide private MIBs that can be identified by the OID 1.3.6.1.4.1.11863.The MIB file can be found on the provided CD or the download center of our d-center.html.Also, TP-Link switches support the following public MIBs: LLDP.mib LLDP-Ext-Dot1.mibConfiguration Guide2
Configuring SNMP & RMONSNMP LLDP-Ext-MED.mib RFC1213.mib RFC1493-Bridge.mib RFC1757-RMON.mib RFC2618-RADIUS-Auth-Client.mib RFC2620-RADIUS-Acc-Client.mib RFC2674-pBridge.mib RFC2674-qBridge.mib RFC2863-pBridge.mib RFC2925-Disman-Ping.mib RFC2925-Disman-Traceroute.mibFor detail information about the supported public MIBs, see Supported Public MIBs for TPLink Switches which can be found on the training center of our uides.htmlSNMP EntityAn SNMP entity is a device running the SNMP protocol. Both the SNMP manager and SNMPagent are SNMP entities.SNMP EngineAn SNMP engine is a part of the SNMP entity. Every SNMP entity has one and onlyone engine. An SNMP engine provides services for ending and receiving messages,authenticating and encrypting messages, and controlling access to managed objects.An SNMP engine can be uniquely identified by an engine ID within an administrative domain.Since there is a one-to-one association between SNMP engines and SNMP entities, we canalso use the engine ID to uniquely and unambiguously identify the SNMP entity within thatadministrative domain.SNMP VersionThe device supports three SNMP versions: SNMPv1, SNMPv2c and SNMPv3. Table 1-1lists features supported by different SNMP versions, and Table 1-2 shows correspondingapplication scenarios.Table 1-1Features Supported by Different SNMP VersionsFeatureSNMPv1SNMPv2cSNMPv3Access ControlBased on SNMPCommunity and MIB ViewBased on SNMPCommunity and MIB ViewBased on SNMP User, Group,and MIB ViewConfiguration Guide3
Configuring SNMP & RMONSNMPFeatureSNMPv1SNMPv2cAuthenticationand PrivacyBased on CommunityNameBased on Not supportedSupportedSupportedTable 1-2SNMPv3Supported authentication andprivacy modes are as follows:Authentication: MD5/SHAPrivacy: DESApplication Scenarios of Different VersionsVersionApplication ScenarioSNMPv1Applicable to small-scale networks with simple networking, low security requirements orgood stability (such as campus networks and small enterprise networks).SNMPv2cApplicable to medium and large-scale networks with low security requirements and thosewith good security (such as VPNs), but with busy services in which the traffic congestionmay occur. You can configure Inform to ensure that the notifications from managed devicesare received by network managers.SNMPv3Applicable to networks of various scales, particularly those that have high securityrequirements and require devices to be managed by authenticated administrators (such aswhen data needs to be transferred on public networks).Configuration Guide4
Configuring SNMP & RMON2SNMP ConfigurationsSNMP ConfigurationsTo complete the SNMP configuration, choose an SNMP version according to networkrequirements and supportability of the NMS software, and then follow these steps:Choose SNMPv1 or SNMPv2c1) Enable SNMP.2) Create an SNMP view for managed objects.3) Create a community, specify the accessible view and the corresponding access rights.Choose SNMPv31) Enable SNMP.2) Create an SNMP view for managed objects.3) Create an SNMP group, and specify the access rights.4) Create SNMP users, and configure the authentication mode, privacy mode andcorresponding passwords.2.1Using the GUI2.1.1 Enabling SNMPChoose the MAINTENANCE SNMP Global Config to load the following page.Figure 2-1Global ConfigFollow these steps to configure SNMP globally:1) In the Global Config section, enable SNMP and configure the local and remote engineID.SNMPEnable or disable SNMP globally.Configuration Guide5
Configuring SNMP & RMONLocal Engine IDSNMP ConfigurationsSet the engine ID of the local SNMP agent (the switch) with 10 to 64 hexadecimaldigits. By default, the switch generates the engine ID using TP-Link’s enterprisenumber (80002e5703) and its own MAC address.The local engine ID is a unique alphanumeric string used to identify the SNMPengine. As an SNMP agent contains only one SNMP engine, the local engine IDcan uniquely identify the SNMP agent.Remote Engine IDSet the ID of the remote SNMP manager with 10 to 64 hexadecimal digits. If noremote SNMP manager is needed, you can leave this field empty.The remote engine ID is a unique alphanumeric string. It is used to identify theSNMP engine on the remote device thats receives inform messages from Switch.2) Click Apply.Note: The engine ID must contain an even number of characters. Changing the value of the SNMP engine ID has important side effects. In SNMPv3, a user’spassword is converted to an MD5 or SHA security digest based on the password and theengine ID. If the value of local engine ID changes, the switch will automatically delete allSNMPv3 local users as their security digests become invalid. Similarly, all SNMPv3 remoteusers will be deleted if the value of remote engine ID changes.2.1.2 Creating an SNMP ViewChoose the menu MAINTENANCE SNMP Global Config to load the following page.Figure 2-2SNMP View ConfigNMS manages MIB objects based on the SNMP view. An SNMP view is a subset of a MIB.The system provides a default view named viewDefault, and you can create other SNMPviews according to your needs.Follow these steps to create an SNMP view:Configuration Guide6
Configuring SNMP & RMONSNMP Configurations1) Clickto load the following page. Enter a view name, and specify the view typeand a MIB object that is related to the view.Figure 2-3Creating an SNMP ViewView NameSet the view name with 1 to 16 characters. A complete view consists of all MIBobjects that have the same view name.View TypeSet the view to include or exclude the related MIB object. By default, it is include.Include: The NMS can view or manage the function indicated by the object.Exclude: The NMS cannot view or manage the function indicated by the object.MIB Object IDEnter a MIB Object ID to specify a specific function of the device. When a MIB ObjectID is specified, all its child Object IDs are specified. For specific ID rules, refer to thedevice related MIBs.2) Click Create.2.1.3 Creating SNMP Communities (For SNMP v1/v2c)Choose the menu MAINTENANCE SNMP SNMP v1/v2c and clickfollowing page.Figure 2-4to load theCreating an SNMP Community1) Set the community name, access rights and the related view.Community NameConfigure the community name. This community name is used like a password togive the NMS access to MIB objects in the switch’s SNMP agent.Configuration Guide7
Configuring SNMP & RMONAccess ModeSNMP ConfigurationsSpecify the access right to the related view. The default is read-only.Read Only: The NMS can view but not modify parameters of the specified view.Read & Write: The NMS can view and modify parameters of the specified view.MIB ViewChoose an SNMP view that allows the community to access. The default view isviewDefault.2) Click Create.2.1.4 Creating an SNMP Group (For SNMP v3)Create an SNMP group and configure related parameters.Choose the menu MAINTENANCE SNMP SNMP v3 SNMP Group and clickload the following page.Figure 2-5toCreating an SNMP GroupFollow these steps to create an SNMP Group:1) Assign a name to the group, then set the security level and the read view, write view andnotify view.Group NameSet the SNMP group name. You may enter 1 to 16 characters.The identifier of a group consists of a group name, security model and securitylevel. Groups of the same identifier are recognized as being in the same group.Security ModelDisplays the security model. SNMPv3 uses v3, the most secure model.Configuration Guide8
Configuring SNMP & RMONSecurity LevelSNMP ConfigurationsSet the security level which for the SNMPv3 group. The default is NoAuthNoPriv.NoAuthNoPriv: No authentication mode or privacy mode is applied to check orencrypt packets.AuthNoPriv: An authentication mode is applied to check packets, but no privacymode is applied to encrypt them.AuthPriv: An authentication mode and a privacy mode are applied to check andencrypt packets.Read ViewChoose a view to allow parameters to be viewed but not modified by the NMS.The view is necessary for any group. By default, the view is viewDefault. To modifyparameters of a view, you need to add it to Write View.Write ViewChoose a view to allow parameters to be modified but not viewed by the NMS.The default is none. The view in Write View should also be added to Read View.Notify ViewChoose a view to allow it to send notifications to the NMS.2) Click Create.2.1.5 Creating SNMP Users (For SNMP v3)Choose the menu MAINTENANCE SNMP SNMP v3 SNMP User and clickload the following page.Figure 2-6toCreating an SNMP UserFollow these steps to create an SNMP user:1) Specify the user name, user type and the group which the user belongs to. Thenconfigure the security level.User NameSet the SNMP user name. You may use 1 to 16 characters. For different entries,user names cannot be the same.Configuration Guide9
Configuring SNMP & RMONUser TypeSNMP ConfigurationsChoose a user type to indicate the location of the user. The default is Local User.Local User: The user resides on the local engine, which is the SNMP agent of theswitch.Remote User: The user resides on the NMS. As the remote engine ID and userpassword are used to compute the authentication and privacy digests, beforeconfiguring a remote user, you need to set the remote engine ID first.Group NameChoose the group that the user belongs to. Users with the same Group Name,Security Model and Security Level will be in the same group.Security ModelDisplays the security model. SNMPv3 uses v3, the most secure model.Security LevelSet the security level. The security level from highest to lowest is: NoAuthNoPriv,AuthNoPriv, AuthPriv, and the default is NoAuthNoPriv. The security level of theuser should not be lower than the group it belongs to.NoAuthNoPriv: Uses a username match for authentication, and no encryption isimplemented.AuthNoPriv: An authentication mode is applied to check packets, but no privacymode is applied to encrypt them.AuthPriv: An authentication mode and a privacy mode are applied to check andencrypt packets.2) If you have chosen AuthNoPriv or AuthPriv as the security level, you need to setcorresponding Authentication Mode or Privacy Mode. If not, skip the step.AuthenticationModeWith AuthNoPriv or AuthPriv selected, configure the authentication mode andpassword. Two authentication modes are provided:MD5: Enable the HMAC-MD5 algorithm for authentication.SHA: Enable the SHA (Secure Hash Algorithm) algorithm for authentication. SHAalgorithm is securer than MD5 algorithm.AuthenticationPasswordSet the password for authentication.Privacy ModeWith AuthPriv selected, configure the privacy mode and password for encryption.The switch uses the DES (Data Encryption Standard) algorithm for encryption.Privacy PasswordSet the password for encryption.3) Click Create.Configuration Guide10
Configuring SNMP & RMON2.2SNMP ConfigurationsUsing the CLI2.2.1 Enabling SNMPStep 1configureStep 2snmp-serverStep 3snmp-server engineID {[ local local-engineID ] [remote remote-engineID ]}Enter global configuration mode.Enabling SNMP.Configure the local engine ID and the remote engine ID.local-engineID: Enter the engine ID of the local SNMP agent (the switch) with 10 to 64hexadecimal digits. By default, the switch generates the engine ID using TP-Link’s enterprisenumber (80002e5703) and its own MAC address.The local engine ID is a unique alphanumeric string used to identify the SNMP engine. As anSNMP agent contains only one SNMP engine, the local engine ID can uniquely identify theSNMP agent.remote-engineID: Enter the remote engine ID with 10 to 64 hexadecimal digits. The ID mustcontain an even number of characters. The remote engine ID is a unique alphanumeric string. Itis used to identify the SNMP engine on the remote device that receives inform messages fromswitch.Note:Changing the value of the SNMP engine ID has important side effects. In SNMPv3, a user’spassword is converted to an MD5 or SHA security digest based on the password and theengine ID. If the value of local engine ID changes, the switch will automatically delete allSNMPv3 local users as their security digests become invalid. Similarly, all SNMPv3 remoteusers will be deleted if the value of remote engine ID changes.Step 4show snmp-serverStep 5show smnp-server engineIDStep 6endStep 7copy running-config startup-configDisplays the global settings of SNMP.Displays the engine ID of SNMP.Return to privileged EXEC mode.Save the settings in the configuration file.The following example shows how to enable SNMP and set 123456789a as the remoteengine ID:Switch#configureConfiguration Guide11
Configuring SNMP & RMONSNMP fig)#snmp-server engineID remote 123456789aSwitch(config)#show snmp-serverSNMP agent is enabled.0 SNMP packets input0 Bad SNMP version errors0 Unknown community name0 Illegal operation for community name supplied0 Encoding errors0 Number of requested variables0 Number of altered variables0 Get-request PDUs0 Get-next PDUs0 Set-request PDUs0 SNMP packets output0 Too big errors (Maximum packet size 1500)0 No such name errors0 Bad value errors0 General errors0 Response PDUs0 Trap PDUsSwitch(config)#show snmp-server engineIDLocal engine ID: 80002e5703000aeb13a23dRemote engine ID: 123456789aSwitch(config)#endSwitch#copy running-config startup-config2.2.2 Creating an SNMP ViewSpecify the OID (Object Identifier) of the view to determine objects to be managed.Step 1configureEnter global configuration mode.Configuration Guide12
Configuring SNMP & RMONStep 2SNMP Configurationssnmp-server view name mib-oid {include exclude}Configure the view.name: Enter a view name with 1 to 16 characters. You can create multiple entries with eachassociated to a MIB object. A complete view consists of all MIB objects that have the sameview name.mib-oid: Enter the MIB object ID with 1 to 61 characters.include exclude: Specify a view type. Include indicates that objects of the view can bemanaged by the NMS, while exclude indicates that objects of the view cannot be managedby the NMS.Step 3show snmp-server viewStep 4endStep 5copy running-config startup-configDisplays the view table.Return to Privileged EXEC Mode.Save the settings in the configuration file.The following example shows how to set a view to allow the NMS to manage all function.Name the view as View:Switch#configureSwitch(config)#snmp-server view View 1 includeSwitch(config)#show snmp-server viewNo. View Name Type--- -------------------MOID----1viewDefault include 12viewDefault exclude 1.3.6.1.6.3.153viewDefault exclude 1.3.6.1.6.3.164viewDefault exclude 1.3.6.1.6.3.185Viewinclude 1Switch(config)#endSwitch#copy running-config startup-configConfiguration Guide13
Configuring SNMP & RMONSNMP Configurations2.2.3 Creating SNMP Communities (For SNMP v1/v2c)For SNMPv1 and SNMPv2c the Community Name is used for authentication, functioning asthe password.Step 1configureStep 2snmp-server community name { read-only read-write } [mib-view ]Enter global configuration mode.Configure the community.name: Enter a group name with 1 to 16 characters.read-only read-write: Choose an access permissions for the community. Read-onlyindicates that the NMS can view but cannot modify parameters of the view, while read-writeindicates that the NMS can both view and modify.mib-view: Enter a view to allow it to be accessed by the community. The name contains 1 to61 characters. The default view is viewDefault.Step 3show snmp-server communityStep 4endStep 5copy running-config startup-configDisplays community entries.Return to privileged EXEC mode.Save the settings in the configuration file.The following example shows how to set an SNMP community. Name the community as thenms-monitor, and allow the NMS to view and modify parameters of View:Switch#configureSwitch(config)#snmp-server community nms-monitor read-write ViewSwitch(config)#show snmp-server tch(config)#endSwitch#copy running-config startup-configConfiguration Guide14
Configuring SNMP & RMONSNMP Configurations2.2.4 Creating an SNMP Group (For SNMPv3)Create an SNMP group and set user access control with read, write and notify views.Meanwhile, set the authentication and privacy modes to secure the communicationbetween the NMS and managed devices.Step 1configureStep 2snmp-server group name [ smode v3 ] [ slev {noAuthNoPriv authNoPriv authPriv}] [ readread-view ] [ write write-view ] [ notify notify-view ]Enter global configuration mode.Create an SNMP group.name: Enter the group name with 1 to 16 characters. The identifier of a group consists of agroup name, security model and security level. Groups of the same identifier are recognizedas being in the same group.v3: Configure the security mode for the group. v3 indicates SNMPv3, the most securemodel.noAuthNoPriv authNoPriv authPriv: Choose a security level among noAuthNoPriv (noauthorization and no encryption), authNoPriv (authorization and no encryption), authPriv(authorization and encryption). The default is noAuthNoPriv. Please note that if you havechosen v1 or v2c as the security mode, the security level cannot be configured.read-view: Set the view to be the Read view. Then the NMS can view parameters of thespecified view.write-view: Set the view to be the Write view. Then the NMS can modify parameters of thespecified view. Please note that the view in the Write view should also be in the Read view.notify-view: Set the view to be the Notify view. Then the NMS can get notifications of thespecified view from the agent.Step 3show snmp-server groupStep 4endStep 5copy running-config startup-configDisplays SNMP group entries.Return to Privileged EXEC Mode.Save the settings in the configuration file.The following example shows how to create an SNMPv3 group with the group name asnms1, the security level as authPriv, and the Read and Notify view are both View1:Switch#configureSwitch(config)#snmp-server group nms1 smode v3 slev authPriv read View1 notifyView1Switch(config)#show snmp-server groupConfiguration Guide15
Configuring SNMP & RMONSNMP hPrivView1View1Switch(config)#endSwitch#copy running-config startup-config2.2.5 Creating SNMP Users (For SNMPv3)Configure users of the SNMP group. Users belong to the group, and use the same securitylevel and access rights as the group.Step 1configureStep 2snmp-server user name { local remote } group-name [ smode v3 ] [ slev { noAuthNoPriv authNoPriv authPriv }] [ cmode { none MD5 SHA }] [ cpwd confirm-pwd ] [ emode { none DES }] [ epwd encrypt-pwd ]Enter global configuration mode.Configure users of the SNMP group.name: Enter the user name with 1 to 16 characters.local remote: Choose a user type. Local indicates that the user is connected to a localSNMP engine, while remote means that the user is connected to a remote SNMP engine.As the remote engine ID and user password are used to compute the authentication andprivacy digests, before configuring a remote user, you need to set the remote engine IDfirst.group-name: Enter the name of the group which the user belongs to. The group isdetermined by the group name, security mode and security level.v3: Configure the security mode for the user. v3 indicates SNMPv3, the most secure model.noAuthNoPriv authNoPriv authPriv: Choose a security level from noAuthNoPriv (noauthorization and no encryption), authNoPriv (authorization and no encryption), authPriv(authorization and encryption). The security level from highest to lowest is: noAuthNoPriv,authNoPriv, authPriv, and the default is noAuthNoPriv. The security level of the user shouldnot be lower than the group it belongs to.none MD5 SHA: Choose an authentication algorithm. SHA authentication mode has ahigher security than MD5 mode. By default, the Authentication Mode is none.confirm-pwd: Enter an authentication password with 1 to 16 characters excluding questionmark and space. This password in the configuration file will be displayed in the symmetricencrypted form.none DES: Choose a privacy mode. None indicates no privacy method is used, and DESindicates DES encryption method is used. By default, the Privacy Mode is none.encrypt-pwd: Enter a privacy password with 1 to 16 characters excluding question mark andspace. This password in the configuration file will be displayed in the symmetric encryptedform.Configuration Guide16
Configuring SNMP & RMONSNMP ConfigurationsStep 3show snmp-server userStep 4endStep 5copy running-config startup-configDisplays the information of SNMP users.Return to privileged EXEC mode.Save the settings in the configuration file.The following example shows how to create an SNMP user and add it to group nms1.Name the user as admin, and set the user as a remote user, SNMPv3 as the securitymode, authPriv as the security level, SHA as the authentication algorithm, 1234 as theauthentication password, DES as the privacy algorithm and 1234 as the privacy r user admin remote nms1 smode v3 slev authPriv cmodeSHA cpwd 1234 emode DES epwd 1234Switch(config)#show snmp-server userNo. U-NameU-TypeG-NameS-ModeS-LevA-ModeP-Mode--- py running-config startup-configConfiguration Guide17
Configuring SNMP & RMON3Notification ConfigurationsNotification ConfigurationsWith Notification enabled, the switch can send notifications to the NMS about importantevents relating to the device’s operation. This facilitates the monitoring and managementof the NMS.To configure SNMP notification, follow these steps:1) Configure the information of NMS hosts.2) Enable SNMP traps.Configuration GuidelinesTo guarantee the communication between the switch and the NMS, ensure the switch andthe NMS are able to reach one another.3.1Using the GUI3.1.1 Configuring the Information of NMS HostsChoose the menu MAINTENANCE SNMP Notification Notification Config and clickto load the following page.Figure 3-1Adding an NMS HostFollow these steps to add an NMS host:1) Choose the IP mode according to the network environment, and specify the IP addressof the NMS host and the UDP port that receives notifications.IP ModeChoose an IP mode for the NMS host.Configuration Guide18
Configuring SNMP & RMONIP AddressNotification ConfigurationsIf you set the IP Mode as IPv4, specify an IPv4 address for the NMS host.If you set the IP Mode as IPv6, specify an IPv6 address for the NMS host.UDP PortSpecify a UDP port on the NMS host to receive notifications. The default is port162. For communication security, we recommend that you change the portnumber under the condition that communications on other UDP ports are notaffected.Specify the user name or community name used by the NMS host, and configure thesecurity model and security level based on the settings of the user or community.User NameChoose the user name or community name used by the NMS host.Security ModeIf a community name (created for SNMPv1/v2c) is entered in User Name, specifythe security mode as v1 or v2c. If a user name (created for SNMPv3) is entered inUser Name, here displays the security mode as v3.The NMS host should use the corresponding SNMP version.Security LevelIf Security Level is v3, displays the security level of the user.2) Choose a notification type based on the SNMP version. If you choose the Inform type,you need to set retry times and timeout interval.TypeChoose a notification type for the NMS host. For SNMPv1, the supported type istrap. For SNMPv2c and SNMPv3, you can configure the type as trap or inform.Trap: The switch will send Trap messages to the NMS host when certain eventsoccur. When the NMS host receives a Trap message, it will not send a response tothe switch. Thus the switch cannot tell whether a message is received or not, andthe messages that are not received will not be resent.Inform: The switch will send Inform messages to the NMS host when certainevents occur. When the NMS host receives an Inform message, it sends aresponse to the switch. If the switch does not receive a response within thetimeout interval, it will resend the Inform message. Therefore, Informs are morereliable than Traps.RetrySet the retry times for Informs. The switch will resend the Inform message if itdoes not receive response from the NMS host within the timeout interval. It willstop sending Inform messages when the retry time reaches the limit.TimeoutSet the length of time that the switch waits for a response from the NMS hostafter sending an inform message.3) Click Create.3.1.2 Enabling SNMP TrapsChoose the menu MAINTENANCE SNMP Notification Trap Config to load thefollowing page.Configuration Guide19
Configuring SNMP & RMONFigure 3-2Notification ConfigurationsEnabling SNMP TrapsThe supported traps are listed on the page. Follow these steps to enable any or all of thesetraps:1) Select the traps to enable according to your needs.SNMPAuthenticationTriggered when a received SNMP request fails the authentication.ColdstartIndicates an SNMP initialization caused by the reinitialization of the switch system.The trap can be triggered when you reboot the switch.WarmstartIndicates the SNMP feature on the switch is reinitialized with the physicalconfiguration unchanged. The trap can be triggered if you disable and then enableSNMP after the SNMP is completely configured and enabled.Link StatusTriggered when the switch detects a link status change.CPU UtilizationTriggered when the utilization rate of the CPU has exceeded the limit that youhave set. The limit of CPU utilization rate for the switch is 80% by default.MemoryUtilizationTriggered when the memory utilization exceeds 80%.Flash OperationTriggered when flash is modified during operations such as backup, reset,firmware upgrade, configuration import, and so on.VLAN Create/DeleteTriggered when certain VLANs are created or deleted successfully.IP ChangeMonitors the IP address changes of each interface. The trap can be triggeredwhen the IP address of any interface is changed.Storm ControlMonitors whether the storm rate has reached the limit that you have set. The trapcan be triggered when the feature is enabled and b
The following basic concepts of SNMP will be introduced: SNMP manager, SNMP agent, MIB (Management Information Base), SNMP entity, SNMP engine, and SNMP version. SNMP Manager The SNMP manager uses SNMP to monitor and control SNMP agents, providing a friendly management interface for the administrator to manage network devices conveniently. It
