Transcription
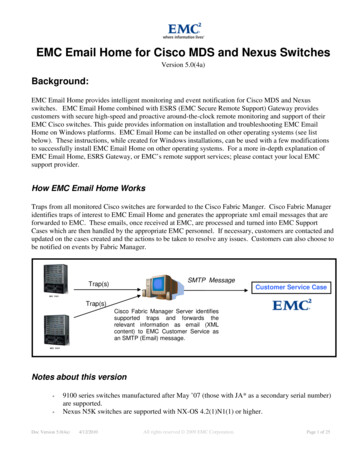
EMC Email Home for Cisco MDS and Nexus SwitchesVersion 5.0(4a)Background:EMC Email Home provides intelligent monitoring and event notification for Cisco MDS and Nexusswitches. EMC Email Home combined with ESRS (EMC Secure Remote Support) Gateway providescustomers with secure high-speed and proactive around-the-clock remote monitoring and support of theirEMC Cisco switches. This guide provides information on installation and troubleshooting EMC EmailHome on Windows platforms. EMC Email Home can be installed on other operating systems (see listbelow). These instructions, while created for Windows installations, can be used with a few modificationsto successfully install EMC Email Home on other operating systems. For a more in-depth explanation ofEMC Email Home, ESRS Gateway, or EMC’s remote support services; please contact your local EMCsupport provider.How EMC Email Home WorksTraps from all monitored Cisco switches are forwarded to the Cisco Fabric Manger. Cisco Fabric Manageridentifies traps of interest to EMC Email Home and generates the appropriate xml email messages that areforwarded to EMC. These emails, once received at EMC, are processed and turned into EMC SupportCases which are then handled by the appropriate EMC personnel. If necessary, customers are contacted andupdated on the cases created and the actions to be taken to resolve any issues. Customers can also choose tobe notified on events by Fabric Manager.SMTP MessageTrap(s)Customer Service CaseTrap(s)Cisco Fabric Manager Server identifiessupported traps and forwards therelevant information as email (XMLcontent) to EMC Customer Service asan SMTP (Email) message.Notes about this version 9100 series switches manufactured after May ’07 (those with JA* as a secondary serial number)are supported.Nexus N5K switches are supported with NX-OS 4.2(1)N1(1) or higher.Doc Version 5.0(4a)4/12/2010All rights reserved 2009 EMC Corporation.Page 1 of 25
Limited ConnectEMC/FM support for modem use only. Please refer to Customer ServiceProcedure CON-CSP-05.Documentation changesFabric Manager now has its own version of Release Notes that support both Cisco MDS 9000 Familyswitches and Cisco Nexus 5000 Series switches. These release notes cover known caveats, platformrequirements, and new features and functionality. As with the NX-OS Release notes, EMC has a versionthat contains supplemental and EMC specific information on http://Powerlink.emc.com , and the Ciscorelease notes can be obtained from the following 5/tsd products support series home.htmlLocation of Cisco Fabric Manager DocumentationDocumentation for Cisco Fabric Manager has moved to the Network Management location on Cisco.com.Starting with Fabric Manager Release 4.2(1a), you can access Fabric Manager documentation by going toCisco.com and selecting Support, Select a Product, Products, Network Management, Data CenterManagement, Cisco Fabric Manager.Upgrade InstructionsUpgrading Fabric Manager is only supported when upgrading from Fabric Manager 3.2(1a) and above. Theconfiguration settings for Email Home lost by doing a fresh install are minimal and the importance ofcorrectly configuring the monitoring of the switch is critical. For those prior versions, please remove yourprevious version of Fabric Manager and follow the New Installation Instructions noted below.If you are at Fabric Manager 3.2(1a) or above and upgrading, follow the new installation instructions belowand instead click “Yes” on the dialog that asks “Cisco Fabric Manager is already installed. Do you wantto upgrade it?” Follow the prompts provided and Fabric Manager should upgrade correctly. Keep in mindthat some selections will be filled in or grayed out due to the upgrade to preserve your prior install choices.If you run into any problems with the upgrade, please remove Fabric Manager Server and follow the NewInstallation Instructions below instead. All necessary settings used for Email Home should be carriedforward on the upgrade.In order to monitor for port related events, both the switch and Fabric Manager have to be on specific codeand require special configuration. The switch must be running SAN-OS 3.3(3) or above, or NX-OS4.1(1b) and above with Fabric Manager 4.1(3a) or above to correctly configure for port events. The newcode and Fabric Manager are required to use delayed traps which stops invalid notifications for host reboots.Please see the instructions in the New Installation Instructions section to turn on delayed traps if you areupgrading from a previous version.Doc Version 5.0(4a)4/12/2010All rights reserved 2009 EMC Corporation.Page 2 of 25
About Delayed TrapsIn previous code versions, Fabric Manager listened to interface traps and generated EMC Email Home emailmessages immediately. Link traps are generated when an interface goes to down from up or vice versa.These link traps can be initiated for both real failures and other conditions. Link traps are created arecreated when a scheduled server reboot happens. EMC Email Home via Fabric Manager monitors theselink traps and generates an email notification on them. The alerts from servers reboots can and did createdmultiple invalid service requests. These invalid service requests made finding real port issues extremelydifficult. A better way was needed to filter out these invalid alerts and concentrate on real port issues.Cisco SAN-OS 3.3(3) and above, and NX-OS Release 4.1(1b) and above provides the ability to generate adelayed trap so that invalid alerts for host reboots is removed or at least minimized. Delayed traps filtersserver reboots and avoids generating unnecessary EMC Email Home email messages. This feature isapplicable only for F/FL ports. When a switch is configured to use the delayed traps feature, instead ofgenerating the trap immediately after the F/FL port goes down, the switch waits for the specified delay timer(default 4mins) and then sends the trap. If the port comes back up in the specified timer value, the trap isnot sent. This reduces the number of emails generated and intervention of customers and EMC Support.Users have the ability to select the current existing feature or this new delayed trap feature. Delayed trapscan be enabled using both Cisco Fabric Manager and the CLI.Doc Version 5.0(4a)4/12/2010All rights reserved 2009 EMC Corporation.Page 3 of 25
New Installation InstructionsInstallation Changes for Cisco Fabric Manager in This ReleaseIf you plan to make use of the Fabric Manager Server federation feature, then you need to follow a slightlydifferent installation procedure for Cisco Fabric Manager. For more information, refer to the Cisco FabricManager Fundamentals Configuration Guide and the Cisco Fabric Manager Server Federation DeploymentGuide located at http://www.cisco.com/en/US/products/ps10495/tsd products support series home.html.If you do not plan to install a federation of servers, then the installation procedure is unchanged from CiscoFabric Manager Release 4.1(3b).Installation InstructionsIt is recommended that Cisco Fabric Manager Server be deployed on a dedicated physical or virtual server.Cisco Fabric Manager is a Java based application that can be deployed on any platform that has the JavaRuntime Environment (JRE). This document assumes Cisco Fabric Manager running on a MicrosoftWindows platform. Other operating systems such as Linux should work but are not documented within thisdocument. See the Cisco Fabric Manager Fundamentals Configuration Guide for details on installingFabric Manager Server on other operating systems. Fabric Manager has been tested in the followingconfigurations:Operating System VersionWindows 2003 and SP2Windows 2003 and SP2Windows 2003 and SP2Windows XP SP2 and SP3Windows XP SP2 and SP3Windows XP SP2 and SP3Windows Vista SP1 withoutUACWindows 2008 SP2 (32-bit and64-bit) 2Red Hat Enterprise Linux ASRelease 5Solaris 9Solaris 10Java Version 11.5 or 1.61.5 or 1.61.5 or 1.61.5 or 1.61.5 or 1.61.5 or 1.61.5 or 1.6Browser VersionInternet Explorer 6Internet Explorer 7Firefox 3.0Internet Explorer 6Internet Explorer 7Firefox 3.0Internet Explorer 71.61.5 or 1.6Firefox 3.01.5 or 1.61.5 or 1.6Packaged with default Solaris 9Firefox 3.01Do not use Java update 1.6.13 or 1.6.14.Can be used only as a Fabric Manager Server.Doc Version 5.0(4a)4/12/20102All rights reserved 2009 EMC Corporation.Page 4 of 25
Note: For large fabrics, it is highly recommended that Cisco Fabric Manager Server be run on a Dual ProcessorServer with at least 2 Gigs of RAM and 10 GB free space. While this configuration should be able to monitor allconfigured Fabrics, there may be a limit to the number of fabrics that can be monitored depending on a variety offactors. If a limit is reached, additional hosts with Fabric Manager installations may be required.Step 1: The EMC Customer Engineer for the account should be contacted to ensure that ALL switchespurchased through EMC, especially the ones to be monitored, have been correctly installed in theappropriate EMC databases. Any switch not correctly installed will have all the emails for it disregardedautomatically and therefore the notifications will not be received at EMC Support.Step 2: Collect a list of the switches you want to have monitored by email home, their IP addresses, theSMTP gateway that will be used, the IP address of the server running Fabric Manager, and an email addressyou want to have test emails sent to.Step 3: Install Fabric Manager 5.0(4a) server service on the host that will be dedicated to monitoring theswitches. Users installing Fabric Manager must have full administrator privileges to create user accountsand start services. Users should also have access to all ports. These are the ports used by Fabric ManagerServer and the PostgreSQL database: 1098, 1099, 4444, 4445, 8009, 8083, 8090, 8092, 8093, 514, and5432.You will also need the CD that shipped with the switch or have downloaded the zip file from EMC’sPowerLink. If you download the zip file from PowerLink, make sure you unzip the files keeping thedirectory structure when you do. The unzipped files or the CD should look like the following.Double click on the “start.htm” icon. The following screen should come up. If you see a warningmessage indicating active content has been restricted on this computer. Right click on this warningmessage and select “Allow Blocked Content”Doc Version 5.0(4a)4/12/2010All rights reserved 2009 EMC Corporation.Page 5 of 25
Navigate to “Install Management Software”, “For Windows”, and select “Cisco Fabric Manager”.Read the notes on the next web page that comes up. Ensure that you have JRE 1.5x or 1.6x (1.6.12 orbelow) installed on the host and the correct permissions as previously noted.Doc Version 5.0(4a)4/12/2010All rights reserved 2009 EMC Corporation.Page 6 of 25
Ensure you comply with the notes then Click on the selection “Cisco Fabric Manager Installer”.You may see the following screen. Select Yes.The Wizard will come up. Select Custom, then Next on the following screen.Doc Version 5.0(4a)4/12/2010All rights reserved 2009 EMC Corporation.Page 7 of 25
Accept the license agreement on the following screen and click next.Select Fabric Manager Server (licensed), your destination for the files, and then Next.Doc Version 5.0(4a)4/12/2010All rights reserved 2009 EMC Corporation.Page 8 of 25
On the next screen you are asked for the database to use. For all EMC Email Home installationsmake sure you select the following:-Install PostgreSQLDB User: adminDB Password: pass#Word123Confirm DB Password: pass#Word123Note: Failure to use a secure password like the above one may cause the installation to fail.Doc Version 5.0(4a)4/12/2010All rights reserved 2009 EMC Corporation.Page 9 of 25
On the next screen any user and password can be used but admin and password are recommended.Local Mode on the next screen is recommended.Accept defaults on the next screen. If Web Server Port 80 is not available, note the port that is available.Doc Version 5.0(4a)4/12/2010All rights reserved 2009 EMC Corporation.Page 10 of 25
Install will now take place.Once installation of Fabric Manager Service is complete you will see the following. Click Finish.Fabric Manager Server, Fabric Manager client, and Device Manager are now installed on your host.You should see icons for them on your desktop. Try logging into Fabric Manager client to ensure it isworking correctly.Step 4: You now need to customize the Fabric Manager Server configuration file for EMC email home.The location has moved in this release of Fabric Manager. By default in Windows, Cisco Fabric Manager isDoc Version 5.0(4a)4/12/2010All rights reserved 2009 EMC Corporation.Page 11 of 25
installed under the path C:\Program Files\Cisco Systems\dcm\fm\conf. Look for the file namedserver.properties. Make a backup copy of the file prior to making changes. You have two choices inediting this file. You can use an editor like notepad and not a word processing application as they can addin hidden characters. If you use WordPad make sure you save the file as text and remove and .txt suffix.You may also use the Web interface.To use the web interface, from your web browser enter the URL for your Fabric Manager Serverinstallation, which by default is the IP address of the management station. You will be presented a loginscreen. Enter the user name and password and click Log In.You select Admin from the web interface, then Configure, and Preferences if you want to make thechanges from the Web interface. (see below).Select Admin ScreenSelect Configure ScreenSelect Preferences ScreenIn the Panel that appears on the right side scroll down to section 9 EMC CALL HOME.Doc Version 5.0(4a)4/12/2010All rights reserved 2009 EMC Corporation.Page 12 of 25
Step 5: Under the section “EMC CALL HOME”, edit the properties shown in below table. Leave theothers Properties alone.PropertyChange lhome.locationsingle line text string (max length - 255)375TasmanDrive,SanJose, CA95134server.callhome.fromEmailFrom email address (ex: sanAdmin@xyz.com).NoneNote: The appropriate person from whom the emailwill show as coming from. This should be a validemail address. At the present time, no returnconfirmations will be sent.server.callhome.recipientEmailDestination Email Address:NoneNote: Email can be sent to multiple recipients.Multiple email addresses can be entered on the sameline using “,” as the email separator. Please keep inmind that adding people to this distribution list maycause the recipients to receive large amount of email.Note: If sending emails through the ESRS Gateway,email addresses other than emailalert@emc.com willnot work.When you first test this, you should use a test emailaddress. Once you have confirmed emails are beingsent on problem situations, change the address to be theEMC Production address of emailalert@emc.com .Doc Version 5.0(4a)4/12/2010All rights reserved 2009 EMC Corporation.Page 13 of 25
Ex: emailalert@emc.com,sanAdmin@xyz.comLimitations: single line text string (max length – 255).server.callhome.smtphostPlease get this information from your IT Administrator. NoneSpecify an SMTP host address that is configured tosend email outside the company. ESRS Gatewayaddress can also be used.Ex: outbound.xyz.comNote: Please ping the SMTP host from the system thatis running Cisco Fabric Manager to test ver.callhome.portFailsOnlytrueNote: only required if monitoring port eventsNote: This property does not exist in the web interfaceor the file. It must be manually added using a texteditor. This property enables FM to send alerts onLinkFailure(7) events.falsefalseStep 6: Save the changes to the server.properties file and close the file. If you use the Web interface, makesure you scroll to the bottom and click “Modify” to save your changes, logout, and then exit.Step 7: Cisco Fabric Manager runs as a service in a Microsoft Windows environment. Open the MicrosoftWindows services window by selecting Start Control Panel Administrative Services Services, andidentify the “Cisco Fabric Manager” service as shown below. Right mouse click, and select “Restart”, thiswill restart the Cisco Fabric Manager and activates the Cisco EMC Email Home functionality.Step 8: Launch Fabric Manager client by double clicking the icon. You will now have the new FabricManager thin client login screen. The FM Server address is where Fabric Manager Server Service wasinstalled. This will most likely be the local host. The default login is “admin” as the user name and“password” as the password. Please note it can take few minutes for Fabric Manager to restart.Doc Version 5.0(4a)4/12/2010All rights reserved 2009 EMC Corporation.Page 14 of 25
Step 9: Next you need login to the seed switch. This is one of the switches in the fabric that you want tomonitor and use Email Home against. Put in the IP address of the seed switch, user name, and password.Click Discover to open up the fabric.Step 10: After a few seconds you should see a message indicating that a fabric has been discovered. Clickon the Ok prompt. You will now see another screen like that below that shows the fabric. If you want tomonitor other fabrics for email home, select “Discover ” and input the information to discover the otherfabrics. You do not need an additional license for EMC Email Home, even for multiple fabrics.Next, select the Fabrics tab.Doc Version 5.0(4a)4/12/2010All rights reserved 2009 EMC Corporation.Page 15 of 25
By default now Fabrics are now set to Manage Continuously which you need for Email Home. Confirmthat “Manage Continuously” for each Fabric is selected. If you don’t have Managed Continuouslychecked, close Fabric Manager, the fabric will not be monitored. Click close.Step 11: Cisco switches provide a wide range of events. Cisco NX-OS provides flexibility to enable /disable a groups of events for versions prior to 4.2(1a), and a very granular selection of events in 4.2(1a) andhigher.The FRU events need to be enabled for Email Home to work. By default these traps are enabled. One canverify these settings in Fabric Manager by going to Physical Attributes pane Events SNMP Traps.For NX-OS versions prior to 4.2(1a) for MDS, and all SAN-OS versions, click on the Other tab and ensureFRU Changes is selected for all switches being monitored. This is not applicable for Nexus N5K switches.See below.For NX-OS versions 4.2(1a) and higher, and Nexus NX-OS 4.2(1)N1(1) and higher, the trap selection isvery granular. These selections are available from the Control tab. The most common and widely used(those traps that were selected by a single category in prior versions) will be enabled by default in this panel.Those would consist of any FRU, Link, Module, Unit, Fan, or Power traps. See below.Doc Version 5.0(4a)4/12/2010All rights reserved 2009 EMC Corporation.Page 16 of 25
Step 12: You need to confirm that Cisco Fabric Manager registered your host to receive the SNMP trapsfor the fabric. In other words, you must check to make sure the SNMP alerts are being sent to the host withFabric Manager running on it that is configured for Email Home. By default when Fabric Manager isopened, the host should be registered unless all available 10 entries are filled.You can check to ensure Cisco Fabric Manager is registered to receive traps through Fabric Manager via theDestinations tab. Cisco Fabric Manager must be logged into the switch at the time you check it in DeviceManager. By default, Fabric Manager receives SNMP notifications on port 2162 (Device Manager receivesthem on 1163). In the example below, the trap is being sent to port 2162 on the server with IP address10.1.0.2. You can only have up to 10 (ten) address destinations per switch. If you already have 10, youmust delete one entry, exit Fabric Manager, restart Fabric Manager, and confirm the destination entries arecorrect. You can also just add in the destination address manually through Fabric Manager. Please keep inmind if the IP address of the server changes (with DHCP for example) the address destinations must beupdated.Step 13: Next you need to click on the Delayed Traps tab (see picture below). It will bring up a list ofswitches running code that supports delayed traps (NX-OS 4.1(1b) or higher, and SAN-OS 3.3(3) orhigher). You need to select each of the switches capable of supporting delayed traps and check Enable. Inthe Delay area you can set the amount of time for the delay. The default is 4 minutes. This should matchDoc Version 5.0(4a)4/12/2010All rights reserved 2009 EMC Corporation.Page 17 of 25
the maximum amount of time, in minutes; it takes for a host attached to any monitored switch to reboot tothe point that the HBA initializes.Delayed traps must also be enabled on the switches to be monitored. Log into the switch through a terminalsession or the console port of the active supervisor, an SSH session, or a Telnet session. Enable the delayedtraps feature on each managed switch.Example for MDS:MDS# config tEnter configuration commands, one per line.End with CNTL/Z.MDS(config)# system delayed-traps enable mode FXMDS(config)# copy running-config #####] 100%MDS(config)# exitMDS# exitExample for Nexus:Nexus5000# config tEnter configuration commands, one per line.End with CNTL/Z.Nexus5000(config)# system delayed-traps enable mode FNexus5000(config)# copy running-config #####] 100%Nexus5000(config)# exitNexus5000# exitStep 14: You need to ensure that each Fabric and each switch within the fabric is visible in the FabricManager GUI. Email Home will only work for those fabric and switches that are displayed. A change inFM 3.1(2) and above is that you can monitor multiple fabrics for Email Home without a FMS license.Step 15: You now need to test Email Home to ensure that it is working correctly. There are a variety ofways to create test events that should create emails. The best event to create to test email home is the onethat the customer feels comfortable with. Ways to create test events are listed below in the event chart.Pulling a power supply cable was the one that was used in many of the tests along with resetting a line card.Doc Version 5.0(4a)4/12/2010All rights reserved 2009 EMC Corporation.Page 18 of 25
In order for testing to be done all the way to EMC Support (check the EMC call queues), you will need tohave the EMC Customer Engineer involved in the testing.Before doing the event it is recommended that the email address first be set to a test one in theserver.properties files. Select a local email address. Once you confirm the email has gone to the testaccount, change it to the EMC one listed above. Once an event is created, you should see the email arrivewithin 15 minutes depending on the gateway. If you don’t see an email arrive to the test account in 15minutes, recheck the installation steps and also see the Troubleshooting section below. If you do see thetest email arrive, change the email address in the server.properties files to the EMC one(emailalert@emc.com), restart the Fabric Manager service, and redo the test event. Wait around 15minutes and have the EMC Customer Engineer check CSI to see if a case has been created. Steps to checkCSI are available under EMC Primus solution emc177432 (only viewable to EMC support personnel).If the EMC Customer Engineer can find a case opened by the test email home, EMC Email home is workingcorrectly and you are done with the installation. The switch or switches are now being monitored. Youmust keep the Fabric Manager Service (not the GUI itself) running at all times for Email Home to work. Ifthe Customer Engineer cannot find the test case created by the email, you need to ensure that you correctlyinstalled the switch into the support databases. Have the EMC Customer Engineer check to ensure theswitch or switches are correctly installed in the EMC databases. You might want to try changing the emaildestination to the Customer Engineer’s EMC email account and see if that works. If the email doesn’tmake it to the Customer Engineer’s email, the customer needs to check their network and gateway. If youare still encountering problems, see the Troubleshooting section below or contact EMC Support.The table below lists the various failures that are forwarded to EMC via the EMC Email Homesolution. Not all platforms support all events.FailureCisco NX-OS Event FilterPowerPower FailureAC Source FailureRemoved Power SupplyInserted Power SupplyEntity FRUEntity FRUEntity FRUEntity FRUFailureEntity FRUFanRemovedOver TemperatureModule (Blade)Port Module FailurePort Module InsertedSupervisor FailureSupervisor InsertedEntity FRUEntity Sensor Mib – Event alwaysEnabled. DisabledEntity FRUEntity FRUEntity FRUEntity FRU*Port Failure (not optic)Link DownLink ietf / ietf-extended*Note: Delayed traps must be configured on switch and FM to use. See Delayed Traps steps above.Doc Version 5.0(4a)4/12/2010All rights reserved 2009 EMC Corporation.Page 19 of 25
Here is more detailed information on the events that are supported by EMC Email Home ication indicates that the power status of a FRU has changed. This eventis generated when any of the following occurs:offEnvPower(5): FRU is powered off because of power problem in the FRU.For example, the FRU's power translation (DC-DC converter) or distributionfailed.STEPS TOREPRODUCEOn a system withredundant powersupply, unplugone power cable.offEnvTemp(6): FRU is powered off because of temperature problem.offEnvFan(7):failed(8):FRU is powered off because of fan problems.FRU is in failed state.Notes: The OID of cefcPowerStatusChange is1.3.6.1.4.1.9.9.117.2.0.2. The OID of cefcFRUPowerOperStatusis 1.3.6.1.4.1.9.9.117.1.1.2.1.2AC Source FailureNotification indicates that there is not enough power for all the line cards.RemovedPSoffDenied(4): FRU is powered off because available system power isinsufficient.Notes: The OID of cefcPowerStatusChange is 1.3.6.1.4.1.9.9.117.2.0.2. TheOID of cefcFRUPowerOperStatus is 1.3.6.1.4.1.9.9.117.1.1.2.1.2Notification indicates that a redundant power supply is removed.FanRemovedNotes: The OID of a cefcFRURemoved trap is 1.3.6.1.4.1.9.9.117.2.0.4Notification indicates that a Fan Module was removed.OverTemperatureNotes: The OID of a cefcFRURemoved trap is 1.3.6.1.4.1.9.9.117.2.0.4Notification indicates that a temperature sensor detects that the temperature istoo high. The sensor value crossed the threshold listed inentSensorThresholdTable. This notification is generated once each time thesensor value crosses the threshold. The agent implementation guaranteesprompt, timely evaluation of threshold and generation of this notification.Notes: The OID of a entSensorThresholdNotification trap is1.3.6.1.4.1.9.9.91.2.0.1Fan FailureNotification indicates that a fan module has failed.Insert line cardsinto the switchone by one untilpower is deniedto a line card.Pull out a modulefrom the chassisPull out a FANtray from themodule.Change thetemperaturesensor alarmthreshold to avalue that islower than thecurrenttemperature.Fail the fanmodule.warning(4) - partial failure, needs replacement as soon as possible.Notes: The OID of a cefcFanTrayStatusChange trap is1.3.6.1.4.1.9.9.117.2.0.6Line Card FailureNotification indicates a line card has failed.Reset the LineCard through DMNotes: The OID of cefcModuleStatusChange is 1.3.6.1.4.19.9.117.2.0.1. TheOID of cefcModuleOperStatus is c Version 5.0(4a)4/12/2010Module has failed due to some condition not stated.Module has been provisioned, but it is missingAll rights reserved 2009 EMC Corporation.Page 20 of 25
mismatchWithParent(9) Module is not compatible with parent entity. Modulehas not been provisioned and wrong type of module is plugged in. This statecan be cleared by plugging in the appropriate module.mismatchConfig(10) Module is not compatible with the currentconfiguration. Module was correctly provisioned earlier; however the modulewas replaced by an incompatible module.This state can be resolved by clearing the configuration, or replacing with theappropriate module.diagFailed(11)failure.Module diagnostic test failed due to some hardwareDormant(12)Module is waiting for an external or internal event tobecome operational.outOfServiceAdmin(13) module is administratively set to be powered on butout of service.outOfServiceEnvTemp(14)Module is powered on but out of service, due toenvironmental temperature problem. An out-of-service module consumesless power thus will cool down the board.poweredDown(15)poweredUp(16)Module is in powered down state.Module is in powered up state.powerDenied(17)System does not have enough power in power budget topower on this module.powerCycled(18)Module is being power cycled.okButPowerOverWarning(19) Module is drawing more power than allocatedto this module. The module is still operational but may go into a failure state.This state may be caused by misconfiguration of power requirements(especially for inline power).okButPowerOverCritical(20) Module is drawing more power than thismodule is designed to handle. The module is still operational but may go intoa failure state and could potentially take the system down. This state may becaused by gross miss-configuration of power requirements (especially forinline power).Supervisor FailuresyncInProgress(21) Synchronization in progress.In a high availability system there will be 2 control modules, active andstandby. This transitional state specifies the synchronization of data betweenthe active and standby modules.Notification indicates that a Supervisor has failed.Notes: The OID of cefcModuleStatusChange is 1.3.6.1.4.19.9.117.2.0.1. TheOID of cefcMo
EMC Email Home, ESRS Gateway, or EMC's remote support services; please contact your local EMC support provider. How EMC Email Home Works . Traps from all monitored Cisco switches are forwarded to the Cisco Fabric Manger. Cisco Fabric Manager identifies traps of interest to EMC Email Home and generates the appropriate xml email messages that are
