Transcription
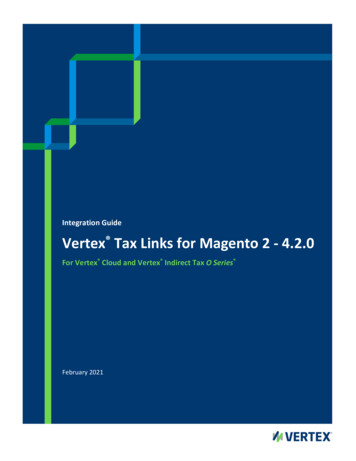
Vertex SystemsAR-Invoices and Credit MemosThese instructions are for entering customer invoices and credit memos not associated with asales order. For invoices or credit memos associated with a sales order, please see the ProcessSales Orders document.This document also assumes all the necessary posting group, sales tax, terms, and inventory (ifapplicable) set up has been completed.Entering Invoices1.2.3.In the Search box, enter Sales Invoices, and then choose the related link.On the Home tab, in the New group, choose New. Create a new sales invoice.Complete the General Tab1. Fill in the No. field—tab from the field for the system to assign a number.2. In the Sell-to Customer No. field, enter the number of the number of the customer. Theaddress and contact fields are populated based on the information found on thecustomer card.3. In the Posting Date field enter the date that you want to appear on the posted entries.4. Fill in the Document Date field. The invoice due date is calculated from this date. This isalso the date that will appear on the printed invoice.5. External Document No. is an optional field. It is normally left blank. Later, when applyingthe payment for this invoice, this field will be used to record the customer’s checknumber.6. Salesperson Code. Enter the salesperson code or select from the drop down. This field isoptional and separate set up is required. The code will auto populated based on thecustomer card.7. Campaign No. Enter the campaign number or select from the drop down. This field isoptional and separate set up is required.8. Responsibility Center. Enter a responsibility center or select from the drop down. Thisfield is optional and separate set up is required. The responsibility center would be adepartment or area responsible for this sale. This field will auto populate based on thecustomer card.Vertex Systems, 2550 Corporate Exchange Drive, Columbus, OH 43231Page 1
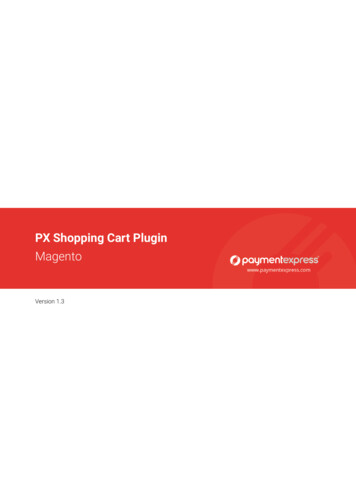
Vertex SystemsAR-Invoices and Credit Memos4.Enter the invoice lines1. in the Type field, select the appropriate line type.2. In the No. field, enter the appropriate number that corresponds with the line typeselected.3. In the Global Dim 1 field enter the code if applicable. (If this is the first invoice, you willneed to choose this column. The actual field name will be the name of your actualcompany’s global dim 1.)4. In the Global Dim 2 field enter the code if applicable. (If this is the first invioce, you willneed to choose this column. The actual field name will be the name of your actualcompany’s global dim 2.)5. In the Quantity field, enter the quantity to be sold.6. In the Unit of Measure field, enter the appropriate code.Vertex Systems, 2550 Corporate Exchange Drive, Columbus, OH 43231Page 2
Vertex SystemsAR-Invoices and Credit Memos7.In the Unit Price Excl. Vat field, enter the appropriate amount. Amounts should be a perunit based on the quantity and unit of measure—price per each item.8. In the Tax Group Code, enter the appropriate code. The tax group categorizes productsand services into groups subject to the same tax terms. When a sale is taxable, FinancialManager uses the tax area and the tax group to determine the correct tax rates. The taxliable option and tax area are set in the sales order header, Invoicing tab, but they can bechanged on the sales lines.9. The Line Amount Excl. VAT will auto calculate the line total taking Quantity multipliedby Unit Price Excl. Vat.10. Repeat for remaining lines.5.Review the Invoicing tab. Default information listed on this tab is pulled from the Customer card.Some information can be overridden.1. If the bill-to customer (customer to whom you send the invoice) is different from yousell-to customer (customer to whom items are sent), in the Bill-to Customer No. field,select the bill-to customer.2. Payment Terms Code is based on information from the customer card.3. The due date is calculated from the payment terms on the customer card and thedocument date on the sales order. The date can be changed in the Due Date field.Financial Manager uses this date for the Aged Accounts Receivable report for postedinvoices.4. Tax Liable. Will populate based on the customer card.5. Tax Area Code. Will populate based on the customer card.Vertex Systems, 2550 Corporate Exchange Drive, Columbus, OH 43231Page 3
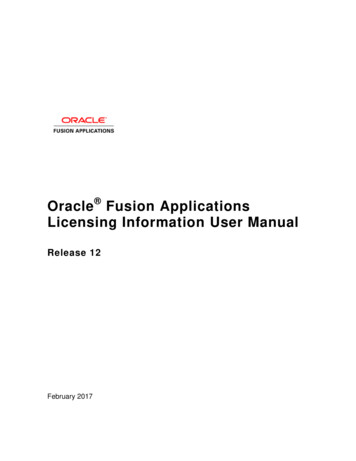
Vertex SystemsAR-Invoices and Credit Memos6.Review the Shipping tab. Default information listed on this tab is pulled from the Customer card.Some information can be overridden.1. Ship-to-Code. Multiple ship to addresses can be assigned to one customer. Change theship-to-code if necessary. Address and contact information pull from the code’s card.2. Location code. Enter the location this invoice is shipping from. Can also be entered in theline items. Optional field. Separate set up is required.3. Shipment Method Code. Enter a code or select from the drop down. Optional field.Separate set up is required. Examples would be FOB, pick up etc.4. Shipping Agent Code. Enter a code or select from the drop down. Optional field.Separate set up is required. Examples would be FedEx, UPS, etc.5. Package Tracking No. Enter the package tracking number. Optional field.6. Shipment date. Assumes today’s date, but can be changed to the actual shipping date.Vertex Systems, 2550 Corporate Exchange Drive, Columbus, OH 43231Page 4
Vertex SystemsAR-Invoices and Credit Memos7.Run a Test Report if desired. On the Actions tab, Posting group, select Test Report.8.Post or Release the document1. Post. Document posts without printed documentation. (Found on both Home andActions tabs). Depending on your line type you may have to choose Ship and Invoice.Vertex Systems, 2550 Corporate Exchange Drive, Columbus, OH 43231Page 5
Vertex SystemsAR-Invoices and Credit Memos2.3.Post and Print. Document posts with transaction printout. (Found on both Home andActions tabs). Depending on your line type you may have to choose Ship and Invoice.This prints documents associated with just this invoice.Release. This marks the document as released and available for batch processing. SeePost a Batch of Sales Invoices for posting instructions.Post a Batch of Sales InvoicesIt is important to enter all the necessary information on the sales invoices before they are batchposted. Otherwise it is possible that they will not be posted. When the batch job is finishedposting, a message shows how many of the invoices have been posted (for example, 9 out of 10).1.2.3.In the Search box, enter Sales Invoices, and then choose the related link.On the Home tab, in the Posting group, choose Post Batch Sales Invoices.Complete the Options tab1.4.Posting Date: Enter the date that the program will use as the document and/or postingdate when you post if you place a checkmark in one or both of the following boxes. If theposting date or document date on a document is blank, the date in this field is used evenif you have not placed a check mark in the relevant box.2. Replace Posting Date: Place a check in the box if you want to replace the sales invoices'posting date with the date entered in the field above.3. Replace Document Date: Place a check mark in the box if you want to replace the salesinvoices' document date with the date in the Posting Date field.4. Calc. Inv. Discount: Place a check mark in the box if you want the program to calculatethe invoice discount amount on the sales invoices before posting.Complete the Sales Invoice tab. Complete or add the needed filters to select the sales orders youwant to post. Leave blank to process all released sales invoices.Vertex Systems, 2550 Corporate Exchange Drive, Columbus, OH 43231Page 6
Vertex SystemsAR-Invoices and Credit MemosPrint, Email, Export, or View Posted Sales Invoices1.2.3.4.In the Navigation Pane, select the Posted Documents group, and then choose the type ofdocument you want to work with. Depending on the document type steps can vary.To Print: On the Home tab, in the Process group, choose Print. This instruction applies to alldocument types listed except G/L Registers, Posted Deposit List and Posted Bank Rec. List.a. There is no option to print G/L Registers or Posted Deposit list from this view.b. To print Posted Bank Rec. List: select the bank account statement you want to workwith. On the Home tab, in the Manage group, choose view. On the Home tab, inthe Process Group, choose print.To Email: On the Actions tab, in the Electronic Document group, choose Send.To Export to Excel, Word or attach to an email: On the Application menu, choose Print &Send.Vertex Systems, 2550 Corporate Exchange Drive, Columbus, OH 43231Page 7
Vertex SystemsAR-Invoices and Credit Memos5.6.To Export to XML: On the Actions tab, in the Electronic Document group, choose Export EDocument to XML.To View: On the Home tab, in the Manage group, choose View.Create Standard Sales Codes for Recurring SalesUse standard sales codes when you regularly create sales orders or sales invoices with the samelines for one or more customers. You can set up any number of standard sales codes, and each ofthem can consist of any number of standard sales lines. You then specify which standard salescodes are applicable for which customers.When you create sales document (quote, order, invoice, or credit memo) for a customer to whichyou have assigned a standard sales code, you can use the Get Standard Customer Sales Codefunction to automatically insert the sales lines that you set up for the code.To create a standard sales code:1.2.3.In the Search box, enter Standard Sales Code, and then choose the related link.In the New tab, New group, select New.In the Code field, type a code to represent the group of sales lines.Vertex Systems, 2550 Corporate Exchange Drive, Columbus, OH 43231Page 8
Vertex SystemsAR-Invoices and Credit Memos4.5.6.In the Description field, type a description of the code.In the Currency Code field, leave blank for local currency or select a currency.Enter the sales lines that you want to include in the group. The Quantity field is optional.To apply a standard sales code to a customer:1.2.3.4.In the Search box, enter Customers, and then choose the related link.Open the customer card for the customer that will be invoiced using a standard sales code.In the Navigate tab, Sales group, select Std. Cust. Sales Codes.In the Code field, select the sales code that applies to the customer.Vertex Systems, 2550 Corporate Exchange Drive, Columbus, OH 43231Page 9
Vertex SystemsAR-Invoices and Credit MemosTo use standard sales codes on a sales order or sales invoice:1.2.3.Create a sales order or sales invoice header as you normally would.In the Actions tab, Functions group, select Get Std. Cust. Sales Codes.Select the sales code. Only sales codes that have been applied to the customer are available. Thesales lines are populated with the sales lines in the standard sales code.Vertex Systems, 2550 Corporate Exchange Drive, Columbus, OH 43231Page 10
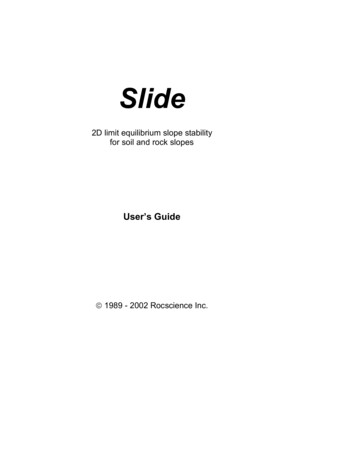
Vertex SystemsAR-Invoices and Credit MemosEntering Credit Memos1.2.3.In the Search box, enter Sales Credit Memos, and then choose the related link.On the Home tab, in the New group, choose New. Create a new credit memo.Fill the lines with the posted sales entries that you want to correct.You can fill the lines automatically with the following functions:oUse the Copy Document batch job to copy an existing document to the credit memo. Itcan be either a posted document or a document that is not yet posted.Vertex Systems, 2550 Corporate Exchange Drive, Columbus, OH 43231Page 11
Vertex SystemsAR-Invoices and Credit MemosThis function only reverses cost exactly when exact cost reversing is required in the Sales & ReceivablesSetup window.oUse the Get Posted Document Lines to Reverse function to copy one or more posteddocument lines from one or more posted documents to the new credit memo document.This function always exactly reverses the costs from the posted document line, regardlessof whether exact cost reversing is required in the Sales & Receivables Setup window.When you use either of these functions, a link is created to the original item ledger entries inthe Appl.-from Item Entry field to ensure that the costs are copied from the original posteddocument. If the line has item tracking, the Appl.-from Item Entry field is filled in on the itemtracking line or lines instead of on the document line.Vertex Systems, 2550 Corporate Exchange Drive, Columbus, OH 43231Page 12
Vertex SystemsAR-Invoices and Credit Memos4.Post, Post and Print, or Release the credit memo.o Post. Document posts without printed documentation. (Found on both Home andActions tabs). Depending on your line type you may have to choose Ship and Invoice.o Post and Print. Document posts with transaction printout. (Found on both Home andActions tabs). Depending on your line type you may have to choose Ship and Invoice.This prints documents associated with just this invoice.o Release. This marks the document as released and available for batch processing. (Foundon the Home and Actions tab).Print, Email, Export, or View Posted Sales Credit Memos1.2.3.4.5.In the Search box, enter Posted Sales Credit Memos, and then choose the related link.Select the credit memo.To Print: On the Home tab, in the Print group, choose Print.To Email: On the Actions tab, in the Electronic Document group, choose Send.To Export to Excel, Word or attach to an email: On the Application menu, choose Print &Send.7.To Export to XML: On the Actions tab, in the Electronic Document group, choose Export EDocument to XML.To View: On the Home tab, in the Manage group, choose View.8.Vertex Systems, 2550 Corporate Exchange Drive, Columbus, OH 43231Page 13
Vertex SystemsAR-Invoices and Credit MemosFor further information contact Vertex Support at (800) 536-3427 orsupport@vertexsystems.com. You can also search the HELP files by searching “PurchaseInvoice” or visit the Microsoft Dynamics NAV library at http://msdn.microsoft.com/enus/library/hh169374(v nav.70).aspxVertex Systems, 2550 Corporate Exchange Drive, Columbus, OH 43231Page 14
The tax group categorizes products and services into groups subject to the same tax terms. When a sale is taxable, Financial Manager uses the tax area and the tax group to determine the correct tax rates. The tax liable option and tax area are set in the sales order header, Invoicing tab, but they can be changed on the sales lines. 9.