Transcription
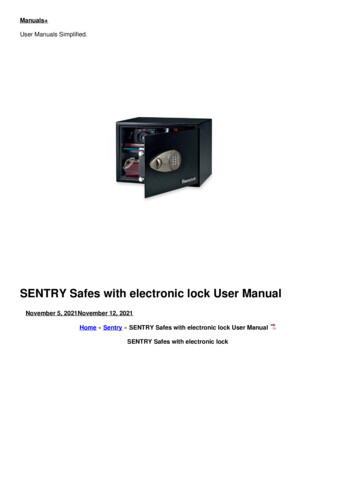
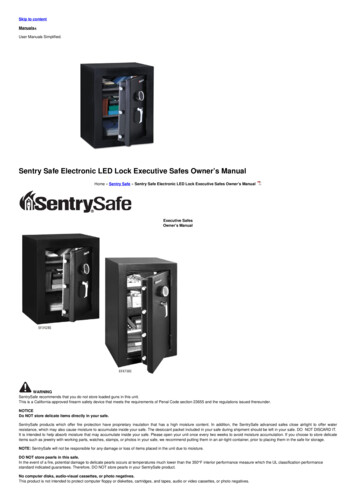
Skip to contentManuals User Manuals Simplified.Sentry Safe Electronic LED Lock Executive Safes Owner’s ManualHome » Sentry Safe » Sentry Safe Electronic LED Lock Executive Safes Owner’s ManualExecutive SafesOwner’s ManualWARNINGSentrySafe recommends that you do not store loaded guns in this unit.This is a California-approved firearm safety device that meets the requirements of Penal Code section 23655 and the regulations issued thereunder.NOTICEDo NOT store delicate items directly in your safe.SentrySafe products which offer fire protection have proprietary insulation that has a high moisture content. In addition, the SentrySafe advanced safes close airtight to offer waterresistance, which may also cause moisture to accumulate inside your safe. The desiccant packet included in your safe during shipment should be left in your safe. DO NOT DISCARD IT.It is intended to help absorb moisture that may accumulate inside your safe. Please open your unit once every two weeks to avoid moisture accumulation. If you choose to store delicateitems such as jewelry with working parts, watches, stamps, or photos in your safe, we recommend putting them in an air-tight container, prior to placing them in the safe for storage.NOTE: SentrySafe will not be responsible for any damage or loss of items placed in the unit due to moisture.DO NOT store pearls in this safe.In the event of a fire, potential damage to delicate pearls occurs at temperatures much lower than the 350 F interior performance measure which the UL classification performancestandard indicated guarantees. Therefore, DO NOT store pearls in your SentrySafe product.No computer disks, audio-visual cassettes, or photo negatives.This product is not intended to protect computer floppy or diskettes, cartridges, and tapes, audio or video cassettes, or photo negatives.
Liquids can damage the keypad!Pen points or other sharp objects can puncture the keypad membrane!Your safe is only part of your total security protection.SentrySafe recommends that you store your safe in closets, offices, basements, bedrooms, and any other locations that are convenient for you but out of the direct line of sight from pryingeyes. The location of the safe does not affect the safe’s ability to protect your valuables inside.If children live or visit in your home, do not leave your SentrySafe Executive Safe open and unattended. Children at play could accidentally be locked inside the safe. Keep yoursafe closed and locked at all times.Thank you for your purchase of a SentrySafe Product. SentrySafe is committed to securing, organizing, and protecting your most important documents, valuables, and keepsakes. IMPORTANT DO NOT RETURN SAFE TO THE STORE!If you experience any problems or challenges with your safe, please contact us. Many issues can be resolved quickly without the product being s to registerBy registering your SentrySafe product you can easily retrieve forgotten codes and combinations. By registering your SentrySafe product you can be sure that in the unfortunatecircumstance of a fire you will be guaranteed your replacement safe (provided official paperwork has been completed).Contents [ hide1 Bolt-down instructions2 Lock instructions3 Standard Electronic Lock4 To install batteries5 Access codes6 Programming a user code7 Programming a user PIN8 Key override9 Troubleshooting10 Signals11 Delay mode12 Peril Protection13 How to obtain a replacementkey14 File Downloads15 References16 Related ManualsBolt-down instructionsTo provide water resistance this safe must be bolted down. (hardware supplied)Bolt down kit contents:2 Lag screws2 WashersTools needed to bolt safe to a surface:DrillWrench9/32″ (7.2 mm) drill bit – for drilling into wood3/8″ (9.5 mm) drill bit – for drilling into masonry1.Select a suitable and convenient location for your safe. Set the safe in place and use the holes provided in the bottom or back ofthe safe to mark the location of the holes to be drilled in the floor.2. Move the safe away and drill holes of the appropriate diameter and depth for the type of hardware and the mounting surface being used (2 each – bolts, washers, and masonryanchors).
3. Place the safe back over the holes and install the fasteners as required. If a water-resistant unit was purchased, rubberized washers are provided. Assure that the area around thesafe hole opening is clean using a damp cloth. Place the rubber side of the washer facing down against the safe floor and install the fastener.NOTE: SentrySafe is not responsible for any costs incurred if the unit is to be replaced.Lock instructionsStandard Electronic LockTo activate lock:Four alkaline AA batteries, Voltage: 6Vdc, (not included) are required to activate the keypad.NOTE: Do not use rechargeable batteries or any other type of non-alkaline battery. Do not mix old and new batteries. Do not mix alkaline and standard batteries.To install batteries1.Using two hands, hold the keypad, thumbs down, on its left and right sides. Push up the keypad with your thumbs,and disconnect it from the safe by pulling it towards you.2.3.4.5.Let the disengaged keypad hang by its wires. This will expose the battery holder.Install four alkaline AA batteries as illustrated on the back of the battery holder.Reconnect the keypad by inserting the keypad’s four posts into the matching holes.Push down to snap into place.NOTICETest first with the door open!(See the back cover of this manual for your factory code.)Access codes
There are three possible ways to unlock and access the safe—by entering its preset Factory Code, your own User Code, or a User PIN (Personal Identification Number).You can always open the safe by entering the 5-digit Factory Code. This code cannot be deleted.But if you prefer to use your own code, you can program the safe to open to the 5-digit User Code of your choice. If you wish to give someone else temporary access to the safe, you canprogram a User PIN that can later be erased.Programming a user codeThere are two ways to program a user code.Press the Program button. (Prog).Enter the Factory Code. The green LED remains ON while you enter the 5-digit user code of your choice. After 5 digits are entered the green LED turns OFF.(To enter a new User Code, repeat these steps.)–OR–Press the red button on the inside of the door (hinge side). The lock will “beep” and the green LED will come on.Enter a 5-digit user code. (To enter a new User Code, repeat these steps.)Keep your new user code secure For your records, please copy it here:Programming a user PIN1.2.3.4.Press the Program button.Press it a second time.Enter your 5-digit User Code. The green LED remains ON.Enter the 5-digit User PIN of your choice (any combination except 00000.) After 5 digits are entered, the green LED turns OFF.(To enter a new User PIN, repeat these steps. To erase the User PIN, press Program twice, enter your User Code, and then enter 00000.)If your electronic lock fails or you do not have any codes available, you may use the override key that comes with the unit.Key override1. Using two hands, hold the keypad, thumbs down, on its left and right sides. Push up the keypad with your thumbs, disconnect and remove the battery holder.
Troubleshooting2. Insert the skeleton key into the keyhole inside the opening for the battery.3. Turn the key to the right.4. Open the door.SignalsYour electronic-lock safe communicates by means of several audio/visual signals.The Problem:Red (Error) LED three beepsindicates one of the followingWhy It Is Happening:The Solution:You have pressed the Program key out of sequence.Verify the code and re-enteror reprogramYou have entered an invalid code or user pin.Verify the code and re-enteror reprogramYou have let 5 seconds or more elapse between key presses.Lights after three consecutive invalid codes are input (2-minute delay mode).Comes ON after you enter a valid code and remains lit during the 4- the second period in which thesafe can be opened.Green LED onlyComes ON in the Programming mode and remains lit until you have finished entering a 5-digit code.Yellow LED onlyThe yellow light comes ONBatteries need to be replaced.Delay modeThe lock automatically enters a 2-minute Delay mode after an invalid code has been entered three consecutive times. In this mode, the lock cannot be activated and any key entry willgenerate an ERROR signal.Customer Servicewww.sentrysafe.comCustomer Service: 1-800-828-1438Peril ProtectionFire ProtectionVerified by ETL SEMKO to meet manufacturer’s specification for fire resistance 1400 F (760 C) for 30 minutes endurance.How to obtain a replacement keyTo order replacement keys and/or combinations, we must have the correct model and a serial number of your safe. Find your safe’s Serial Number on the small label located on theoutside of your safe and on the original owner’s manual. Once you locate this information, please visit www.sentrysafe.com or call customer service at 1-800-828-1438.Customer Service: 1-800-828-1438www.sentrysafe.com 2017Master Lock Company LLCMilwaukee, Wisconsin 53210 U.S.A.www.masterlock.comFile DownloadsOwner's ManualDownload [optimized]Electronic LED Lock Executive Safes, EF3428E, EF4738E DownloadReferencesLog In Register My SafeLocks, Padlocks and Security Products Master Lock Search Search Close Modal Icon Close Modal IconFirearm Storage at a New, Lower Price SentrySafeRelated Manuals1. SentrySafe Fire-Safe Electronic Lock Manual User Manual SentrySafe Fire-Safe Electronic Lock IMPORTANT If you.2. Liberty Safe Combination and Keypad Lock Instructions Liberty Safe Combination and Keypad Lock Congratulations on your purchase.
3.4.5.6.AIBOCN Electronic Keypad Deadbolt Lock User Manual AIBOCN Electronic Keypad Deadbolt Lock PREFACE Please read this manual.Ruggard Electronic Dry Cabinet with Fingerprint Lock User Manual Ruggard Electronic Dry Cabinet with Fingerprint Lock THANK YOU FOR.Revere Safelogic Toplit Electronic Lock User Guide Revere Safelogic Toplit Electronic Lock QUICK START GUIDE Congratulations on.Matrix Executive Electric Height Adjustable Desk [JBMATEL12K, JBMATEL15K] User Manual Matrix Executive Electric Height Adjustable Desk JBMATEL12K, JBMATEL15K User Manual.
Set the safe in place and use the holes provided in the bottom or back of the safe to mark the location of the holes to be drilled in the floor. 2. Move the safe away and drill holes of the appropriate diameter and depth for the type of hardware and the mounting surface being used (2 each - bolts, washers, and masonry anchors).