Transcription
Installation&Operating InstructionsTo be provided to the owner/user.IMPORTANT!PLEASE CHECK ENTIRE UNIT FOR ANY DAMAGE.If it appears damaged, contact Hydro Dimensions immediately.Warranty does not cover damages that occurs in transitContact Customer Service at (866)-409-9634Monday – Friday 8:00 – 5:00 PST.
NOTES:Copyright 2011 Hydro Dimensions
TABLE OF CONTENTSWarranty Confirmation & Product Registration .3Installation Instructions & Pre-Installation Procedures . .4Installation Procedures 5Important Safety Instructions .6Electrical Instructions for Hydro & Air Massage Systems .7Electrical Instructions for Dual Massage System .8Post Installation Testing and Cleaning .9General Operating Instructions .10Hydro Massage Operating Instructions .11Air Massage Operating Instructions 11Dual Massage Operating Instructions .11Care and Maintenance .12Troubleshooting Guide .13Warranty .142Copyright 2011 Hydro Dimensions
Warranty Confirmation & Product Registration InformationOWNER INFORMATIONIMPORTANT: To ensure that your warranty isregistered and confirmed with the manufacturer,please take A few moments to complete, sign andreturn the Product Registration Card (below) within30 days of date of purchase.WARRANTY CONFIRMATION: By returning thisproduct Registration Card we confirm the date ofpurchase for your new walk-in bathtub. ThisModel Name / NumberSerial Numberconfirmation will allow Hydro Dimensions toprocess any warranty claims.Purchase DatePURCHASE REGISTRATION: The informationprovided on the Product Registration Card will bekept on file with Hydro Dimensions as officialpurchase registration.DealerWhile completing this card, please take time to fill out the owner information above, as this will be yourreference to help expedite any warranty claim, should the need arise.Hydro DimensionsProduct Registration CardTo ensure that your warranty is registered with Hydro Dimensions complete, sign and return Thisregistration card within 30 days of the purchase or installation.NOTE: Your warranty will not be Recognized by Hydro Dimensions unless this card is fully completedand returned to Hydro Dimensions, 27957 Diaz Road, Temecula , CA 92590NameDealer NameAddressCityCityTub ModelColorDate PurchasedSerial #PhoneI have read the Hydro Dimensions Owners Manual carefully and understand and agree that anyinstallation, operation or maintenance of the bath tub must be done strictly in accordance with theinstruction guidelines contained in the Hydro Dimensions installation and operating instructions.SIGNATURE DATE3Copyright 2011 Hydro Dimensions
INSTALLATION INSTRUCTIONSREAD ALL INSTRUCTIONS CAREFULLY BEFORE INSTALLATIONWARNING: When using this unit, basic precautions should be followed, including the following:DANGER: RISK OF ELECTRICAL SHOCK. Connect only to a circuit protected by a ground-fault circuitinterrupter (GFCI). Grounding is required; all electrical connections should be made by a licensedelectrician, in accordance with the requirements of national electrical codes and procedures.INSTALLER / OWNER BEARS ALL RESPONSIBILTY TO COMPLY WITH ALL STATE AND LOCALBUILDING CODES WHEN INSTALLING THIS UNITPRE-INSTALLATION PROCEDURES:1. Immediately unpack and inspect the unit thoroughly for freight damage, even if there is no visible damage tothe carton. If necessary, contact your dealer/distributor immediately to file a freight claim.2. All bath tubs are water tested and operated at the factory prior to shipment. However rough handling may causeleaks that can be detected if water tested prior to installation.3. Place the tub on a flat surface in an area where it may be drained after testing.4. Never lift the tub by any portion of the hydro massage system piping.5. Place a plug or tape over the drain, fill the tub with water to the overflow and allow standing for a few minutes.6. Using an extension cord plug in pump and or blower and run for 10 minutes, inspect the tub/systems for leaks.Turn system off and let stand for 10 minutes. Inspect tub completely (around pump and or blower, all plumbingfittings and door for leaks) any defect must be reported to your dealer/distributor prior to installation in order tohave it covered under warranty.7. Check to ensure that your installation will conform to all applicable codes and secure necessary permits. Allelectrical and plumbing connections should be made by a qualified electricians and plumbers.IMPORTANT: FAILURE TO FOLLOW THE PRE-INSTALLATION PROCEDURES, MANUFACTURERWILL NOT BE LIABLE FOR THE REMOVAL OR INSTALLATION OF THE BATHTUB,AND COULD RESULT IN TERMINATION OF THE WARRANTY.4Copyright 2011 Hydro Dimensions
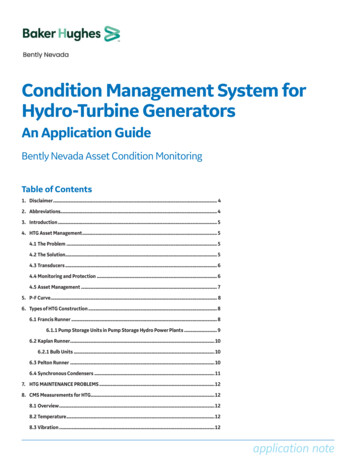
INSTALLATION PROCEDURES:1. Bathtub must be set on a solid flat surface. All six (6) adjustable feet must come in contact with the floor.2. Plumbing hardware (faucet, hoses, and waste/overflow) should be installed prior to setting tub in-place.3. Filler panel is used for 60” opening installations.4. The drain body is to be installed between the drain shoe and the drain tee.5Copyright 2011 Hydro Dimensions
IMPORTANT SAFETY INSTRUCTIONSINSTRUCTIONS PERTAINING TO RISK OF FIRE, ELECTRIC SHOCK, OR INJURY TO PERSONS.WARNING: When using this unit, basic precautions should be followed, including the following:READ AND FOLLOW ALL INSTRUCTIONSDANGER! TO REDUCE THE RISK OF INJURY:A. Do not permit children to use this unit unless an adult closely supervises them at all times. Supervision is alsorequired when an elderly or handicapped individual uses whirlpool bath.B. Use this unit only for its intended use as described in this manual. Do not use attachments not recommendedby the manufacturer.C. Do not operate this unit without the guard over the suction fitting. The guard is a safety device that reducesthe potential hazard of hair or body entrapment. Keep hair and body away from suction guard whenpump is running.D. Never operate electrically connected devices in or near the bath. No electric appliances should be within 5feet/1.5 meters of this bathtub (hair dryers, lamp, telephone, radio, television, etc).E. Never drop or insert any object in any opening within the whirlpool.F. Since excessive water temperatures have a high potential for causing fetal damage during the early monthsof pregnancy, pregnant or possibly pregnant women should limit whirlpool water temperature to 38 C (100 F).G. The use of drugs or alcoholic beverages before or during whirlpool use may lead to unconsciousness with thepossibility of drowning.H. Persons with a medical history of heart disease, low or high blood pressure, circulatory system problems ordiabetes should consult a physician before using a whirlpool.I. Persons using medication should consult a physician before using a whirlpool since medication may inducedrowsiness while other medication may affect heart rate, blood pressure and circulation.J. A thermostatic mixing valve is required. Section 414.5 of the 2009 Uniform Plumbing Codes require that themaximum hot water temperature discharging from the bathtub and/or whirlpool bathtub filler shall be limited to120 F (49 C) by a device that conforms to ASSE 1070 or CSA B125.3. The water heater thermostat shall notbe considered a control for meeting this provision.K. The water in a whirlpool should never exceed 40 C (104 F). Water temperatures between 38 C (100 F) and40 C (104 F) are considered safe for a healthy adult. Use time should be limited to approximately 30minutes, followed by a shower to cool down. Lower water temperatures are recommended for extended use(exceeding 10-15 minutes) and are definitely recommended for younger children. If you become nauseous,dizzy or develop a headache, get out at once and cool down. Get medical attention if symptoms persist. Checkwith a physician before using whirlpool again.L. This unit must be connected to a circuit that is protected by a Ground Fault Circuit Interrupter (GFCI). TheGFCI should be provided and installed by a licensed electrician and tested on a regular basis (at least monthly).To test the GFCI push the TEST button. The GFCI should interrupt the power. Push the RESET button and thepower should be restored. If the GFCI fails to operate in this manner there is a possibility of an electric shock,DO NOT OPERATE THIS UNIT. Disconnect the unit and have the problem corrected by a licensed electricianbefore using.CAUTION: DO NOT USE HARSH ABRASIVES OR SOLVENTS FOR CLEANING THIS UNIT.SAVE THESE INSTRUCTIONSCopyright 2011 Hydro Dimensions6
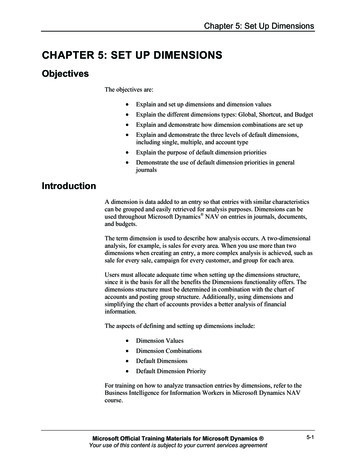
ELECTRICAL INSTRUCTIONS:HYDRO MASSAGE SYSTEM1. Hydro massage system requires one (1) dedicated 15-amp, 120 volt service.2. A receptacle with a 15-amp configuration must be provided by the electrician.NOTE: Provide a power supply outlet (receptacle) appropriately rated for each load. For voltage and currentrequirements refer to the label on each load.HYDRO MASSAGE WIRINGMAIN CIRCUIT15A/120VoltGFCI ProtectedUSACanada(GREEN) GROUNDPUMP CONTROLUSACanadaOUTPUT INPUT(WHITE) NEUTRALW/LKeypadOutput Power Cable(BLACK) HOTKEYPADInput Power CableJunction BoxAIR MASSAGE SYSTEM1. Air massage system requires one (1) dedicated 15-amp, 120-volt service.2. A receptacle with a 15-amp configuration must be provided by the electrician.NOTE: Provide a power supply outlet (receptacle) appropriately rated for each load. For voltage and currentrequirements refer to the label on each load.AIR MASSAGE WIRINGMAIN CIRCUIT15A/120VoltGFCI ProtectedUSA(GRE EN) G ROUNDPUMP CONTROLUSACanadaCanadaOUTPUT INPUT(WHITE) NEUTRALOutput Powe r Cable(BLACK) HOTInput Powe r CableJunction B ox7Copyright 2011 Hydro DimensionsKE YPADKeypad
DUAL MASSAGE SYSTEM1. Dual massage system requires two dedicated 15-amp 120-volt services one (1) for hydro massage pump andone (1) for the air massage blower.2. Two dedicated 15-amp configuration must be provided by the electrician.3. Connect a # 8 bare copper bonding wire from the blower control box to the cold water plumbing or othersuitable ground. Grounding is required.NOTE: Provide a power supply outlet (receptacle) appropriately rated for each load. For voltage and currentrequirements refer to the label on each load.HYDRO & AIR MASSAGE WIRINGGROUNDPUMP CONTROLUSAOUTPUT INPUT(GREEN) GROUNDUSACanadaCanadaKEYPADOutput Power CableKeypad(WHITE) NEUTRAL(BLACK) HOTInput Power Cable15A/120VoltGFCI ProtectedMAIN CIRCUIT15A/120VoltGFCI ProtectedPUMP CONTROLUSA(GREEN) GROUNDUSACanadaCanada(WHITE) NEUTRAL(BLACK) HOTOUTPUT INPUTOutput Power CableW/LKEYPADKeypadInput Power Cable8Copyright 2011 Hydro Dimensions
POST - INSTALLATION TESTING AND CLEANING:SYSTEM TEST: After installation make sure all plumbing connections and hydro massage and air massagesystem connections are correctly installed, run the following tests.1. Before filling the tub with water, be sure to remove all loose debris from tub. Wipe down the door seal using adamp cloth, as well as the surface in the door jamb that will come in contact with the door seal.2. Fill the tub to the overflow and check for leaks. Check by hand where visual verification is not possible.3. Turn the pump and or blower on and let run for at least 15 minutes. Check for leaks while the system/systemsare running and again after you turn them off. Check by hand where visual verification is not possible.Refer all service issues to your dealer/distributor.CLEANING:WARNING: Under no circumstances use wire brushes, metal sponges, knives, steel wool or scouringpads on any part of the tub, or solvents that contain petroleum distillates such as acetone,lacquer, paint thinner, benzene or abrasive cleanser on any part of the tub. DO NOT USEammonia or chlorine-based agents on any plated surface. These products will remove theplating, thereby voiding the warranty on the plated finish.1. Remove any blobs of plaster and/or dabs of paint that have adhered to the surface by gently scraping themoff with the sharpened edge of a makeshift spatula fashioned out of wood.2. Oil or grease spots can be lifted with denatured alcohol.3. Use liquid, non-bleach and automatic dishwashing detergent to remove any construction residue.4. For tough stains and surface scratches lightly rubbing with a liquid cleaning compound (such as polishingcompound used for cars), followed by a light application of liquid or paste wax, will restore luster to any dulledsurface.5. Clean plated surfaces with warm water only.SAVE THESE INSTRUCTIONS9Copyright 2011 Hydro Dimensions
IMPORTANT OPERATING INSTRUCTIONSCAUTION: DO NOT OPERATE THE HYDRO MASSAGE SYSTEM WITH ANY PARTS OR FITTINGS REMOVED.1. Use this unit only for its intended use as described in the manual.2. To avoid injury, exercise care when entering or exiting the bathtub, the floor may be slippery.3. Do not use door as support while entering or exiting the bathtub, as door may swing with applied weight.4. Do not add liquids or powders to the water, especially foamy, bubbly or oily types other than thoserecommended for Hydromassage Bathing or detergent used for cleaning the Hydromassage system.5. Risk of hypothermia and drowning, (refer to IMPORTANT SAFETY INSTRUCTIONS) Do not use hydromassage bathtub after strenuous exercise. However under no circumstances use a bathtub with water above104 F (40 C.6. Enter your bathtub and latch the door securely. The forward motion of the door lock seals the door.7. Be certain tub drain is open as first water coming from tub spout may be to cold or to hot. Carefully test watertemperature by slowly moving hand into water stream.8. After adjusting water temperature, move the drain valve handle all the way to the left to close the tub drain.9. After bathing and before draining tub check and make sure door latch is in its locked position (all the wayforward). Turn the overflow valve handle all the way to the right to open the drain. Do not open door until allwater has been drained from the bathtub.10. Be careful while exiting the bathtub, water on the floor or in tub may cause slippery conditions.11. Be sure tub door remains in the open position when not in use. Failure to do so could deform door gasketcausing the tub door to leak.10Copyright 2011 Hydro Dimensions
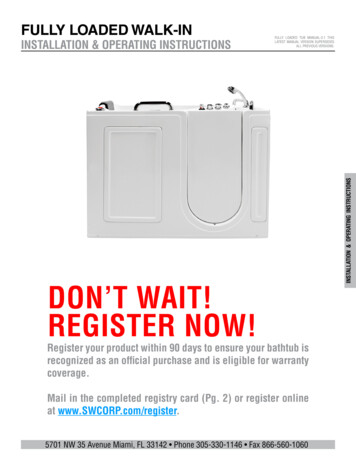
OnOffHYDRO MASSAGE OPERATION1. Pressing the ON button will turn the pump on. Pressing the OFFbutton will turn the pump off.2. The Hydro Massage System will stop automatically after 20 minutes.3. Direction of the jets can be controlled by adjusting the eyeballs ofthe jets to the desired direction. Back jets can be individually adjustedfrom off to full by turning the chrome ring 90 to the left or right.AIR MASSAGE OPERATIONJET EYEBALL1. Pressing the on/off button will start and stop the blower.2. Pressing and holding this key will increase or decrease the blowerspeed until desired level is reached.CHROME RING1233. Pressing this button once, the blower speed will vary graduallyFrom maximum to minimum and back to maximum. 2nd press, systemturns off and on, alternately. 3rd press, returns to maximum speed.4. The air massage system will stop automatically after 20 minutes.5. Advanced function: An automatic drying cycle will start 20 minutesafter the blower is turned off.HYDRO AND AIR MASSAGE OPERATION1231. Pressing the on/off button will start and stop the blower.2. Pressing and holding this key will increase or decrease theBlower speed until desired level is reached.3. Pressing this button once, the blower speed will vary graduallyfrom maximum to minimum and back to maximum. 2nd press, systemturns off and on, alternately. 3rd press, returns to maximum speed.4. The air massage system will stop automatically after 20 minutes.OnOff5. Advanced function: An automatic drying cycle will start 20 minutesafter the blower is turned off.6. Pressing the ON button will turn the pump on. Pressing the OFFbutton will turn the pump off.7. The Hydro Massage System will stop automatically after 20 minutes.8. Direction of the jets can be controlled by adjusting the eyeballs ofthe jets to the desired direction. Back jets can be individually adjustedfrom off to full by turning the chrome ring 90 to the left or right.11Copyright 2011 Hydro DimensionsJET EYEBALLCHROME RING
CARE AND MAINTENANCERegular care of your walk-in tub with the hydro massage system will keep it clean and working at its best. Thiscare should include the tub, the trim and fittings and internal water-carrying part of the pipe system.No maintenance is required for the pump or the motor powering it. The motor is lubricated for life. The shaft andseals in the pump are water lubricated and self-adjusting.Because of the detrimental effects that mineral deposits, soap scum and bacteria have on finished surfaces, it isimportant to keep your bathtub and the fixtures (fittings) of your walk-in hydro massage system clean on a regularbasis. The best way to counteract the soiling and often time corrosive action of these residues is to prevent waterfrom remaining on any finished surface.NOTE: DO NOT USE OIL OR OIL BASED BATH ADDITIVES.If you won’t to use any kind of bath additives, use only a small amount of low-foaming powder or crystalsubstance. The hydro massage action intensifies the foaming properties of soap.REGULAR CLEANING1. After each use, rinse all exposed surfaces with warm water, then wipe tub completely dry.2. Once a week, wash all exposed surfaces of the bathtub. Oily or greasy spots can be lifted with denaturedalcohol.3. To preserve the tub finish, waxing is recommended. Products such as Gel Gloss or a marine grade wax willmaintain the tub finish. You can find them at most hardware stores.4. It is especially IMPORTANT to wipe down the door seal and door jamb with a soft cloth weekly in orderto maintain the integrity of the water seal. In order to keep the door seal and door jamb clean and notaccumulate dirt or debris of any kind, clean seal and jamb with products such as Tide, Gain or Cheer liquidlaundry detergent or vinegar mixed with warm water.5. Once a month purge and clean the entire system using 1/8 cup of liquid laundry detergent. Productssuch as Tide, Gain or Cheer will remove body and bath oils and other sources that can contribute to bacterialgrowth in the hydro massage system.Follow these steps:1. Fill the tub with warm water to the overflow.2. Turn on the hydro massage system and pour detergent in the water. Run the system for 15 minutes or untilbubbles start to overflow. Turn off system and let stand for 15 minutes. Turn system back on and run foranother 15 minutes or until bubbles overflow. Turn system off and drain tub.3. Refill tub with cold water and run system for another 15 minutes to rinse out the plumbing. Using your handheld shower rinse out tub then dry with a soft cloth.6. Be sure tub door remains in the open position when not in use. Failure to do so could deform door gasketcausing the tub door to leak.WARNING: Under no circumstances use wire brushes, metal sponges, knives, steel wool or scouringpads on any part of the tub, or solvents that contain petroleum distillates such as acetone,lacquer, paint thinner, benzene or abrasive cleanser on any part of the tub. DO NOT USEammonia or chlorine-based agents on any plated surface. These products will remove theplating, thereby voiding the warranty on the plated finish.USER SERVICE INSTRUCTIONS1. There are no user serviceable parts. All service, repairs must be performed by a qualified service technicianin accordance with all applicable local and national codes.2. For replacement parts contact your dealer/distributor.12Copyright 2011 Hydro Dimensions
TROUBLESHOOTING GUIDEWARNING: Always turn off power at main electrical service panel when servicing your walk in bathtub.SYMPTOMS Motor will not start.PROBLEMSSOLUTIONS GFCI or breaker in off position. Disconnected or defective wiring. Short between bath and breaker. GFCI or breaker defective. Reset GFCI or breaker. Check and reconnect if needed. Motor does not reach fullSpeed. Low voltage. Wiring too small. Contact your electrician. Contact your electrician. Motor overheats. Low voltage. Wiring too small. Inadequate ventilation. Contact your electrician. Contact your electrician. Gain ventilation to motor. Leaking around pump. Loose unions. O-ring missing. Hand tighten unions. Replace O-ring. No pressure out of backJets. Jet in closed position. Turn jet face ½ turn left or right No air out of lower bathingwell air jets In low speed. Speed of blower set to low. Increase blower speed until all jetsare working. Breaker trips repeatedly. Check for short in wiring. Replace GFCI or breaker.DOOR SEAL LEAKINGIf a small leak has been detected around the door, check closely for any accumulation of dirt or debris. Any smallcollection of either on the door seal or where the seal comes in contact with the door jamb could result in a minorleak through the door seal.1. Before filling tub with water, be sure to wipe down the door seal using a damp soft cloth, as well as thesurface on the door jamb that will come in contact with the seal.2. Once the above surfaces have been wiped clean, be sure that when closing the door, the latch iscompletely locked forwardNOTE: When draining the water from the tub, be sure that the door latch is in the locked position (forward).If the latch is not secure when draining the tub, as the water level lowers, the pressure on the door will bereduced, thus increasing the possibility of a leak around the door.13Copyright 2011 Hydro Dimensions
LIMITED LIFETIME WARRANTYThis limited lifetime warranty is extended to the first user to be free from defects in workmanship and material under normal use andconditions from the date of original purchase. Product registration card must be mailed to Hydro Dimensions 27957 Diaz RoadTemecula, CA 92590 to activate this warranty. Warranty relates to all fitting and components included with the tub from themanufacturer. For the first year the tub and all component parts related to the product are included. The bathtub shell, frame, and finish arecovered by a lifetime warranty. The warranty does not apply to fading, cracking, delamination or blistering due to excessive wear, sun fadingor scouring due to cleaning. All supporting equipment, motors, electronic controls, faucet, waste & overflow, and all plated finishes, arecovered by a limited ten (10) year Warranty. NOTE: After the first year, replacement parts will include shipping and handling charges.Different warranty periods apply, For the first year one hundred percent 100% of all component parts related to the product are included. For the second and third year sixty percent 60% of all component parts related to the product are included. For the forth and fifth year fifty percent 50% of all component parts related to the product are included. For the sixth and seventh year thrifty percent 30% of all component parts related to the product are included. For the eight and ninth year twenty percent 20% of all component parts related to the product are included. For the tenth year ten percent 10% of all component parts related to the product are includedThis warranty is non-transferable and applies only to the original owner.Should service be required for any reason of any defect or malfunction of the product during the first year, manufacturer will replace orrepair the part or product without charge subject to verification of the defect or malfunction. Notification MUST BE sent via certified mail toHydro Dimensions 27957 Diaz Road Temecula, CA 92590.The Manufacturer will not be responsible for any water damage to structures or property for any reason including but not limited tomanufacturer defects or improper installation. Manufacturer will assume no responsibility for the loss of the system, inconvenience due toloss, damage to real or personal property or any other consequential damage. Manufacturer will not be liable for any incidental expenses ormaterial charges in connection with removal or replacement of the walk-in bathtub or any part or parts of the System.This warranty shall not apply to any type of failure resulting from negligence, abuse, misuse, misapplication, improper installation, alterationor modification, chemical corrosion or improper maintenance. There will be a charge for replacement parts or replacement of the entireelectrical unit if the defective unit is returned for any of the reasons listed above.Manufacturer reserves the sole authority to make any type of warranties or representations concerning its products and will not beresponsible for any warranties or representations made by any outside source, including dealers, retailers, distributors or contractors.Manufacturer does not warrant the installation of any of our products including Walk-in Baths, shower pans or shower stalls. Items includeall plumbing or electrical related connections. Improper or negligent installation of the product or other components, alteration made of, oralterations or modifications to the System, may cause the product or the System to malfunction. Such problems are not covered by thewarranty.DOOR SEALManufacturer warrants the door seal for the life of the unit under normal use and conditions. This warranty shall not apply to any failureresulting from negligence, abuse, misuse, misapplication, alteration or modification or improper maintenance. The replacement door sealwill be issued to the end user and it will be the responsibility of the end user to determine the means of installation. Manufacturer will not beliable for any incidental expenses or material charges in connection with removal or replacement of the door seal.TO THE EXTENT PERMITTED BY LAW, ALL IMPLIED WARRANTIES INCLUDING THOSE OF MERCHANTABILITY AND FITNESS FORA PARTICULAR PURPOSE ARE HEREBY DISCLAIMED. Hydro Dimensions AND SELLER HEREBY DISCLAIM ANY LIABILITY FORSPECIAL, INCIDENTAL, OR CONSEQUENTIAL DAMAGES. Some states/provinces do not allow limitations on how long an impliedwarranty lasts, or the exclusion or limitation of special, incidental or consequential damages, so these limitations and exclusions may notapply to you. This warranty gives you specific legal rights. You may have other rights which vary from state/province to state/province.This is the only warranty expressed or implied by Hydro Dimensions.CUSTOMER SERVICEContact Customer Service at (888) 506-0527Monday – Friday 8:00 – 5:00 PST14Copyright 2011 Hydro Dimensions
27957 Diaz RoadTemecula, Ca 92590951-676-7290 Fax 951-676-7292E-mail: sales@hydrodimensions.comCopyright 2011 Hydro Dimensions
leaks that can be detected if water tested prior to installation. 3. Place the tub on a flat surface in an area where it may be drained after testing. 4. Never lift the tub by any portion of the hydro massage system piping. 5. Place a plug or tape over the drain, fill the tub with water to the overflow and allow standing for a few minutes. 6.