Transcription
CA Workload Automation DEOverview Guider11.3
This Documentation, which includes embedded help systems and electronically distributed materials, (hereinafter referred toas the “Documentation”) is for your informational purposes only and is subject to change or withdrawal by CA at any time.This Documentation may not be copied, transferred, reproduced, disclosed, modified or duplicated, in whole or in part, withoutthe prior written consent of CA. This Documentation is confidential and proprietary information of CA and may not be disclosedby you or used for any purpose other than as may be permitted in (i) a separate agreement between you and CA governingyour use of the CA software to which the Documentation relates; or (ii) a separate confidentiality agreement between you andCA.Notwithstanding the foregoing, if you are a licensed user of the software product(s) addressed in the Documentation, you mayprint or otherwise make available a reasonable number of copies of the Documentation for internal use by you and youremployees in connection with that software, provided that all CA copyright notices and legends are affixed to each reproducedcopy.The right to print or otherwise make available copies of the Documentation is limited to the period during which the applicablelicense for such software remains in full force and effect. Should the license terminate for any reason, it is your responsibility tocertify in writing to CA that all copies and partial copies of the Documentation have been returned to CA or destroyed.TO THE EXTENT PERMITTED BY APPLICABLE LAW, CA PROVIDES THIS DOCUMENTATION “AS IS” WITHOUT WARRANTY OF ANYKIND, INCLUDING WITHOUT LIMITATION, ANY IMPLIED WARRANTIES OF MERCHANTABILITY, FITNESS FOR A PARTICULARPURPOSE, OR NONINFRINGEMENT. IN NO EVENT WILL CA BE LIABLE TO YOU OR ANY THIRD PARTY FOR ANY LOSS OR DAMAGE,DIRECT OR INDIRECT, FROM THE USE OF THIS DOCUMENTATION, INCLUDING WITHOUT LIMITATION, LOST PROFITS, LOSTINVESTMENT, BUSINESS INTERRUPTION, GOODWILL, OR LOST DATA, EVEN IF CA IS EXPRESSLY ADVISED IN ADVANCE OF THEPOSSIBILITY OF SUCH LOSS OR DAMAGE.The use of any software product referenced in the Documentation is governed by the applicable license agreement and suchlicense agreement is not modified in any way by the terms of this notice.The manufacturer of this Documentation is CA.Provided with “Restricted Rights.” Use, duplication or disclosure by the United States Government is subject to the restrictionsset forth in FAR Sections 12.212, 52.227-14, and 52.227-19(c)(1) - (2) and DFARS Section 252.227-7014(b)(3), as applicable, ortheir successors.Copyright 2011 CA. All rights reserved. All trademarks, trade names, service marks, and logos referenced herein belong totheir respective companies.
CA Technologies Product ReferencesThis document references the following CA Technologies products: CA Workload Automation DE CA Workload Automation Desktop Client (CA WA Desktop Client) CA Workload Automation DE Web Client CA Workload Automation High Availability DE (CA WA High Availability) CA Workload Automation Web Services (CA WA Web Services) CA Workload Automation Agent for UNIX (CA WA Agent for UNIX) CA Workload Automation Agent for Linux (CA WA Agent for Linux) CA Workload Automation Agent for Windows (CA WA Agent for Windows) CA Workload Automation Agent for i5/OS (CA WA Agent for i5/OS) CA Workload Automation Agent for z/OS (CA WA Agent for z/OS) CA Workload Automation Agent for Application Services (CA WA Agent forApplication Services) CA Workload Automation Agent for Web Services (CA WA Agent for Web Services) CA Workload Automation Agent for Micro Focus (CA WA Agent for Micro Focus) CA Workload Automation Agent for Databases (CA WA Agent for Databases) CA Workload Automation Agent for SAP (CA WA Agent for SAP) CA Workload Automation Agent for PeopleSoft (CA WA Agent for PeopleSoft) CA Workload Automation Agent for Oracle E-Business Suite (CA WA Agent forOracle E-Business Suite) CA Workload Automation Restart Option EE (CA WA Restart Option) CA Spectrum Service Assurance (CA Spectrum SA)
Contact CA TechnologiesContact CA SupportFor your convenience, CA Technologies provides one site where you can access theinformation that you need for your Home Office, Small Business, and Enterprise CATechnologies products. At http://ca.com/support, you can access the followingresources: Online and telephone contact information for technical assistance and customerservices Information about user communities and forums Product and documentation downloads CA Support policies and guidelines Other helpful resources appropriate for your productProviding Feedback About Product DocumentationIf you have comments or questions about CA Technologies product documentation, youcan send a message to techpubs@ca.com.To provide feedback about CA Technologies product documentation, complete ourshort customer survey which is available on the CA Support website athttp://ca.com/docs.
ContentsChapter 1: Introduction7About CA Workload Automation DE . 7CA Workload Automation DE Server. 7CA WA Desktop Client . 8Agents . 8What You are Going to Do . 8Scheduling Scenario . 9Scheduling Steps . 10Information You Need to Work Through this Tutorial . 10Using the Examples in this Tutorial . 10Chapter 2: Define Your Workload13Define Steps . 13Connecting to the Server Using CA WA Desktop Client . 14Use the Default Connection Set During Installation . 14Define an Application . 15Scheduling your Application using an Event . 16Understanding the Relationship between Events and Applications . 16Define the Default Date-Time/Manual Event . 18Defining Jobs in your Application . 19Add Jobs to the Workspace. 20Define the Relationships between Jobs . 21Defining Job Details for each Job . 22Save the Application and Upload it to the Server . 27Testing What Will Run using Event Simulation . 28Simulate the Event’s Next Execution . 28Simulate for Friday . 29Simulate for the Last Workday of the Month . 30Test Schedule Criteria . 31Chapter 3: Run Your Workload33Trigger your Event Manually . 34Chapter 4: Monitor Your Workload35View Your Workload using Subscription Filters . 36Contents 5
Controlling your Application . 36Release your Application. 37Monitoring your Application . 38Controlling your Jobs. 39Display Job Details. 39Correct Submission Errors . 40Display Job Output . 41Using a Custom View to Monitor and Control Workload. 41Create a Custom View . 42Control Jobs from a Custom View . 44Control Applications from a Custom View . 45Chapter 5: CA WA Desktop Client Tips47Using Online Help . 47Add a New Server Connection . 48Setting Application and Job Properties . 49Move Perspective Icons . 50Remove Types of Workload Objects . 50Move Views Around . 51Reset your Workspace . 51Index6 Overview Guide53
Chapter 1: IntroductionCA Workload Automation DE provides distributed job scheduling and workloadmanagement across the enterprise. It is a simple, flexible, and powerful solution forenterprise application integration (EAI) and systems operations. Platform-independentas a result of its next-generation XML and JAVA architecture, CA Workload AutomationDE functions across various server and Enterprise Resource Planning (ERP) platforms,including the following: UNIX Windows NT/2000/2003 z/OS IBM OS/400 OpenVMS Compaq NSK SAP R/3 PeopleSoft OracleThis guide is a tutorial for new users. It walks you through the process of defining,running, and monitoring your workload. Along the way, you will learn about key CAWorkload Automation DE concepts.About CA Workload Automation DEBefore you start this tutorial, ensure you have the following components:CA Workload Automation DE ServerThe CA Workload Automation DE server is installed on a Windows or UNIX server byyour server administrator.The server is the core of the CA Workload Automation DE system. It handles and directsall incoming communication from CA WA Desktop Client, agents, a Relational DatabaseManagement System (RDBMS), and a peer server in a high availability configuration.Chapter 1: Introduction 7
What You are Going to DoCA WA Desktop ClientCA WA Desktop Client is installed on your personal computer.CA WA Desktop Client is a graphical interface for defining, monitoring, and controllingenterprise workload. The interface lets you quickly drag-and-drop your way throughworkload definitions, manage calendars, and monitor and control batch workload,regardless of the operating system. A CA Workload Automation DE system can havemany CA WA Desktop Clients.CA WA Desktop Client also includes the administrator's tools for setting up security,configuring server and agent parameters, monitoring messages sent from the server,and diagnosing problems with the CA Workload Automation DE solution.Note: If CA WA Desktop Client is not installed on your computer, ask your serveradministrator for the CA Workload Automation DE DVD. You can also download the CAWA Desktop Client setup file from the CA Support website (http://ca.com/support).AgentsAgents are installed on various servers by your CA Workload Automation DEadministrator or agent administrator.Agents are applications that extend batch workload across multiple operating systems.Agents run batch workload and monitor its progress. They communicate with the CAWorkload Automation DE server through TCP/IP.When your administrator installs the CA Workload Automation DE server, a defaultagent automatically gets installed on the same computer as the server. For example, ifyour administrator installs the server on Windows 2000, CA WA Agent for Windowsautomatically gets installed on the same computer. The default agent is often used toverify the installation.What You are Going to DoIn this tutorial, you will use CA Workload Automation DE to schedule and run six jobs onthe same computer. All jobs will run the same batch file or script.8 Overview Guide
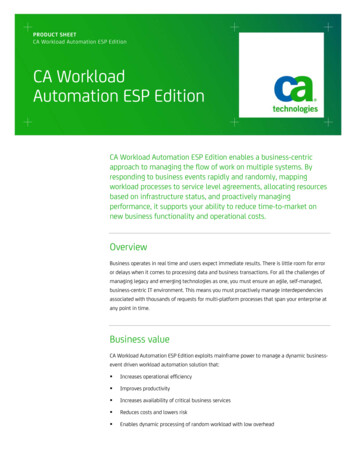
What You are Going to DoScheduling ScenarioThe following flowchart represents the jobs you will set up: The names of the jobs are A, B, C, D, E, and F. Arrows indicate relationships between jobs. For example, A is the predecessor for Band C. When A completes successfully, the server releases B and C. The run frequencies of each job are as follows: A, B, C, and D run daily; E runs onFriday and F runs on the last workday of the month.Chapter 1: Introduction 9
What You are Going to DoScheduling StepsThis tutorial guides you through the three steps you will use to schedule workload withCA Workload Automation DE.Information You Need to Work Through this TutorialBefore you connect to the server, obtain the following information from your serveradministrator: User Name — Your server user name. Password — The password for your server user name. The name of the default agent installed with the server. For this tutorial, you willuse the default agent to run your jobs. The name of the default agent is AGENT.However, your server administrator may have changed the default name wheninstalling the server.You can use another agent instead of the default agent. Ensure that you have thename of the agent that is installed on the computer where you will run your jobs. The directory in which the server is installed. For this tutorial, you will use the testcommand file or script installed with the server.If you are using another agent to run your jobs, ensure that you have the full pathto the command file, script, or command your jobs will run.Using the Examples in this TutorialIn this guide, we use the default agent to run sample workload. Ensure you know thedirectory in which the server is installed.10 Overview Guide
What You are Going to DoWindows ExamplesIf the server and its default agent are running on a Windows computer, follow theWindows examples in this guide.You will need the path to the sample Windows command file installed with the server.This command file displays the arguments entered for the echo command.The following is the default path to the s the server installation directory.Using a text editor, you can also create your own test file with the following text:echo %*Save the file in a directory you have access to on the agent computer.UNIX ExamplesIf the server and its default agent are running on a UNIX computer, follow the UNIXexamples in this guide.You will need the path to the sample UNIX script installed with the server. This scriptdisplays the arguments entered for the echo command.The following is the default path to the es the server installation directory.Using a text editor, you can also create your own test file with the following text:echo *Save the file in a directory you have access to on the agent computer.Chapter 1: Introduction 11
Chapter 2: Define Your WorkloadThis section contains the following topics:Define Steps (see page 13)Connecting to the Server Using CA WA Desktop Client (see page 14)Define an Application (see page 15)Scheduling your Application using an Event (see page 16)Defining Jobs in your Application (see page 19)Save the Application and Upload it to the Server (see page 27)Testing What Will Run using Event Simulation (see page 28)Test Schedule Criteria (see page 31)Define StepsChapter 2: Define Your Workload 13
Connecting to the Server Using CA WA Desktop ClientConnecting to the Server Using CA WA Desktop ClientYou define, monitor, and control workload using CA WA Desktop Client. CA WA DesktopClient has four main components named perspectives: Define, Monitor, Services, andAdmin. Other perspectives are CLI, Report, and SAP Tools. Depending on your accountpermissions, you may not have access to all of the perspectives.Use the Define perspective to define your workload. The Define perspective lets youcreate graphical representations of jobs and their relationships and define detailedscheduling requirements for jobs.Use the Default Connection Set During InstallationWhen you open CA WA Desktop Client, you can use the default connection set duringinstallation to connect to the server.To use the default connection set during installation1.Open CA WA Desktop Client in one of the following ways: Select Start, Programs, CA, WA Desktop Client, CA Workload AutomationDesktop Client. Double-click the CA Workload Automation Desktop Client icon on your desktop.The Connect to Server dialog opens.2.Enter your user name and password, and click Connect.The Welcome view opens.3.Click the Define icon.4.Click Update Workload.The Define perspective opens.14 Overview Guide
Define an ApplicationDefine an ApplicationTo set up the scheduling scenario in this tutorial, you will first define an Application.When you have defined this Application, you will schedule an Event to run theApplication at 4 p.m. daily. Then, you will define the six jobs in the Application.An Application consists of one or more jobs. A job can be an executable file, a taskrepresenting a manual process, or a database query. Two examples of executable filesare command files and UNIX scripts.Usually, jobs in an Application are related. For example, all of your payroll jobs may bein one Application. An Application may contain jobs that run on the same platform or itmay have jobs that run on different platforms.To define a new Application1.Open the Define perspective.2.Right-click your server connection in the Application Workspace view, and selectNew from the pop-up menu.The Basic page of the Application properties dialog opens.3.Enter a name for your Application in the Name field. For this tutorial, enterquick name where name is your first name.Usually, you will choose a name to reflect the line of business, such as Payroll,Inventory, Housekeeping, or Order Processing.There are few limitations on Application names. For security reasons, your serveradministrator can restrict the Application names you can use. The name is not case-sensitive; the name automatically enters in uppercaseletters. Do not use special characters (such as punctuation marks, brackets, andspaces). To enter a name with more than one word, you can use an underscoreto separate the words. You can choose a name with up to 128 characters.Note: Fields marked with an asterisk (*) are mandatory.4.Select the Wait for previous generation check box.Each time an Application runs, the server creates a unique instance named ageneration and assigns the next sequential generation number for that Application.In many cases, you may want one generation to complete before the next onebegins. For example, you may not want to process Tuesday’s payroll until Monday’spayroll is complete.In this tutorial, each time your Application is scheduled, it must wait for all previousgenerations of the Application to complete before it starts processing.5.Verify that the Agent option button is selected in the Default agent section.Chapter 2: Define Your Workload 15
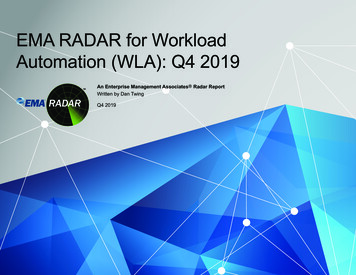
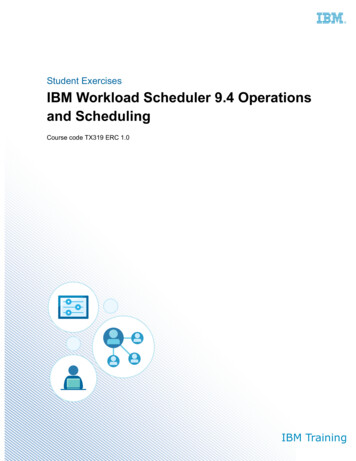
Scheduling your Application using an Event6.Select the agent that will run all jobs in the Application in the Agent drop-down list.For this tutorial, if you are using the default agent installed with the server, selectAGENT. If your server administrator specified another name for the default agent,select that name instead.If you are using an agent other than the default, select that agent name.7.Click OK.The Application appears in the workspace.More information:Setting Application and Job Properties (see page 49)Scheduling your Application using an EventThe server uses an Event to determine when and how often to run an Application. MostEvents are scheduled Events. An Application with a scheduled Event runs according to aspecified date and time. You can also run an Application by triggering the Eventmanually or triggering the Event by a particular condition (such as a file being created).Understanding the Relationship between Events and ApplicationsThe following diagram shows the relationship between an Event, an Applicationdefinition, and an active Application. An Event named CYBER.PAYROLL is scheduled at 4p.m. each day to run the Payroll Application. The Payroll Application definition includessix Windows jobs. Some of these jobs run daily, one job runs weekly, and one job runsmonthly. When you schedule an Event, the server determines which jobs should beselected to run that day.16 Overview Guide
Scheduling your Application using an EventThis diagram shows the four jobs that run daily in the active Payroll Application.Chapter 2: Define Your Workload 17
Scheduling your Application using an EventDefine the Default Date-Time/Manual EventWhen you define a new Application in the Define perspective, CA WA Desktop Clientdefines a default Date-Time/Manual Event that lets you schedule the Application or runthe Application manually.For this tutorial, you will schedule the Event to run the Application at 4 p.m. daily.To define the default Date-Time/Manual Event1.Double-click the Event in the Application Events view. Alternatively, right-click theEvent, and select Edit from the pop-up menu.The Event definition dialog opens.2.Click Properties in the left pane.The Properties page opens in the right pane.For this tutorial, we will use the default Event properties: Event prefix (your server user ID)An Event name has two parts: a prefix and a descriptive name.The prefix lets you group Events. You can list Events based on their prefix. Forexample, all of your production Events could have a PROD (or PRODUCTION)prefix and all of your test Events could have a TEST prefix.You can choose a prefix with up to 32 characters. CA WA Desktop Clientconverts the prefix to uppercase. Event name (your Application name)The Event name must be unique. Usually, this name will be the same as yourApplication name.You can choose a name with up to 128 characters. CA WA Desktop Clientconverts this name to uppercase. Specify CalendarsThis Event does not require a special calendar definition. If you do not specify acalendar, the server uses the SYSTEM calendar, which is the default calendarfor storing scheduling terms unique to your installation.18 Overview Guide
Defining Jobs in your Application Specify Application to run (your Application name)The Event runs the Application it is defined for.3.Click Schedule in the left pane.The Schedule page opens in the right pane.4.Click Add Schedule.A new schedule criteria entry appears.5.Type 4pm daily in the When field.Note: You can use uppercase or lowercase. Do not use periods (a.m. or p.m.).You can also use the Schedule event dialog to specify your scheduling criteria.a.Click the ellipses (.) in the When field.The Schedule event dialog opens.b.Select the Use generated statement option button, if it is not already selected.c.Select the appropriate phrases or terms in the order you want it to appear inyour schedule statement.d.Click OK.The Schedule event dialog closes and your schedule criteria appears in theSchedule page.6.Click OK.Your Event is now defined to run the Application at 4 p.m. daily.Note: For more information on scheduling criteria, see the Define Perspective Help.Defining Jobs in your ApplicationIn the Define perspective, the Palette view contains the job types that you can define inan Application, organized in groups. Use the workspace to create a workload diagram,which is a graphical representation of the jobs in your Application.For this tutorial, you will use the Windows or UNIX workload object in the System groupto create your workload depending on the computer your agent is installed on.You can customize the Palette view to show only the workload objects you need.More information:Remove Types of Workload Objects (see page 50)Chapter 2: Define Your Workload 19
Defining Jobs in your ApplicationAdd Jobs to the WorkspaceThe next step is to add the jobs to the workspace.To add jobs to the workspace1.Select the Windows or UNIX job from the System group in the Palette view, anddrag the job to the workspace.The Windows or UNIX icon appears on the Application workspace view. The job isassigned a default job name (for example, UNIX0).2.Add another five Windows or UNIX jobs onto the workspace in positions similar tothe diagram shown below.For example: If a job must run after another job, place it below that job on the workspace. If a job can run at the same time as another job, place it beside that job on theworkspace.Note: You don’t need to click the icon on the job palette again. Simply click themouse as many times as necessary on the workspace and CA WA Desktop Client willplace the same icon there until you choose another type. When you select an itemfrom the Palette view, it remains selected until you select another item.Don’t worry about the layout; you will use an icon later to tidy it.Your diagram should look like one of the following diagrams:20 Overview Guide
Defining Jobs in your ApplicationDefine the Relationships between JobsThe next step is to draw lines to represent the dependencies between the jobs in yourApplication.To define the relationships between jobs1.Click the Dependencies icon in the workspace toolbar.Your cursor displays as a single link chain. You will use it to create relationshipsbetween jobs by connecting them with lines.2.Click the Windows0 or UNIX0 job in your Application and hold the left mousebutton.3.Drag the mouse from the selected job to the second job (its successor) in yourworkload (for example, between Windows0 and Windows1).A line appears indicating the job’s dependency.4.Release the left mouse button.5.Click and drag the mouse to draw lines from each of the jobs to their successors.Repeat this step until you have drawn all the dependencies.Your diagram should look like one of the following diagrams:6.Click the Layout icon in the workspace toolbar.Your Application and its job dependencies are shown in an organized layout.Chapter 2: Define Your Workload 21
Defining Jobs in your ApplicationDefining Job Details for each JobNow you will specify details for each of the jobs in your Application. For each job, youwill specify the following: The job name The job’s run frequency (when the job is to run) The command file or script to runNotes: You do not have to specify the agent name in the job definition because you set adefault agent for all jobs in this Applicatio
CA Technologies Product References This document references the following CA Technologies products: CA Workload Automation DE CA Workload Automation Desktop Client (CA WA Desktop Client) CA Workload Automation DE Web Client CA Workload Automation High Availability DE (CA WA High Availability) CA Workload Automation Web Services (CA WA Web Services)