Transcription
EPOSQUICK USER GUIDEEPOS Manager1
EPOSContent1. Product Overview. 32. Scope of the document. 33. EPOS Manager workflow. 34. Validating internet access. 45. Troubleshooting internet access. 46. Registration for the EPOS Manager tool. 57. Accessing your account for the first time. 58. Single Sign On(SSO). 59. Retrieving client files for the first time. 610. Installing the client manually for the first time. 711. Troubleshooting client installation. 712. Using the EPOS Manager application. 813. Deployment of firmware updates. 814. Objectives of tenant administrator. 92
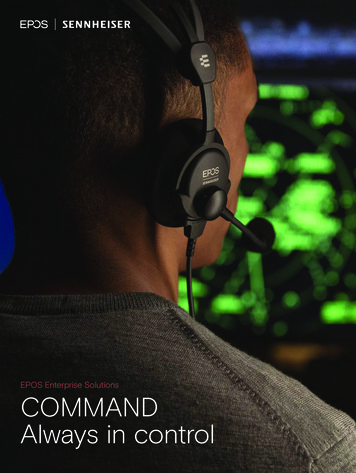
EPOS1. Product OverviewEPOS – is a leading provider of premium headset and conferencing solutions.EPOS Manager, is a cloud based IT management application which reliably manages acompany’s EPOS headset and speakerphone assets and keeps them up-to-date withthe latest version of EPOS device software.2. Scope of the documentThis document is designed to give users, a precise and efficient jumpstart to using theEPOS Manager tool.The document is technical in content and is intended to be a quick start to validatingthat the company has the right environment and settings to use the EPOS Manager tool.For more detailed manuals, we kindly refer to the EPOS Manager and the EPOS Connectmanuals.3. EPOS Manager workflowTo utilize the benefits of the EPOS Manager Application, an organization needs to have atenant administrator account. This account is linked and maintained safely using the securestorage and infrastructure available in the Microsoft Azure cloud computing environment.End-users are provided with the EPOS Connect application to connect and interact withthe EPOS Manager Application.The following diagram shows the basic workflow of EPOS Manager (used by the tenantAdministrator) and EPOS Connect (used by the end-users) applications.3
EPOS4. Validating internet accessTo ensure that your IT environment is ready to use the EPOS Manager tool,please run though this small checklist:Access the main page.Access the following pages using your internet e EPOS Manager landing page should now appear.Access the backend of the nageUser/GetSupportEmailAddressDepending on browser settings, it will either open directly or ask to be saved first.E.g. Chrome will com/","MessageCode":"Retrieve. Success","Message":"Retrieve.Success"}Access the file storage area.https://update.eposstorage.com/deviceinfo/EC E.pngDepending on browser settings, it will either open directly or ask to be saved first.5. Troubleshooting internet accessIf any of above links failed, please contact your IT department and ask to get the followingadded to your company’s allowed list:For accessing application .eposaudio.comFor accessing static content (device image, description, software and firmware):https://update.eposstorage.comFor logging purposes:https://agentlog.table.core.windows.net/4
EPOS6. Registration for the EPOS Manager toolIf you have not yet applied for access to the EPOS Manager tool, this is done using the formavailable on the EPOS webpage.www.eposaudio.com/epos-managerFill in the form and submit it. The submission will be sent to the support team. Please expecta response within a couple of business days. A member of our support team will reach out toyou to ensure a smooth start up with EPOS Manager.7. Accessing your account for the first timeOnce you have signed up, have approved access to the system and received an approvalmail, you will be able to access your account.To create your personal password, please use the link provided in the E-mail.You are now ready to access the system.Browse to the main entrance page https://enterprise.eposaudio.com and enter theEPOS Manager tool for the first time by using the email you signed up with and your newlycreated password.8. Single Sign On(SSO)EPOS Manager supports Single Sign On using Open ID Connect protocol. Once provisioned,EPOS Manager can be accessed by selecting theLogin with Single Sign On link from the login page.The below information is required for configuring Single Sign On using Open ID Connect protocol.– Type (OpenID Connect is supported in EPOS Manager)– ClientId (Id of the Open ID Connect client)– Client Secret (Secret of the Open ID Connect client)– Domain (Sign In domain)– Email Claim (Name of the Email claim)– MetaDataUrl (OpenID discovery endpoint)– Single Sign On Platform (Identity provider platform used in your organization - Azure Active Directory, Okta,etc.)To create the Open ID Connect Client for EPOS Manager, the below redirect URI should be agersso01.onmicrosoft.com/oauth2/authresp5
EPOS9. Retrieving client files for the first timeGetting the client installation package.Once logged in, the following steps are necessary to get your first agent running.Click your way to the Pending Updates section under the Manage Updates menu.The list presented contains all the latest firmware and software released from EPOS.Look for EPOS Connect. If you cannot see it in the list, use the Search option by typing EPOSConnect.Click to approve receiving this software.The line will then disappear and reappear under the section called Software Updates. This andthe Firmware Updates section will be your working areas going forward.Click the Software Updates TAB.In this view, you have the possibility of downloading the latest EPOS Connect client to yourlocal machine.Once clicked, the download starts automatically or prompts you for options(depending on your browser settings). (Often to the Download folder)Once downloaded, please create a folder where you unpack the downloaded file.Your installation folder should now contain the following files for Windows: (version numbercan vary)1. EPOSConnect 4.0.0.9.exe2. product details.txt3. TenantConfiguration.dat4. WebToolAgent.xml5. WebToolAgentReleaseNote.txtEPOS Connect for Win latest version supports msi installer and can also be downloadedfrom the same view. It will contain the following files for Windows:1. DSEASDK.msi2. EPOSConnect 7.1.0.20448.msi3. PackageInfo.xml4. product details.txt5. TenantConfiguration.dat6. WebToolAgent.xml7. WebToolAgentReleaseNote.txtBoth msi need to be installed on the machine. EPOS Connect msi needs to be installed for firmware updatesand device configuration. DSEA SDK msi needs to be installed for call control support. The sequence ofinstallation is EPOS Connect MSI followed by DSEA SDK MSI. The custom MSI parameter‘AUTOLAUNCH ENABLED 0’ has to be set for the DSEA SDK MSI installation.6
EPOSEPOS Connect for MAC installer can be downloaded following the same steps as for EPOSConnect for Win.10. Installing the client manually for the first timeFrom the installation folder where you placed the installation files and the TenantConfiguration.dat file, run the exe/pkg file. (Administration rights to the machine are required.)Follow the installation wizard and complete the installation.Start the application by clicking the EPOS Connect shortcut (EPOS) on the desktop– or find it by typing EPOS Connect in the search program under the Windows menu.On MAC you can start the application by typing EPOS Connect in the AppFinder andlaunching it.Please leave time for the product to initialize and negotiate with the cloud service.Usually it takes a few minutes, but in a few cases it can take up to 5 minutes.Log in to your web portal and click on the Manage User menu item.Your user automatically gets added to the system after the negotiation has taken place.11. Troubleshooting client installationPlease ensure that the “Validating internet access” section has passed all validations.If the user still does not appear on the cloud part of the system, please check the following:EPOS Connect for Win:A) In the desktop client, open the Option – AboutEnsure that Connected to name matches the company name you choose under registration.If Connected to says GenericTenant it indicates that the TenantConfiguration.dat was notplaced correctly during installation.You must uninstall and clean up the \ProgramData\EPOS\EPOS Connect folderbefore reinstalling.B) No connection.Search for “The operation timed out” or “not be established”.Example:AgentApp: ManageAgentRegistration: WinHttpSendRequest: 12002: The operation timed outOrManageAgentRegistration: WinHttpSendRequest: 12002: The operation timed outIf these errors are shown, then the server cannot be reached. This can be due toproxy settings, firewall settings or unstable internet connection. Please contactyour IT department for assistance.7
EPOSEPOS Connect for MAC:A) In the desktop client, open the Help pageEnsure that Tenant Name matches to the name you choose under registration.If Connected to says Generic Tenant it indicates that the TenantConfiguration.dat was notplaced correctly during installation.You must uninstall using the uninstall script available at /Library/Application Support/EPOS/EPOS Connect/uninstall.sh before reinstalling.B) No connection.Search for "The operation timed out" or "not be established"If these errors are shown, then the server cannot be reached. This can be due toproxy settings, firewall settings or unstable internet connection. Please contactyour IT department for assistance.C) Devices not shown in UIGo to Security & Privacy and drop down to Input Monitoring.Click the lock icon.Select EPOS Connect.Save it by clicking the lock icon.Exit EPOS Connect and relaunch EPOS Connect.12. Using the EPOS Manager applicationAfter installing the EPOS Connect Application, any device connected by a USB connectorwith EPOS Connect will establish a connection with the EPOS Manager Application. Detailsof devices, updates and specific users can be edited and viewed in the EPOS ManagerApplication. All updates and configurations of the devices connected and EPOS Connectare handled by the EPOS Manager Application deploying upgrades from the cloud server.EPOS Connect will fetch the applicable updates for software/firmware from the cloud server.13. Deployment of firmware updatesEPOS administrator uploads updates in the cloud and sends notifications to tenants. Theuploaded update then has to be accepted by you in the Pending Updates under ManageUpdates Menu. From Firmware Updates, select download and deploy. You can choose to deploy a “Forced Update” to a device, to ensure that an important update of that deviceis performed immediately.8
EPOS14. Objectives of tenant administratorA Tenant Administrator can use the following menus to supervise and accomplish thedesired configuration to attain the best efficiency in the organization.– Manage User menu for managing users using the inventory deployed in the organization.Tenant administrator can create groups to efficiently monitor and deploy updates to thesoftware or devices.– Manage Device menu for managing assets deployed in the organization. Tenant Admin can viewdetails such as firmware versions and configuration settings by selecting an asset.– Manage Updates function for managing software updates of Applications and firmware updates of the assets (headsets) deployed in the organization.– Configuration menu for managing product configuration. Tenant Admin can view thedetailed configuration of the products in the company and can create a company specificconfiguration file that can be deployed to all the devices in the company.9
EPOSContact informationSupport ware-help@eposaudio.comPhone:Find your local support phonenumber and opening hours here below.ASIA-PACIFICDenmarkSpainT 45 89882841T 34 9112380858:00 – 17:008:00 – 17:00ChinaFinlandSwedenT 86 1057319666T 358 942450352T 46 8446808959:00 – 18:008:00 – 17:008:00 – 17:00FranceSwitzerlandT 33 170610386T 41 3152811328:00 – 17:008:00 – 17:00IndiaGermanyUnited KingdomT 1 800 200 3632T 49 3030808045T 44 20351440729:00 – 18:008:00 – 17:008:00 – 17:00JapanHungaryT 81 364 068 919T 36 140880569:00 – 18:008:00 – 17:00New ZealandIcelandMexicoT 64 (9) 580 0489T 353 15262572T 52 55535024018:00 – 17:008:00 – 17:008:00 – 17:00SingaporeIrelandT 65 6408 5143T 353 152625729:00 – 18:008:00 – 17:00South KoreaLuxembourgUnited StatesT 82 1544 1699T 352 27860234T 1-800-895-741210:00 – 18:008:00 – 17:008:00 – 17:00AustraliaT 61 2 9910 67008:00 – 17:00Hong Kong S.A.R.,ChinaT 85 2341284009:00 – 18:00EUROPEAustriaT 43 7208808578:00 – 17:00NetherlandsT 31 20-80809568:00 – 17:00BelgiumRussiaT 32 28080784T 8800-10085578:00 – 17:008:00 – 17:00LATIN AMERICABrazilT 55 11438075568:00 – 17:00NORTH AMERICACanadaT 1-800-895-74128:00 – 17:00MIDDLE EAST/AFRICAUnited Arab EmiratesT 800 0357038448:00 – 17:0010
- Client Secret (Secret of the Open ID Connect client) - Domain (Sign In domain) - Email Claim (Name of the Email claim) - MetaDataUrl (OpenID discovery endpoint) - Single Sign On Platform (Identity provider platform used in your organization - Azure Active Directory, Okta, etc.)