Transcription
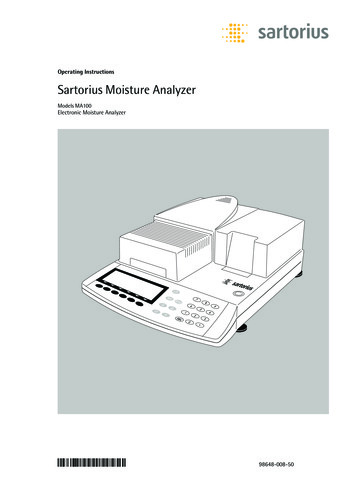
Operating InstructionsMoisture AnalyzerModel MA35Electronic Moisture Analyzer1000034789
Intended UseThe MA35 moisture analyzer is intended for fastand reliable determination of the material moisturecontent of liquid, pasty and solid substances usingthe thermogravimetric method.SymbolsThe following symbols are used in these instructions:§indicates steps you must perform indicates steps required only under certain conditions describes what happens after you have performeda particular step–indicates an item in a list! indicates a hazard2
ContentsIntended Use . . . . . . . . . . . . . . . . . . . . . . . . . 2Warnings and Safety Information . . . . . . 4Getting Started . . . . . . . . . . . . . . . . . . . . . . 7General View of the Equipment . . . . . . . . . . 7Storage and Shipping Conditions . . . . . . . . 8Conditioning the Moisture Analyzer . . . . . . 9Setting up the Moisture Analyzer . . . . . . . . 9Connecting the Moisture Analyzerto AC Power . . . . . . . . . . . . . . . . . . . . . . . . . 10Safety Precautions . . . . . . . . . . . . . . . . . . . . 10Connecting Electronic PeripheralDevices . . . . . . . . . . . . . . . . . . . . . . . . . . . . . 10Warmup Time . . . . . . . . . . . . . . . . . . . . . . . . 12Leveling the Moisture Analyzer . . . . . . . . . 12Installing the Aluminum Panels(Optional; Part No. YDS05MA) . . . . . . . . . . 12Turning On the Analyzer; Opening andClosing the Sample Chamber . . . . . . . . . . . 13Basic Principles . . . . . . . . . . . . . . . . . . . . . .Purpose . . . . . . . . . . . . . . . . . . . . . . . . . . . . .Material . . . . . . . . . . . . . . . . . . . . . . . . . . . .Preparation . . . . . . . . . . . . . . . . . . . . . . . . .Adjusting against anExisting Measurement System . . . . . . . . . .Setting the Drying Program Parameters . . . . . . . . . . . . . . . . . . . . . . . . . .Preparing the Sample . . . . . . . . . . . . . . . . .Use a disposable sample pan . . . . . . . . . . .Distribute the sample on thesample pan . . . . . . . . . . . . . . . . . . . . . . . . . .1414141717171718Operation . . . . . . . . . . . . . . . . . . . . . . . . . . 27Example: Analysis with SpecifiedDrying Time . . . . . . . . . . . . . . . . . . . . . . . . . 27Adjusting the Analyzer . . . . . . . . . . . . . . .Heating Element Adjustment . . . . . . . . . . .Weighing System Adjustment . . . . . . . . . .External Calibration and Adjustmentwith a Factory-Defined Weight . . . . . . . . .29292930Interface Port . . . . . . . . . . . . . . . . . . . . . . . 32Female Interface Connector . . . . . . . . . . . . 33Error Codes . . . . . . . . . . . . . . . . . . . . . . . . . 34Care and Maintenance . . . . . . . . . . . . . . .Service . . . . . . . . . . . . . . . . . . . . . . . . . . . . .Repairs . . . . . . . . . . . . . . . . . . . . . . . . . . . . .Cleaning . . . . . . . . . . . . . . . . . . . . . . . . . . . .Cleaning the Heating Unit andTemperature Sensor . . . . . . . . . . . . . . . . . .Safety Inspection . . . . . . . . . . . . . . . . . . . . .353535353637Disposal . . . . . . . . . . . . . . . . . . . . . . . . . . . . 37Overview . . . . . . . . . . . . . . . . . . . . . . . . . . . 38Specifications . . . . . . . . . . . . . . . . . . . . . . . . 38Accessories (Options) . . . . . . . . . . . . . . . . . . 40Declaration of Conformity . . . . . . . . . . . . 41Certificate of Compliance . . . . . . . . . . . . 4218Operating Design . . . . . . . . . . . . . . . . . . . . 19Keys . . . . . . . . . . . . . . . . . . . . . . . . . . . . . . . . 19Display . . . . . . . . . . . . . . . . . . . . . . . . . . . . . 20Configuration . . . . . . . . . . . . . . . . . . . . . . . 21Setting the Device Parameters . . . . . . . . . . 21Setting the Drying Parameters . . . . . . . . . . 233
Warnings and Safety InformationThis moisture analyzer complies withthe European Council Directives aswell as international regulations andstandards for electrical equipment,electromagnetic compatibility, and thestipulated safety requirements. Improper use or handling, however,can result in damage and/or injury.To prevent damage to the equipment,read these operating instructions thoroughly before using your MA35moisture analyzer. Keep these instructions in a safe place.Follow the instructions below to ensure safe and trouble-free operationof your moisture analyzer:! Use the moisture analyzer only forperforming moisture analysis on samples. Any improper use of the analyzer can endanger persons andmay result in damage to the analyzeror other material assets.! Make sure before getting started thatthe voltage rating printed on the manufacturer’s label is identical toyour local line voltage (see “Connecting the Moisture Analyzer to ACPower” in the chapter entitled “Getting Started”).––––––! Do not use this moisture analyzer in ahazardous area; operate it only underthe ambient conditions specified inthese instructions.! If you use electrical equipment ininstallations and under ambient conditions subject to stricter safetystandards than those described in themanual, you must comply with theprovisions as specified in the applicable regulations for installation in yourcountry.–4The moisture analyzer may be operated only by qualified persons who arefamiliar with the properties of thesample to be analyzed.––The analyzer comes with a power supply that has a grounding conductor.The only way to switch the power offcompletely is to unplug the powercord.Position the power cord so that it cannot touch any hot areas of themoisture analyzer.Use only extension cords that meetthe applicable standards and have aprotective grounding conductor.Disconnecting the ground conductor isprohibited.Connect only Sartorius accessoriesand options, as these are optimallydesigned for use with your moistureanalyzer.Note on installation:The operator shall be responsiblefor any modifications to Sartoriusequipment or connections of cablesnot supplied by Sartorius and mustcheck and, if necessary, correct these modifications. On request, Sartoriuswill provide information on the minimum operating specifications.Protect the analyzer from contact withliquidIf there is visible damage to theequipment or power cord, unplug theequipment and lock it in a secure placeto ensure that it cannot be used forthe time being.
! Clean your moisture analyzer onlyaccording to the cleaning instructions(see “Care and Maintenance”).Hazards for persons or equipmentposed by certain sample materials:Do not open the analyzer housing. Please contact your local Sartorius Service should any problems arise withyour device.FireExplosion– Flammable or explosive substances– Substances that contain solventsWarning: Severe Burns!–When setting up the moisture analyzer,leave enough space to prevent heatfrom building up and to keep your analyzer from overheating:– leave 20 cm (about 8 inches) aroundthe moisture analyzer– leave 1 m (3 ft.) above the moistureanalyzer–Do not place any flammable substanceson, under or near the moisture analyzer, because the area around the heatingunit will heat up–Be careful when removing a samplefrom the chamber: the sample, theheating unit and the sample pan maystill be extremely hot–Prevent excess heat build-up aroundthe analyzer– Substances that release flammable orexplosive gases or vapors during the drying processIn some cases, it is possible to operatethe moisture analyzer in an enclosednitrogen atmosphere to prevent thevapor released during drying fromcoming into contact with oxygen in thesurrounding atmosphere. Check on acase-to-case basis whether this methodcan be used, because installation of theanalyzer in too small an enclosed spacecan affect its functioning (for instance,through excessive heat build-up withinthe analyzer). When in doubt, performa risk analysis.The user shall be liable and responsiblefor any damage that arises in connectionwith this moisture analyzer.5
PoisoningCaustic burns– Substances containing toxic or caustic orcorrosive components may only be driedunder a fume hood. The value for the“lower toxic limit” in a work area mustnot be exceeded.Corrosion:– Corrosion may be caused by substancesthat release aggressive vapors during theheating process (such as acids).We recommend working with only smallquantities of such samples, to avoidbuild-up of vapors that can condenseon cold housing parts and can cause corrosion.The user shall be liable and responsiblefor any damage that arises in connectionwith this moisture analyzer.6
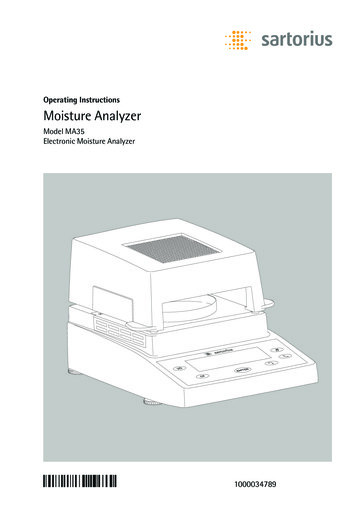
Getting StartedGeneral View of the tionHinged cover with heating elementLeveling feetOn/off keyCF key (clear function; delete)Enter key (confirm)‘Down/Back’ key‘Up/Forward’ keyPrint keyPos.9101112131415DesignationDisposable sample panPan supportPan draft shieldDisplayKeypadInterface portPower jack7
The moisture analyzer is a compact analyzer and comprises the followingcomponents: a heater unit, a weighingsystem and an operating unit. In additionto the socket for AC power (mains supply), it also has an interface port forconnecting peripheral devices, such as acomputer, printer, etc.Storage and Shipping ConditionsAllowable storage temperature:–20 to 70 C––––––Do not expose the moisture analyzerunnecessarily to extreme temperatures,moisture, shocks, blows or vibration.Unpacking the Moisture Analyzer§ After unpacking the equipment, pleasecheck it immediately for any visible damage– If any sign of damage is visible, proceedas directed under “Safety Inspection” inthe chapter entitled “Care and Maintenance.”–It is a good idea to save the box and allparts of the packaging until you havesuccessfully installed your equipment.Only the original packaging providesthe best protection for shipment. Beforepacking your moisture analyzer, unplugall connected cables to prevent damage.––––––8Equipment SuppliedThe equipment supplied includes thecomponents listed below:Moisture analyzerPower cordPan supportPan draft shield80 disposable aluminum sample pans1 pair of forcepsInstallation InstructionsThe MA35 moisture analyzer is designedto provide reliable results under normalambient conditions in the laboratoryand in industry. When choosing a location to set up your analyzer, observethe following so that you will be able towork with added speed and accuracy:Set up the moisture analyzer on a stable,even surface that is not exposed tovibrations, and level it using the four leveling feetAvoid placing the moisture analyzer inclose proximity to a heater or otherwiseexposing it to heat or direct sunlightAvoid exposing the moisture analyzerto extreme temperature fluctuationsProtect the moisture analyzer fromdrafts that come from open windowsor doorsKeep the moisture analyzer protectedfrom dust, whenever possibleProtect the moisture analyzer fromaggressive chemical vaporsDo not expose the equipment to extrememoisture over long periodsMake sure to choose a place whereexcessive heat cannot build up. Leaveenough space between the moistureanalyzer and materials that are affectedby heat.
Conditioning the Moisture AnalyzerMoisture in the air can condense on the surfaces ofa cold moisture analyzer whenever it is brought intoa substantially warmer place. If you transfer themoisture analyzer to a warmer area, condition it forabout 2 hours at room temperature, leaving itunplugged from AC power. Leave the device connected to the power supply after first connecting.Setting up the Moisture Analyzer§ Position the components listed below in the ordergiven:– Pan draft shield– Pan support– Disposable sample pan9
§ Connecting the Moisture Analyzer to AC PowerCheck the voltage rating and the plug designThe heating element has been factory-set to 230 Vor 115 volts for technical reasons. The voltage hasbeen set as specified on your order. The voltagesetting is indicated on the manufacturer’s label (seethe bottom of the analyzer), for example:– 230 volts: MA35M- 230 – 115 volts: MA35M- 115 ! CAUTION! If the voltage indicated on the label does–––§not match your local line voltage:Do not operate your moisture analyzer; contactyour local Sartorius office or dealer.Use onlyGenuine Sartorius power cords, orPower cords approved by a certified electricianIf you need to connect an extension cord, use onlya cable with a protective grounding conductorConnecting the moisture analyzer, rated to Class 1,to AC power (mains supply):Plug the power cord into an electrical outlet (mainssupply) that is properly installed with a protectivegrounding conductor (protective earth PE)Safety PrecautionsIf you use an electrical outlet that does not have aprotective grounding conductor, make sure to havean equivalent protective conductor installed by acertified electrician as specified in the applicableregulations for installation in your country.Make sure the protective grounding effect is notneutralized by use of an extension cord that lacks aprotective grounding conductor.§10Connecting Electronic Peripheral DevicesMake absolutely sure to unplug the analyzer fromAC power before you connect or disconnect aperipheral device (printer or PC) to or from theinterface port.
NOTE: This equipment has been testedand found to comply with the limits pursuant to part 15 of FCC Rules.These limits are designed to providereasonable protection against harmfulinterference. This equipment generates,uses and can radiate radio frequencyenergy and, if not installed and used inaccordance with these instructions,may cause harmful interference to radiocommunications.For information on the specific limits andclass of this equipment, please refer tothe Declaration of Conformity. Depending on the particular class,you are either required or requested tocorrect the interference.If you have a Class A digital device,you need to comply with the FCCstatement as follows: “Operation of thisequipment in a residential area is likelyto cause harmful interference in whichcase the user will be required to correctthe interference at his own expense.”If you have a Class B digital device,please read and follow the FCCinformation given below:“However, there is no guarantee thatinterference will not occur in a particularinstallation. If this equipment does causeharmful interference to radio or tele vision reception, which can be determined by turning the equipment offand on, the user is encouraged to try tocorrect the interference by one or moreof the following measures:– Reorient or relocate the receivingantenna.– Increase the separation between theequipment and receiver.– Connect the equipment into an outlet ona circuit different from that to which thereceiver is connected.– Consult the dealer or an experiencedradio/TV technician for help.”Before you operate this equipment,check which FCC class (Class A or Class B)it has according to the Declaration ofConformity included. Be sure to observethe information of this Declaration11
Warmup TimeTo deliver exact results, the moisture analyzer mustwarm up for at least 30 minutes every time youconnect it to AC power or after a relatively longpower outage.Only after this time will the analyzer has reachedthe required operating temperature.––Leveling the Moisture AnalyzerPurpose:To compensate for unevenness at the placeof installationThis is particularly important for testing liquid samples, which must be at a uniform level in thesample panAlways level the moisture analyzer again any timeafter it has been moved to a different location.§Extend or retract the front and/or rear leveling feetas needed to adjust the moisture analyzerInstalling the Aluminum Panels (Optional;Part No. YDS05MA)! To prevent burns, allow the glass panels to coolsufficiently before removing them! Do not handle the aluminum panels with oily orgreasy fingers! Do not scratch the aluminum panels; do not useabrasive or corrosive substances to clean the aluminum panels12§Remove the 2 rubber caps and the 2 screwsbeneath them, and then remove the panel retainer§Remove the glass panels§Position the aluminum panels in the retainer§Fasten the aluminum panels with the retainer andscrews; replace the 2 rubber caps
Turning On the Analyzer; Opening and Closing theSample Chamber§ To turn on the analyzer: press e§ When opening or closing the sample chamber, do notrelease the cover until it is in the fully open or fullyclosed position13
Basic PrinciplesPurposeThe moisture analyzer can be used forquick and reliable determination of themoisture content of materials of liquid,pasty, and solid substances using the thermogravimetric method.–––––––MaterialThe moisture of a material is often mistakenly equated to its water content.In fact, the moisture of a materialincludes all of the volatile componentswhich are emitted when the sample isheated, irrespective of the type of material. Among such volatilesubstances are:WaterFatsOilsAlcoholsOrganic solventsFlavoringsVolatile components, products of decomposition (when a sample is overheated)There are many methods for determiningthe moisture content of a substance.Basically, these methods can be dividedinto two categories:When absolute methods are used, themoisture content is directly determined(for example, as a weight loss registeredduring the drying routine). These methods include oven drying, infrareddrying, and microwave drying. All threeof these methods are thermogravimetric.14When deductive methods are used, themoisture content is indirectly determined. A physical property related to themoisture in the substance is measured(e.g., conductivity). These methodsinclude capacitive and spectroscopicapproaches.Thermogravimetry is the process ofdetermining the loss of mass that occurswhen a substance is heated. In this process, the sample is weighed before andafter being heated, and the differencebetween the two weights is calculated.In a conventional drying oven, circulating hot air warms the sample from theoutside to the inside. Efficiency is lostduring drying because as the moistureevaporates, it cools the sample surface.By contrast, infrared rays (IR rays) penetrate the substance. The majority of therays reach the interior of a sample, andthen directly heat the sample.
IR-StrahlungIR raysWärmeenergieHeatSubstanzSubstanceDark substanceLow reflectionBright substanceStrong reflectionThe proportion of the IR rays which doesnot heat the sample is either reflected onthe surface of the sample or penetrates thesample unimpeded.The color and surface properties of the sample significantly influence how effectivethe heating process is. For example, darksubstances absorb IR rays better than brightsubstances.How the rays penetrate the sample dependson the permeability of the sample. If thedegree of light-transmitting capacity is low,the rays can penetrate only the uppermostlayers of the sample. The heat conductivityof the sample dictates the degree to whichthe heat can be transmitted to the under lying layers. The higher the conductivity,the faster and more uniformly thesubstance is heated.The substance should be applied to the sample pan in a thin, even layer. A heightof approximately 2–5 mm for 5–15 g substance weight has proved to be ideal. Otherwise, the sample will not be driedcompletely or the analysis time will beunnecessarily extended, a crust/skin willform on the surface of the sample or thesample will scorch, and the analysis resultsobtained will not be reproducible (andhence cannot be used).15
While preparing substances for measurement, no processes may be used that generate heat. The heat generated mayresult in a loss of moisture prior to the measurement.Perform initial analysis of a new substanceto test how the IR rays are absorbed by thesample and converted into heat. A printoutof the intermediate values of the dryingprocess provides information on this at anearly stage.Since introducing IR rays produces intensiveenergy input in the sample, the temperaturesetting selected for infrared drying is usuallylower than the temperature setting usedwhen working with a drying oven.In many cases, the fully automatic switchoff mode will meet your requirements. If thefinal result is higher or lower than expected,try varying the temperature setting beforeresorting to a different switch-off criterion.16When analyzing the samples that losetheir moisture only very slowly orwhen operating a cold moisture analyzer, the fully automatic mode mayend the drying routine too early sinceno analyzable progress in the dryingroutine can be detected. In this case,preheat the moisture analyzer for twoto three minutes before starting thedrying routine, or select a differentswitch-off criterion.
PreparationBefore drying a sample, you must carryout the following preparations:– Adjust against the existing measurementsystem– Prepare the sample– Set the drying program parametersAdjusting against anExisting Measurement SystemA moisture analysis method often replaces another drying method (such asoven drying method) because it is simpleto use and requires shorter analysis time.In this case, you should adapt this method to that of the moisture analyzerin order to obtain values comparable tothose yielded by your standard referencemethod.Setting the Drying Program Parameters– By selecting the right drying programparameters, it is possible to achieve thesame results as the standard procedurein a much shorter time and with muchsimpler operation.Preparing the Samplet Select a sampleSelect a representative part of the wholesubstance as a sample.– Choose a representative number of individual samples for quality control– Choose enough samples to indicate atrend for in-process controlIf required, homogenize the productbefore a sample is taken by:– Mixing or stirring– Taking several samples from differentareas of the product– Taking several samples at defined intervalsTake only one sample at a time for agiven analysis and prepare it as quicklyas possible.In this way, it will not lose or gain moisture as a result of the ambient conditions.If several samples need to be takensimultaneously, the samples must besealed in airtight containers to ensurethat the storage conditions do not alterthe state or condition of the samples:– Warm or highly volatile substances losetheir moisture very quickly.– If you store the samples in a container,the moisture can condense on the wallsof the container.– If the container is too big and not filledcompletely, the sample can exchange itsmoisture with the air remaining in thecontainer.Mix the condensed moisture back in witha sample if necessary.Prepare the sampleWhen crushing a sample, avoid any contact with heat. Heat results in moisture loss.t Crush the sample using– Pestle– Lab mill17
t Use an appropriate tool for grindingthe sample.t If the sample is liquid containing solids,use one of the following tools:– Glass stirrer– Spoon– Magnetic stirrerUse a disposable sample pant Use only Sartorius disposable samplepans (inner diameter of 90 mm). Reusingsample pans leads to poor repeatabilityof results:– After cleaning, sample residues can stillremain on the pan.– Residues from cleaning agents can evaporate during the next moistureanalysis.– Scratches and grooves made duringcleaning result in damage that formspoints of attack for hot, rising air produced during the drying process(more pronounced buoyancy).t––––––18Distribute the sample on thesample panDistribute the sample on the sample panin a thin, even layer (height: 2 to 5 mm,weight: 5 to 15 g); otherwise:A sample applied unevenly will result in anonuniform distribution of heatThe sample will not be dried completelyThe analysis time will be unnecessarilyextendedThe sample will burn or a crust/skin willform on its surface as a result of a verythick layerThe crust makes it difficult or impossiblefor moisture to escape from the sampleduring the drying processAn uncertain and unknown quantity ofmoisture will remain in the samplet Apply liquid samples, pasty samples, orsamples that can melt to a glass-fiber filter (order no. 6906940); this providesthe following benefits:– Uniform distribution due to the capillaryeffect– Liquids are prevented from beadingtogether and forming drops– With larger surfaces, the moisture canevaporate faster– Colorless/transparent samples do notreflect– Considerably more convenient than the“sea-sand method”When drying samples containing sugar,a crust or skin can form and seal the surface. A glass-fiber filter is particularlyuseful in such cases. The moisture canevaporate downwards through the surface of the filter. Crust/skin formationcan be prevented or limited by placingthe glass-fiber filter on top of the sample.t Cover solid, heat-sensitive samples witha glass-fiber filter (order no. 6906940);this provides the following benefits:– Gentle heating, because the sample surface is shielded from excessive heat– Higher temperature setting can beselected– Uniformity of the sample surface– Fast evaporation of the moisture– Excellent repeatability for samples containing fat
Operating DesignThis chapter explains the operatingoptions available to you so that you canfamiliarize yourself with the moistureanalyzer. There is only one key to a function, i.e., the key retains this function throughout most of the menu levels.The texts and symbols shown alwayshave the same meaning.KeysSome of the keys trigger different functions, depending on whether you press the key briefly or press and hold the key:– Press briefly hold the key down for less than 1.2 seconds– Press and hold hold the key down for more than 1.2 seconds– If you press and hold longer than 1.2 seconds, the function triggered is repeated every0.6 seconds for as long as you hold the key.KeyDesignationeOn/off keycCF keyEnter keyDown/BackkeyUp/ForwardkeyrPrint keyPress brieflySwitch device on or off*Analysis: cancel functionMenu: cancel selectionAnalysis: trigger theselected function (e.g.,Menu: store theselected settingAnalysis: select afunction (e.g., tare)Menu: decrease value orreturn to previous selectionAnalysis: select afunction (e.g., tare)Menu: increase value orgo to next selectionSend readout valueor data record overthe interface portPress and hold——Menu: store theselected setting andtare) close the menuMenu: decreasevalue 10-foldMenu: increasevalue 10-fold—* When you switch off the moisture analyzer, it remains in standby mode19
DisplayThe texts and symbols shown on the displayalways have the same meaning. The displayis divided into several areas.Drying parameters/Adjustment functionGraphicsymbolsResultFunction lineBusy symbol,plus/minus sign,standby symbolUnitDrying parameters:The following symbols indicate drying program parameters for information, selectionand configuration:120 C Target temperature40min Drying timeAFully automaticgAUnit:When the weighing system stabilizes, theunit of measurement for the weight or calculated value is displayed here.Graphic symbols:Which symbol is shown here depends onthe operating status of the analyzer. Theexamples below indicate “Please closehood,” “Heating the sample” and “Pleasewait” (hourglass).Analysis startAdjustment function:20Result:This section shows the weight or calculatedvalue.Weight unit or unitfor a calculated value2.0min Interval for automaticoutput of intermediateresultsbBusy symbol, plus/minus sign,standby symbol:The J symbol is shown here when themoisture analyzer is processing a function.The plus/minus sign for the weight valueor calculated value appears here as well,and the standby symbol when the device isswitched off.Adjustment functionFunction line:Press the Down/Back or Up/Forward keysto move the focus and select one of thefunctions shown here, and the Enter key toactivate the selected function:
ConfigurationSetting the Device Parameterso Factory settingSetup5. Interface5.1 Baud rateDeviceparameters5.1.35.1.4 o5.1.55.1.65.1.75.1.8600 baud1200 baud2400 baud4800 baud9600 baud19,200 baud5.2 Parity5.2.3 o Odd5.2.4 Even5.2.5 None5.3 Number ofstop bits5.3.1 o 1 stop bit5.3.2 2 stop bits5.4 Handshakemode5.4.1 Software5.4.2 o Hardware5.4.3 None5.5 Number ofdata bits5.5.1 o 7 bits5.5.2 8 bits6. Printing6.7 Printout6.7.1 Result only6.7.2 o Complete (with GLPand dryingparameters)6.9 Language6.9.16.9.2 o6.9.36.9.46.9.56.9.66.9.86.9.99. Reset menu9.1 FactorysettingsGermanEnglishUS English(US date/time format)FrenchItalianSpanishRussian CP1251Russian CP8669.1.1 Reset to factory settings9.1.2 o Do not reset21
ExampleChanging the language to US mode (menu item 6.9.3)StepKey (or instruction)1. Select SET in the function lineRepeatedly:DisplayoC2. Confirm SET5.3. Select menu item 66.4. Open submenu6.75. Select menu item 6.96.96. Open submenu6.9.2 7. Select menu item 6.9.36.9.38. Confirm menu item 6.9.36.9.3 9. Close the Setup menu22Repeatedly: coC
Setting the Drying ParametersSelect PRG in the function line to adapt parameters for the drying program to the particularrequirements of the product sampled.Drying Parameters40 160 CTemperature during heatingEnd of analysis0.0 minSelect 0.0 minutes for fully automatic shutoff0.1 to 99 min Select an interval from 0.1 to 99 minutes to define a specific analysis time%M%S%MSgDisplay mode for resultMoistureDry weightRatioResidual weightEAStart of analysisWith stability, after thekey is pressedWithout stability, after the cover is closed0.0 min0.1 to 10.0 minPrint intermediate resultsOff23
Drying Parameter Features– Heating temperature set to defined valueduring measurementStart of analysis– With stability after thekey ispressed:When START is shown in the functionline and you pressto confirm, theinitial weight is stored at stabilityregardless of whether the cover is openor closed.Measurement begins as soon as the coveris closed.End of Analysis with Shutoff Parameters– Fully automatic mode– Timer modeFully automatic mode:Use the fully automatic mode whenloss of weight on drying follows aclearly delineated curve which can be unambiguously evaluated (see below).WeightMoisture (evaporation)– Without stability after the cover
- When setting up the moisture analyzer, leave enough space to prevent heat from building up and to keep your ana-lyzer from overheating: - leave 20 cm (about 8 inches) around the moisture analyzer - leave 1 m (3 ft.) above the moisture analyzer - Do not place any flammable substances on, under or near the moisture analyz-