Transcription
Customer RelationshipManagement SoftwareSecond CRM Mobile Web App GuideVersion 1.2
Table of ContentsSECOND CRM MOBILE OVERVIEW . 3USER LOGIN . 3LOGIN & NAVIGATION . 5DASHBOARD . 5VIEW . 6List View . 6Detail View . 7Related Record . 8SETTING . 9EMAIL SETTING. 9MY PREFERENCES . 10CREATE CRM RECORD . 11CREATE RELATED RECORDS . 15SEND EMAIL. 18DROPDOWN FIELDS . 22VIEW & EDIT CRM RECORD . 232
Second CRM Mobile OverviewSecond CRM Mobile web app enables users to access their CRM data anywhere and anytime fromtheir mobile devices (phones or tablets) as long as they are connected to the Internet. With SecondCRM Mobile web apps, users will have real time access to the information on all their businessopportunities and take the right business decisions, no matter where they are.NoteSecond CRM Mobile app currently supports iPhone, iPad, Android phones & tablets,Windows 8 Phone and tablets and BlackBerry 10 devices.User LoginTo access Second CRM Mobile app, go to mybusinessapps.globe.com.ph from your mobile browserand login into your myBusiness account.NoteFor the first time user, you need to register as a myBusiness user first and then, sign up forSecond CRM.To login into myBusiness, click on [Login] button.Figure 1. myBusiness LoginIn this page, you need to enter your account username and password. Then, click on [Login] button.3
Figure 2. myBusiness Login DetailsYou will be re-directed to your myBusiness Dashboard and you can launch Second CRM by clickingSecond CRM logo.Figure 3. myBusiness LoginNow, you will be re-directed to your Second CRM Dashboard. At dashboard, you can see the list ofmodules to which you have access within Second CRM Mobile app. The module list is differentaccording to Second CRM editions.At the top of the page, you can see the logout button on the left and setting button on the right.Figure 4. Second CRM Mobile Dashboard4
Login & NavigationUpon starting the Second CRM Mobile, the Login screen will appear as shown in User Login section.After login, you will be shown a dashboard screen.DashboardAt dashboard, you can see the list of modules to which you have access within Second CRM Mobile.The module list is different according to Second CRM editions.ImportantPlease note that your ability to access the above modules may be restricted by a role. Checkwith your system administrator if you cannot access the above module.Figure 5. Second CRM Mobile DashboardAt the top of the page, you can see the logout button on the left and setting button on the right.5
Figure 6. Second CRM Mobile DashboardViewEach and every module in the Second CRM has 2 different types of views namely the List View andDetails View. List View: List View is the part where you can see the brief list of all record you have in theapplication. Detail View: Detail View is the part where you can see the detail information of particularrecord.List ViewList View is the part where you can see the brief list of all CRM record you have in the applicationsuch as record name, phone number and email. All the record will be sorting according toalphabetical order.Figure 7. List View6
Detail ViewDetail View is the part where you can see the detail information of particular record. For example,tap on one record on the List View and the detail information will appear after that.Figure 8. Detail View7
Related RecordRelated Records provides user with detailed history attached to particular Account/Contact/Lead.For example user is at client site and manages to arrange another meeting, so he may quickly go torespective lead/account and add new event. This will remain as history to it for future reference.Figure 9. Related Record8
SettingAt dashboard, you can see the Setting icon at top right. Tap the icon to edit the setting. In this settingmodule, you can setting your email and choose the module that you wish to see in your dashboard.Figure 10. SettingEmail SettingImportantTo send out email from Second CRM mobile, you need to setup again the email settingbefore you can send out email but just need one time setup only.To setup you email, tap on [Email] tab and key-in your outgoing server information. Once done, tapon [Save] button.9
Figure 11. Email SettingMy PreferencesAt [My Preferences], you can choose the module that you wish to see in your dashboard.To do so, tap on [My Preferences], next to [Email]. Then, tap on the tick icon on the right as shownbelow to see the module in dashboard. Once finish, tap [Save].Figure 12. Update Profile[Refresh Module] button is used to refresh module when error occur.10
Figure 13. Update ProfileCreate CRM RecordNoteInventory modules like Quote, Invoice, Sales Order and Purchase Order can be viewed andsearched only.Use the following steps to create new record in Second CRM:1. To create any new record for specific module, tap on require module. For example, Accountmodule.Figure 14. Select Module2. Then, tap the [ ] button at the top right of the page.Figure 15. Create New Record11
3. Fill in the account name and tap [Create] to create the new account record. A popup massagewill appear and tap OK.NoteOnly mandatory fields will be asked to enter, you can enter complete record aftersave it first.Figure 16. Key-in Record Information12
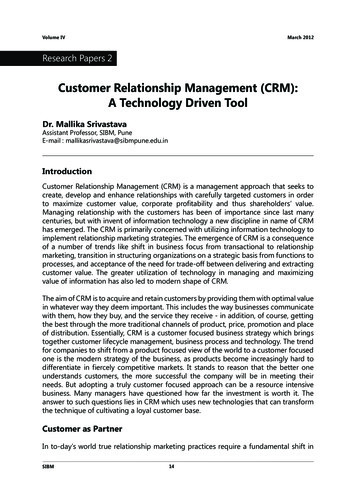
4. The next page, you can key-in other information for the new record and asterisk [*] once aremandatory. Once done, tap [Update] to transfer your data to the CRM system.A popup massage will appear and tap OK. Now, you can see new account already listedunder [Account] module.Figure 17. Key-in Detail Information13
14
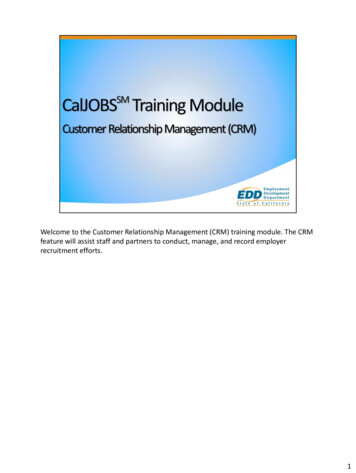
Create Related RecordsRelated Records provides user with detailed history attached to particular Account/Contact/Lead.NoteInventory modules like Quote, Invoice, Sales Order and Purchase Order can be viewed andsearched only.For example user is at client site and manages to arrange another meeting, so he/she may quickly goto respective Account and add new event. To do so:1. Tap on Account module and list view of data will appear.Figure 18. Create Related Record2. Then, tap on record name to view record detail. At the bottom of [Detail View] page, tap[Event].Figure 19. Create Related Record15
3. Click on [ ] symbol at the top right and key-in all the information.Figure 20. Create Event4. Once done, tap [Create] button at the right top. A popup massage will appear and tap [OK].Figure 21. Key-in Detail Information16
5. On the next page, you may add or edit any details information regarding the Event. Oncedone, tap [Update] button at the right top.A popup massage will appear and tap [OK]. Now, you can see the Event already create underparticular record.Figure 22. Update Information6. From the related record, tap on [Back] button to view the list view.Figure 23. Return to List View17
Send EmailYou can to send an email to your contact(s) directly from the Second CRM system. A reference to acopy of the sent email will be stored at each individual contact and is displayed under [Email] atrelated record.ImportantTo send out email from Second CRM mobile, you need to setup again the email settingbefore you can send out email but just need one time setup only.To send an email to selected contact:1. Tap on [Contact] module and choose the contact you want to send email.Figure 24. Return to List View18
2. In [Detail View] page, scroll down until you see email field. Next to email field, tap on sendemail icon.Figure 25. Return to List View19
3. You will be redirect to compose page where you can compose your email. Once done, tap on[Send] button. A popup massage will appear and tap [OK].Figure 26. Return to List View20
4. To view back the email details, at the bottom of [Detail View] page, tap on [Email] module.Now, you can see the email already store under [Email] module. To view, tap on the subject.Figure 27. Return to List View21
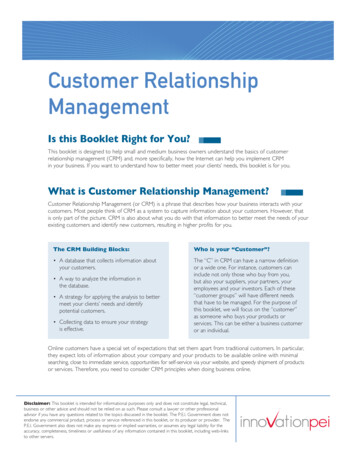
Dropdown FieldsDropdown fields allow you to choose one value from a list of predefined options. For example, youwant to add/edit start date and status for event.To add/edit value for start date & time in a dropdown field, tap on the record field. A small pop upwill appear at the bottom of the page for you to select the desired date and status.Figure 28. Dropdown FieldThen, tap [Done] to keep the new value. Tapping [Cancel] will return you to the page with a defaultvalue for the field. Once done, tap [Update] / [Create] button at the right top. A popup massage willappear and tap [OK].Figure 29. Dropdown Value22
View & Edit CRM RecordSecond CRM Mobile allows you to search record for any modules from the search at the top of themodule page. You can use this function to search any particular record you wish to access in themodule.To view and update the record, tap on any module in the dashboard. For example, tap on PotentialModule. At the top, tap the search box and begin typing the name of a record you wish to access.Figure 30. Search RecordOnce the record appears, tap on record name to view the detail information.23
Figure 31. Detail Informations ViewYou can edit the record by tap the [x] icon on the right of the field to remove the value or you cantap on the record field.Once done, tap [Update] button to keep the new value. Tap on [Back] button to back to the list view.Figure 32. Edit Record24
CRM Mobile web apps, users will have real time access to the information on all their business opportunities and take the right business decisions, no matter where they are. Note Second CRM Mobile app currently supports iPhone, iPad, Android phones & tablets, Windows 8 Phone and tablets and BlackBerry 10 devices. User Login To access Second CRM Mobile app, go to