Transcription
Setup GuideMcAfee Endpoint Suite InstallerFor use with the McAfee Endpoint Protection and EndpointProtection Advanced Suites
McAfee Suite Installer Setup GuideCOPYRIGHTCopyright 2013 McAfee, Inc. Do not copy without permission.TRADEMARK ATTRIBUTIONSMcAfee, the McAfee logo, McAfee Active Protection, McAfee AppPrism, McAfee Artemis, McAfee CleanBoot, McAfee DeepSAFE,ePolicy Orchestrator,McAfee ePO, McAfee EMM, McAfee Enterprise Mobility Management, Foundscore, Foundstone, McAfee NetPrism, McAfee PolicyEnforcer, Policy Lab, McAfee QuickClean, Safe Eyes, McAfee SECURE, SecureOS, McAfee Shredder, SiteAdvisor, SmartFilter, McAfeeStinger, McAfee Total Protection, TrustedSource, VirusScan, WaveSecure, WormTraq are trademarks or registered trademarks ofMcAfee, Inc. or its subsidiaries in the United States and other countries. Other names and brands may be claimed as the property ofothers.LICENSE INFORMATIONLicense AgreementNOTICE TO ALL USERS: CAREFULLY READ THE APPROPRIATE LEGAL AGREEMENT CORRESPONDING TO THE LICENSE YOUPURCHASED, WHICH SETS FORTH THE GENERAL TERMS AND CONDITIONS FOR THE USE OF THE LICENSED SOFTWARE. IF YOUDO NOT KNOW WHICH TYPE OF LICENSE YOU HAVE ACQUIRED, PLEASE CONSULT THE SALES AND OTHER RELATED LICENSEGRANT OR PURCHASE ORDER DOCUMENTS THAT ACCOMPANY YOUR SOFTWARE PACKAGING OR THAT YOU HAVE RECEIVEDSEPARATELY AS PART OF THE PURCHASE (AS A BOOKLET, A FILE ON THE PRODUCT CD, OR A FILE AVAILABLE ON THE WEBSITEFROM WHICH YOU DOWNLOADED THE SOFTWARE PACKAGE). IF YOU DO NOT AGREE TO ALL OF THE TERMS SET FORTH IN THEAGREEMENT, DO NOT INSTALL THE SOFTWARE. IF APPLICABLE, YOU MAY RETURN THE PRODUCT TO MCAFEE OR THE PLACE OFPURCHASE FOR A FULL REFUND.
McAfee Suite Installer Setup GuideContentsBefore You Begin .4Configure the McAfee ePO Server .6Systems and the System Tree .7Set Policies for Endpoints . . . . .9Create Custom Policies .15Set Tasks for Endpoints . . .17Create Client Tasks . . . . .19Policy and Task Inheritance in the System Tree . . . .20Deploy the McAfee Agent . . .21Use Dashboards and Queries . . 24Review .28Real Time for ePO . . .29VirusScan Enterprise for Linux . .30Endpoint Protection for Mac . .32Policy Auditor . 34Device Control . . .38Appendix A: List of included best practice policies . . . .41Appendix B: References . . .45
McAfee Suite Installer Setup GuideBefore You Begin Thank you for downloading the McAfee Endpoint Suite Installer. This guide is organized so you canevaluate McAfee Endpoint in a pilot environment consisting of a McAfee ePolicy Orchestrator (McAfeeePO ) server and a number of client computers. The guide contains step-by-step instructions for manyof the common configuration and policy options of the McAfee Endpoint Suites. It also brings you thebenefit of pre-built best practice policies and configurations for various products used by millions ofePolicy Orchestrator-managed systems, from SMB to largest enterprises.Many links throughout the document lead to short, instructional videos or specific KB articles that provideadditional information on relevant topics. Video links referencing ePolicy Orchestrator 4.5 and 4.6 aregenerally applicable to version 5.0.What’s IncludedComponents of McAfee Endpoint Protection Suite (EPS) included in this installation: AfeeMcAfeeMcAfeeMcAfeeePolicy Orchestrator (ePO) 5.0.1Agent 4.8VirusScan Enterprise 8.8Host Intrusion Prevention Firewall 8.0 for DesktopsSiteAdvisor Enterprise 3.5Web Filtering for Endpoint 3.5Device Control 9.3 for DesktopsEndpoint Protection for Mac 2.1VirusScan Enterprise for Linux 1.9Security for Microsoft Exchange 8.0Quarantine Manager 7.0.1Real Time for ePO 1.0If you are evaluating McAfee Endpoint Protection Suite Advanced (EPA), the installation includes thecomponents above, plus the following: McAfee Host Intrusion Prevention (IPS) 8.0 for DesktopsMcAfee Policy Auditor 6.2 for DesktopsImportant NotesArrangement of the Setup GuideThe first several sections of this guide deal with VirusScan, Host IPS, SiteAdvisor, the McAfee Agent, aswell as general usage of ePO to familiarize you with the basic workflows. Details on deploying additionalproducts follow later in the document in their respective sections.Active DirectoryAlthough ePolicy Orchestrator does not require a Windows Active Directory Domain, AD is required forsome of the more advanced management features, such as user-based policies, or using AD credentialsfor ePolicy Orchestrator user accounts.Page 4McAfee Suite Installer
McAfee Suite Installer Setup GuideMcAfee Global Threat Intelligence (GTI)Throughout this document you will see references to McAfee’s Global Threat Intelligence, or GTI.Today’s changing threat landscape requires an advanced security solution that can proactively counternew threats. McAfee GTI hosts an extensive threat intelligence system in the cloud with visibility acrossall threat vectors — file, web, message, and network — and a view into the latest vulnerabilities acrossthe IT industry. McAfee correlates real-world data collected from millions of sensors around the globeand delivers real-time, and often predictive, protection via its security products. Several products in theMcAfee Endpoint Suites utilize GTI to protect McAfee customers every day. Policy examples in this guidecover how to take advantage of GTI technology.McAfee Application ControlLooking to lock down and protect fixed-function devices, ATMs, cash registers, or SCADA systems?Consider McAfee Application Control, also managed by ePolicy Orchestrator.McAfee Suite InstallerPage 5
McAfee Suite Installer Setup GuideConfigure the McAfee ePO ServerLog in to ePolicy OrchestratorLog in with the User Name of Admin and the password that you designated during the installation.On first login, you are presented with the Guided Configuration dashboard. Since the installer automatedmany of the basic configuration steps, including creation of a system tree plus client policies and tasks,we will bypass the Guided Configuration and dive straight in.Proxy ConfigurationNOTE: If you use a proxy server in your environment, you will need to specify the configuration in theePolicy Orchestrator Server Settings, so it can retrieve client updates and other content. If no proxysettings are required, skip to the following task, entitled The ePO Software Repository.Configuring Proxy Settings1 Click Menu Configuration Server Settings, select Proxy Settings from the Setting Categories,and then click Edit.2 Select Configure the proxy settings manually, provide the specific configuration information yourproxy server uses for each set of options, then click Save.The ePO Software RepositoryThe McAfee ePO server is the central software repository for all McAfee product installations, updates,and other content. The modular design of ePolicy Orchestrator allows new products to be added asextensions. This includes new or updated versions of McAfee and McAfee-compatible solutions from theSecurity Innovation Alliance. Packages are components that are checked in to the master repository, andthen deployed to client systems. ePolicy Orchestrator also allows for replication to distributedrepositories at remote locations for bandwidth optimization.Page 6McAfee Suite Installer
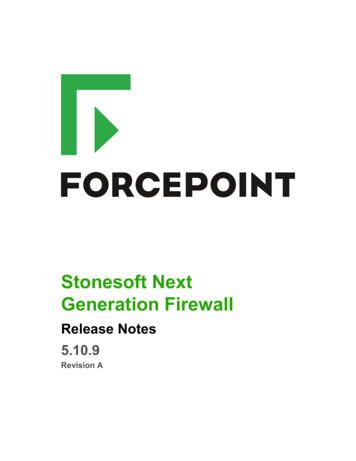
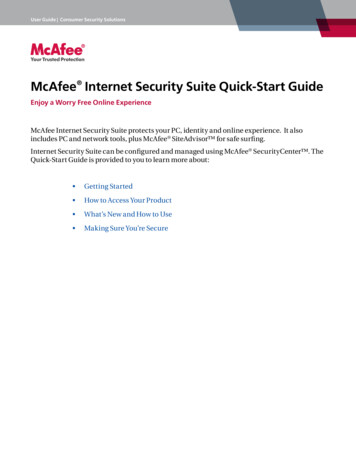
McAfee Suite Installer Setup GuideFor McAfee ePO to keep your client systems up-to-date, a repository task that retrieves updates from aMcAfee site (HTTP or FTP) was created to run daily at 1:00 am. The steps below show you how tomodify the task so that it checks the McAfee update site every 12 hours instead.Editing the Repository Pull Task1 Click Menu Automation Server Tasks.2 In the list, find the task named Update Master Repository and, under the Actions column, clickEdit to open the Server Task Builder.3 On the Description page, make sure Schedule status is set to Enabled, then click Next.4 Select Move existing packages to Previous branch, then click Next.NOTE: Checking this option allows ePolicy Orchestrator to maintain more than one set of signature files.When the task runs next, the current updates are moved to a directory on the server called Previous.This allows you to roll back updates if necessary.5 On the Schedule page, choose when you want ePolicy Orchestrator to check the McAfee site forupdates. Schedule the task to run Hourly, with No End Date. Set Schedule to every 12 hours.6 Click Next.7 On the Summary page, click Save. The console returns to the Server Tasks page.You can set any update schedule you desire. There are generally two approaches — the standardapproach similar to that described above, and a more advanced methodology to use if you are requiredto test signatures (DATs) on a subset of your systems prior to deployment to the remainder of yourpopulation. The standard approach is appropriate for most evaluations. Information on the advancedapproach is detailed in the white paper Validating DAT and Other Content Files with McAfee ePolicyOrchestrator located on the McAfee Customer Portal.Systems and the System TreeThe ePolicy Orchestrator System Tree organizes managed systems in units for monitoring, assigningpolicies, scheduling tasks, and taking actions. These units are called groups, which are created andadministered by Global Administrators or users with the appropriate permissions. Groups may containboth systems and other groups.As shown in the graphic below, the installer created a sample system tree during setup. Three groupswere created under the default My Organization group; Laptops, Servers, and Workstations. TheServers group also has several subgroups for different server types based on function or role. Thesesample groups were created for your convenience. You are not required to use them, but they arereferenced in the instructional exercises that follow. If you wish to test system & group creation usingActive Directory, detailed steps are provided in the McAfee Quick Tips video Active DirectorySynchronization in ePO.McAfee Suite InstallerPage 7
McAfee Suite Installer Setup GuideAdding Systems to your System Tree GroupsIf you chose Automatic Discovery of systems during the installation, use the following steps to organizeyour test systems in the System Tree. If you did not select Automatic Discovery, skip to the followingtask, entitled Adding Systems Manually.Systems Added with Automatic Discovery1 Click the System Tree button on the favorites bar.2 Click on the My Organization group on the left. The systems are displayed on the right.3 If there are any systems discovered that you do not want to be included in your testing, you canremove them from the tree. Place a check in the box next to all the systems you want to remove (youcan use Shift Click to select more than one), click Actions Directory Management Delete, andthen click OK. You do NOT need to check the box for Remove Agent on Next Agent-to-ServerCommunication.4 Drag and drop the remaining systems to their appropriate groups. You can drag multiple systems byplacing a check mark by each first. A dialog box will appear asking “Are you sure you want to move thesystem(s)?”. Click OK. You can check the box if you do not wish to see this dialog in the future.Adding Systems Manually1 In the System Tree, highlight the Workstations group and click System Tree Actions New Systems.2 For How to Add Systems, select Add systems to the current group, but do not push agents.3 For Target Systems, type the NetBIOS name for each system in the text box, separated by commas,spaces, or line breaks. You can also click Browse to select systems.4 Verify that System Tree sorting is disabled.5 Click OK.6 As needed, repeat these steps to add any servers to your Laptops or Servers group or its subgroups.There are several methods of organizing and populating the System Tree: Manually structure your System Tree by creating your own groups and adding individual systems. Synchronize with Active Directory or NT domain as a source for systems. In the case of usingActive Directory, synchronization mirrors AD and automatically provides System Tree structure. Create your own groups and sort based on IP ranges or subnets. This is called criteria-basedsorting. Import a text file of groups and systems.Page 8McAfee Suite Installer
McAfee Suite Installer Setup GuideSet Policies for EndpointsPolicies are used to set the configuration for the various McAfee Endpoint products, such as Host IPS,Endpoint Encryption, and many other products. Several pre-built best practice policies have beenincluded as part the installer. They differ somewhat from the default policies in that some are designedfor optimization and others for tighter security. Note that these policies are not yet in effect. Within thisguide we will discuss and assign several of these policies, and cover policy creation as well. All additionalpolicies are denoted with a “POC” prefix to aid you in your proof of concept or evaluation.In a production environment one would normally create and assign required policies in the System Treebefore software is ever deployed. As such, the same approach will be used for this test deployment andevaluation.The McAfee Agent PoliciesThe McAfee Agent is the client-side component providing secure communication with ePolicyOrchestrator. It downloads and enforces policies, and executes client-side tasks such as deployment andupdating. The Agent also uploads events and provides additional data regarding each system’s status.Assigning a McAfee Agent Policy GloballyThe following policy allows for remote viewing of the McAfee Agent log via browser and increases theAgent to Server Connection Interval (ASCI) from the default of 60 minutes to 120 minutes.One reason to modify the Agent to Server Connection Interval on a group of systems might be to lessenthe impact on already taxed WAN connections to remote sites, or simply because you are managingmany thousands of systems. See more information on the McAfee Agent in the Quick Tips videoControlling Agent Communication.1 Click the System Tree button on the favorites bar.2 Highlight My Organization.3 Click the Assigned Policies tab. From the Product drop-down menu, select McAfee Agent. On the line that lists General, click Edit Assignment. For Inherit from, select Break inheritance and assign the policy and settings below. From the Assigned Policy drop-down menu, select POC – General. Click Save. The policy is now assigned to that group and all its subgroups.NOTE: To view the McAfee Agent Log on a remote system, type the following your web-browser:http:// computer name or IP address :8081 where 8081 is the default port for the Agent Wake Up call. Ifyou changed this port number during ePolicy Orchestrator installation, then use the port you specified.This can be very useful when you need to view the log for a system on the other side of the country.You can test this function after deploying the Agent.VirusScan Enterprise PoliciesAssigning a VirusScan Policy to a GroupMcAfee Suite InstallerPage 9
McAfee Suite Installer Setup GuideHaving assigned a policy globally, the following applies policies to a specific group. Do you have onegroup of systems that has a higher probability of being exposed to malware than others? You are likelythinking of your laptop community and the common concerns around issues such as non-standardimages, use of unsecured wireless networks, or who is using the laptop and where they are surfing whenoff the corporate network. Setting GTI File Reputation to High is used for systems that have greatersusceptibility to being attacked.Follow these steps to set GTI File Reputation to High for the Laptops group.1 Click the System Tree button on the favorites bar.2 Highlight the Laptops group.3 Click the Assigned Policies tab. From the Product drop-down menu, select VirusScan Enterprise 8.8.0. On the line that lists On-Access General Policies, click Edit Assignment. For Inherit from, select Break inheritance and assign the policy and settings below. From the Assigned Policy drop-down menu, select POC - Enable GTI for On-Access (High). Click Save.For additional information on this feature, see the FAQs for Global Threat Intelligence File Reputation.Assigning Best Practice VirusScan Policies to the SQL Servers GroupThe installer includes many best practice server policies used by customers where the standard default of“scan everything” may not be applicable. For instance, it is common practice to create AV exclusions ondatabase servers, Microsoft Exchange Servers, Domain Controllers, and so on. An extensive list ofcommon exclusions can be found here: VirusScan Enterprise exclusions (Master Article). Details onavailable syntax are found in the VirusScan Enterprise 8.8 Product Guide.The following policy example was specifically chosen to illustrate McAfee VirusScan’s unique ability tovary scan settings based on the process in play at any given time. In the specific example below,Sqlserver.exe and Sqlwriter.exe are considered “low-risk” processes for spreading malware (unlikeExplorer.exe or Iexplore.exe, for example). Hence the policies are configured such that scan on read andscan on write are not active for those two select low-risk processes. Real customers combine thisapproach with traditional file and directory exclusions to provide the best server performance possiblewhile limiting the threat of malware infection at the file system level. As such, a set of “Low Risk” and“Default” policies are used in concert.Follow these steps to first assign the Default Processes Policy to the SQL Servers group.1 Click the System Tree button on the favorites bar.2 Highlight the SQL Servers group.3 Click the Assigned Policies tab.4 From the Product drop-down menu, select VirusScan Enterprise 8.8.0.5 On the line that lists On-Access Default Processes Policies, click Edit Assignment.6 For Inherit from, select Break inheritance and assign the policy and settings below.7 From the Assigned Policy drop-down menu, select POC – Default: MS SQL Servers.8 Click Save.Follow these steps to also assign the Low-Risk Processes Policy to the SQL Servers group.1 Click the System Tree button on the favorites bar.2 Highlight the SQL Servers group.3 Click the Assigned Policies tab.4 From the Product drop-down menu, select VirusScan Enterprise 8.8.0.Page 10McAfee Suite Installer
McAfee Suite Installer Setup Guide5 On the line that lists On-Access Low-Risk Processes Policies, click Edit Assignment.6 For Inherit from, select Break inheritance and assign the policy and settings below.7 From the Assigned Policy drop-down menu, select POC – Low: MS SQL Servers.8 Click Save.Here’s another way of considering the type of policies you just assigned: A Low Risk Processes policy has process exclusions specific to the system type to which it is beingdeployed. In other words, VirusScan might scan little or nothing for a select group of low-riskprocesses as configured, such as sqlserver.exe and sqlwriter.exe. A Default Processes policy has common file & directory exclusions specific to the system type towhich it is being deployed. File reads and writes by any process not classified as Low-Risk willtrigger normal file scanning, except on the database and other key files and directories, i.e., yourstandard AV exclusions.Quick Tip: Standard desktops and file servers might use a Default-only policy, as process exclusionsare not typically required. You can get additional information on Risk-Based Scanning from the McAfeeKnowledgebase articles KB55139 and KB66036, and the McAfee Quick Tips video What is Risk BasedScanning?.Host IPS PoliciesPlease note that McAfee Host IPS has two main components: kernel-level IPS protection and a firewall.The McAfee EPS suite contains the firewall only, while the EPA suite contains both components. If youare evaluating the EPS suite, skip to the section entitled Host IPS Firewall.The main function of McAfee Host IPS is to protect systems against known and unknown attacks. This isoften achieved without an update to the software, by use of patented buffer overflow and otherbehavioral protection. It has the additional benefit reducing the urgency and frequency of patching byprotecting vulnerabilities from exploit even before a patch has been applied. Consider the time spent onpatching within your organization. By deploying Host IPS, many of those vulnerabilities would beprotected from exploit, allowing you to patch on a more reasonable schedule. For example, McAfee HostIPS protected against 60% of all exploits against Microsoft vulnerabilities, and nearly 75% of all exploitsagainst Adobe vulnerabilities, disclosed between 2006 and 2011. Also consider the Host IPS ability toprotect systems against exploit on those occasions when a new vulnerability exists but the correspondingpatch is not yet available.Kernel Level Host IPSFor the initial stages of this evaluation, you will assign a policy that instructs Host IPS to block Highseverity, and log Medium and Low events. Blocking on High severity events is a minimum if you plan touse attack tools to test the product’s effectiveness. This is combined with logging of Medium and Lowseverity events. To accomplish more than simply log events, a policy such as this is often used inimplementation in live environments.Enabling Host IPSFollow these steps to assign a policy that enables Host IPS on your client systems.1 Click the System Tree button on the favorites bar.2 Highlight the Workstations group.3 Click the Assigned Policies tab.McAfee Suite InstallerPage 11
McAfee Suite Installer Setup Guide From the Product drop-down menu, select Host Intrusion Prevention 8.0: IPS. On the line that lists IPS Options, click Edit Assignment. For Inherit from, select Break inheritance and assign the policy and settings below. From the Assigned Policy drop-down menu, select POC - Host and Network IPS enabled. Click Save. The policy is now assigned to that group and all its subgroups.4 Repeat the above steps for your Laptops group.Setting Protection LevelFollow these steps to assign a policy that blocks High severity events, and logs any of Medium and Lowseverity. Logging provides detailed advanced knowledge of which signatures may require exclusionsprior to enforcing block on Medium events, thus guiding accurate policy tuning. One can elevate selectLow severity signatures to Medium later if desired, instead of maintaining all Lows active.1 Click the System Tree button on the favorites bar.2 Highlight the Workstations group.3 Click the Assigned Policies tab. From the Product drop-down menu, select Host Intrusion Prevention 8.0: IPS. On the line that lists IPS Protection, click Edit Assignment. For Inherit from, select Break inheritance and assign the policy and settings below. From the Assigned Policy drop-down menu, select POC - Block High events; Log Medium andLow. Click Save. The policy is now assigned to that group and all its subgroups.4 Repeat the above steps for your Laptops group.Assigning IPS RulesAs virtual systems are often used for evaluations, assigning this policy uses the standard signature set,but facilitates testing by changing VMWare protection and VNC detection signatures to a severity of Low.The McAfee Default policy maintains these signatures at their normal severity levels and should beconsidered before staging in a live environment.1 Click the System Tree button on the favorites bar.2 Highlight the Workstations group.3 Click the Assigned Policies tab. From the Product drop-down menu, select Host Intrusion Prevention 8.0: IPS. On the line that lists IPS Rules, click Edit Assignment. For Inherit from, select Break inheritance and assign the policy and settings below. From the Assigned Policy drop-down menu, select POC - VMware and VNC exception policy. Click Save. The policy is now assigned to that group and all its subgroups.4 Repeat the above steps for your Laptops group.Host IPS FirewallThe Host IPS Firewall is stateful and offers location awareness and other advanced features, including IPReputation filtering, part of McAfee’s Global Threat Intelligence (GTI). The firewall uses GTI to protectendpoints from botnets, distributed denial-of-service (DDoS) attacks, advanced persistent threats, andrisky web connections.McAfee collects data from billions of IP addresses and network ports, and calculates a reputation scorebased on network traffic, including port, destination, protocol, and inbound and outbound connectionrequests. The score reflects the likelihood that a network connection poses a threat, such as a connectionassociated with botnet control.Page 12McAfee Suite Installer
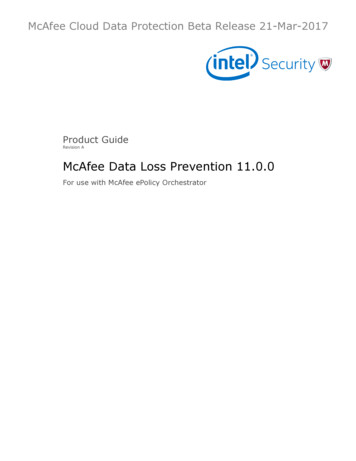
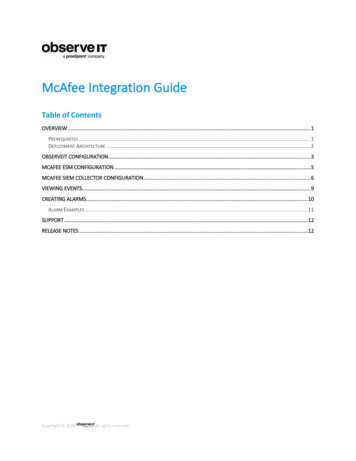
McAfee Suite Installer Setup GuideCoupling a single firewall rule with a GTI-only policy lets you immediately receive the benefit of cloudintelligence on known botnets and their command and control centers. This is achieved with little effort,minimal overhead, and no interference with your existing host or network firewall rules.Enabling the FirewallFollow these steps to assign a policy that simply enables the firewall and sets the sensitivity level for GTIat Medium risk or higher. At this point, no firewall ruleset is active or assigned.1 Click the System Tree button on the favorites bar.2 Highlight the Workstations group.3 Click the Assigned Policies tab. From the Product drop-down menu, select Host Intrusion Prevention 8.0: Firewall. On the line that lists Firewall Options, click Edit Assignment. For Inherit from, select Break inheritance and assign the policy and settings below. From the Assigned Policy drop-down menu, select POC – Enable FW and GTI. Click Save. The policy is now assigned to that group and all its subgroups.4 Repeat the above steps for your Laptops group.Assigning the GTI–Only RulesetThe steps below assign a policy that allows all traffic, but uses GTI to perform lookups of IP reputationsand block connections to any external addresses posing a threat.1 Click the System Tree button on the favorites bar.2 Highlight the Workstations group.3 Click the Assigned Policies tab. From the Product drop-down menu, select Host Intrusion Prevention 8.0: Firewall. On the line that lists Firewall Rules, click Edit Assignment. For Inherit from, select Break inheritance and assign the policy and settings below. From the Assigned Policy drop-down menu, select POC - GTI-Only Rule Set. Click Save. The policy is now assigned to that group and all its subgroups.4 Repeat the above steps for your Laptops group.Perhaps you have shied away from Host IPS, feeling that it would be a complex or lengthy process todeploy, or had concern about blocking legitimate processes. By following a logical, systematic approach,you can quickly realize the benefits of deploying Host IPS in your environment. While the policies appliedhere are sufficient for initial testing, prior to full production deployment you are strongly encouraged toread over the deployment methodology discussed in detail in the Host IPS 8.0 Installation Guide, pp. 1126. Answers to many common questions can be found in the FAQ for Host Intrusion Prevention 8.0.SiteAdvisor Enterprise and Web Filtering forEndpoint policiesMcAfee SiteAdvisor Enterprise leverages McAfee Global Threat Intelligence to provide reputation ratingsfor web sites using a color-coded system — primarily Red, Yellow, and Green, based on the riskassociated with a given site (for example, “Red sites” hosting malware). Annotations are made in thebrowser, in search engine results (shown below), as well as links in IM and email programs such asMicrosoft Outlook and Outlook Express.McAfee Suite InstallerPage 13
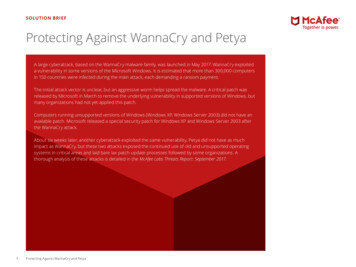
McAfee Suite Installer Setup GuideSiteAdvisor also contains a Web Filtering component administrators can use to enforce policies regardingthe content of categories such as pornography, gambling, and other undesired sites. Administrators canset policies that determine which sites managed systems can access, create customized block messages,and prevent users from disabling the client software on managed systems.NOTE: By default SiteAdvisor will block access to Red sites, display a warning message for Yellow sitesbut allow access, and allow access to Green and unrated (Gray) sites. By default Web Filtering forEndpoint does not block any sites based on their content categorization. We’ll see how to create asample URL filtering policy below.Ratings Enforcement on File DownloadsThe following SiteAdvisor policy enables file download rating and email annotations. In other words,SiteAdvisor will enforce the Red\Yellow\Green rating on file downloads, as well as on the web sitesthemselves. For instance a “Yellow site” may have both Red and Green downloads. This policy wouldblock the download of Red (dangerous) files, but allow the download of Green (safe) files.1 Click the System Tree button on the favorites bar.2 Highlight My Organization.3 Click the Assigned Policies tab. From the Product drop-down menu, select SiteAdvisor Enterprise Plus 3.5. On the line that lists General, click Edit Assignment. For Inherit from, select Break inheritance and assign the policy and settings below. From the Assigned Policy drop-down menu, select POC General Policy. Click Save. The policy is now assigned to that group and all its subgroups.Page 14McAfee Suite Installer
McAfee Suite Installer Setup GuideCreate Custom PoliciesSo far, we have assigned preconfigured policies that were created for you. At some point, you will haveto create policies to accommodate some requirements on your network. In this section, we will createand
McAfee ePO, McAfee EMM, McAfee Enterprise Mobility Management, Foundscore, Foundstone, McAfee NetPrism, McAfee Policy . You do NOT need to check the box for Remove Agent on Next Agent-to-Server Communication. 4 Drag and drop the remaining systems to their appropriate groups. You can drag multiple systems by