Transcription
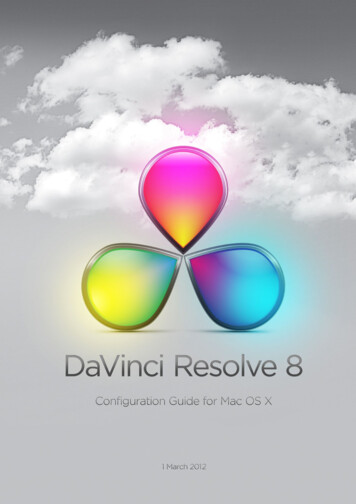
NDaVinci Fancy ShakeINSTALLATION GUIDEDaVinci Fancy Shake is a synthetic shake carefully engineered to providethe authentic look and durability of natural shake at a fraction of thecost and weight. Special care has been taken to make the product easyto install. By following these instructions, and using good installationpractices, you will be assured of a quality installation.N OTE TO I NSTALLERDaVinci Fancy Shake offers a 7/16" thick profile, yetremains lightweight, because the shakes have anengineered rib structure on the back. When cuttingshakes for open valleys or at overhangs such aseaves and gable ends, the core-out and ribbedsupport structure on the underside of theshake needs to be hidden by standardmetal flashings.Pay special attention to recommendationsfor accessories and installation at eaves (page 2),gable ends (page 4) and valleys (page 6).JOB S ITE R EADY !DaVinci Fancy Shake is delivered to the construction site inbundles pre-collated with all three shake widths and all shakecolors that make up the DaVinci Fancy Shake blend thatis being installed. This pre-planned distribution produces theright aesthetic effect every time. Collated bundles also simplifyinstallation and save time by eliminating hand sorting on thejob site.This information is provided for the use of professional roofing contractors. This Installation Guide does not supersede local building codeswhich should always be followed. DaVinci Roofscapes does not warranty or have any responsibility for installation of its products. TheDaVinci Roofscapes Lifetime Limited Material Warranty outlines its warranty responsibilities for the roofing materials it manufactures.For questions about DaVinci Fancy Shake or its application, contact DaVinci Roofscapes , LLC913-599-0766 or 800-DaVinci (800-328-4624) or www.davinciroofscapes.comPlease be sure to check DaVinci’s website for updates. Installation Guide is subject to change without notice.MLIGFS-08/18Pg. 1 of 9TM
INSTALLATIONDeckingD ECKINGDaVinci Fancy Shake must be installed on a smoothflat surface (plywood or OSB); minimum 15/32" APAapproved plywoodor 7/16" approved OSB. It is alsonecessary that all previous roofing materials be tornoff prior to installation of DaVinci Fancy Shake.Imperfection in the decking may transmitthrough to finished roof.UnderlaymentD RIP- E DGEMetal flashing is required on gable endsand eaves. An overhanging drip edge suchas a Style “D” or Style “F” is recommendedon gable ends to help mask the rib-structureon the underside. An overhanging dripedge may also be used on eaves althoughStyle “A” or Style “B” drip edge areacceptable options.Drip-EdgeoptionalIce & Water ShieldStyle D or Style FDrip Edgecan be usedI CE AND WATER S HIELDStarter Course(Severe Climate Underlayment in accordance with Chapter 15 of the UBC)In areas where the average daily temperature in January is 25 F or lower or where icebuildup is possible, DaVinci requires ice and water shield be installed: from the bottomedge to two feet above the exterior wall line on all eaves, in all valleys, on all gable ends,and around all roof projections. In all cases ice and water shield is required in all valleys,regardless of average daily temperatures or the possibility of ice buildup.U NDERLAYMENTS TARTER C OURSEMethod 1: Class A installation – One layer ofMB Technologies TU-35 must be installed over theentire roof deck including areas with ice and watershield. No interlayment is required.Each starter tile should be installed extending past the dripedge by approximately 1". However, if using Style D or Style Fdrip edge, the starter shingle can be allowed to overhang lessif it is appropriate for the gutter system. The starter tilesshould be installed with the DaVinci logo on top. The startertiles be spaced 3/8" apart as tiles will expand when warm.Each starter tile should be nailed with two nails on a lineapproximately 6" from the butt and ¾" from outside edge.Method 2: Class C Installation – Areas of the roofdeck not covered by ice and watershield must becovered with 30 lb non-perforated asphalt saturatedfelt meeting requirements of ASTM D 226.G ETTING S TARTEDUse two corrosion-resistant nails in each shake near nailing location shown on the shakes. (See page 9). This includes the roofer’schoice of: copper, stainless steel or hot-dipped galvanized nails. Once the starter is in place, begin installing shakes in the lowerleft corner (or lower right corner for a left-handed roofer).The shakes should be flush with the starter tiles on the outer (rakes) and lower (eaves) edges. DaVinci recommends 3/8" gapbetween shakes.Two methods of installation are available: Straight or staggered (see details below).Use the alignment indicator at the top of each shake to help manage the exposure. An exposure of between 6" or 7" is acceptablefor straight courses and between 6" and 7" for staggered courses. As you progress up the roof, be careful not to damage shakesalready in place. Put something, perhaps a cut shake, under toe irons (scaffolding brackets) to avoid scratching or marring thefinish of the shake already installed below.MLIGFS-08/18Pg. 2 of 9
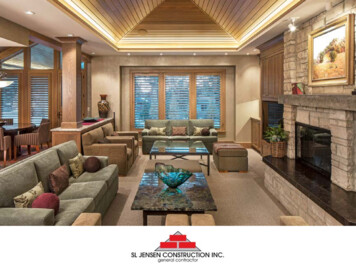
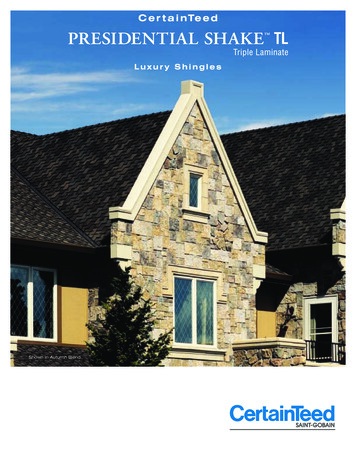
INSTALLATIONS TRAIGHT C OURSINGInstall the shakes one at a time starting in the lower left handcorner if right handed and lower right hand corner if lefthanded. The first course of shakes should be laid directly onthe starter tiles. The shakes should be installed individuallywith two nails in the defined areas. The shakes should be laidas they come out of the bundle with a rack type system, alsoknown as rack-style, stairstepping, or pyramiding; to preventsame size shingle directly on top of another. The shakes shouldbe laid with a 3/8" gap between each shake. The gaps betweenshakes on adjacent courses should offset by a minimum 1½".The use of the alignment lines on the shakes may be used tofacilitate installation but chalk lines should be used frequentlyto assure horizontal alignment.Straight Coursing on DaVinci Fancy Shake at a 7" Exposure(Tiles can also be laid at 6” Exposure.)32"Nailholes25"18"Chalk lines should be snapped on underlayment with the tipsof the shakes following the lines. Do not snap lines onDaVinci Slate or use red chalk as the chalk maypermanently discolor the shake.3/8" Gap between each shingleSTAGGERED C OURSINGIf the roof pitch is 6:12 or greater you may stagger thecourses with a 7" exposure. The way this is accomplishedis laying the shakes in 7" courses with every other shinglelowered 1". Tiles can also be laid at 6" Exposure.An example of how to accomplish this is as follows:Staggered Coursing on DaVinci Fancy Shake at a 7" Exposure(Tiles can also be laid at 6” Exposure.)32"NailholesStep 1: Lay the starter course across the eave and then25"put the first course of shake flush on top of the starter. Thensnap a horizontal line 7” above the tips of the shakes youjust installed or 25” from the eave line (butt of the shakeyou just laid).Step 2: Now start laying your second course of shakesputting the tip of the first shingle you lay on the chalk line.The next or adjacent shake should be 1” below the line.The third shake should be on the line; the fourth shakeshould be below the line. This continues in the samepattern all the way across the roof one shingle tip on theline and the next 1” below the line. This continues in thesame pattern all the way across the roof one shingle tip onthe line and the next 1" below the line.18"7"7"3/8" Gapbetween eachshingleStep 3: Snap another horizontal line 7" above the line you chalked in Step 2 or 32" above the eave line. Start laying shakes asin step 2 with the first shake tip on the line and the next shake tip 1" below the line.Step 4: Continue up the roof in this manner. Every course does not need to be chalked. As roofers begin to understand theconcept, they can use alignment indicators to accomplish the stagger. We do, however, recommend occasional horizontalchalking to assure correct alignment.Chalk lines should be snapped on underlayment with the tips of the shakes following the lines. Do not snap lines on DaVinciFancy Shake or use red chalk as the chalk may permanently discolor the shake.MLIGFS-08/18Pg. 3 of 9
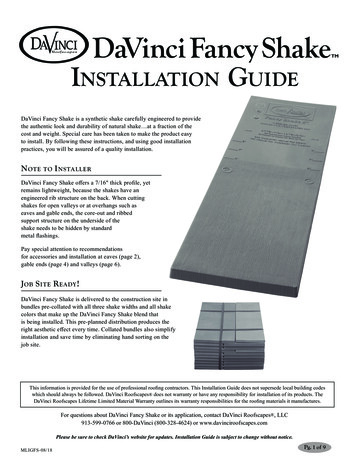
INSTALLATIONG ABLE E NDS / R AKESWhen approaching the gable end of a course, it’s always bestto avoid cutting shakes. Cutting DaVinci Fancy Shake atgable ends can almost always be avoided by choosing fromthe three different shake sizes, and spacing between shakes.In the rare case when cutting is required, shakes should becut so that the factory edge faces out on the gable end.C UTTINGField Shakes should extend¼" past the overhang dripedge on gable ends (rakes).DaVinci Fancy Shake may be cut with a utility knife andstraight edge. It may also be cut effectively with a circularsaw. Carbide tooth blades are recommended for maximumblade life.G APThe recommended gap between slates is 3/8" with a minimum3/16" gap required. The number of shingles per square forDaVinci Fancy Shakes is based on the assumption of 3/8"spacing between shakes. If spacing is less, more shingles persquare will be required.A VOID “C RACK ON C RACK ”The gap between two shingles in one course should alwaysline up 1½" or more from the gap between two shingles in thecourse below.CorrectC OLOR AND W IDTH VARIATIONIncorrectMLIGFS-08/18DaVinci field shakes come in three width sizes:12", 7" and 5". A four-inch shake is also available as anaccessory. Each bundle contains a mixture of 30 shakes andincludes a pre-collated assortment of widths and colors neededfor each color blend. DaVinci Roofscapes recommends that,if possible, shakes be applied as they come out of the bundlesfor the most pleasing aesthetic affect and to prevent “striping”and “patterning” on the roof. Keep in mind there needs to be1½" side lap maintained and installation mustbe in a rack or pyramid style.Pg. 4 of 9
INSTALLATIONH IP AND R IDGE P REPARATIONAfter installing field shakes, hips and ridges should be prepared by installing a minimum 6" wide piece of non-corrosivemetal or UV stable EPDM or equivalent over the hips and ridges. This metal or rubber should extend at least threeinches from the center point on each side of the hip or ridge.R IDGE V ENT A PPLICATIONIf using a continuous ridge vent we recommend a rigid shingle roll-over type. When installing continuous ridge vent, careshould be taken to insure joints in ridge vent are water tight. Once the continuous vent is installed, pre-packaged 6" DaVincihip and ridge shakes should be installed in accordance with the standard hip and ridge installation instructions below.Special caution should be used when cutting the decking on the ridge to assure adequate nailing for the ridge pieces.S TANDARD H IP AND R IDGE I NSTALLATIONThere are two ways to start applying DaVinci Fancy ShakeHip and Ridge at the bottom of a hip. The first way is toinstall a double course of DaVinci Fancy Shake Hip andRidge on the bottom of the hip. In this method the topportion of the under-shake should be cut so that it onlycovers the first course of field shakes. The second courseis then installed without cutting. The tails of the shakesare left uncut and will project pass the eave of the roof.Using a chalk line to assure straightness, the prepackaged5" hip and ridge should be installed one piece at a timeso that the butts of two shingles are adjacent and the insideedges touch. These shakes that make up a hip and ridgeunit should be installed with a 6" exposure. DaVincirecommends using 5" units for hips and ridges unlesscontinuous ridge vent is being used.Standard InstallationA LTERNATE H IP S TARTER6" exposureThe second method for starting a hip will involve mitering thefirst two shakes installed.Step 1: Start by taking a single piece of DaVinci Fancy Shake HipNon-corrosivemetal5" DaVinci FancyShakesAlternate Installation: Step 1and Ridge and laying the butt of the shake with its corner at thecorner of the hip and the butt flush with the eave of the house.Make a cut on the shake at the same angle of the hip. Cut a shakefor the other side of the hip in the same fashion and press the twoshakes tight together.Step 2: The second set ofshakes should be installeduncut with these outside edgespulled all the way down tothe eave of the roof.AlternateInstallation: Step 2MLIGFS-08/18Pg. 5 of 9
INSTALLATIONVALLEYSBecause DaVinci Fancy Shake has a rib-structure on the underside, special care must be used when installing DaVinciFancy Shake in valleys. Open or closed valley systems may be used with several variants of each system. Whetherinstalling an open or a closed valley system, valley metal should be made from 24" stock of copper, aluminum,or a minimum 28-gauge clad steel. We require ice and water shield as underlayment in all valleys.O PEN VALLEYSIf open valleys are preferred, take special care in determining proper configuration of valley metal as the cored-out areasof the shake may show once the shakes are cut. Location of the valley, roof pitch and height of roof should be consideredin determining if the cuts will be visible.Option A: In many cases, with steeper pitched roofs, it is acceptable toinstall a “W” valley and cut the DaVinci Fancy Shake on an angle paralleland 2½" from the center diverter. Keep in mind that the cut rib structureof the shakes may be visible from the ground with some roof pitches. Metalshould be broken with a diverter at least 1" tall.Option ASingle Diverter Valley Metal1"10½"Option B: Where Option A is unacceptable, we suggest making thedouble “W” valley. This should be made from 24" stock that is broken inthe middle without diverter to look like a “V ”. Additionally, there shouldbe a “W” (diverter) on either side 2½" from the center line. (See Diagram)DaVinci Fancy Shake should be cut and laid against the diverters oneither side.Option BTwin Diverter Valley Metal1"10"Valley metal broken from 24" stock.The top corner of the shake closest tothe center of the valley should be cutoff at a 45 angle.Always nail shakes within5” of the center line.MLIGFS-08/18Valley metal (Option A or B)Ice and water shield isrequired in all valleys.Use wider shakes adjacent tovalley where possible.Pg. 6 of 9
INSTALLATIONC LOSED VALLEYSA closed valley can be achieved by using Valley metal option (A, B, or C). In our preferred method, option A,valley metal with a single, narrow-based diverter in the middle is used and the DaVinci Shakes are cut and buttedto the diverter. An alternate is to use standard “W” valley with the shakes butted against the diverter. Lastly valleymetal broken in the middle with no diverter can be used. In this option shakes should be cut to fit flush with matchingcourse on the opposite side. Wider shakes should be used as valley cuts in order to ensure that nailing be kept atleast 5" from center or as far from center as possible.Option AStanding Seam Valley MetalOption A: Install valley with a standing seam in the middle1¼ "and place already-cut DaVinci Fancy Shake against centerstanding seam.Option B: It is acceptable to install a “W” valley and place analready-cut DaVinci Shake against center diverter. Metal shouldbe broken with a diverter at least 1" tall.10½" - 11"Option BSingle Diverter Valley Metal1¼ "10½"Option C: Classic closed valley with no diverter in themiddle of the valley.Option AClassic Closed Valley (no diverter)11½"Valley metal broken from 24" stock.The top corner of the shake closest tothe center of the valley should be cutoff at a 45 angle.Always nail shakes within5” of the center line.MLIGFS-08/18Valley metal (Option A or B)Ice and water shield isrequired in all valleys.Use wider shakes adjacent tovalley where possible.Pg. 7 of 9
SPECIAL ISSUESF LASHINGFold downcounter flashingover step flashing.Flashing should be used in all areasin which the roof abuts a verticalwall, dormer, chimney, skylight orother structural protrusions.Fasten flashingto roof.Use the step flashing method, withcopper, a minimum of 28-gauge cladsteel, or aluminum. The flashingshould extend 4" up vertical walls.Succeedingflashing pieces11" long with4" overlap.First piece offlashing is 11"CounterFlashingApronFlashingMinimum LengthsV ENTILATIONIn some climatic regions of the country, properventilation is crucial to the proper performance ofa roofing system. Proper ventilation is especiallyimportant in cold climates where modern housesare well insulated and weather-tight. We suggestyou follow standard building practices in your areaand meet all national and local building codes. Acontinuous ridge vent is an especially effectiveventilation system that we highly recommend.11"4"4"Continuous VentS NOW G UARDSSnow guards should be considered in all geographicareas where accumulating snow fall is possible.Most kinds of brass, copper, or clad aluminumsnow guard systems work well with DaVinci.Rocky Mountain Snow Guards, Inc. is good sourcefor further information about snow guards. Contactthem at www.rockymountainsnowguards.comor call 877-414-7606. It is recommended that snowguards be installed during the installation of theDaVinci roof although retro-fit snow guards areavailable for previously installed DaVinci roofs.Details regarding installation remain theresponsibility of the installer and the customer.Soffit VentsFor additional information please see Q & A Guide to Snow Guards at /?document id 91.Consult with your local contractor to determine if snow guards would be appropriate for your project.DaVinci makes no representations or warranties about the propriety of snow guard installation on anygiven project. Rather, the decision to install snow guards rests solely with the end user.MLIGFS-08/18Pg. 8 of 9
PRODUCT FEATURESE XPOSUREWith DaVinci Fancy Shake, the allowable exposure depends ontwo factors:1. Roof Pitch2. Whether the shakes are laid staggered or straightR OOF P ITCHC OURSINGExposureAlignmentGuidesE XPOSURELess than 2:12Not Recommended* 2:12 to 4:12Straight or Staggered7"4:12 or greaterStraight or Staggered7"* For slopes between 2:12 and 4:12, an ice water shield is required over theentire area.Nail HolesN AILINGEach shingle should be applied with two copper, non-corrosivestainless steel, or hot-dipped galvanized 3/8" head x 1½" lengthnails. Shakes can be nailed by hand or with a pneumatic nail gun.Don’t overdrive nails or nail at an angle. Keep the nail head flushwith the surface of the shingle to avoid creating “craters” whichcan collect moisture and can also prevent the exposed end ofthe shingles from laying flat. Ring-shank nails are optional forplywood, but must be used for OSB decks and in high wind areas.Natural AppearanceUse these alignment guides with the top edge of the previousrow of shakes to control the exposure.C UTTINGDaVinci Fancy Shake can be cut with a utility knife andstraight edge. Electrical circular saws (carbide blade, twoteeth per inch) or cordless circular saws (a minimum of18 volts is recommended) may also be used.N ATURAL A PPEARANCETo produce the most natural and realistic appearance,DaVinci Fancy Shake is modeled to reflect machine-sawnshingles. Scientifically engineered, reinforcing ribs on theback of the shingle add stability and strength.Please note: DaVinci Fancy Shake is made flat, should bestored flat, and must not be installed unless it is flat and inits original form. If shakes are not stored flat and becometwisted or curled, lay them flat in a warm place and theywill return to their original flatness. Damaged shinglesshould never be installed.Q UICK R EFERENCEI SSUED A V INCIR ECOMMENDSA CCEPTABLEA LTERNATIVESValleyCopper28-gauge clad metalFlashingCopper28-gauge clad metalEaves FlashingCopper28-gauge clad metalNailsNon-CorrosiveStainless SteelHot-dippedGalvanizedFor questions about DaVinci Fancy Shake or its application, contact DaVinci Roofscapes , LLC913-599-0766 or 800-DaVinci (800-328-4624) or www.davinciroofscapes.comPlease be sure to check DaVinci’s website for updates. Installation Guide is subject to change without notice.MLIGFS-08/18Pg. 9 of 9
The number of shingles per square for DaVinci Fancy Shakes is based on the assumption of 3/8" spacing between shakes. If spacing is less, more shingles per square will be required. AVOID "CRACK ON CRACK " The gap between two shingles in one course should always line up 1½" or more from the gap between two shingles in the course below.