Transcription
Designing Your IVR:A Quick Setup Guide to Using Easy-IVR
INTRODUCTIONSetting up a Contact Center means bringing together a number of important elements.One of those is Interactive Voice Response (IVR) systems. An IVR is what customerstypically hear when calling a company – for example, “thanks for calling Acme Inc.For Sales, press 1. For service, press 2.” In essence, IVRs present a greeting, captureinformation, and efficiently route the call to the appropriate agents.Easy-IVR, available on Contact Center Pro and Elite plans, simplifies the steps involved- and the interface used - to significantly streamline the process of creating an IVR,without requiring any advanced technical knowledge.This document is not intended to serve as an exhaustive “how-to” library of creatingIVRs, but rather as a go-to-guide to help with next steps, knowing where to look,and how to use Easy-IVR efficiently. It includes an overview of the requirementsand best practices for using Easy-IVR to set up one or more IVR systems in yourcontact center.OVERALL PREPARATIONYou can think of the elements listed below – queues, phone numbers, etc. – as buildingblocks for your IVR, and the Easy-IVR wizard as an assembly line. The more blocks youhave prepared in advance, the shorter your build time is likely to be.To deliver an optimal experience, you first need to understand how you want customersto interact with agents, and where you want callers to go. It’s best to give some thoughtto your call flow before starting.Example Scenario: You run a healthcare clinic. Callers have several common needs: book an appointment (the most common),locations and hours, and contact the Pharmacy team. The Pharmacy team is an outside group, at a different phone number.Using Easy-IVR, you could create an IVR that: Routes appointment requests to the appropriate agents; Reads out a prompt that answers common questions such as hoursand location; and Sends calls for the Pharmacy team to the external phone number.QUEUESThe cornerstone of most IVRs, this is the most common option for connecting callersto agents. In essence, a queue receives an inquiry, maintains the caller’s place in line,and delivers the call to an agent as soon as one is available.There are two ways to use queues in Easy-IVR: by selecting from queues that are alreadybuilt (via your Contact Center admin interface), or by creating queues on the fly inEasy-IVR. You can use Easy-IVR to add as many queues as needed to your IVR instance.Your only limitation is the number of buttons on the phone keypad, namely nine (9).Designing with Easy-IVR: Best Practices2
PHONE NUMBERSPhone numbers can be used for several purposes in an IVR. Some Contact Centers mayrequire DIDs for functions such as blind transfer to outside parties. You might use this,for example, if you have a secondary group that fields sales calls after hours.PROMPTSPrompts are simply recorded audio files, which must be provided in WAV format.It's best to have a collection of pre-recorded prompts to cover all levels and optionsin your IVR. Here's a list of the basic prompts you're likely to need; your deploymentmay require additional files beyond these. Welcome prompt. To introduce the company. Language menu prompt. If your IVR will offer multiple languages, this promptwill explain the options to the caller, and prompt them to make a selection.*Special note - Using multiple languages will increase the number of promptsrequired. Each prompt (other than the Welcome and Language menu prompts)will need to exist in every available language. Main menu prompt. Once the caller has made a language selection (or ifthere is only one language), they'll arrive at the main menu. This is whereyou'll present them with options to get to the person or department they need.Another common example is "Press 1 for Sales, 2 for Support, or 3 for Billing."Easy-IVR will allow you to enter multiple options, from 1-9 (corresponding to thecaller's keypad). After-hours prompt. For when some or all queues are closed and outside ofregular hours. No agents prompt. For cases where the caller is able to dial in during regularhours, but no agents are available. This is usually considered an emergencysituation, or at least an unexpected one, e.g. a fire drill, local network outage,or some other unexpected event that is preventing the agents from logginginto the software.You can overwrite the audio files later, from the Prompt Files page (Configure General Prompt Files).PROMPTS – DESCRIPTIONSFor each prompt, you'll be asked to enter a description. While it can be just a fewwords, we recommend you include enough detail to easily tell the prompts apartand know what fits where.SCHEDULESThe default value is 24/7, but if your Contact Center requires schedules,you'll need to have them defined in advance. You can do this via Configure General Working Hours.Designing with Easy-IVR: Best Practices3
In Easy-IVR, schedules can be applied to the main menu and to any queues thatexist. If you have additional queues for different languages, each of them canhave its own schedule.Note that if you chose to leave the hours as 24/7, the no agents message will playwhen the contact center is closed. Create an appropriate prompt for that situation.EASY-IVR STEPSNew vs. existing IVRs: If you’re creating a newIVR, click “Create New IVR” button. To edit anexisting IVR, click the Pencil icon, which will beavailable if your IVR was created via Easy-IVR.After that, the steps are virtually identical. Formore detail see “Optimizing an Existing IVR.”1 GeneralA) Give your IVR a name.B) Specify language(s). Note that theanguage selection will put the user on a"track" of sorts, wherein the options andprompts they'll hear will be in the chosenlanguage only. However, the user canalways press the pound key to return to theprevious level and choose a new language.Also note that using multiple languages willincrease the total number of recorded prompt files.C) Provide the description for your Welcome prompt.D) Upload the recorded prompt file.E) (If multiple languages will be used) Set a selection button for eachapplicable language.2 MenuHere you'll specify the main menu options, what/who they connect to, and whatkeys the user will press to select each option. You’ll first enter the following:A) Menu prompt - Description.B) Menu prompt - Upload WAV file for each language in use.C) Set up menu options. Each numerical option corresponds to the key the callerwill press to make a selection. As an example: "Press 1 for Sales, 2 for Support."Designing with Easy-IVR: Best Practices4
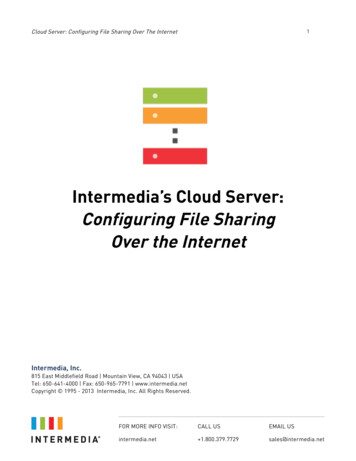
Next you’ll move to MenuOptions.There are three possibleactions for each menu option: Queue Blind Transfer VoicemailNot Setup is a fourth optionthat means that keypadselection is invalid. Nothingwill happen if the callerchooses an option that’sconfigured as Not Setup.The Queue option will transfer to the selected queue. This is the most common option,and requires the following elements:A) Queue selection - Pick a queue. Or if no queue has been created yet, click the button to create a new queue on the fly. Any queue you generate here will beavailable in future IVRs.B) Playlist for queue - Choose initial music track (these are populated by the system),the prompt description, and the recorded prompt file for each language. Repeatthis process for the on-hold music, the on-hold prompt description, and the onhold prompt files in each language. The only available playlist is 30 seconds music,prompt, 30 seconds of music, prompt, repeat. Each prompt can be different, or thesame file can be uploaded in both prompt slots.C) Blind transfer sends the call to a number from your DNIS list or a new one thatyou enter manually. This could, for example, be a third-party team that handlescalls under certain conditions, or perhaps a different location / branch.Voicemail plays a provided prompt. Again, you'll need a description, plus a WAV filefor each language. VM then records the caller's message, and sends it to an e-mailaddress of your choosing.Not Setup means this option, and the corresponding keypad number, are not in use.As an example, if the 6 key was flagged as Not Setup, the user pressing 6 wouldhave no effect.*Note: The pound (#) key is reserved for the "Return to previous menu" function.Designing with Easy-IVR: Best Practices5
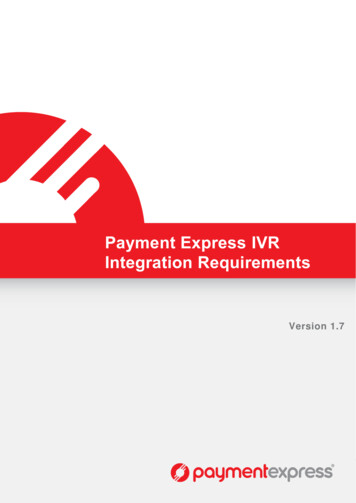
3 SCHEDULESHere you'll select the schedule touse for the main menu, as well asany queues you selected in theprevious step.Specify the schedule to use for themain menu. The default value is"Open 24/7."For any queues you've selectedin Step 2, you'll need to specifyschedules.If you're using different languages,you have the option to select adifferent schedule for each queue.As an example, the Billing queue could use "Regular weekday" hours for the Englishoption, and "Extended Pacific hours" for the Spanish option.This way you can close your entire IVR if call queues are closed, preventing callers fromneeding to make a selection. You can also close only certain selected queues, allowingcallers to reach the menu in the event that at least one queue is open.Designing with Easy-IVR: Best Practices6
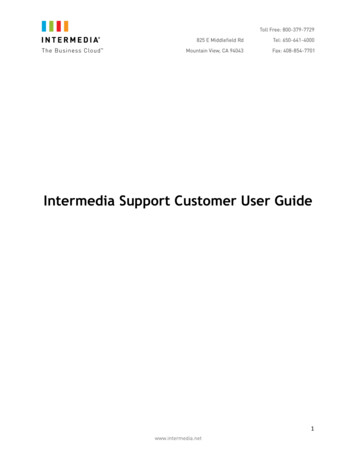
4 OFF-HOURSThere are two componentsto this final step: After-hourstreatment, and No agenttreatment. The first applieswhen callers attempt to dial inoutside of the schedules youset in Step 3; the second applieswhen the current time is withinbusiness hours, but the callerarrives in a queue that currentlyhas no agents.For both conditions, therequirements are the same:A) Provide a descriptionof the prompt to play.B) Upload the recordedprompt file, for eachlanguage if applicable.C) Choose a behaviour foreach queue you’ve set up:1. Blind Transfer2. Voicemail3. Hang up5 PUBLISH!Once you’ve specified the behaviour for both conditions and all queues, you’llbe able to Publish. Easy-IVR will now check your work for any potential issues.If a problem is found, the wizard will call it to your attention via on-screen textin a conspicuous colour. You can go back through each step, addressing issuesas they appear, without losing any of your work. Upon successful publishing,your new IVR should be live in a matter of minutes!
OPTIMIZING AN EXISTING IVRIn most cases, changing an existing IVR will require less preparation. This sectiontherefore omits elements such as writing prompt descriptions and uploadingrecording files.To edit an existing IVR, start at the same page: Configure Inbound Voice IVRs.Please see the below screenshot for reference.Existing IVRs that were created via Easy-IVR can be edited here. They will showa Pencil icon, and will have a status of either Published or Draft.IVRs that are still in Draft mode can be deleted; once an IVR is published you canstill edit it but not delete it.Note that IVRs showing a Gear icon were created in the IVR Studio tool; while youcan see them in the list and make changes to their Advanced Settings, these IVRscannot be edited via the Easy-IVR interface.Once you click the Edit icon, the steps for optimizing your existing IVR will beessentially identical to those listed in the above section. You can follow thosesteps starting from 1 – General (Pg 4).J.D. Power 2019 Certified Assisted Technical Program, developed in conjunction with TSIA.Based on successful completion of an audit and exceeding a customer satisfaction benchmarkfor assisted support operations. For more information, visit www.jdpower.com or www.tsia.com.Intermedia Unite, SecuriSync, VoIP Scout, AnyMeeting and HostPilot are either trademarks orregistered trademarks of Intermedia.net, Inc. in the United States and/or other countries. 2021 Intermedia.net, Inc.Questions? Contact Intermedia today.800.379.7729 sales@intermedia.comintermedia.comRef#: 1262A DIR Guide for Easy-IVR DATA EN US 102220
There are two ways to use queues in Easy-IVR: by selecting from queues that are already built (via your Contact Center admin interface), or by creating queues on the fly in Easy-IVR. You can use Easy-IVR to add as many queues as needed to your IVR instance. Your only limitation is the number of buttons on the phone keypad, namely nine (9).