Transcription
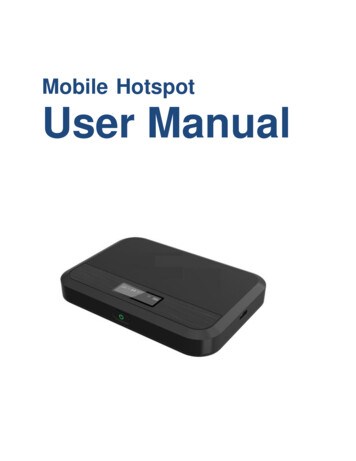
T9 Franklin Mobile HotspotUser Manual
ContentsGetting Started .1Overview . 2System Requirements . 2Components . 3Device Display . 5Battery Management . 6Using Your T9 .7Accessing the Network . 8Using Your T9 for the First Time . 8System Requirements . 8Installing the LTE Nano SIM Card. 8Charging the Battery . 9Connecting to Your T9 . 10Wi-Fi Name (SSID) and Password .10Connecting to the Internet .11Using Your T9 after Setup is Complete . 11Mobile Hotspot to share connections .11Wi-Fi and Mobile Hotspot (http://mobile.hotspot) Security .11Updating Your T9 software . 12T9 Settings. 13Managing Your Mobile Hotspot . 14Access the T9 Mobile Hotspot home page .14Home . 15Messages . 16On the T9 device display .16On the T9 Mobile Hotspot Home page .16Settings . 17Wi-Fi .18Mobile Network .22Device .26Advanced Router .29About . 34Support . 35Troubleshooting . 36Overview . 37First Steps . 37Common Problems and Solutions . 37
Regulatory Information . 39Regulatory Statements . 40FCC Equipment Authorization ID: XHG-R717 .40Body-Worn Operation .40Safety Hazards . 41Trademark . 43Glossary . 44Glossary . 45
1Getting StartedOverviewComponentsDevice DisplayBattery Management1
OverviewThank you for choosing T9, LTE Mobile Hotspot!Having the T9 at your fingertips will allow you to access LTE network for fast uploads anddownloads. You can also connect up to eight Wi-Fi capable devices to the Internet at once laptops, tablets, eReaders, Smartphones and more.System Requirements Compatible with all IEEE802.11b/g/n/ac Wi-Fi enabled devices.Works with the latest versions of most browsers*.* It is recommended to use the latest versions of Internet browsers. Outdated versions may not becompatible with the T9 Web Admin User Interface, http://mobile.hotspot or http://192.168.0.12
Components3
1. Power/Menu Button – Turn on/off T9. Shows device menu and informationButton OperationOperationsTurn OnTurn OffDisplayWake-UpInfo DisplayActionsPress and hold the button for 3 seconds.Press and hold the button until “Goodbye” messageappears.When the display is off (sleep mode), the first quick pressof the button wakes up the display.When the display is on, press the button quickly to gothrough the device menu and information.LED IndicatorColorsOffSolidBlinkingCharging StatusPower off.Power off and connected to a charger.Power on/Operating normally2. Display – Provides device status information such as battery, service signal strength, thenumber of users connected with Wi-Fi etc.3. Charger Port – The USB charger connects here.4. Back Cover Notch – Lift the notch to open the back cover.5. Reset Button – To perform reset of your device, gently press and hold the button for 3seconds, then release.6. SIM Card Stopper – Lift the stopper to insert or replace the Nano SIM card.7. Battery contact – Insert the battery to align with the battery contacts.8. SIM Card Slot – The SIM card installation slot.4
Device Display5
Battery ManagementYour T9 is equipped with a replaceable and rechargeable battery. It works from its chargedbattery alone, or when the device is plugged into a power source.Note: Please do not attempt to open or disassemble your hotspot and the battery pack. Doingso may cause damage that voids your warranty.Charge the battery with the charger provided together with your hotspot. While the battery ischarging, the battery charging icondisplays.IMPORTANT! Please use only an approved charger to charge your hotspot. Improper handlingof the charging port, as well as the use of an incompatible charger, may cause damage to yourdevice and void the warranty.6
2Using Your T9Accessing the NetworkUsing Your T9 for the First TimeConnecting to Your T9Using Your T9 After Setup is Complete7
Accessing the NetworkWork effectively outside the home or office with the reliable broadband speed that the LTEservice provides. You can connect to the internet at speeds fast enough to keep up-to-date onall your email correspondence, download attachments, and access your corporate intranet.Using Your T9 for the First TimeSystem RequirementsYour computer, tablet, or other wireless devices need Wi-Fi capability and Internet browsersoftware only. Your T9 is compatible with most major operating systems and the latest versionsof browsers.Installing the LTE Nano SIM CardYour SIM (Subscriber Identity Module) card is a small rectangular plastic card that storesimportant information about your wireless service.If not already inserted, follow the instructions below to install your LTE Nano SIM card.1. Remove the back cover of your device and take the battery out.2. Lift the “LIFT” tab and slide your Nano SIM card in the SIM card slot with Wireless Carrierlogo facing up. After installation, secure the “LIFT” tab back into place.3. Properly install the battery and put the back cover on.IMPORTANT! Do not bend or scratch your Nano SIM card. Avoid exposing your Nano SIM cardto static electricity, water, or dirt. Whenever you insert or remove the SIM card, ensure your T9is powered off and is not connected to any power source. Never use tools, knives, keys, or anytype of object to force the door open or to remove the Nano SIM card.8
Charging the BatteryBefore using your mobile hotspot, ensure that the battery is fully charged. Be sure to use thecharger that came with your device.NOTE: Your T9 is equipped with a replaceable rechargeable battery. When handling the batteryor SIM card, please make sure the device is not connected to any power sources. Do not use anytools, sharp objects or any utensils when dealing with the battery. Doing so may cause damagethat voids your warranty. It normally takes 3 5 hours, depending your power sources and device status to fullycharge the battery.The battery discharges faster as additional devices connect to your hotspot.Battery life depends on the network, signal strength, temperature, features, and activeconnection time.When charging, keep your device near room temperature.Never leave the T9 in an unattended vehicle due to uncontrolled temperatures that may beoutside the desired temperatures for your device.It is normal for batteries to gradually wear down and require longer charging time.9
Connecting to Your T9Wi-Fi Name (SSID) and PasswordYou can find your Wi-Fi Name and Password any time you need. Just press the power/menubutton () shortly when the display is on.PressquicklyPressquicklyData usage displayPressquicklyWi-Fi Name displayPressquicklyPassword displayPressquicklyWeb Admin URL Guide displayPressquicklyBack to Home screen10Home screen, Device menu guide(Switching every 3 seconds)
Connecting to the Internet12Open the Wi-Fi application or controls on your laptop or Wi-Fi capable device that you wantto connect to your T9. Then find your T9’s Wi-Fi name.Click Connect and enter the Password when prompted.NOTE: The last four characters of your Wi-Fi Name is unique for your T9. You can change theWi-Fi Name of your own. See “Settings”.Using Your T9 after Setup is CompleteMobile Hotspot to share connectionsYou can use your T9 as a wireless mobile hotspot to connect to a total of eight Wi-Fi capabledevices to the mobile broadband network.Wi-Fi and Mobile Hotspot (http://mobile.hotspot) SecurityThe T9 comes from the factory with security turned on. By default, Mobile Hotspot password is‘admin’. Your Mobile Hotspot password is always the same as ‘admin’ unless you change it inthe Mobile Hotspot home page.You can create your own Mobile Hotspot password by signing into the Mobile Hotspot homepage. After you change your own Mobile Hotspot home password, you will be required to usethe new password to sign in to the Mobile Hotspot home page.To change your Mobile Hotspot home password:123Connect your Wi-Fi capable device to your T9.Open a web browser and enter http://mobile.hotspot or http://192.168.0.1.From the Web UI, click Settings Device Web Interface.11
Updating Your T9 softwareNew software is updated automatically in the following scenarios.1) Every power up the device will check for a new SW update.2) If a new update is available it will be downloaded in the background and wait to beapplied on the next power off.3) The device must have at least 40% battery or 20% on charger to apply an update.4) If the device is on AC power all the time and an update is available the device willdownload and wait to apply the update in 48 hours between the hours of 2-4am. It alsowill be updated when the device turns off.5) If there is traffic or data activity for at least 1 minute at the 2-4am window the device willwait until next day 2-4am window (24 hours later) to apply the update.Update startsUpdatingUpdate successfully12Update failed
3T9 SettingsManaging Your Mobile HotspotHomeMessagesSettingsAboutSupport13
Managing Your Mobile HotspotAccess the T9 Mobile Hotspot home pageYou can access your Mobile Hotspot device information using an internet browse.Access T9 Mobile Hotspot using a browser123Connect your Wi-Fi capable device to the T9.Open a web browser on your connected device and open your home page by enteringeither http://mobile.hotspot or http://192.168.0.1.Enter the password and Click Login. If you entered the correct password, the Web UserInterface screen appears.NOTE: The default password is 'admin'. On your first login, you will be directed to 'Changepassword'14
HomeThe T9 Mobile Hotspot home page allows you to quickly access all menu options for your T9. MessagesSettingsAboutSupportCheck status of network connection and data usage on the Home page. Disconnect: Click Disconnect to disconnect the Internet. Reset: Reset data usage.15
MessagesMessages page displays SMS messages sent to you by Wireless Carrier.On the T9 device displayThe number of unread messages displays to the right of the message icon.When a new message arrives, the message icon appears. A maximum of 20 messages can bestored.On the T9 Mobile Hotspot Home pageYou can see the message contents by pressing the Messages menu on your Mobile Hotspothome page. To delete a selected message, click the trash bin icon to the right of the messagedate and timeline. To delete all messages, click Delete All Messages button.The Message page allows you to view the message contents by pressing the DeviceMessages menu on your T9 Mobile Hotspot Admin home page. To delete a selectedmessage, click the trash bin icon to the right of the message date and timeline. To delete allmessages, click Delete All button.16
SettingsThe Settings page has the following menu options. Wi-FiMobile NetworkDeviceAdvanced Router17
Wi-FiThe Wi-Fi menu contains the following options:-Basic : the basic wireless network parameters18
--Multi SSID: Select ON if you like to set up a separate guest Wi-Fi network. Your T9will broadcast two Wi-Fi Names.Guest Wi-Fi: If ON is selected for Multi SSID, Guest Wi-Fi menu will appear. You canchange Guest Wi-Fi settings.Multi SSID Isolation: If On is selected, it prevents your devices from communicatingacross the Main and Guest Wi-Fi access points.Allow Guest Wi-Fi users to access the Web interface: If the box is checked, users onthe Guest Wi-Fi also can access the Web User Interface.Wi-Fi Name: Service Set Identifier (SSID). To change it, enter a string less than 32characters as the name for your wireless local area network (WLAN).Wi-Fi Password: To change, enter the new Wi-Fi password. The password needs tobe at least 8 characters long. l Privacy Separator: If ON is selected, your devices onthe same Wi-Fi Name can't make Local Area Network communication.Wi-Fi Band: It supports both the 2.4- and 5GHz bands of wi-fi spectrum for topthroughput. You can choose Wi-Fi Band depends on your preference.NOTE: if you connect WLAN printer to your T9, Privacy Separator should be OFF to sendfile from your PC to the printer-SSID Stealth: If ON is selected, the Wi-Fi name won't be found by other devicesaround it. You need to manually enter the Wi-Fi name and connect.Authentication Method: The authentication methods are described iptionApply both the WPA-PSK and WPA2-PSK scheme.WPA-PSK is the securer version of WPA withimplementation of the 802.11i standard.Authentication via Shared Key protocol.Authentication and encryption won't be performed.There are risks that private info will be intercepted ornetwork will be used by unauthorized individuals.Encryption Method: Select an encryption method from the drop-down list.Maximum Connections: Choose the maximum number of the devices which connectto your device simultaneously. You can also click the right or left arrow to distributethe maximum number of the connected devices between the Main Wi-Fi and theGuest Wi-Fi.19
-Display Wi-Fi Name: If ON is selected, the Wi-Fi Name will be displayed on yourR850 device display menu.Display Wi-Fi Password: If ON is selected, the Wi-Fi password will be displayed onyour T9 device display menu.Wi-Fi Settings Reset: Click the Reset button to reset all Wi-Fi settings to the default.AdvancedThese advanced settings should only be changed for specific circumstances. Changes tothe advanced settings could result in loss of Wi-Fi connection with your devices. Consultyour devices’ manuals for Wi-Fi specifications.1. From the Web UI, click Settings Wi-Fi Advanced to view the wireless networkadvanced parameters (2.4GHz, 5GHz)and the WPS settings shown in the followingfigure.- 802.11 Mode: Select an 802.11 mode from the drop-down list.- Wi-Fi Channel: Select a Wi-Fi channel from the drop-down list.2. Click Save Changes to save your settings.NOTE: Default Inactive Time is 10 minutes. If the T9 is inactive for more than 10 minutes, itis required to press the power button to connect to Wi-Fi.20
-Connected DevicesThe Connected Devices menu contains the following options:- Main Wi-Fi Devices – Normally this is the hostname of the connected device as seton the connected device. You can use the pencil tool to change the name of anyconnected device.- MAC Address – The MAC address is a unique network identifier for this connecteddevice.To Edit a Connected Device:1. Click on the Edit. A page opens, allowing you to edit the name of the device.2. Update the name of the device and click OK.21
Mobile NetworkManage your mobile network settings.-Mobile Settings1. From the Web UI, click Settings Mobile Network Mobile Settings. The MobileSettings page is shown in the following figure.- Manage Connection Mode You Prefer: Auto Connect on or off.- Roaming: Turn Data Roaming on or off. Turn it ON to require confirmationbefore connecting to the roaming network.CAUTION! Allowing roaming could result in additional service charges.2. Click Save Changes to save your settings.22
-APNFrom the Web UI, click Settings Mobile Network APN. The default APN parametersare shown in the following figure. You can use the default APN to connect to the Internet.You can also add new APNs.To add a new APN, follow the steps below:1. Click Add to access the following page.23
3. Enter the related parameters as described in the following table.DescriptionParametersType the profile name.NameUser name is used to obtain authentication from the ISP whenUser namethe connection is established.PasswordAuth(Authentication)4.Password is used to obtain authentication from the ISP whenthe connection is established.Password Authentication Protocol (PAP) provides a simplemethod without encryption for the peer to establish its identityusing a 2-way handshake. Challenge-Handshake AuthenticationProtocol (CHAP) is used to periodically verify the identity of thepeer using a 3-way handshake.Click Save Changes to add the new APN.Additional APN Options- To activate the new APN, check the circle in front of it and then click Save Changes.- To edit the new APN, click Edit, change the settings, and then click Save.To delete the new APN, click Delete.NOTE: The default APN cannot be edited or deleted.-SIM1. From the Web UI, click Settings Mobile Network SIM. The SIM PIN lock is disabledby default. You can enable it by entering SIM PIN.2. Enter the SIM PIN and press Save Changes to save your settings. The SIM Status willbe changed to Enabled. Once the SIM PIN Lock is enabled, you need to enter SIM PIN24
to connect to the mobile broadband network each time you power on your T9.NOTE: If you enter the wrong SIM PIN three times, your SIM will be disabledpermanently until you enter the PUK code from your service provider.-AdvancedAdvanced Mobile Network Settings should only be used as directed by T-Mobile CustomerService personnel. Certain advanced options will reset your device's connections andprogramming and will require reactivation.1. From the Web UI, click Settings Mobile Network Advanced to set the mobilenetwork advanced settings on this interface.- Factory Reset: Click Factory Reset to reset the modem to the factory default value.25
Device-Preferences1. From the Web UI, click Settings Device Preferences.- Device Display Timeout: Select a timeout time from the drop-down list. Your T9 displayturns off after this timeout period if there is no menu button action.- LED Enable: If ON is selected, the LED indicator next to Your T9 display will blink whenthe device is on. This LED is a power indicator that shows the device is on when thedevice display is off.2. Click Save Changes to save your settings.-Data Usage1. From the Web UI, click Settings Device Data Usage.2. Choose Day of Month, Usage Limit and Click Save Changes to save your settings.26
-Web Interface1. From the Web UI, click Settings Device Web Interface.- Display Password: If ON is selected, the Web Interface admin password is displayed onyour T9 device display menu.- Change Password:- Current Password: Enter the current password.- New Password: Enter the new password.- Confirm New Password: Enter the new password again.2. Click Save Changes to save your settings.27
-Backup and Restore1. From the Web UI, click Settings Device Backup and Restore to access menus toback up your device settings to your computer, restore from the backup and restore yourdevice to its factory default settings.To back up your device settings to your computer, follow the steps below:a. Click Back Up Now.b. Click Save on the pop-up window.c. Choose a location on your computer to save the backup file.d. Click Save.To restore from the backup, follow the steps below:a. Click Choose File to select the backup file in your computer.b. Click Restore now.To restore your device to its factory default settings, follow the steps below:a. Click Restore Factory Defaults.b. Click OK to confirm the command.28
Advanced RouterConfigure LAN, Firewall, and Customization settings.-LAN1. From the Web UI, click Settings Advanced Router LAN Settings to display the routerinformation shown in the following figure.- IP Address: IP address for Web User Interface.- Subnet Mask: Subnet mask for the IP address.- VPN Pass-through: VPN pass-through must be enabled if you want to allow VPN tunnelsto pass through your device’s firewall.- DHCP Server: Enable or disable DHCP Server function.- DHCP IP Range: Allocate begin and end IP address for IP Range.- DHCP Lease Time: Define how long the leased IP address will be. The new IP addresswill be relocated after the IP address is expired.- DNS Manual Mode: Turn DNS manual mode on or off.- UPnP: Turn UPnP (Universal Plug n Play) mode on or off.- NAT Timeout: Set TCP NAT time.2. Click Save changes to save your settings.29
-FirewallFrom the Web UI, click Settings Advanced Router Firewall. You may set up firewallrules to protect your network from virus and malicious activity on the Internet.IP Address FilteringTo set IP Address Filtering rules, follow the steps below:1. Turn on the Firewall Switch.2. Turn on the IP Address Filtering.30
3. Click Add.4. Enter the related parameters as described in the following table.ParametersLAN IP AddressLAN PortWAN IP AddressWAN PortProtocolStatusDescriptionEnter the LAN IP addressSet the LAN portEnter the WAN IP addressSet the WAN portSet which protocol will be used for filteringSet how to handle the packet if it matches with the rule5. Click Save Changes to save your settings.31
Port MappingTo set port mapping rules, follow the steps below.1. Turn on the Firewall Switch.2. Turn on Port mapping.3. Click Add.ParametersNameDescriptionEnter a name for the rule32
WAN PortLAN IP AddressLAN PortProtocolStatusSet the WAN portEnter the LAN IP addressSet the LAN portSet which protocol will be used for filteringSet how to handle the packet if it matches with the rule5. Click Save Change to save your settings.33
AboutView your device's connection information, firmware information, WWAN information, Wi-Fidetails and device information.From the Web UI main screen, click the About tab to view the available information.34
SupportObtain support information from the Web UI Support Tab.From the Web UI main screen, click the Support tab to view the available options.35
4TroubleshootingOverviewFirst StepsCommon Problems and Solutions36
OverviewThe following tips can help solve many common problems encountered while using the T9.First Steps1234Make sure you are using your T9 in the correct geographic region (within coverage).Ensure that your wireless coverage extends to your current location by using the interactiveWireless Carrier’s coverage map tool.Ensure that you have an active service plan.Restarting your computer and your T9 can resolve many issues.IMPORTANT! Before contacting customer care, be sure to restart both your T9 and any devicethat is currently connected.Common Problems and SolutionsT9 just powered off without pressing the Power/Menu button. Why?This may occur under Battery depletion.To restore power, manually press and hold the Power/Menu button to turn on your T9. If thebattery is depleted, charge the battery with the AC charger provided.IMPORTANT! If the power button will not start your T9, please try Power Reset (see How do Iperform a Power Reset on T9? below).How do I perform a Power Reset on T9?Using the power button: Press and hold the power button for 10 seconds until the T9 restarts.By replacing the battery: If pressing and holding the power button for 10 seconds does notrestart the T9, open the battery cover, take out the battery and re-install the battery after 5seconds. Put the battery cover back and turn on the T9 by pressing the power button.37
How do I perform a Reset?Using the reset button: Remove the back cover. Make sure the battery is installed and your T9is on. Press down the reset button for 3 seconds and release. Then, yo
logo facing up. After installation, secure the "LIFT" tab back into place. 3. Properly install the battery and put the back cover on. IMPORTANT! Do not bend or scratch your Nano SIM card. Avoid exposing your Nano SIM card to static electricity, water, or dirt. Whenever you insert or remove the SIM card, ensure your T9