Transcription
Department of Defense Electronic InvoicingWide Area Workflow –Vendor Getting Started GuideWAWF 사용 안내서 - 밴더(납품업체)Prepared by: The Defense Finance and Accounting Service, eSolutions OfficeDocument Version Date: 17 January 2011Document Version: 5.0
Table of ContentsWAWF Getting Started for Vendors . 1밴더(납품업체) WAWF 사용입문Verifying the EB POC in CCR . 14CCR 내 EB POC 확인하기Registering in WAWF User ID & Password - Vendor . 16WAWF 사용자 ID & 패스워드 등록하기-밴더(납품업체)
WAWF Getting Started for VendorsIntroductionThank you for your interest in Wide Area Workflow. This guide will helpyou get started using WAWF. In addition to this guide feel free to access thefollowing web links for additional information and training on WAWF:WAWF 에 관심을 가져주셔서 감사합니다. 이 안내서는 WAWF 를 처음 사용 할 경우도움이 될 것 입니다. 이 안내서 외에도 다음 웹 사이트에 접속하면 WAWF 교육에관한 추가 정보를 얻을 수 있습니다.WAWF General Information and RegistrationWAWF 일반적 정보 및 등록https://wawf.eb.milWAWF Training Database (great place to practice using WAWF)WAWF 교육자료(WAWF 를 이용해 실습 가능)https://wawftraining.eb.milWAWF On-line Training Course (great place to begin learning WAWF)WAWF 온라인 교육 과정 (WAWF 를 처음 교육 받을수 있는곳 )www.wawftraining.comDFAS Electronic Commerce End Users Tool Box (register for classroomtraining and obtain user guides)DFAS 전자 상거래 엔드 유저 툴 박스 (교육을 받기 위해서 등록 후 사용자 안내서를 oniccommerce/wawftrain.htmlOverviewGeneral Steps for a Vendor to follow to use WAWF:WAWF 사용을 위해 밴더가 따라야 할 기본적단계Steps1 DescriptionRegister with the Central Contractor Registry (CCR)CCR (Central Contractor Registry)에 등록2Establish and Electronic Business (EB) Point of Contact (POC) in CCRCCR 의 전자 업무 담당자(EB POC) 설정3Register of Electronic Document Access (EDA) (Optional)EDA 등록(선택사항)4Ensure CAGE Code is added to WAWF Group StructureCAGE 코드가 WAWF 에 추가 되었는지 확인5Establish an Organizational Email Address업체의 이-메일 주소를 설정1
6Designate a Group Administrator Manager (GAM)그룹관리자(GAM) 지정7Determine if batch feeds for data input is necessary데이터입력을 위한 일괄입력설정여부 결정8Set up PCs to Access WAWFWAWF 접속을 위한 PC 설정9Self Register GAMGAM 으로 자기-등록(Self Register)할것10Have all users for the CAGE Code(s) self-register on the WAWFweb site for one of the available Vendor Roles.WAWF 웹사이트에 모든 사용자가 자기-등록해 사용가능한 밴더역할을받도록함11Practice Using WAWFWAWF 사용연습Continued on next page2
WAWF Getting Started for Vendors, Continued1st Step Register with Central Contractor Registry (CCR)CCR(Central Contractor Registry)에 등록 All vendors must be registered in the CCR in order to sell goods and servicesto the Department of Defense (DoD).모든 납품업체(vendor)는 국방성(DoD)에 물품 및 서비스 납품 시 반드시 CCR 에등록해야 함. (아래의 CCR 등록 사이트 참조)Register at URL http://www.ccr.gov/ (External Link). For help with registration in CCR, contact Federal Service Desk at 866-6068220 or 334-206-7828. If you do not know your CCR POC, you can contact theFederal Service Desk.CCR 등록 관련 문의는 CCR 지원 센터 1-866-606-8220 또는 334-206-7828 로 연락.해당업체 CCR 담당자를 모를 경우 지원센터(contact the Federal Service Desk) 로 연락3
2ND Step Establish or verify the Electronic Business (EB) Point of Contact (POC) in CCRCCR 내 전자업무 담당자(EB POC) 설정 혹은 확인 To facilitate electronic commerce between vendors and DOD, vendors must establishan EB POC for their company in CCR.업체와 DoD간의 전자 상거래를 위해, 업체는 반드시 CCR 내 자사의 전자업무담당자(EB POC)를 설정 해야 함. The EB POC will be responsible for authorizing vendor employee(s) access to submit,modify and/or view data on behalf of the vendor. In WAWF terminology, the EBPOC also functions as the Group Administrator (GAM). The GAM is your company's"Gate Keeper" and will be responsible for authorizing access to WAWF for all yourcompany's employee(s).EB POC는 업체의 직원이 문서를 제출, 수정 및/또는 업체를 대신해 데이터 조회를 위한 액세스를 인가하는 책임을 지게 될 것임. WAWF 용어 중 EB POC는 그룹 관리자(GAM)로서의 역할도 함. GAM은 업체의 “게이트 키퍼(문지기; 출입확인담당자)”가 되며 업체 모든 직원의 WAWF 액세스 인가를 책임지게 될 것임. The CCR POC is responsible for entering EB POC data in CCR.CCR 의 담당자는 전자업무 담당자(EB POC)관련 데이터를 CCR 에입력해야하는 책임이 있음 To see if an EB POC is listed for a specific company, go to http://www.ccr.gov/(External Link) and click on "CCR Search". Where prompted, enter the DUNSNumber or CAGE Code or Company Name and click the "Search" button. If you arepresented with a list of DUNS numbers, you will need to pick the specific location andclick on the Detail link. Scroll to the bottom of the Inquiry Results page. There youcan see if anyone is listed as the EB POC. If no one is listed, the company has notidentified an EB POC yet.특정업체의 전자업무담당자를 확인하려면, http://www.ccr.gov/ 에 접속 후"CCRSearch"를 클릭. 해당 란에 DUNS Number 또는 CAGE Code 또는 Company Name을 입력 후 "Search" button 을 클릭. 업체의 DUNS number 가 많을 경우, 특정지역(specific location)을 지정후 Detail link 를 클릭.Inquiry Results 페이지 하단에서 EBPOC 명단을 확인 할 수 있으며, 명단에 없을경우, 그 업체는 EP POC 을 아직 지정하지 않은것임 If a vendor sees that there is no one listed as their EB POC, they need to contact theCCR POC and ask the CCR to update the company's registration to include the EBPOC.업체의 EB POC 가 명단에 없을경우 CCR 담당자(CCR POC)에게 업체의 EBPOC 를 업데이트 시켜달라고 요청할것 Each vendor can establish up to two EB POCs one primary and one alternate EB POCfor each Cage/DUNS code.각 업체(Vendor)는 각 Cage/DUNS 코드에 대한 두 사람 (주 와 종)의 전자업무 담당자(EB POC)를 설정할 수 있음.4
WAWF Getting Started for Vendors, Continued3rd Step Register for Electronic Document Access (EDA). (Optional Step, but recommended.)EDA 에 등록(선택사항이지만 권고사항) Electronic Document Access (EDA) acts as a virtual file cabinet for the storage andretrieval of multiple types of acquisition documents to include Purchase Orders andpost-award contracts. Vendors may be authorized to view contract documents thatmatch their validated DUNS or CAGE codes.EDA 는 실질적인 파일 케비넷 역할로 구매의뢰서(Purchase Order)와 성립된계약(post-award contracts) 을 포함한 다양한 타입의 접수서류를 저장 및 검색할 수 있게 함. 업체는유효한 DUNS or CAGE codes 와 일치하는 계약서를 볼수있도록 허가받을수 있음. Go to the following URLhttp://eda.ogden.disa.mil/users guide/access/Registration/reg002 VendorSteps.htmlfor instructions. (External Link).자세한 지시사항은 위의 사이트를 접속5
4th Step Have your CAGE Code added to the WAWF Group Structure업체의 CAGE 코드를 WAWF 에 추가 Your CAGE Code/s must be added to WAWF Group Structure beforeany personnel can self-register in WAWF. If you have multipleCAGE Codes they can all be added to your group at the same time.업체의 CAGE 코드는 업체의 직원이 WAWF 내에서 자기-등록 하기 이전에반드시 추가 되어 있어야 함. 만일 하나의 업체가 다수의 CAGE 코드 가 있으면이 모두를 그룹으로 동시에 추가시킬수 있음 Optional CAGE Code extensions can be created to subdivide yourCAGE Code into smaller units. Each CAGE Code and extension willhave its own organizational e-mail address. The email addresses willbe used to notify your sub-groups that a document status has changed.선택적 CAGE 코드확장(extensions)은 업체의 CAGE 코드를 더 작은 유닛으로세분화하기위해 만들어질수 있다. 각각의 CAGE 코드와 확장(extensions)된CAGE 코드는 업체만의 고유 이메일을 갖게되며, 세분화된 그룹은 서류에변경이 있을시 그 메일을 통해 연락받게됨. To establish a vendor group for a CAGE Code, someone in yourcompany needs to either call the Customer Support Center phonenumber or send an email to DISA Ogden. If your organization hasmultiple CAGE Codes, the WAWF Customer Support Center willassist in adding all your CAGE Codes to your CAGE Group Structurein WAWF. (see Customer Support link)CAGE 코드의 업체 그룹을 설정 하려면, 업체의 직원이 WAWF 고객 지원센터에 전화하거나 DISA Ogden 으로 이메일을 해야함. 업체에 여러 개의CAGE 코드가 있을 경우 WAWF 고객지원센터에서 모든 CAGE 코드를 WAWF의 CAGE 그룹 내에 추가하는 것을 도와줄 것임. Phoned in requests will be activated online. Emailed requests will beprocessed within 48 hours after receipt.전화로 요청 할 경우에는 온라인으로 활성화 시키게 될 것임. 이-메일로 요청할 경우, 이-메일 접수 후 48 시간 내에 처리가 이루어질 것임. Group Activation Email: Please use the following template to emailrequests to WAWF Customer Support: Customer Please fill in missinginformation with your company information. (External Link).그룹활성화 이메일 : WAWF 고객지원센터로 이-메일 요청을 하려면 다음에나오는 서식을 사용함: 누락된 곳 만 채워 넣으면 됨6
Important - PLEASE NOTIFY YOUR EB POC! We will needtheir authorization to activate individual accounts after the CAGECode(s) are added to WAWF.중요 – 업체의 EB POC 를 알려 주어야 함! CAGE 코드가 WAWF 에 추가된 후 개별계정을 활성화 시키려면 EB POC 의 인가를 받아야 함.7
WAWF Getting Started for Vendors, Continued5th Step Establish an Organizational email Address.업체(조직)의 이-메일 주소를 설정 WAWF routes information according to CAGE Codes. WAWFdocuments themselves do not get routed, but status information aboutthe documents is sent in emails. For example, email confirmations aresent when a vendor SUBMITS a document. Email notices are sentwhen the government ACCEPTS or REJECTS the document.CAGE 코드에 의해 WAWF 가 정보를 발송. WAWF 문서 자체를 발송하는 것이아니라 문서에 관한 상태 정보가 이-메일로 보내짐. 예를 들면, 업체가 문서를제출(SUBMITS)하면 이-메일 공지 사항이 전송됨. 정부에서 문서를수신(ACCEPT) 또는 반송(REJECT)하면 이-메일로 공지가 됨. In order to receive status information about the WAWF documents,vendors need to establish organizational email accounts and determinewho will have access to this organizational email account.WAWF 문서의 상태에 관한 정보를 받아보려면, 업체(조직)의 이-메일 계정을설정 해야하며 설정된 메일 계정을 누가 관리 할 것인지를 결정해야 함 Ensure that the organizational email address is operational and canreceive email prior to registering it with the WAWF CustomerSupport Center.업체(조직)의 이-메일 주소가 사용가능 한 것인지 그리고 메일을 수신할 수 있는지 WAWF 고객지원센터에 등록하기 전에 반드시 확인해야 함. The GAM or EB POC shall provide the organizational email to theWAWF Customer Support Center. (See GAM Appointment Letter inStep 6 below).그룹 관리자(GAM) 또는 전자업무 담당자(EB POC)는 WAWF 고객지원센터에업체(조직)의 이-메일 주소를 제공해야 함.(단계 6에 있는GAM AppointmentLetter 를 참조할것) Note: If you do not set up an organizational email address, thepersonal email address of the first person who self-registers from yourCAGE/DUNS Code will be used as the organizational email address.만일 업체(조직)의 이-메일 주소가 설정되어 있지 않을 경우, 첫번째로 업체의CAGE/DUNS 코드를 사용하여 자기-등록한 사람의 개인 이-메일 주소가업체(조직)의 이-메일 주소처럼 사용 될 것임8
WAWF Getting Started for Vendors, Continued6th Step Designate a Group Administrator (GAM) for your company.업체의 그룹관리자(GAM) 지정 A GAM determines who has access to their data submitted in WAWFand provides the authorization to activate. GAM 은 WAWF 에 제출된자료에 누가 접근할 수 있을지를 결정하며 활성화 여부의 인가를 담당 함. In medium to large sized companies, there may be a need to establishmore than one GAM. 중/ 대기업은 한명 이상의 GAM 을 설정해야 할필요가 있을수 있음 Vendors must appoint a GAM to manage their WAWF account. It isrecommended that the EB POC be the GAM. As mentioned earlier,the GAM is your companies "Gate Keeper" and as such this personauthorizes the activations and deactivations for the company's CAGECode(s). When the EB POC registers as the GAM no additionalpaperwork is required to establish your WAWF GAM account.업체는 WAWF 계정을 관리하는 그룹관리자(GAM)을 반드시 지정해야 함.전자업무 담당자(EB POC)가 그룹 관리자(GAM)가 되도록 권장함. 앞에서언급한 것처럼, 이 그룹 관리자(GAM)는 업체 의 “게이트 키퍼”이며 이 사람이업체 CAGE 코드/들의 활성화 및 비활성화에 대한 인가를 하게 됨. 전자업무담당자(EB POC)가 그룹관리자(GAM)로서 등록되면 업체의 WAWF GAM계정을 설정하기 위해 요구되는 추가 서류는 필요 없음. The EB POC will also be contacted when there is a question aboutinvoices submitted through WAWF. Please ensure your EB POC isfamiliar with the WAWF process and they can contact companypersonnel to answer invoicing questions from government officials.EB POC 는 WAWF 를 통해 제출된 인보이스에 관한 질문을 받을 수 있으므로업체의 EB POC 가 WAWF 프로세스에 대해 잘 알고 있거나, 정부 관련자들로부터의 질문에 바로 답을 할 수 있는 업체의 담당자와 연락 가능한 사람이어야 함 If you appoint a GAM that is not your EB POC, they are required tosubmit their GAM appointment letter, signed by their EBPOC, viaemail to the Ogden Customer Support Center Customer Support emailor they may fax it to the customer Service Center. The fax number is1-801-605-7453. GAM appointment letter전자업무 담당자(EB POC)가 아닌 다른 사람을 그룹 관리자(GAM)로 지정한경우. 전자업무 담당자는 반드시 그룹 관리자(GAM) 지명서를 작성 후사인하여 Ogden Customer Support Center 로 이메일하거나 WAWF고객지원센터로 팩스함.FAX 번호: 1-801-605-74539
WAWF Getting Started for Vendors, Continued7th Step Determine if batch feeds for data input is necessary.데이터입력을 위한 일괄전송(batch feed) 필요여부를 결정 Most Vendors use the manual, web entry method to input theirdocuments directly into WAWF. Web entry is a good method if youhave a small volume of payment documents to create or if you have asmall amount of lines on your contract(s). But for vendors that have alarge number of transactions and/or many line items per paymentdocument, you may want to consider submitting documents intoWAWF via the File Transfer Protocol (FTP) or Electronic DataInterchange (EDI) method.업체 대부분은 자료를 WAWF 에 입력하는데 웹(인터넷)을 통한 수동입력(manual, web entry method) 방법을 사용함. 지불을 위해 만들 서류가 적거나,계약서상의 아이템라인(Line item) 이 많지 않을 경우 웹을 통한 입력은 좋은방법임. 그러나 거래의 양이 많거나, 서류상에 많은 아이템라인(Line item)이있는 업체는 FTP(File Transfer Protocol) 또는 Electronic Data Interchange (EDI)방식을 통해 서류를 WAWF 에 제출하는 방법을 생각할수 있음. WAWF FTP and EDI Guides are available after your account hasbeen activated. If further assistance is needed, please contact theWAWF Customer Service Center and ask for help with EDI. Atrouble ticket will be created and you will be forwarded to the JointInteroperability Test Center (JITC) and a technician will be assignedto assist you in testing your file layout(s). (See Customer SupportLink).업체의 계정이 활성화 된 후 WAWF FTP 및 EDI 안내서가 이용가능함. EDI 에관해 추후 도움이 필요시 WAWF 고객서비스센터에 연락하면, 업체의 요청이JITC(Joint Interoperability Test Center) 로 전달되며, 업체시스템의 파일배치(file layout)를 테스트 할 전문가가 지정되어 도움을 줄 것임.10
8th Step Set up PCs to access WAWF.WAWF 액세스를 위한 PC 설정 Your current computer configuration is usually sufficient to useWAWF. On rare occasions your computer's browser setting may needto be changed.업체가 현재 가지고 있는 컴퓨터 설정만으로도 대개 WAWF 를 이용하기에는충분함. 드문 경우이기는 하지만 컴퓨터의 브라우저 세팅 내역을 변경할필요가 있을 수 있음. Please try using WAWF first and then if you experience problemscheck your set-up by selecting the "Machine Setup" link on theWAWF home page or call the Ogden Help desk for assistance - forOgden Help desk information select the "Customer Support" link onthe WAWF home page.먼저 WAWF 를 사용한 후 문제가 있으면 WAWF 홈페이지의 ‘Machine Setup’링크에 접속하거나 Ogden 헬프데스크에 전화할것. Ogden 헬프데스크에 관한정보는 WAWF 홈페이지의 Customer Support 링크를 클릭할것.9th Step GAM needs to Self Register in WAWF.그룹관리자(GAM)는 WAWF 에 자기등록할것 Refer to the "Registration" Link on the WAWF Home Page and theHelp button for details on registering in the WAWF application as aGAM.GAM 으로 WAWF 에 등록하기 위한 자세한 내용은 WAWF 홈페이지의Registration" 링크와 Help 버튼을 눌러 참조함. If the GAM's account has not been activated within 2 business days ofself-registering, notify the WAWF Customer Service. (See CustomerService Link).자기등록 후 2 영업일(Business day) 안에 GAM 계정이 활성화 되지않을 경우,WAWF 고객서비스센터에 알릴것.Continued on next page11
WAWF Getting Started for Vendors, Continued10th Step Have all users for the CAGE Code(s) self-register on the WAWF web sitefor one of the available Vendor Roles.모든 사용자를 WAWF 웹사이트에 자기-등록 시켜 밴더롤(Vendor Roles)을 갖게 함 Once the EB POC (GAM) has been activated, all company users willneed to self-register. Now the EB POC (GAM) can activate ordeactivate their company personnel within WAWF.일단 EB POC (GAM)이 활성화 되면, 업체의 모든 사용자들은 자기-등록해야함. 이제 EB POC (GAM)은 WAWF 내에 있는 자기업체의 직원들을 활성화또는비활성화 시킬 수 있음. Every user of WAWF must self-register on the WAWF web site bycompleting the online registration form.WAWF 의 모든 사용자는 온라인상의 등록서(registration form)을 완료하여WAWF 에 자기등록해야함 Refer to the "Registration" Link on the WAWF Home Page and theHelp button for details on registering in the WAWF application in aVendor Role.밴더롤(Vendor Role)로 WAWF 에 등록하기 위한 자세한 내용은WAWF 홈페이지의 Registration" 링크와 Help 버튼을 눌러 참조함 Note: User accounts will not be activated until the GAM activates theaccounts. The GAM will receive an email for all registrations.참고: GAM 이 계정을 활성화할 시킬때까지 사용자계정은 활성화되지 않음.GAM 은 모든 등록에 대해 이메일을 받을것임. If a user's account has not been activated within 2 business days ofself-registering, notify the EB POC or WAWF Customer SupportCenter.사용자계정이 자기등록 후 2 영업일내에 활성화되지 않으면 EBPOC 혹은WAWF 고객지원센터에 알릴것12
11th Step Practice Using WAWF.WAWF 사용 연습하기 Online Training Site - Once you have completed steps 1-10, you maywant to practice using WAWF in the online training site. This site isfor practice only. You can practice submitting documents forpayment, and viewing and working on documents in the onlinetraining site. After getting to the WAWF practice site, you shouldclick the "Training Instructions" hyperlink in the left column to getyour training User IDs and passwords and important sample data.온라인 교육사이트 – 1 10 모든 단계 완료 후, 온라인 교육 사이트에서 WAWF사용 연습을 할 수있음.온라인 교육사이트에서 서류 제출 및 서류의 흐름등을 관찰 및 연습할수 있음. 교육용 유저 ID 와 Password 를 받으려면WAWF 교육사이트에 접속 - Help 창- ‘Web based Training’ 클릭 - "TrainingInstructions" hyperlink 클릭 - 1 번 Vendor 클릭 To practice in the online training site go to the following URLhttps://wawftraining.eb.mil/ (External Link).위의 사이트에서 온라인 연습이 가능함Continued on Next Page13
Verifying the EB POC in CCRIntroductionIn order to register in WAWF you must have an Electronic Business (EB)Point of Contact (POC).WAWF 에 등록하기 위해, 해당업체는 ,EB POC(Electronic Business Point of Contact)가있어야 함ProcedureFollow the steps below to verify who is listed as your EB POC in CCR.CCR 에 해당 업체의 EB POC 가 누구인지 확인하려면 아래 단계를 따를 것Step1ActionGo to the CCR web site http://www.ccr.govhttp://www.ccr.gov CCR 웹사이트를 열기Result: Home page screen opens.결과: 메인페이지 화면이 열림2Click CCR Search. CCR Search 를 클릭Result: CCR Search screen is displayed.결과: CCR 탐색 스크린 이 나타남3Enter Cage Code in the Cage Code Field or enter your Company Name in theCompany Name field. Click Search.CAGE 코드입력란에 CAGE 코드입력 또는 회사이름란에 업체의 이름을 입력Result: The CCR Search Results screen displays.결과: CCR 탐색 결과 화면이 나타남14
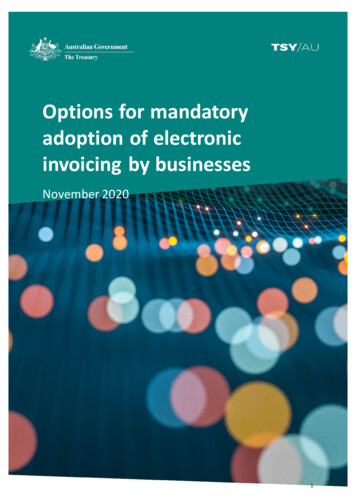
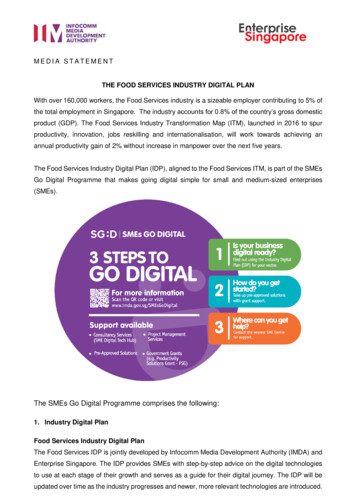
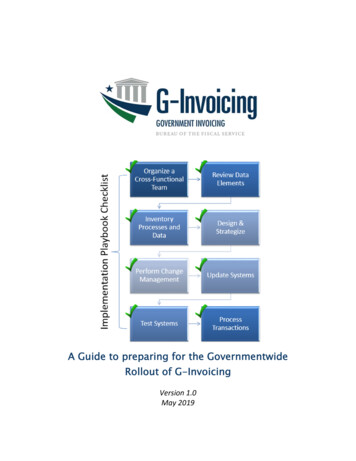
WAWF Getting Started for Vendors, ContinuedStep4ActionScroll to the bottom of the page and review the inquiry results.페이지 하단으로 내려가면, 질의 결과를 볼 수있음Electronic Business Prim ary POCNam e: Jane DoeAddrress Line 1: 123 Main StreetAddress Line 2: Suite 100City: Anytow nState: CAZip/Postal Code: 55555Country: USAU.S. Phone: 555 123-9876Non-U.S. Phone:Fax: 555 123-6543 Electronic Business Alternate POCNam e: Joe SmithAddrress Line 1: 123 Main StreetAddress Line 2: Suite 100City: Anytow nState: CAZip/Postal Code: 55555Country: USAU.S. Phone: 555 123-9876Non-U.S. Phone:Fax: 555 123-6543IF someone is listed as the EB POC THEN your EB POC is established.Procedure is complete.EB POC 로서 해당되는 데이터가 있다면, 해당 업체의 EB POC 가 이미 설정된것이며, 절차는 완료된것임 IF there is no EB POC listed at the bottom of your profile THEN refer tothe “Establish or verify the Electronic Business Point of Contact (EBPOC) in CCR” section for a detailed procedure.업체 소개(Profile) 하단에 표기된 목록에 EB POC 가 없을 경우, 자세한 순서는“Establish or verify the Electronic Business Point of Contact (EB POC) in CCR”섹션을 참조할 것15
Registering in WAWF User ID & Password - VendorIntroductionIn order to use the WAWF application you will need to self-register. Thereare several roles for which you may register, e.g., GAM, Vendor and VendorView Only.WAWF 사용을 위해서 자기등록을 해야함. 등록할 수 있는 여러 역할(Role)이 있음(예, 그룹관리자(GAM), 업체(Vendor - 편집가능), 업체(Vendor View only -편집불가능))User ID Rules Minimum 8 characters최소 8 글자 이상일것 May contain ONLY the following special characters ! # { }다음의 기호는 사용가능 ! # { } Must not already be registered in WAWF.WAWF 에 등록되어있지 않을 것Password RulesPassword formatting guidelines require that every password must contain:패스워드 생성지침 : 모든 패스워드는 다음을 포함해야함 Minimum 8 characters최소 8 글자이상 일것 Must contain at least 1 capital letter최소 한 개이상 대문자를 포함할것 Must contain at least 1 lower case letter최소 한 개이상 소문자를 포함할것 Must contain at least 1 number최소 한 개이상 숫자를 포함할것 Must contain at least 1 special character최소 한 개이상 특수문자를 포함할것16
Cannot contain consecutive characters (abc or cba)연속되는 문자는 허용 불가 (예. abc 또는 cba) Cannot contain repeating characters (aa, bb, etc)반복되는 문자는 허용 불가 (예. aa, bb 등) Cannot contain the same character more than twice동일 문자는 두번 이상 포함 불가 Entered passwords must be different from last 10 passwords used새로운 패스워드는 기존에 사용했던 10 개의 패스워드와 틀릴 것 Cannot be changed within 24 hours24 시간 안에 변경 불가능Continued on next page17
Registering in WAWF User ID & Password – Vendor, ContinuedProcedureFollow the steps below to self-register in WAWF.WAWF 자기등록을 위해 다음 단계를 따를 것Step1ActionGo to https://wawf.eb.mil 옆사이트에 접속Result: U.S. Government Computer System Notice and Warningscreen is displayed결과: : U.S. 정부 컴퓨터시스템 통지 및 경고 스크린이 나타남.2Click Accept. Accept 를 클릭3Result: Home screen displays. 결과: 메인(Home) 스크린이 나타남Click Registration.Registration 을 클릭함Result: Registration screen displays.결과: Registration 스크린이 나타남18
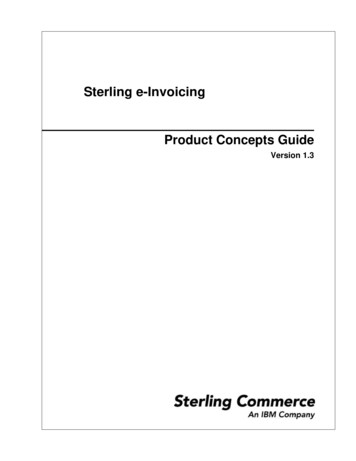
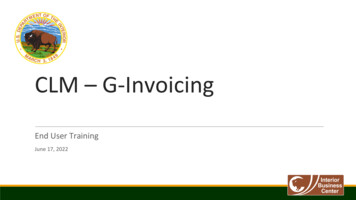
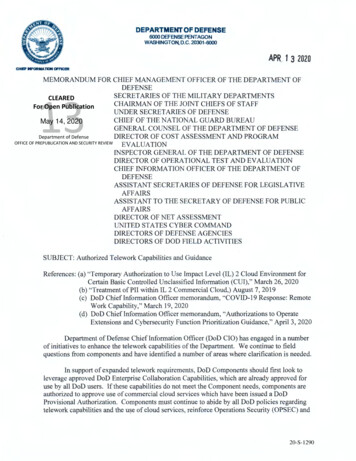
Registering in WAWF User ID & Password - Vendor, ContinuedStep4ActionSelect the radio button labeled User ID \ Password and Vendor.Click Next.User ID \ Password 와 Vendor 를 선택 후 Next 를 클릭Result: Data Capture screen displays.결과: 데이터 캡쳐 스크린이 나타남5Click the Edit link next to User Profile.User Profile 옆의 Edit 링크를 클릭Result: The Registration – Edit User Profile screen displays.결과: The Registration - Edit User Profile 스크린이 나타남19
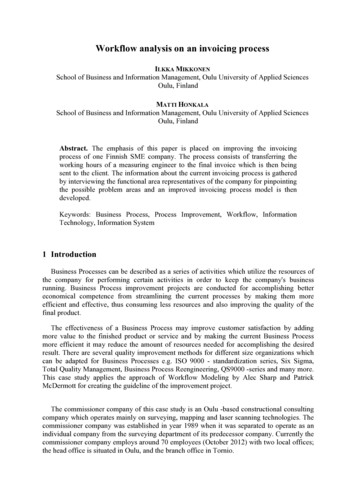
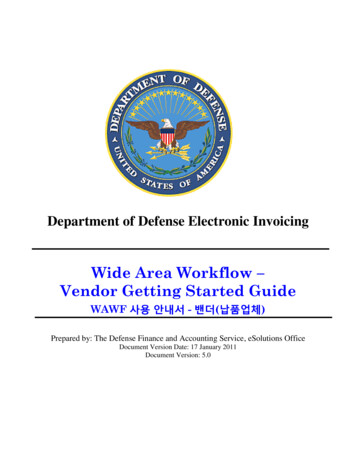
Registering in WAWF User ID & Password - Vendor, Continued6Enter required data and click Save.필요한 데이터를 입력 후 Save 를 클릭Result: User is returned to the Data Capture screen.결과 : 사용자는 데이터 캡쳐화면으로 돌아감7Repeat steps 5-6 for User Authentication, User SecurityQuestions, Vendor User Roles and Administrative User Roles.Click Submit.사용자인증, 사용자보안관련질문, 밴더역할, 관리적 사용자역할 은 56 단계를 반복할 것.Note: Comments and attachments are optional on theVendor/Administrator User Roles sections.참고: Vendor/Administrator User Roles 섹션에서 Comments 와 attachments는선택사항임Result: The Registration - View & Accept Information SystemUser Agreement screen displays.결과: The Registration - View & Accept Information System User Agreement스크린이 나타남20
8Click Accept. Accept 를 클릭Result: Confirmation of registration screen displays. You willreceive an e-mail containing your User ID. Once you have beenactivated by an administrator, you will receive another emailnotifying you of the role(s) for which you have been activated.If you have any questions, please contact the Customer Support.결과: 등록확인 스크린이 나타남. 사용자본인 ID 를 포함한 이 메일을 받게됨. 일단 관리자에 의해 활성화 되면 ‘본인의 역할(role)이 활성화되었다’는 또 다른 메일을 받게 됨. 궁금한 점은 고객 서포트 센터에연락할 것21
3rd Step Register for Electronic Document Access (EDA). (Optional Step, but recommended.) EDA 에 등록(선 사ଥ이ऐք 권고사ଥ) Electronic Document Access (EDA) acts as a virtual file cabinet for the storage and retrieval of multiple types of acquisition documents to include Purchase Orders and post-award contracts.