Transcription
BERNINA Q -maticInstruction ManualQ-matic Manual UG.indd 106.07.2016 13:37:29
WelcomeDear BERNINA customerThank you very much! You have decided on a top-quality accessory for your BERNINA Longarm machine andtherefore on a product which will delight you for years. For more than 100 years our family company hasattached greatest importance to satisfied customers. As for me, it is a matter of personal concern to offeryou Swiss development and precision at the height of perfection, future-orientated sewing technology and acomprehensive customer service.The BERNINA Longarm machines are ultramodern models whose development not only focused the highestdemands on technique and the ease of use but also the development of complex accessorie and software.After all we sell our products to creative people like you, who do not only appreciate high quality but whoalso keep making progress in creativity, adapting artistic competences and increasing your skills with ourproducts.Enjoy creative Longarm-quilting with the BERNINA Q-matic software and visit us for further information atwww.bernina.com. Our highly trained BERNINA dealers will inform you about further service andmaintenance offers. I wish you lots of pleasure and creative hours with your BERNINA Longarm and Q-matic.H.P. UeltschiOwnerBERNINA International AGCH-8266 Steckborn3
Edition noticeEdition noticeText, Setting and LayoutBERNINA International AGFotosBERNINA International AGArtikelnummer2016.08 en 1018305.0.04Translation of the original instruction manual1st EditionCopyright2016 BERNINA International AGAll rights reserved: For technical reasons and for the purpose of product improvements, changesconcerning the features of the machine can be made at any time and without advance notice. The suppliedaccessory can vary depending on the country of delivery.4
ContentsContentsIMPORTANT SAFETY INSTRUCTIONS Software128SAVE THESE INSTRUCTIONS11IMPORTANT SAFETY INSTRUCTIONS Hardware11SAVE THESE INSTRUCTIONS!18My Q-matic191.1Introduction191.2Welcome to the world of BERNINA191.3Key to signs201.4Introduction and the operation principle of the BERNINA Q-maticQ-matic systemQ-matic SoftwareArt & Stitch softwareInteractions between the programs Q-matic and Art & StitchOperating principle with the two file types quilt design and quilt project (Q-matic Software)2020202121211.5Overview systemOverview frontOverview side2222231.6Overview User interfaceOverview menu barOverview functions and visual displayOverview DisplayOverview upper Tool CenterOverview lower Tool CenterOverview icons232324242525261.7Delivery contentDelivery content Art & Stitch softwareDelivery content Q-matic system2727271.8Installation and operation of the software and the PC/MonitorInternet use with the Q-matic Touch PCReplacing the All-in-One Touch PCReinstalling WindowsReinstalling or Update of the Art & Stitch SoftwareReinstalling or Update of the Q-matic software/firmwareUpdate Q-matic softwareUpdate Q-Series firmwareSaving quilt designs and tags on a BERNINA USB Stick272727282828282930Quilting preparation312.1Connecting and switching on the Frame machine312.2Spool pin312.3Presser foot312.4Needle and stitch plate312.5Threading315
Contents3462.6Calling up help concerning Q 20 / Q 24312.7Q-matic system status and troubleshooting312.8Starting and switching off the Q-matic332.9Pressing the emergency stop knob342.10Restarting the system after a case of emergency342.11Creating the safe area34Settings363.1Activating/Deactivating securing363.2Sewing on/off363.3Grid on/off363.4Signals on/off363.5The needle is centered in the «Editing Display»363.6Changing the Easy Glide settings of the machine37Creative quilting384.1Selecting a quilt design384.2Deleting quilt designs from the «Design Center»384.3Searching quilt designs394.4Editing quilt designsCalling up the HelpMoving quilt designsCopying quilt designsDeleting quilt designsZooming in the view of the quilt design at the desired positionChanging the 1:1 view of the quilt designAdapting the view of the quilt design to the size of the displayZooming the view of the quilt design in or outEntering the size of the quilt topPlacing and deleting markersRealigning the safe area in the «Editing Display»Realigning the safe area at the reference pointGrab and dropDefining the sewing sequencePut quilt patterns in a waiting queue or remove itChanging the sewing directionRotating quilt designsMirroring quilt designsMasking quilt designs using «Design»Masking quilt designs using «Create Region» via the «Sewhead»Masking quilt designs using «Create Region» in the «Editing Display»Defining a boundary via the «Sewhead»Defining a boundary in the «Editing Display»Trimming quilt designs via the «Sewhead»Trimming quilt designs in the «Editing Display»Duplicating quilt designs (E2E)Mutliple duplication of quilt designsConnecting quilt 556586062646567
ContentsSeparating quilt designsAligning quilt designs in the «Editing Display»Aligning quilt designs via the «Sewhead»Altering the size of quilt designs in the «Editing Display»Altering the size of quilt designs via the «Sewhead»Altering the size of quilt designs via the enter keysTransferring quilt designs to the program Art & Stitch4.556Administrating quilt projects and quilt designsSaving a quilt projectOpening a quilt projectCreating a new quilt projectSaving quilt designsSaving quilt designs on the BERNINA USB stickImporting quilt designsImporting quilt designs from the BERNINA USB stickDeleting quilt designs from the «Design Center»Deleting quilt designs from the «Design Pool»Deleting quilt projectsCreating tagsAltering tagsDeleting tagsAllocating tags to a quilt designAllocating tags to several quilt designsRemoving tags from one quilt designRemoving tags from several quilt 080818182838384865.1Sewing quilt designs865.2Interrupting the sewing process of quilt designs865.3Interrupting the sewing process of a quilt design after a thread breakage87Attachment886.1Cleaning the display886.2Cleaning the energy chain and the X-Y-belts886.3Troubleshooting896.4Error messages Q-matic software906.5Overview quilt designsTips around the quilt designsAmanda MurphyKeryn EmmersonPatricia RitterAggy BurczykBasic Shapes by ABAlfonsina UriburuLinzi UptonGerda RaschleLisa CalleIndex9191919496981001021041051061077
Important safety instructionsIMPORTANT SAFETY INSTRUCTIONSSoftwareNot any part of the publication or the enclosed software may becopied or spread, transferred, converted, saved in a database,translated to a human or a computer language or made accessible toa third party in any form or in any way, neither electronically normechanically nor manually or in any other way.NOTEThe illustrated screen pictures of the software, which are showed inthis manual, serve the purpose to visualize and can differ from theones which really appear in the software.PRINTED INSTRUCTION MANUALRegistered owners of the BERNINA Q-matic software are allowed tocopy the BERNINA Q-matic instruction manual for the personal useonce (1). This copy can be printed by a private printer or by acommercial printing office.LIMITED WARRANTYBERNINA International AG warrants for 90 days, starting on the daywhen the software has been transferred to you that product is free ofany defects in workmanship and materials. You are given thepossibility to return the products which are covered by this warrantyalong with the proof of having purchased them to BERNINA or to thespecialised BERNINA dealer during this particuar warranty duration.You will get replacement free of cost. Any other costs such as cost ofshipment or insurance shall be those of the purchaser. The risk of lost,damage or loss of the products is the purchaser's alone. Thepurchaser relies on his personal knowledge and on his ownjudgement when choosing the software which is only needed forprivate use. The purchaser assumes the complete risk concerning theresults and the perfomance of the software. Subject to legallydetermined warranties and conditions BERNINA International AG8
Important safety instructionsdeclines any acceptation of all other warranties and conditions, be itexplicit or implicit, unconditionally and without restriction anywarranties and conditions concerning the general useability, thesuitability for a certain purpose, property rights and the invasion ofthird-party rights. Particularly BERNINA International AG doesn'tprovide the guarantee that the software meets the purchaser'srequirements, runs flawlessly or appears exactly as this is shown in theaccompanying documentation.LIMITED LIABILITYAs far as legally tolerable, neither BERNINA International AG, theirdevelopers, the people in power, the employees nor subcompaniesare responsible to you for consequential, incidental or indirectdamages (compensation for losses in sale, operational interruptions,loss of data etc.), whether predictable or not, which emerge from theuse or the non-usability of the software or the provided safety deviceand cable as well as the instruction manual, independent on the basisfor a claim and also when BERNINA or an authorized BERNINA retailerhas been informed aobut the eventuality of such damges. Somestates or jurisdictions don't allow the exclusion of incidental orconsequential, indirect or particular damages, which means that thebefore mentioned limited liability may not apply for you.CONCLUSIONYour license to use the BERNINA Q-matic software is legally valid aslong as you stick to the terms of the license agreement. If you do notstick to even one term of the license agreement, the immediateannulment of the license agreement will follow automatically withoutany announcing notice by BERNINA International AG. You canconclude the license at any time by returning the BERNINA Q-matic9
Important safety instructionssoftware plus any copies of it, the backup device and the cable as wellas the complete accompanying documentation to BERNINAInternational AG.Application of the anti-virus software and other programs:On the All-in-one Touch PC which is supplied with the Q-matic,basically no other programs than the ones included in the deliverycontent should be installed. Only access the Internet when this isexplicitly required by the customer service/support provided byBERNINA or Art & Stitch in connection with the technical support.Explicitly no other anti-virus software than the program «WindowsDefender» which is already installed in Windows 10 is to be used. This10
Important safety instructionsis the only way to ensure that the Q-matic system runs flawlessly.Always use your personal laptop or PC to surf the World wide webwhen purchasing new designs or to run another software.License agreements of the Q-matic software and the Art &Stitch SoftwareBy installing and using the Q-matic software and Art & Stitchsoftware, the general terms of the license agreements are acceptedautomatically by the user.SAVE THESE INSTRUCTIONSAppropriate useYour BERNINA -Q-matic software has been developed and designedfor private household use. It's purpose is to quilt fabrics and othermaterials as it is decribed in this instruction manual. Any other use isnot considered appropriate. BERNINA assumes no liability concerningconsequences resulting from an inappropriate usage.IMPORTANT SAFETY INSTRUCTIONSHardwarePlease be aware of the following basic safety instructions when usingyour machine. Before using this machine, read instruction manualcarefully.DANGER!To reduce the risk of electrical shock: Never leave the machine unattended as long as it is plugged in.11
Important safety instructions Always unplug the machine from the electrical outlet immediatelyafter using and before cleaning.Protection against LED radiation: Do not view the LED light directly with optical instruments (e.g.magnifier). The LED light corresponds with protection class 1M.WARNINGTo reduce the risk of burns, fire, electric shock or injury to persons:12 To assemble the system at least 2 adult people are needed. The installation, the operation and the repairs are only to becarried out by people who have sufficient knowledge of thesystem and this instruction. In addition to that, these people mustknow any warnings and precautions which are indicated in thesafety notes. Furthermore these people need to possess theeducation, instructions and the authorization to connect anddisconnect circuits and devices according to the existing safetyregulations. Before you start installing and operating the system, please checkall the components for any transport or installation damages.Don't try to disassemble the system or system components.Contact the authorized BERNINA dealer if components need tobe repaired or replaced. Never lift the system holding the motor cables, power cables orhydraulic tubes. Keep the motor cables, power cables and thehydraulic tubes away from heat, sharp edges and wetness. Stopoperating the product immediately when you notice that motorcables, power cables or hydraulic tubes are damaged and replacethe damaged components at once. Do never carry out any repairson motor cables, power cables or hydraulic tubes.
Important safety instructions Don't operate the system outdoor. Don't expose the system todamp or wet conditions. Avoid surroundings with chemicalinfluences or corrosive environment. Don't operate the systemnear inflammable dissolvents, propellants and/or explosivesubstances (e.g. gas, steam, dust etc.). Avoid temperaturesbeyond the acceptable temperature range from 5 to 45 C. Don'texpose the components of the system to vibrations and/or impactloads. Don't insert any objects into the system when it is connected tothe power supply. Be careful when laying the extension cables. Make sure that thecables are not pinched or taut. Position the cable so that trippingcan be avoided. Only use spare parts and accessory parts whichare authorized or provided by BERNINA. To disconnect, turn the main power switch at the control cabinetto «0» then remove the plug from the outlet. Do not unplug bypulling the cord, instead grasp the plug to pull it from the outlet. Always disconnect the power plug from the electrical outletbefore cleaning and maintenance adjustments, which arementioned in the instruction manual, are carried out. Clean the system components with a mild detergent and a dampcloth. Don't use corrosive detergent or high pressure washsystems to clean the components. Make sure that the system isclean and dry before you connect it to the power supply and startoperating it again. Use this system only for purposes as described in this manual.Possible risks Never let children be unattended in the surrounding of the systemwhen it is working autonomically.13
Important safety instructions Do not use the system as a toy. Close attention is necessary whenthis Q-matic system is used by or near children. Children are not allowed to play with the system. While assembling the single and small parts, be careful that theyare out of the reach of children (choking hazard)! Choking hazard! Keep plastic bags away from children andbabies. Don't pull the bags over the head. Cleaning and maintenance work must not be carried out bychildren unless they are supervised. Standing/Sitting on the frame is strictly forbidden. Inappropriateuse of the system can result in serious injuries. Make sure that you don't pinch your fingers during the assembly. Never operate this system if it has a damaged cord or plug or if itis not working properly. Contact the nearest authorized BERNINAdealer for further assistance.General warnings14 With the Q-matic installation, the channel locks (Optionalaccessory) must not be attached to the system anymore.Otherwise it can result in bruises. With the Q-matic installation, the magnetic park positioningbrackets with a magnet at the carriage must be removed andreplaced by the new Q-matic stand-off. Staying within (between the fabric rails and the table) or beneaththe quilt frame is strictly forbidden during the automaticoperation. Only proven service technicians are allowed to open the controlcabinet. Inside the control cabinet current-carrying parts areaccessible. Danger!
Important safety instructions Side clamps can become unfastened from the fabric. Children (orshort people) shouldn't stand on the side where the side clampscould be catapulted to. Switching off the system must be carried out via the main switchand not via the emergency stop knob. The emergency stop knobis considered to be used only in emergency situations. When the PC is supplied via the control cabinet, it must be shutdown via the regular operating system prior to switching off theQ-matic system. Otherwise damages to the software resp. theoperating system or the loss of data can occur. Never plug in or out any cables when the system is switched on.For all grounded, cord-connected appliances GROUNDING INSTRUCTIONS: This appliance must begrounded. In the event of malfunction or breakdown, groundingprovides a path of least resistance for electric current to reducethe risk of electric shock. This appliance is equipped with a cordhaving an equipment-grounding conductor and a groundingplug. The plug must be plugged into an appropriate outlet that isproperly installed and grounded in accordance with all local safetyregulations. DANGER Improper connection of the equipment-groundingconductor can result in a risk of electric shock. The conductorwith insulation having an outer surface that is green with orwithout yellow stripes is the equipment-grounding conductor. Ifrepair or replacement of the cord or plug is necessary, do notconnect the equipment-grounding conductor to a live terminal.Check with a qualified electrician or serviceman if the groundinginstructions are not completely understood, or if in doubt as towhether the appliance is properly grounded. Do not modify theplug provided with the appliance – if it will not fit the outlet, havea proper outlet installed by a qualified electrician.15
Important safety instructionsNotes on assembly instruction 16To connect the cabling to the motor drives their casings must beopened. Therefore a contact with sensitive electronic componentsis possible. As a consequence it is necessary to be groundedbefore mounting the cables to the motor drives so that any
Important safety instructionselectrostatic charge can be discharged. This can be done bytouching an exposed metal part of the existing quilt framebeforehand.Extending the FrameDANGERThe Frame isn't provided with extended legsThe Frame is likely to topple. Purchase and attach the appropriate upgrade kit at the specialized BERNINA dealer's.ð The Frame must be equipped with extended legs. If this is not the case, the Q-matic systemmust not be assembled on any terms.Make sure that the Frame is equipped with extended legs before theQ-matic-System is assembled. If this is not the case, purchase theappropriate upgrade kit at the specialized BERNINA dealer and attachit to the Frame.17
Important safety instructionsFrame without extended legs:77.4 cm (30.5 inch)Frame with extended legs:89.4 cm (35.2 inch)SAVE THESE INSTRUCTIONS!Appropriate useYour BERNINA machine with Frame is built and designed forambitious hobby practice. It answers the purpose of quilting fabrics asdescribed in the separate instruction manual of BERNINA Q 20 / Q 24.Any other usage is not intended. BERNINA doesn't assume liabilityresulting from inappropriate application.18
My Q-matic1My Q-matic1.1 IntroductionOn the machines Q 20 / Q24 large quilt projects can be created. All your personal settings can be saved andrecalled at any time.The Q-matic program supports you when quilting and provides more than 230 quilt designs (Q-matic system)and 350 quilt designs (Art & Stitch).In addition to this instruction manual, the machine offers a help program which provides useful support andhelpful details concerning some functions of the Q-matic system.The Help program contains information on particular functions and applications in the user interface.Further InformationIn addition to this instruction manual, further information products are enclosed in your Q-matic.The current version of your instruction manual as well as a lot of further information on the machine andaccessories can be found on our website at http://www.bernina.com1.2 Welcome to the world of BERNINAMade to create, this is the slogan of BERNINA. Not only our machines do support you to implement yourideas, but on top of that, our below mentioned opportunities also offer various inspirations and instructionsfor your future projects as well as the option to exchange ideas with other sewing, quilting and embroideringenthusiasts. We wish you lots of pleasrue doing that.inspiration – the sewing magazineAre you looking for ideas and instructions for great projects? In that case the BERNINA magazine«inspiration» is exactly what you need. «inspiration» offers extraordinary sewing and embroidery ideas fourtimes a year. From seasonal fashion trends to trendy accessories and practical tips to decorate your home inan original way.http://www.bernina.com/inspirationThe magazine is available in the languages English, German, Dutch and French. Not available in all countries.BERNINA BlogFancy instructions, free sewing patterns and embroidery motifs as well as many new ideas: all this you canfind in the weekly blog by BERNINA. Our experts give valuable tips and explain step by step how you canachieve the desired result. In the community you can upload your own projects and exchange experiencesand ideas with other sewing and embroidering enthusiasts.http://www.bernina.com/blogProvided in the languages English, German and Dutch.BERNINA YouTube ChannelOn YouTube we offer a wide range of how-to videos and support concerning the most important functionsof our machines. Detailed explanations are also provided as for the various presser feet, so that your projectswill succeed onalProvided in the languages English and German.19
My Q-maticBERNINA Social MediaFollow us on the social networking to learn more about events, thrilling projects as well as tips and tricks allabout sewing and embroidering. We will keep you informed and we are looking forward to presenting youthe one or the other highlight from the world of BERNINA.http://www.bernina.com/social-media1.3 Key to signsDANGERWARNINGCAUTIONNOTICELabels a danger with a high risk which can lead to severe injury or even to death unless it is avoided.Labels a danger with a medium risk which can lead to severe injury unless it is avoided.Labels a danger with a low risk which can lead to light or medium injury unless it is avoided.Labels a danger which can end up with damage unless it is avoided.Tips provided by BERNINA Quilt experts can be found next to this sign.By means of illustration, sample pictures are used in this instruction manual. The machines as well as theaccessory shown in the pictures may vary from the delivery content of your machine.1.4 Introduction and the operation principle of the BERNINA Q-maticQ-matic systemThe Q-matic system is a comprehensive, contemporary and automated Longarm system which has beendesigned to create quilt projects in a computerized way. The system constis of various mechanic components,electronic, the All-in-One touch PC as well as the software programs Q-matic and Art & Stitch.Q-matic SoftwareBy means of the Q-matic software, you can design a quilt project easily and inuitively. At first you shoulddefine the Safe Area, so that the section which is to be quilted has been determined. The function EasyGlidesupports the movements of the machine. Afterwards you enter the size of your quilt so that the editing areamatches exactly with the size of your quilt. Now you are ready to start your quilt project.You can choose from more than 230 quilt designs mustern in the Design Pool and for a better overview youcopy them into the Design Center where they are directly available during the creative process. You can editquilt designs easily by mirroring, enlarging, rotating, trimming, combining or masking. Afterwards the quiltdesigns can be positioned perfectly on the quilt top by the help of Boundary, Markers or Grab/Drop. Usingthe function Align, quilt designs can be also aligned along a line.You can create a Pantograph in a few steps by choosing the function E2E more or Multiply. To improve theview of the editing area, various zooming functions are provided.As soon as you are satisfied with your quilt project, you can start sewing. In doing so you can determine inwhich sequence the quilt designs are to be sewn. You can also remove quilt designs from the waiting line ifyou don't intend to sew them at the moment. After you have sewn the first rows of a Pantograph and youneed to roll the quilt, then the function Realign Safe Area is on hand to join the following rows seamlessly to20
My Q-maticthe already sewn ones. You can pause the sewing process on the Sewhead at any time to adjust the stitchlength or the thread tension. After a thread breakage the machine stops and with the help of the quiltsequence control function the quilt process can be resumed seamlessly at the position of the breakage.Quilt designs and quilt projects can be saved and called up at any time. This means that all your personallydesigned creations are always available.Art & Stitch softwareThe Art & Stitch software provides a very comprehensive digitalization program. This software enables you tocreate your own quilt designs. Using Art & Stitch, files and designs consisting of various Longarm formatsand vector graphics can be opened. You also have the option to digitize a quilt design based on a picture, tocreate an applique design easily or to design creative filling patterns as a background. Moreover you can editan already exisiting quilt design so that it meets your expectations.Afterwards you can save the quilt designs in any common Longarm format. Moreover, Art & Stitch providesmore than 350 quilt designs so you can let your creativity run free.Interactions between the programs Q-matic and Art & StitchYou have the option to switch from the Q-matic software to the Art & Stitch Software at the touch of abutton. In doing so, the previously selected quilt design is directly transferred to the Art & Stitch and can beedited in detail. Subsequently the edited quilt design can be transferred at the touch of a button back to theQ-matic interface to be quilted. At the same time the quilt design is saved in two formats (.ans und .bqm).This allows you to import the edited quilt design into the Q-matic software at a later time, to upload it to theDesign Pool and to edit it further on.Operating principle with the two file types quilt design and quilt project(Q-matic Software)A quilt design consists of one single quilt design or several joined and grouped quilt designs which form oneunit. The quilt design can be edited and altered as a unit. To save a quilt design it must be selected and canthen be saved under any name. The quilt design is saved automatically in the format *.bqm and filed in thefolder «Designs» on the desktop. It can also be saved at any other location, for example in the folder«Personal files» or on a BERNINA USB stick.A quilt project consists of several quilt designs which have been edited individually or together but whichhave not been necessarily grouped. Moreover a quilt project involves information concerning the quilt sizeand the aligning of the different quilt designs on the quilt. In short, the complete project. Quilt projects canalso be saved. The project is saved on the desktop in the format *.bqp in the folder «Projects». The projectscan also be saved at any other location. Saved quilt projects can be opened and edited further on at anytime.21
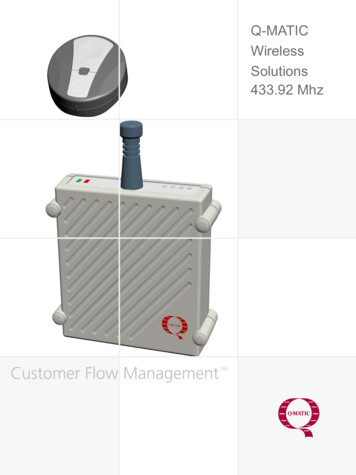
My Q-maticQuilt designs can be imported into the Q-matic software directly in the formats *.bqm and *.dxf.The following illustration shows individual quilt designs (red). By placing designs on the quilt (beige) a wholequilt project is produced.1.5 Overview systemOverview front1234221USB ports2Switching on the PC/Monitor3Y-Drive4X-Drive
My Q-maticOverview side2131Emergency stop knob red2Start button green3Power switch1.6 Overview User interfaceOverview menu barThe menu bar provides the dropdown menu with the functions. Some functions are also available in the«Tool Center». All functions of the menu bar are explained in detail in the instruction manual. FileEditViewToolsDesign ToolsSettingsDesign Librara? (Help)23
My Q-maticOverview functions and visual display13241Menu bar3Tool Center2Editing Display4Design CenterOverview Display12456783910241Editing Display7Start2Width (Width of quilt design)8Break (Timeout)3Height (Height of quilt design)9Stop4Safe Area10Move5Easy Glide6Art & Stitch
My Q-maticOverview upper Tool Center1234567891011121Select7Quilt Size (Size of quilt design)2Add Design (Adding a quilt design)8Markers (Marker points)3Copy/Delete9Realign Safe Area4Center Zoom10Grab/Drop5Actual Size (1:1)/Full View11Sew Options (Sequence of sewing)6Zoom In/Zoom Out12Reverse Sew (Changing the sewing direction)Overview lower Tool Center1234567891011121Rotate7E2E More (Edge to edge )2Flip (Mirror-image up/down)8E2E Less (Edge to edge -)3Mirror (Mirror-image ary11Align6Trim12Resize (Adjusting the size)25
My Q-maticOverview iconsIconNamePurposeMenu barThe menu bar provides the dropdown menuwith the functions. Some functions are alsoavailable in the «Tool Center».CloseThe screen is closed and any adjustments arenot saved.ConfirmConfirms any adjusted settings. The screen isclosed.CancelThe process is canceled. The screen is closedand the previously made adjustments are notsaved.Icons «-/ »Touching the icons «-» and « » the settingvalues are changed.CCAll numbers
Contents 6 2.6 Calling up help concerning Q 20 / Q 24 31 2.7 Q-matic system status and troubleshooting 31 2.8 Starting and switching off the Q-matic 33