Transcription
Weebly Website InstructionManual
Table of Contentsiii
IntroductionIntroductionOur main concern in choosing a website development platform was the ability of the client to reproduce andchange what we have created. Another concern was the cost of web hosting. Weebly is a powerful easy touse website builder, also Weebly is an inexpensive webhost in comparison to sites like Godaddy.com. Thismanual is designed to assist yvvou in the upkeep of your website. Some features of this manual are coloredscreenshots, as well as clear, descriptive, logical steps. Warning a computer with internet connection isrequired to make changes to your website. Any information not included in the manual can be found at http://help.weebly.com.v
Table of contentsChapter 1 Loggingon to Your Website.1Chapter 2 Adding Elements .7Chapter 3 Adding and Changing pages.31Chapter 4 Adding Editors.37Chapter 5 Changing Website Design .41Chapter 6 Publishing Changes.45Chapter 7 Viewing Site Stats.49
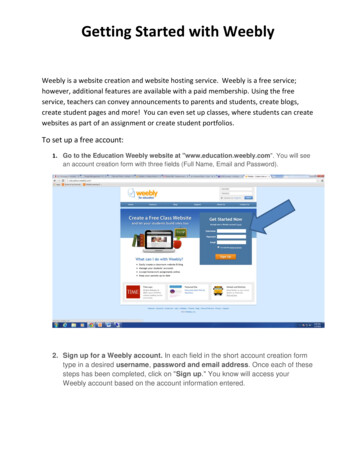
Chapter 1Loggingon to Your Websiteintroductory textHow to Logon to Your Website1.1To logon to your website follow these steps. Step 1 open a web browser (e.g. Firefox, Internet Explorer, Google Chrome, etc.) on a computer connected to the internet. Step 2 In the address bar[fig 1.1] bar type: www.weebly.com and hit enter keyon the keyboard.fig 1.1Step 3 On the Weebly home page click on the log tab located on the on the upperright of the page[fig1.2]. step 4 type in you username and password in their respective fields. Step5 click on the login button.fig 1.21.2How to Change Login InformationTo change your login information follow these steps. Step 1 logon to your Weeblyaccount. Step 2 click on the account tab [fig 1.3].3
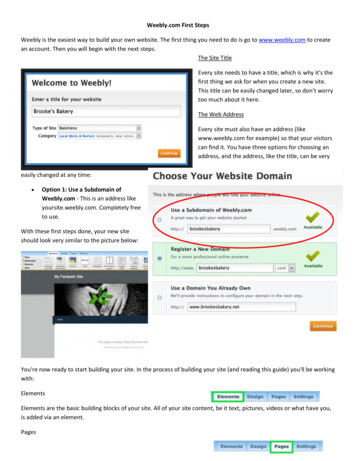
Chapter 1fig 1.3Step 3 click on the blue “Change” text next to each field [fig 1.4]to change eitherthe password, email, or full name.fig 1.41.3Changing the Name of Your Website.To change the name of your website login to your website and follow these steps.Step 1 Click on the settings tab on the Weebly editor [fig1.4]. Step 2 click on thegray “Change site address” text located underneath the name of your website[fig1.5]fig1.544
Chapter 1Step 3 choose which domain you want (ex dentonsquaredonuts.weebly.com, dentonsquaredonuts.com, dentonsquaredonuts.net.). Step 4.1 click on the first domainfor a free Weebly website and then click on the orange “Continue” button[fig1.6].Step 4.2 click on the second domain option to buy your own webpage, then clickon the orange “Continue” button. Step 4.3 click on the third domain option if youalready own a website, then click on the orange “Continue “ button.fig 1.65
Chapter 16
Chapter 2 Adding Elements
Chapter 18
Chapter 22.1Introducing the Weebly EditorTo edit, delete, and or add elements follow these step: Step1 log into weebly.com.Step 2 click on the blue “Mysites” tab located at the top left of the screen.[fig 2.1]fig 2.1Step 3 click on the light blue “Edit” button located to the right of the website name[fig 2.2].fig 2.2The next screen will be your website with the Weebly editor tool across the top. [fig2.3]fig 2.39
2.2Adding a Title to a WebpageTo add a title to a page (or section of a page) follow these steps. Step 1 log into your Weebly and select the website that you want to edit. Step 2 on the navigation banner click thetitle of the page you want edit.[2.4]fig 2.4Step 3 on the Weebly editor located on the top of the screen click on the light blue tablabeled “Elements” located on the top left of the Weebly editor and select the “Basic”ribbon highlighted in yellow [fig 2.5]fig 2.5Step 4 click and hold down on the “title text” icon located on the Weeblyeditor banner. [Fig 2.6]. Step5 drag the “Title Text” icon to the desiredposition on the webpage and release.fig 2.6Step 6 click on the gray “Click here to edit” text to change the title text.2.3Adding a ParagraphTo add a paragraph to a page follow these steps. Step 1 logon to your Weebly and select the website that you want to edit. Step 2 on the navigation banner [fig 2.4]click thetitle of the page you want edit. Step 3 on the Weebly editor[fig2.3] located on the topof the screen click on the light blue tab labeled “Elements” located on the top left ofthe Weebly editor and select the “Basic” ribbon highlighted in yellow in [fig2.5]. Step4 click and hold down on the “Paragraph” icon located on the Weebly editor banner.[fig2.7]Step 5 drag the “Paragraph” icon to the desired position on the webpageand release .step 6 click on the gray “Click here to edit” text to add theparagraph text.fig 2.72.4Adding a Photo10
To add a picture to a page follow these steps. Step 1 log into your Weebly and selectthe website that you want to edit. Step 2 on the navigation banner click the title ofthe page you want edit. Step 3 on the Weebly editor located on the top of the screenclick on the light blue tab labeled “Elements” located on the top left of the Weeblyeditor [fig 2.3] and select the “Basic” ribbon highlighted in yellow in [fig2.5]. Step4 click on and hold down on the “Picture” icon located on the Weebly editor banner.[fig 2.8].fig 2.8Step 5 drag the “Picture” icon to the desired position on the webpage and release.step 6 click on the blue sample picture that says ”Click Here to Edit”.[fig 2.9]fig 2.9Step 7 on the source section banner, located at the top of the photo upload popup[fig2.10] , select one of the following options: My Compute (to choose a picture located on your hard drive ) , Search (to select for professional or creative commonsphoto located on Weeble’s database of photos), or Image URL ( for images locatedon another website)fig 2.102.5Editing a Photo11
Chapter 2After selecting the photo that you want from the appropriate source you are able todo several things: 1 crop, 2 set photo to open larger when clicked, 3 link a photo to awebpage or file, 4 add caption to the photo, 5 delete the photo.Making a Photo Open Larger When ClickedTo make a photo open larger when clicked follow these steps. Step1 uploada photo. Step 2 hover over the photo with the cursor until the editing panelappear in the upper right-hand corner of the photograph.[fig 2.11] Step 4 clickthe open larger when clicked icon (immediately to the right of the orange“Edit” button).fig 2.11Linking a PhotoTo link photos to a webpage follow these steps. Step 1upload a photo. Step 2hover over the photo with the cursor until the editing panel appear in the upper right-hand corner of the photograph. .[fig 2.11] Step 3 click on the linkicon (located in the center of the editing panel ). Step 4choose one of fouroptions , link to: Website URL, Page on Your Website, File on Your Website,or Email Address. [fig 2.12]fig 2.1212
Step 5 click the orange save button located at the bottom right of the “Link to” popup menuAdding a Caption to a PhotoTo add captions to a photo follow these steps. Step 1upload a photo. Step 2 hoverover the photo with the cursor until the editing panel appear in the upper right-handcorner of the photograph[fig2.11]. Step 3 click on the Add Caption icon located tothe left of the trashcan Icon . Step 4 type a caption into the caption popup menu andclick save[fig2.13]fig 2.13Deleting a PhotoTo delete a photo follow these steps. Step 1upload a photo. Step twohover over the photo with the cursor until the editing panel appear in theupper right-hand corner of the photograph [fig 2.11]. Step 3 click on the“Delete” image icon(the trashcan located to the far right of the photoediting menu) and select yes delete on the “Delete This Image” windowthat pops up.[fig2.14]fig 2.1413
2.6Adding ColumnsTo add columns to a page or section of a page follow these steps. Step 1 logon toyour Weebly and select the website that you want to edit. Step 2 on the navigationbanner click the title of the page you want edit.[fig2.4] Step 3 on the Weebly editor located on the top of the screen click on the light blue tab labeled “Elements”located on the top left of the Weebly editor [fig2.5] and select the “Basic” ribbonhighlighted in yellow[fig2.5]. Step 4 click on and hold down on the “Multiple Columns Icon [fig 2.15 ], then drag the Multiple Columns icon onto you webpage, andrelease the mouse button.fig 2.152.7Editing ColumnsEditing the Number of ColumnsTo edit the number of columns follow these steps. Step 1 hover over the columnsuntil the column editing popup appears [2.16] Step 2 select the number of columns.fig 2.16Editing the Spacing of Each ColumnTo edit the size of each column follow these steps. Step 1 hover over the columnuntil the column editing popup appears [fig 2.16]. Step 2 select the gray spacingicon located to the right on the column editing popup. Step 3 chooses the width ofeach column.14
2.8Adding a Contact FormTo add a contact form to a page follow these steps: step 1 log into yourWeebly and select the website that you want to edit. Step 2 on the navigationbanner click the title of the page you want edit[fig 2.4]. Step 3 on the Weebly editor located on the top of the screen click on the light blue tab labeled“Elements” located on the top left of the Weebly editor, and then select the“Basic” ribbon highlighted in yellow in [fig 2.5]. Step 4 click on and holddown on the “Contact Form” icon located on the Weebly editor banner.[2.17].fig 2.17Step 5 drag the “Contact Form” icon to the desired position on the webpageand release.2.9Adding Additional Elements to a Contact FormTo add additional element such as phone number field, address field, file upload field, etc. first place a contact form onto the website then follow thesestepsAdding a Phone Number FieldTo add a phone number field follow these steps. Step 1 add a contact formfrom the basic elements located on the Weebly editor.[2.5] Step 2 clickon the gray “Click here to edit “ text located at the top of the contact form.[2.18]fig 2.18. Step 3 click on the more ribbon located on the Weebly editor [2.5]. Step 4click hold drag and drop the phone icon on to the contact form [2.19].15
fig 2.19Step 5 click on the gray” phone number” text located above the phone numberfield . step 6 click on the required drop down box [fig 2.20] and decide if thisfield should be required or not. Step 7 click on the orang save button located onthe right of the contact form editing popup.fig 2.20Adding an Address FieldTo add an address field follow these steps. Step 1 add a contact form from thebasic elements located on the Weebly editor.[fig 2.5] Step 2 click on the “Clickhere to edit” text located at the top of the contact form. Step 3 click on the moreribbon located on the Weebly editor. Step 4 click hold drag and drop the houseicon on to the contact form [2.21].fig 2.21Step 5 click on the gray” address” text located above the first address field . Step6 click on the required drop down box [2.20] and decide if this field should berequired or not. Step 7 click on the orang save button located on the right of thecontact form editing popup.Adding a Choose One BoxTo add “Choose One ” box follow these steps. Step 1 add a contact form fromthe basic elements located on the Weebly editor.[fig2.5] Step 2 click on the“Click here to edit” text located at the top of the contact form. Step 3 click onthe standard ribbon located on the Weebly editor [fig2.5]. Step 4 click hold dragand drop the ”Yes No” icon on to the contact form [fig2.22].16
fig 2.22Step 5 click on the gray” Choose One ” text located above the first question field.Step 6 click on the edit options text located underneath the field options dropdown menu. Step 7.1 type values into the fields labeled option 1-3 and [fig 2.23](click on the gray plus sign located at the bottom of the field options popup boxto add more fields). 7.2 or alternatively click on the blue “Predefined Options”[fig2.23]text located at the bottom of the field options popup[] and select one ofthe predefined options.fig 2.23Step 8 click on the “Required:” drop down box [fig 2.20] and decide if this fieldshould be required or not. Step 9 click on the orang save button located on theright of the contact form editing popup.17
Adding a Choose All That Apply BoxTo add a “choose all that apply” box follow these steps. Step1 add a contactform from the basic elements located on the Weebly editor.[fig 2.5] Step 2 clickon the “Click here to edit “ text located at the top of the contact form. Step 3click on the standard ribbon located on the Weebly editor. Step 4 click hold dragand drop the “This or That” icon on to the contact form [Fig 2.24].fig 2.24Step 5 click on the gray “Choose Any” text located above the first questionfield. Step 6 click on the edit options text located underneath the field optionsdropdown menu.[fig 2.23] Step 7.1 type values into the fields labeled option 1-3and (click on the gray plus sign located at the bottom of the field options popupbox to add more fields). 7.2 or alternatively click on the blue “Predefined Options” text located at the bottom of the field options popup[fig 2.23] and selectone of the predefined options. step 8 click on the “Required:” drop down box[fig 2.20] and decide if this field should be required. Step 9 click on the orangsave button located on the right of the contact form editing popupAdding a Dropdown BoxTo add ‘Dropdown Box” box follow these steps. Step 1 add a contact formfrom the basic elements located on the Weebly editor.[fig2.5] Step 2 click onthe “Click here to edit” text located at the top of the contact form. Step 3 clickon the standard ribbon located on the Weebly editor. Step 4 click hold drag anddrop the “Dropdown Box” icon on to the contact form [fig2.25].fig 2.25Step 5 click on the gray “Select One” text located above the question field. Step6 click on the edit options text located underneath the field options dropdownmenu. [fig 2.23]Step 7.1 type values into the fields labeled option 1-3 and (clickon the gray plus sign located at the bottom of the field options popup box toadd more fields). 7.2 or alternatively click on the blue “Predefined Options” textlocated at the bottom of the field options popup[fig 2.23] and select one of thepredefined options.18
Step 8 click on the “Required:” drop down box [fig2.20] and decide if this fieldshould be required. Step 9 click on the orang save button located on the right ofthe contact form editing popup.Adding a Comment box.To add comment box to a contact form follow theses steps. Step1 add a contactform from the basic elements located on the weebly editor.[fig2.5] Step 2 click onthe “Click here to edit” text located at the top of the contact form. Step 3 click onthe “Standard” ribbon located on the Weebly editor. Step 4 click hold one of thetextbox icons [fig2.26] drag and drop the icon on to the contact form. Step 5clickon the orang save button located on the right of the contact form editing popupfig 2.26Adding a File Upload FieldTo add an upload field follow these steps. Step1 add a contact form from the basicelements located on the Weebly editor.[fig2.5] Step 2 click on the “Click here toedit” text located at the top of the contact form. Step 3 click on the “Standard”ribbon located on the Weebly editor. Step 4 click hold one of the “Upload File”icon [fig 2.27] drag and drop the icon onto the contact form.fig 2.27Step 5click on the gray “Upload File” text. Step 6 click on the required dropdownbox and choose if uploading a file is required[fig 2.20]. Step 7 click on the orangsave button located on the right of the contact form editing popup.2.10Editing a Contact Form19
Editing the Title of a Contact FormTo edit the title of a contact form follow these steps. Step1 click on the “click hereto edit text located at the top of the contact form [fig 2.28].fig2.28Step 2 click on the blue “Form Options” button located in the center of the contactform editing popup. Step 3 type the title of the contact form in the “form name”field located to the far left of the “Form Options”[fig2.29] popup. Step 4 select theorang save button located on the right hand side of the form editing popup.fig 2.29Changing Recipient EmailTo edit the email address that submissions will be received at follow these steps.Step 1 click on the “click here to edit text located at the top of the contact form[fig 2.28]. Step 2 click on the blue Form Option located in the center of the contactediting popup [fig2.29]. Step 3 type the new email address in the “Email submissions to” field located to the left on the “Form Options” popup. Step 4 select theorang save button located on the right hand side of the form editing popup.Editing Submission Conformation TextTo edit the conformation text that a submitter will receive after a successful submission follow these steps. Step 1 click on the “click here to edit” text located atthe top of the contact form [fig 2.28]. Step 2 click on the blue Form Option locatedin the center of the contact editing popup[fig 2.29].20
Step 3 click on the edit text icon . Step 4 type in the new conformation messageinto the blue text box that pops up[fig 2.30]. Step5 click on the blue save buttonlocated on the bottom right of the text box. Step 6 select the orang save buttonlocated on the right hand side of the form editing popup.fig2.302.11Uploading a File to Your WebsiteTo add a file to a webpage logon to your website and follow these steps.1 clickon the name of the webpage that you want to upload the file to. [fig 2.4]. Step 2click on the multimedia ribbon located on the left hand side of the weebly editor[fig 2.5] Step 3 click on to drag and drop the “File” icon on to the webpage.[fig2.31]fig2.31Step 4 click on the white icon that appears to the left of the “click here to uploadfile” text. [Fig2.32] step 5 click on the blue “ Upload an new file” text that appearsin the upload file popup underneath the weebly editor.[fig 2.33]. Step 6 type inthe name that you want visitors to see on the file in the File name field. step 7choose the file that you want to upload from your hard drive.fig 2.32fig 2.3321
2.12Adding a ButtonTo add a button To add a Button to a webpage logon to your website and followthese steps.1 click on the name of the webpage that you want to add the buttonto. [Fig2.4]. Step 2 click on the basic ribbon located on the left hand side of theWeebly editor[fig 2.5] Step 3click on to, drag, and drop the “Button” icon on to thewebpage.[fig2.34]fig 2.342.13Editing a ButtonEditing the Name of a ButtonTo edit the name of the button click on the button and type in a new name for thebuttonEditing Button PositionTo edit the position of a button follow these steps. Step 1 hover over the buttonuntil the button editing popup appears above the button.[fig 2.35] Step 2 click onone of the three icon on the right-hand side to left align, center or right align thebutton.fig 2.35Editing the Style of a Button22
To edit the style of a button follow these steps. Step 1 hover over the button untilthe button editing popup appears above the button [fig 2.35]. Step 2 click on theicon located on the left hand side of the button editing popup. Step 3 choose oneof the four button style options.Linking a ButtonTo link a button to a file, webpage, email address, or outside website follow thesesteps.Step1 hover over the button until the button editing pop up appears[fig2.35].Step 2 click on the link icon.[fig2.35]Step 3 choose where to link the button in thebutton linking popup menu [fig 2.36]. Step 4 click the orang save button on thebottom right of the button linking popup.fig 2.362.14Adding a ForumAdding a ForumTo add a forum to a webpage log onto your website and follow these steps.Step 1 click on the name of the webpage you want to add the forum to[fig 2.4].Step2 to click on the more ribbon located on the bottom left of the Weebly editor[fig 2.5].23
Step 3 click on the “Mics” ribbon located next to the more ribbon on the Weeblyeditor. Step 4 click hold drag and drop the “Forums” icon [fig 2.37] onto the webpage.fig 2.37Adding a New Forum Thread.To add a new forum thread click on add a forum to your webpage. Step 2 click onthe “Start a topic” button. Step 3 edit the title of the new thread under the “title”field. Step 4click on the green “post topic” icon located under the post text box.[fig 2.38]fig 2.382.15Adding a Page DividerTo add a page divider log onto your website and follow these steps. Step1 clickon the page that you want to add the page divider to[fig 2.4]. Step2 on the “Elements” tab of the Weebly editor [fig 2.5]. Step 3 click on the “More” ribbonlocated on the bottom left-hand side of the Weebly editor. Step4 click on the“Layout” ribbon next to the “More” ribbon on the Weebly editor. Step 5click onthe “Divider” icon[2.39] hold, drag and drop the “Divider” icon on the webpage.24
fig 2.292.16Adding YouTube VideosAdding a YouTube VideoTo add YouTube videos to a webpage log onto your website and follow thesesteps. Step 1 click on the name of the webpage you want to add the YouTubevideo to [fig 2.4]. Click on the multimedia ribbon located on the left-hand side ofthe Weebly editor [fig 2.5]. Step 2 click on the YouTube icon[fig 2.40] drag anddrop on the pagefig 2.40Step 3 click on the side next to the video to bring up the YouTube video editingpopup[fig 2.41]. Step 4 type in the URL of the YouTube video that you want inthe field labeled “YouTube video URL[fig 2.41]. Step 5 choose the size of thevideo by click on the size dropdown menu. Step 6choose the position of the video on the page by click on the position dropdown menu.fig 2.412.17Adding a Google MapAdding a Google MapTo a Google mad to your website login to your website then follow these steps.Step1 click on the name of the webpage you want to add the Google map to[fig2.4]. Step 2 click on the multimedia ribbon located on the left-hand side of theWeebly editor [fig 2.5]25
Step 3 click, hold drag, and drop the Google map icon onto the desired webpage[fig 2.41].fig 2.41Step 4 click next to the map to bring up the Google maps editing popup [fig 2.42]Step 5 type in the address for the map in the address field.[2.43] step 5 adjust thesize adjust the zoom of the map by click on the “zoom” dropdown menu. Step 6adjust the position of the map by click on the position dropdown menufig 2.432.18Adding a SlideshowTo add a slideshow to a webpage login to your your website follow these steps.Step 1 click on the title of the webpage that you want to edit [fig2.4]. Step 2 clickon the “Multimedia” ribbon located on the left-hand side of the Weebly editor[fig2.5].26
Step 3 click, hold, drag and drop the slide show icon [2.44] on to the webpage.fig 2.44Step 4 choose one of the several slideshow layouts on the “slideshow Style” popup[2.45] and click on the orange “Continue” button.fig 2.45Step 5 click on the green “Upload Photos” icon located at the bottom of the “Manage Slideshow Photos” popup. Step 6 choose the photos that you want to uploadfrom your hard drive. Step 6.1 add more photos by clicking on the orang “AddMore Photos” button. step 6.2 click on the blue “save” button located at the topright of the “Manage Slideshow Photos” button.2.19Editing a Slideshow27
Editing the Photos in a SlideshowTo add or edit photos in a slideshow follow these steps. Step 1 click on the slideshow. Step 2 click on the “Add/ Edit Photos” button. Step 3.1 click on the photoediting option that you are interested in applying to each photo (discussed in section 2.5). Step 3.2 click on the blue “Add Photos” icon . Step 4 choose the photothat you want to upload from your hard drive. Step 5 click on the blue save buttonlocated on the top right of the manage slideshow photos popup.Editing the Transition Timing of a SlideshowTo edit the timing of the slideshow transition follow these steps. Step one clickon the slideshow. Step 2 click on the advanced button located on right-hand sideof the slideshow editing popup[2.45]. Step 4 click on the “Speed” drop down boxand choose the transition speed you want.fig 2.452.20Adding a Photo Gallery28
Adding Photos to a Photo GalleryTo add a photo gallery to a webpage login to your website follow these steps.Step1 click on the title of the webpage that you want to edit. Step 2 click on the“Multimedia” ribbon located on the left-hand side of the Weebly editor[fig 2.5].Step 3 click, hold, drag and drop the photo gallery icon [fig 2.46] on to the webpage. Step4 click on the blue “Click Here to Upload photos” box and choose thephotos that you want to upload from your hard drive.fig 2.46Editing a Photo GalleryTo add/edit a photo gallery follow these steps. Step 1 click on a photo in the photogallery[fig 2.47] . Step 2 click on the orange “Add Images” button. Step 3 clickon the green “Upload gallery photos from your computer” button. and select thephotos that you want to add to the gallery from your computer.fig 2.47Editing the Number of Columns in a Photo GalleryTo edit the number of columns in a photo gallery follow these steps. Step oneclick on a photo in the photo gallery. Step 2 click on the columns dropdown boxlocated under the Weebly editor and select the number of columns[fig2. 48] .fig 2.4829
Changing the Cropping of Photos in aTo edit the cropping follow these steps. Step 1 click on a photo in the photo gallery. Step 2 click on the “cropping” dropdown box[fig2.48] and select betweensquare and rectangleChanging the Spacing Between PhotosTo edit the spacing between photos follow these steps. Step 1 click on one of thephotos in the photo gallery. Step 2 click on the “spacing” dropdown box [fig 2.48]and select the amount of spacing between the photos in the photo galleryChanging the Caption on Photo in a PhotoGalleryTo edit caption and or links attached to an individual photo follow these steps.Step 1 click on the desired photo. Step 2 follow the photo editing instructions insection 2.530
Chapter 3 Adding and ChangingPages31
3.1Adding Pages to a WebsiteTo add a new page logon to your website and follow these steps. Step 1 click onthe pages tab located on top of the Weebly editor [fig 2.5]. Step2 type in the nameof the new page into the “page name” field [fig 3.0].fig 3.0Step 3 select the page layout for the new page by clicking on one of the severpage layout options located underneath the “page layout” text.[fig 3.1]fig 3.133
Step 4 click on the blue “Advanced Settings” button located underneath the pagelayout section.[fig 3.2]fig 3.2Step 5.1 in the title field type in the name of the new page. Step 5.2 type in a briefdescription of the purpose of the page in the “Page Description” field. Step 5.3type in key words (ex doughnuts, donuts, nuts, fresh, toppings etc.) in the “MetaKeywords field. Step 6 click on the orange “Save” button.[fig 3.4]fig 3.4Step 7 click on the orange “Add page” button located on the left-hand side of theManage Page[fig 3.0]34
Editing Page Order3.2Rearranging PagesTo change the order of pages on a website. Login to your website and followthese instructions. Step 1 click on the page tab located on top of the Weeblyeditor. Step 2 on the left-hand side of the “Manage Pages” there is a list of yourwebpages. Click and drag up or down on the name of the page you want to rearrange[fig 3.5].fig 3.5To make a page a subpage login to your website and follow these steps. Step 1 clickon the page tab located on top of the Weebly editor. Step 2 on the left-hand side ofthe “Manage Pages” there is a list of your webpages. Click and drag to the right thename of the page you want to rearrange.[fig 3.5].35
Chapter 4 Adding Editors
4.1The Purpose of EditorsBy adding a site editor you give the editor the power to make changes to the website on your behalf.Adding an EditorTo add a website editor logon to your website and follow these steps. Step 1 clickon the Editors tab. Located on the top of the weebly editor[fig2.5]. Step 2 click onthe orange “Add Editors” button[fig 4.0].fig 4.0Step 3 type in the email address of the new website editor in the “Enter emails”field. Step 4 choose the role of the editor and click on the orange “Add Editors”button located on the bottom left of the “Add Editors” popup.[fig 4.1]39
fig 4.140
Chapter 5 Changing Website Design41
5.1Changing a Website’s ThemeChanging Website DesignTo change the design of your website logon to your website and follow thesesteps. Step 1 click on the “Design” tab located on the left-hand side of the page(above Weebly editor.[fig2.5]). Step 2 click on the all themes dropdown box [fig5.1].fig 5.1Step 3 browse the different categories, located on the left-hand side of the themeselection page, and choose a new theme. Step 4 click on the orange “PreviewTheme” button. Step 5 click on the orange” Use Theme” button located on the topof the website.Editing Design OptionsTo change the fonts used on your website logon to your website and follow thesesteps. Step 1 click on the design tab located on the left-hand side of the Weebly[fig2.5] editor. Step 2 click on the “Design Option” ribbons located on the lefthand side of the Weebly editor. Step 3 select the title text, paragraph title text, orthe paragraph text, ribbon located next to the design options ribbon. Step 4 clickon the “Font” dropdown menu and select the font type[fig5.2].43
fig 6.2Step 5 click on “Color” box and select the font color[fig 6.2].Changing Link Colors5.2To change the color of links logon to your website and follow these steps. Step 1click on the design tab located on the left-hand side of the Weebly editor[fig2.5].Step 2 click on the “Design Option” ribbon located on the left-hand side of theWeebly editor. Step 3click on the links ribbon located to the r
Step 3 on the Weebly editor[fig2.3] located on the top of the screen click on the light blue tab labeled "Elements" located on the top left of the Weebly editor and select the "Basic" ribbon highlighted in yellow in [fig2.5]. Step 4 click and hold down on the "Paragraph" icon located on the Weebly editor banner. [fig2.7]