Transcription
WCMBP SystemProvider Enrollment
OverviewThis webinar provides instructions on howto complete an enrollment application fornew providers via the Workers’Compensation Medical Bill Process(WCMBP) Portal.Note: Legacy providers will not have toenroll into the new system. Legacyproviders are providers that werepreviously enrolled in Conduent’s System(Legacy System).Before we begin the demonstration ofonline enrollment, we will discuss the newOWCP-1168 Provider EnrollmentApplication.
Paper Enrollment
New OWCP-1168 Enrollment Application FormPaper submission is one of the several options for enrollment. While thistutorial will be mostly covering the online enrollment process, it is importantto note that you can also enroll via the paper enrollment application usingform OWCP-1168.The form has been updated and can be accessed by following the stepscovered on the next several slides.Note: We encourage Direct Data Entry (DDE) online enrollment as delaysmight be expected with processing hardcopy/paper submissions due to thecurrent conditions of the pandemic.4
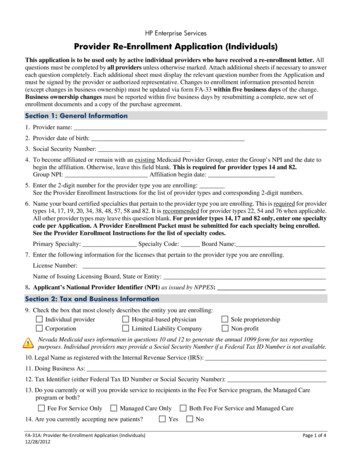
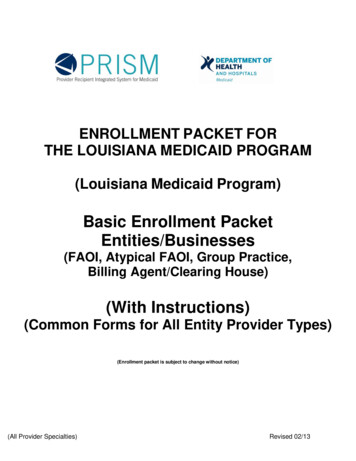
How to Obtain an Enrollment Application251.Go to OWCPMED.DOL.GOV2.Click Resources3.Click Forms & References3
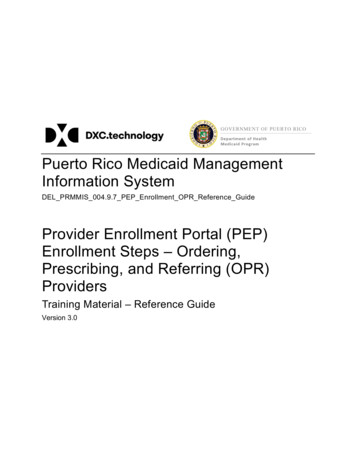
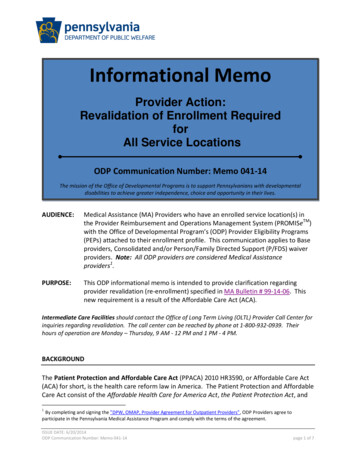
How to Obtain an Enrollment Application4. Click Provider Enrollment Application (OWCP 1168).The OWCP-1168 form will open. The application includes a cover page addressed to providers that gives importantinformation about OWCP and provider enrollment. You can begin filling in the required fields and then print forsubmission.5. When submitting your paper enrollment application, you will also want to include the Provider Enrollment CoverSheet if mailing or faxing your application and supporting documentation.456
Submitting Paper Enrollment Application and Registration ProcessAfter your paper enrollment application has been submitted, reviewed and approved,you will receive a welcome letter and a registration letter.Welcome letter will contain: Welcome message OWCP Provider ID Temporary IDRegistration letter will contain: Instructions on how to complete the registration process Temporary keyYou will use the OWCP Provider ID, Temporary ID, and Temporary Key provided in theletters, and the SSN/FEIN used on your application, to complete the registration process.7
Online Enrollment
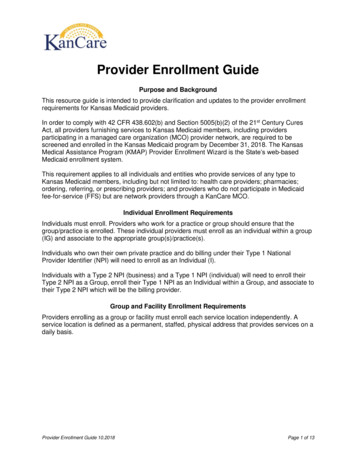
Navigating the WCMBP Portal to Begin Online Enrollment21. Go to https://owcpmed.dol.gov2. Click Provider3. Click Get Started93
Navigating the WCMBP Portal to Begin Online Enrollment4. Click the Click here to begin the enrollmentprocess hyperlink.Providers will need to first register with OWCPConnect before starting a new enrollment oraccessing the new system.OWCP Connect is the mechanism by which all usersare authenticated.410
OWCP Connect Registration55. Select the “here” linkto begin the OWCPConnect Registration.11
OWCP Connect Registration6. Please enter required information (Nameand email address)67. A message will populate to notify youthat the email you are entering isavailable or already linked to an existinguser account.78. Enter result of the addition problem fromthe image9. Click Next8912
OWCP Connect Registration10. Once the validation is completed, enter a password andretype the password to confirm the password.11. Click Next.10Note: Password Criteria should:11 be at least 8 characters long, include an uppercase letter, a lowercase letter, a number, anda special character.By clicking the “Next” button, providers will be taken to thesecurity image page where they must select an image andcreate a “Key Phrase”.13
OWCP Connect Registration12. Select a security image, enter a keyphrase.13. Click Next.121314
OWCP Connect Registration1414. Select security questions from thedrop downs and answer theselected questions.15. Click Submit.1515
OWCP Connect RegistrationSystem creates an account and a link to activate the account is sent to your email address used in registration.Note: The account must be activated within 24 hrs.Click “Resend Email” if the email is not received within 10 minutes.16
OWCP Connect RegistrationLook for an email from: support@dol.gov.16. Click link that says “here.”1617claimantportal1@gmail.com
OWCP Connect Registration17. Login to through OWCP Connect tovalidate your email address andbegin your online enrollment.1718
Starting the Online Enrollment Application1. Select the Enrollment Type.2. Click “Submit”.Note: Enrollment Type Definitions are provided below the Enrollment Type selection area. Please select the appropriatetype for your practice, organization and/or business.1219
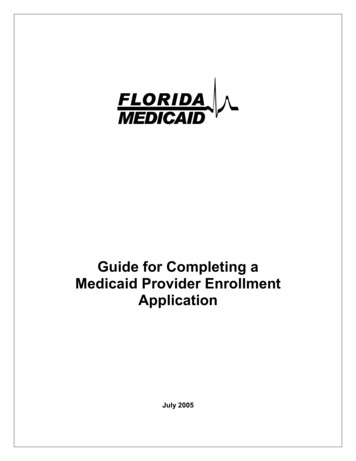
Starting the Online Enrollment Application1.Select a Provider Type from drop downmenu.2.Check a Program(s) to enroll in.3.Select Identifier Type (FEIN or SSN).4.Based on the responses for steps 1-3,you will either enter an organizationname or the individual provider name.5.Enter an NPI and an Entity Type basedon your W9.6.Check if you do not want to be on theonline searchable provider listing. Ifchecked, please supply a reason.7.Click “Finish”.201243567
Starting the Online Enrollment ApplicationCarefully note the 14-digit Application ID. You can use this Application ID number, along with the entered FEIN or SSNnumber to return to your application if you leave at any time during the enrollment process.The application number will also be emailed to you.21
Returning to an Enrollment Application1. To resume your enrollment application ifyou left before completing it, select theProvider drop-down from the MBP Portal.12. Select the Get Started menu option.222
Returning to an Enrollment Application3. Select the “Click here to resume or trackthe in-progress enrollment application”hyperlink in the Resume or Track anEnrollment Application area.Note: This same process can be used tocheck the status of your enrollmentapplication after you have completed it.233
Returning to an Enrollment Application4. Login via OWCP Connect using the emailaddress you used when registering withOWCP Connect.424
Returning to an Enrollment Application5. Enter the password you created whenregistering with OWCP Connect, thenselect Submit.525
Returning to an Enrollment Application6. You will use the Application Numbergiven to you when you started yourenrollment.7. Enter the SSN or FEIN used when youstarted your enrollment.8. Select the Submit button to return toyour application.86726
Completing an Enrollment ApplicationComplete each stepStart/End DateComplete vs Incomplete StatusOptional vs RequiredNote: We already completed step 1, as you can see in the Status column. Based on the information provided in step 1, theenrollment steps are displayed. The “Purge” button will delete all information entered if you need to restart your application.Also, there is one step in particular that only applies to the “Group” Enrollment Type. That is Step 10: Add Servicing ProviderInformation. This step will not be displayed for the Individual and Facility/Agency/Organization/Institution Enrollment Types.27
Completing an Enrollment ApplicationIt’s important to note for the screen shotsshown in this webinar that what is or is notrequired may not apply to your enrollment orprovider type chosen during your enrollment.You can utilize the Required Credentialsbutton when you are enrolling to see what isrequired for your enrollment and providertype chosen.Before completing the next steps, select“Required Credentials”. A separate window willdisplay the credentials that are required foryour provider type.Note: Credential requirements will changedepending on the selected provider type.1. Exit out this window to move on tothe next step Add Location.28
Step 2: Add Location123451. Select the Add button.2. Enter Location Business Name.3. Enter Contact Person First and Last Name.4. Enter Contact Person Phone Number. (Do not add dashes or spaces)5. Click “Next.”Note: Email Address and Fax Number entries are Optional29
Step 2: Add Location1. You must add your physical address, click “Address.”130
Step 2: Add Physical Location12341. Enter the Physical Address Street Number and Street Name.2. Enter the Zip Code.3. Click “Validate Address” . (Complete address will autopopulate after validation)4. Click “OK”.31Possible Validation Results
Step 2: Add Mailing Location121. If mailing address is the same as the physical address, check the bubble that states“Same as Physical Address”.OR2. Click “Address” to Enter Mailing Address Street Number and Street Name if the addressis different.3. Click “OK” after adding the mailing address.323
Step 2: Add Mailing Location211. The system displays the Location List, which confirms your address information entered.2. Click “Close” to move on to the next step, Add Taxonomies.Note: Taxonomy codes refer to the Healthcare Provider Taxonomy Code Set, which categorize the type, classification,and/or specialization of health care providers. This step and some of the subsequent steps may or may not be required,depending on the enrollment and provider type chosen. For example, a Non-Medical Vendor Provider Type will not berequired to enter Taxonomy Codes. Again, selecting the “Required Credentials” button on the page listing the enrollmentsteps will help determine what is or is not required for your enrollment and provider type chosen.33
Step 3: Add Taxonomies1. Click “Add.”162. Use the dropdown menu to viewyour existing Taxonomy Code Type.3. Select Specialty type.4. Available Taxonomy codes willpopulate. Highlight the codes thatare applicable to your organization.Move applicable codes toAssociated Taxonomy Codes.2345. Click “OK.”6. Click “Close” to move on to the nextstep, “Add Ownership Details.”5Note: Ownership Details list any business with more than a 5% interest in or where involvement is at an officer, director oragent of the company. This step is optional for all enrollment and provider types.34
Step 4: Add Ownership DetailsThis step optional. If completed, you mustcomplete required fields and click OK.1. Select the Disclosure Type (Individual orOrganization) Ownership.2. Enter SSN or FEIN.1233. Enter Organization Name or First/LastName.4. Click “Address” to enter Street Number,Street Name and Zip Code.5. Click “OK.”Note: If the ownership information is the samename, FEIN and address as previously entered,click “Copy Name and Tax.” The information willauto populate.3545
Step 4: Add Ownership Details211. The system displays the Ownership List, which was entered.2. Click “Close” to move on to the next step, “Add Licenses and Certifications.”Note: License and Certifications are required by most states to perform the services under your Provider Type.There are exceptions, as with many of other the remaining steps. For example, a Billing Agent provider type willnot be required to enter this information.36
Step 5: Add License/Certification1.Click “Add” to enter License/Certification information.2.Indicate if this is a requiredcertification or required license,or if this specifies that acertification or license is notrequired.3.Enter the recipient’s name in the“Name” field.4.Enter the license or certificationtype in the “License/CertificationType” field.5.Enter the license or certificatenumber in the“License/Certification #” field.3712435
Step 5: Add License/Certification6.Enter or select the initial issuedate and expiration date in the“Initial Issue Date” and the“Expiration Date” fields.7. Within the “Issued State” dropdown menu, select the statewhere the license orcertification was issued. (Mustmatch the state of physicaladdress)8. Enter the issuing agency in the“Issuer Agency” field.9. In the “Web Link” field, enterthe web link to the issuingagency.10. Click “OK.”38768910
Step 5: Add License/Certification1. The system displays the License/Certification List, which confirms your license/certification informationentered.2. Click “Close” to move on to the next step Add Identifiers.Note: Identifiers that are typically issued by external entities that uniquely identify the provider and arerequired to maintain provider enrollment.2139
Step 6: Add Identifiers (Optional)123451. Click “Add.”2. Select the identifier type from the “Identifier Type” drop-down menu.3. Enter the identifier value in the “Identifier Value” field.4. Enter or select the start and end dates in the “Start Date” and “End Date” fields.5. Select “Ok.”Note: This step is optional because all provider types do not require Identifiers. Identifiers are typically issued by externalentities that uniquely identify the provider. Please refer to the “Required Credentials” button to check if your provider typerequires an identifier.40
Step 6: Add Identifiers (Optional)1. The system displays the Provider Identifiers list, which confirms your identifiers entered.2. Click “Close” to move on to the next step, “Add EDI Submission Method.”Note: Electronic Data Interchange (EDI) is the computer-to-computer exchange of business documents in astandard electronic format between business partners.2141
Step 7: Add EDI Submission Method (Optional)1. Select your “Mode of Submission.”2. Click “Ok.”Note: If the Mode of Submission is Billing Agent/Clearinghouse, you must provide the billingagent/clearinghouse OWCP ID in the next step.1242
Step 8: Add EDI Submitter Details (Optional)Note: This step is required if the EDI Submission Method is Billing Agent/Clearinghouse in the previous step.1. Enter the “Billing Agent/Clearinghouse OWCP ID.”2. Enter the date(s).3. Click “OK.”12343
Step 8: Add EDI Submitter Details (Optional)1. The system displays the Billing Agent/Clearinghouse, which confirms their OWCP ID was entered.2. Click “Close” to move on to the next step, “Add EDI Contact Information.”Note: EDI Contact Information will need to be on file if we need to ask the Billing Agent/Clearinghouse anyquestions pertaining to their EDI enrollment and/or future submissions and retrievals.2144
Step 9: Add EDI Contact Information (Optional)1324Note: This step is required if the EDI Submission Method is Billing Agent/Clearinghouse in Step 7.1. Enter the Title of the contact person to answer EDI questions if needed.2. Enter contact person’s First and Last Name.3. Enter 10-digit phone number.4. Click “Address.”45
Step 9: Add EDI Contact Information (Optional)Note: This step is required if the EDI Submission Method is Billing Agent/Clearinghouse in Step 71. Enter Street Number and Name in Address Line 1.2. Enter Zip Code.3. Click “Validate Address”.4. Click “OK”.123446
Step 9: Add EDI Contact Information (Optional)211. The system displays the EDI Contact Information List, which confirms contact information entered.2. Click Close to move on to the next step, “Add Servicing Providers.”47
Step 10: Add Servicing Providers(Applies to “Group” Enrollment Type)Note: As mentioned before, this step only appliesto “Group” Enrollment Type. Step 10 andsubsequent steps will have different step numbersfor the other Enrollment Types.1. Click “Add.”122. Select the “Tax Identifier Type” SSN.3. Enter the individual servicing providers Firstand Last Name and SSN.34. Select the provider type from the “ProviderType” drop down.5. Enter the NPI.4656. Enter up to 5 taxonomy codes.7. Enter all the license/certification information.8. Click “OK.”There is no limit to how many servicing providerscan be added to your practice.4878
Step 10: Add Servicing Providers(Applies to “Group” Enrollment Type)211. The system displays the Servicing Providers Information, which confirms the servicing providersinformation entered.2. Click “Close” to move on to the next step, “Add Payment Details.”Note: Electronic Funds Transfer (EFT) is mandatory. Payment Details must be entered to receive paymentfrom OWCP.49
Step 11: Add Payment Details112534Note: Electronic Funds Transfer (EFT) ismandatory. Payment Details must be enteredto receive payment from OWCP.The ACH form must be signed, uploaded,faxed or mailed. If faxed or mailed, theenrollment cover sheet is needed.1. Click “Add.”2. Enter the name of the financial institution.63. Enter the institution’s routing number.4. Your depositor account number.5. Select the “Type of Account” from the dropdown (Checking or Saving).6. Enter the “Depositor Account Title” (Thename that is printed on your checks).50
Step 11: Add Payment DetailsNote: Electronic Funds Transfer (EFT) ismandatory. Payment Details must be entered toreceive payment from OWCP. The ACH form mustbe signed, uploaded, faxed or mailed. If faxed ormailed, the enrollment cover sheet is needed.7.Click “Address” to add the Financial Institutionaddress. The address details dialog willdisplay.8.Once address is added, select the “Signed byRepresentative” check box to indicate that theACH form has been signed by arepresentative of the financial institution.9.Enter the title of the financial institution’srepresentative in the “Title of Representative”field.778109115110. Enter the representative’s phone number inthe “Representative Phone Number” field.11. Click “OK.”
Step 11: Add Payment Details211. The system displays the Payment Details List, which confirms payment information was entered.2. Click Close to move on to the next step, “Complete Provider Disclosure.”Note: Provider Disclosure page asks questions of the provider to confirm additional background information.52
Step 12: Complete Provider Disclosure1. Answer the two disclosure questions below:Note: If you answer Yes to the first Disclosure questions, please provide details under comments section including typeof action, agency undertaking adverse action and date of action.If you are a FECA provider enrolling in Provider “75” Durable Medical Equipment (DME) and answer “Yes”, provide thephone number that you used in your Medicare DMEPOS enrollment.2. Click “Save” and then click “Close” to move on to the next step, View/Upload Attachments.2153
Step 13: View/Upload Attachments (Optional)Note: This Step is optional because you are able to submit the application via DDE and then mail or fax required attachmentswith a Provider Enrollment Cover Sheet. If attachments are not uploaded at the time of submission, your application will stay inan “Awaiting Attachments Status”. If the attachments and cover sheet are not received, your application will be Returned toProvider (RTP’d). Please click Required Credentials to check what attachments are required for Provider Type.1. Click “Upload Attachments”.Note: Only PDF and TIFF file formats can beuploaded.12. Select the document type from the DocumentType drop-down menu.3. Click the “Browse” button. (The system displaysthe Open window.)4. Locate and select the file from your local drivethat you need to upload and click the “Open”button. (The system updates the File Name field.)5. Click “OK.”54235
Step 13: View/Upload Attachments (Optional)1. The system displays the Attachment List, which confirms an attachment uploaded.2. Click Close to move on to the next step, “Submit Enrollment Application for Review.”2155
Step 14: Submit Enrollment Application for Review1. Click “this link” to print theSignature Page to sign and dateit.3Note: Signature page can befaxed or mailed in with coversheet. If you want to upload, click“Close” and click on previous stepto upload the attachment.2. Click “this link” to obtain andprint the cover sheet.3. Click “Submit Enrollment”.5621
Submitting an Enrollment ApplicationFaxed and/or Mailed applications will be RTP’d if incomplete and/or have missingattachments.Once the enrollment application is completed, the provider can submit:Via Mail Provider EnrollmentDepartment of Labor OWCPP.O. Box 8312London, KY 40742-8312Via Fax 888.444.5335Via DDE owcpmed.dol.gov57
After Submitting Your ApplicationNote: Until your application has been reviewed, you willnot be able to make any changes to your application.If your application has been approved, you will be able tomake changes to your information from within the ProviderPortal.Please refer to the Training & Tutorials page within theWCMBP Portal for a variety of training materials that will behelpful in guiding you on how to perform provider profileupdates (ex. Provider Enrollment and Profile Updateswebinar presentation)58
CNSI looks forward to being thenew medical bill processingagent for the OWCP programsand working with each of you!Thank you!Email: CNSIOWCPOutreach@cns-inc.comCall Center:Division of Federal Employees’ Compensation(DFEC) 1-844-493-1966Division of Energy EmployeesOccupational Illness Compensation(DEEOIC) 1-866-272-2682Division of Coal Mine Workers’ Compensation(DCMWC) 1-800-638-7072
How to Obtain an Enrollment Application 4. Click Provider Enrollment Application (OWCP 1168). The OWCP-1168 form will open. The application includes a cover page addressed to providers that gives important information about OWCP and provider enrollment. You can begin filling in the required fields and then print for submission. 5.