Transcription
Passy-Muir Tracheostomy & VentilatorSwallowing and Speaking ValvesPatient Education HandbookDavid A. MuirInventor of the Passy-Muir Tracheostomy & VentilatorSwallowing and Speaking ValvesIrvine CA 92614-6813 USA949.833.8255 800.634.5397 Fax: 949.833.8299website: www.passymuir.comemail: info@passymuir.comEMERGO EUROPEPrinsessegracht 202514 AP The HagueThe Netherlands Passy-Muir, Inc.All rights reserved.0050PH/R0718“I was diagnosed with muscular dystrophy at age five. Over the years Igradually weakened and became a quadriplegic. I was twenty-three and studyingbiochemical engineering in college when I had a respiratory arrest and becameventilator dependent. I had accepted that I could not walk and I accepted theother difficulties of my disease. However, when I realized I could not talk, Iwanted to give up. Then I realized I was not ready yet. I said to myself, ‘Wait aminute, you’ve never given up this easily before and you’re not going to thistime. There has to be a way around this problem.’ These thoughts became mytheme for three agonizing months while I was working on my design for thespeaking valve. As corny as it sounds, every rain cloud has a silver lining. Thisis absolutely true. Ask me, I know first hand.It has been very rewarding to know my valve has helped to improve the qualityof life for so many people.”David A. Muir
PASSY-MUIR TRACHEOSTOMY & VENTILATORSWALLOWING AND SPEAKING VALVE (PMV ) USER INFORMATIONThis PMV belongs to:Date I began using this PMV:(PMV should be evaluated for replacement after two months)I am using the following PMV: PMV 005 (white) PMV 2000 (clear) PMV 007 (Aqua Color ) PMV 2001 (Purple Color )Date: PMA 2000Oxygen AdapterMy tracheostomy tube is:Name brand:Size: Cuffless Fenestrated Cuffed/Amount of air in cuff:Special Instructions:Instructions for PMV use:I should wear my PMV hours per dayI should wear my PMV when eating: Yes NoSpecial Instructions:David’s LegacyThe Passy-Muir Tracheostomy & Ventilator Swallowing and SpeakingValves were designed by David Muir. He was twenty-three years old and aquadriplegic when he had a respiratory arrest that left him ventilatordependent and unable to speak. Although medically frail, David had courage,genius, determination and a spirit that led him to invent his tracheostomy &ventilator swallowing and speaking valves for his own communication needs.David also had the commitment, the caring and the motivation to share hisvalves with other tracheostomized and ventilator dependent patients. Hisvalves have given the gift of communication to thousands of tracheostomizedand ventilator dependent patients throughout the world.David passed away in August of 1990. We miss his presence, his smile, andhis humor. However, through our efforts to educate clinicians, patients andfamilies about speaking with David’s valves, his spirit continues. We atPassy-Muir Inc. believe that communication is the essence of the humanspirit and it is essential to individual rights and dignity. We are committedin our efforts to offer tracheostomized and ventilator dependent patients astep towards independence and dignity through speech.WARNING: IF YOU ARE HAVING ANY DIFFICULTY WHILE WEARING THEPMV, REMOVE THE PMV IMMEDIATELY AND CONTACT YOUR DOCTOR.I am /am not using a ventilatorSpecial instructions [i.e. vent settings, Peak Inspiratory Pressure (PIP)]:My Doctor’s name is:Phone #My Speech Pathologist’s name is:Phone #My Respiratory Therapist’s name is:Phone #I can order a replacement PMV from:Phone #The PMV can be obtained from your Doctor, Home Equipment Company orHospital. You will need a prescription for the PMV. The PMV is Medicare/MediCaland Medicaid reimbursable. If you have any questions about the PMV, need anyassistance or more information on PMV use, please call our respiratory and speechclinical specialists at: Passy-Muir Inc. 800.634.5397.Additional educational materials on the Passy-Muir Tracheostomy &Ventilator Swallowing and Speaking Valves are available free of chargefrom Passy-Muir and can be obtained by calling 800.634.5397.
I.PATIENT EDUCATION HANDBOOKTABLE OF CONTENTSIntroduction .1II.Passy-Muir Tracheostomy & Ventilator Swallowing andSpeaking Valves (PMVs) .2What is a PMV ?.2Types of PMVs.3Patient Care Kit.4III. Placementof the PMV.61. Positioning.62. Checking Vital Signs.63. Suctioning.84. Deflating the Cuff.85. PMV Placement.106. Removing the PMV.167. Getting used to the PMV (Transitioning).16IV. Troubleshooting .18V. Cleaning, Care and Lifetime of the PMV .23VI. Use of the PMVs with Different Types ofTracheostomy Tubes .25Cuffed Tracheostomy Tubes.25Cuffless Tracheostomy Tubes.26Fenestrated Tracheostomy Tubes.26Metal Tracheostomy Tubes.26Neonatal and Pediatric Tracheostomy Tubes.27Foam Filled Cuffed Tracheostomy Tubes.27VII. Understanding Your Tracheostomy/ PMV Benefits .28Understanding Your Tracheostomy.28PMV Benefits.29Improves Speech and Voice Production.29Improves Swallowing.30Improves Secretion Management.30Improves Senses of Smell and Taste.30Impacts Infection Control.30Assists With Ventilator Weaning.30Assists With Decannulation.31Quality of Life Issues.31VIII. Glossary .33IX. Resources .34X. Passy-Muir Clinical Support and Educational Materials .35I. INTRODUCTIONThis handbook was designed for tracheostomized and/or ventilatordependent patients, their caregivers and families. Each person involvedwith the care and use of the Passy-Muir Tracheostomy & VentilatorSwallowing and Speaking Valve (PMV ) requires the appropriate trainingto ensure patient safety and appropriate PMV use. This handbook coversthe PMV 005 (white), PMV 007 (Aqua Color ) , PMV 2000 (clear),and the PMV 2001 (Purple Color ) valves and it should be used alongwith hands-on training as well as with the PMV Instruction Booklet andWarning Labels contained in the PMV Patient Care Kit.WARNING: YOU MUST BE EVALUATED AND MONITORED BY A QUALIFIEDHEALTHCARE PROFESSIONAL WHEN TRYING THE PMV FOR THE FIRST TIMETO ENSURE YOUR SAFETY AND PROPER USE OF THE PMV. NEVER ATTEMPTTO USE THE PMV UNTIL AFTER YOU HAVE BEEN EVALUATED AND TRAINEDTO USE IT BY A QUALIFIED HEALTHCARE PROFESSIONAL.Note: Terms that can be found in the glossary are written in bold lettersin the text for easy identification.The following are general guidelines. For specific instructions ask yourphysician and/or healthcare professional. These guidelines apply to bothtracheostomy and ventilator use of the PMV. Using the PMV with aventilator will require additional instructions found at the end of eachsection denoted by aFor Ventilator Use.CAUTION: This booklet should be used as a guide only. Additional and patientspecific instructions will be provided by your doctor, nurse, respiratory therapist,and/or speech-language pathologist.“Although I cannot tolerate having my tracheostomy tube plugged, I dotolerate wearing the PMV very well. I can cover my tracheostomy tubeand the PMV with a scarf to minimize their presence while still being ableto work and talk. I have found that the PMV reduces airway irritationand facilitates secretion control so that I can go for long periods withoutcoughing. The PMV is terrific! It has helped to normalize life for me.”Mimi Collins, M.D.Bilateral Vocal Cord ParalysisPhiladelphia, PA1
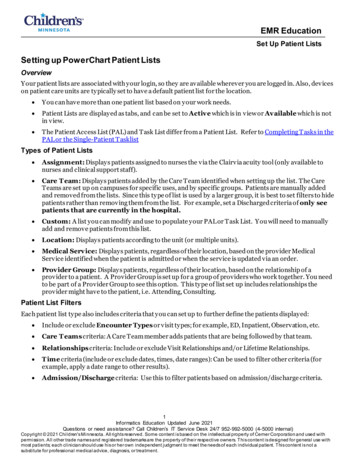
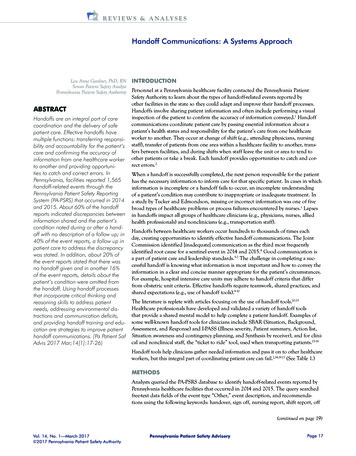
II.PASSY-MUIR TRACHEOSTOMY & VENTILATORSWALLOWING AND SPEAKING VALVES (PMVs)What is a PMV ?Your doctor has ordered a Passy-Muir Tracheostomy & VentilatorSwallowing and Speaking Valve (PMV) that you can wear on the end(hub) of your tracheostomy tube. It will enable you to talk without usingyour fingers to block the tube. The PMV 005 (white), PMV 007 (AquaColor ), PMV 2000 (clear) and PMV 2001 (Purple Color ) are theonly closed position “no leak” one-way speaking valves. Unlike openposition one-way speaking valves (Fig. 1), the closed position “no leak”PMVs stay closed except during inhalation (Fig. 2.1). When you inhale,the PMV opens letting air enter the tracheostomy tube and the lungs. Atthe end of inhalation, the PMV automatically closes and remains closedthroughout exhalation, without leakage. Your exhaled air moves up pastyour vocal cords and out of your mouth and/or nose (instead of back outof the tracheostomy tube) so that sound can be produced (See ChapterVII, Understanding Your Tracheostomy/PMV Benefits, page 28).Because the PMV stays closed and does not leak during exhalation, acolumn of air stays inside the tracheostomy tube and keeps secretionsfrom entering the tube and blocking the PMV (Fig. 2.2). Instead, thesesecretions (if present) are redirected around the tracheostomy tube andup to the mouth where they can be more easily removed (Fig. 2.2). Theclosed position of the PMV restores a closed respiratory system and amore normal breathing pattern because you are exhaling air out of yourmouth and nose instead of through your tracheostomy tube.1All of the PMVs covered by this handbook fit directly on the tracheostomytube and can be adapted to use with a ventilator. PMVs can be used on almostall types and sizes of tracheostomy tubes including neonatal, pediatric andadult (See Chapter VI, Use of the PMV with Different Types of TracheostomyTubes. Page 25).Types of PMVsAll PMVs covered by this handbook can be used with adults, children andinfants who are tracheostomized and/or ventilator dependent. These valves canbe placed directly on the hub of the tracheostomy tube or used with variousadapters in-line with the ventilator as described later in this booklet.WARNING: THE TRACHEOSTOMY TUBE CUFF MUST BE COMPLETELYDEFLATED BEFORE PLACING THE PMV. AN INFLATED CUFF WILL BLOCK THESPACE IN THE AIRWAY AROUND THE TRACHEOSTOMY TUBE AND PREVENT THEPMV USER FROM EXHALING. THE PMV USER WILL BE UNABLE TO BREATHE IFCUFF IS NOT COMPLETELY DEFLATED TO ALLOW AIR TO BE EXHALED AROUNDTHE TRACHEOSTOMY TUBE AND OUT OF THE MOUTH AND NOSE.PMV 005 (white)PMV 007 (Aqua Color )2PMV 2000 (clear)with PMV Secure-It Fig. 1 All OtherSpeaking ValvesOpen Position SpeakingValves have Air Leak DuringExhalation and Do NotProvide a ClosedRespiratory SystemFig. 2 PMV Closed Position “No Leak” Design(1) PMVs Close Completely at End of Inhalation with No AirLeak, thereby Providing a Closed Respiratory System andMore Normal Breathing Pattern. (2) Closed Position “No Leak”Design Maintains a Column of Air in Tracheostomy TubeRedirecting Airflow and Secretions Up the Trachea (Airway)and Out of the Mouth and/or Nose.2The PMV 005 (white) Tracheostomy & VentilatorSwallowing and Speaking Valve is the original PMV. Whileit is more commonly used by non-ventilator dependentpersons, it can also be used with a ventilator using nondisposable, flexible, rubber tubing that can be obtained fromyour healthcare provider.The PMV 007 (Aqua Color ) Tracheostomy & VentilatorSwallowing and Speaking Valve is designed to fit insideadult disposable ventilator tubing. Use of an adapter maybe needed to adapt the PMV to pediatric ventilator tubingor various closed suctioning systems. The PMV 007 (AquaColor) can also be used off the ventilator.PMV 2001 (Purple Color )with PMV Secure-It The PMV 2000 (clear) LowProfile Tracheostomy &Ventilator Swallowing andSpeaking Valve and PMV2001 (Purple Color ) LowProfile Tracheostomy &Ventilator Swallowing andSpeaking Valve are designedto be much smaller in sizethan the PMV 005 (white) or PMV 007 (Aqua Color) and open easierduring inhalation. The PMV 2000 (clear) and PMV 2001 (Purple Color) can3
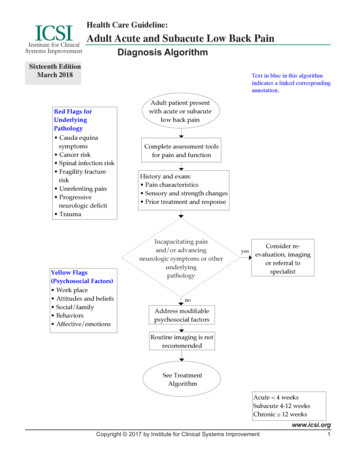
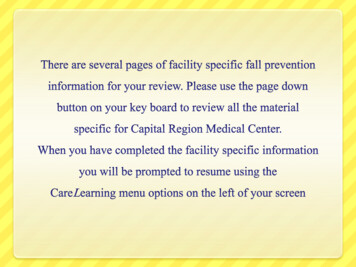
also be used on a ventilator using non-disposable, flexible, rubber tubing. ThePMV 2000 (clear) and PMV 2001 (Purple Color ) are designed to be usedwith the PMV Secure-It , a device that will keep the PMV connected to thetracheostomy tube tie to prevent PMV loss.PMV Patient Care KitEach PMV comes packaged with a PMV Patient Care Kit. The PMVPatient Care Kit comes in a ziplock pouch that will allow you to store theitems you need when using the PMV. The Patient Care Kit contains manyitems designed to be helpful to you and your caregivers (Fig. 3).CAUTION: PMV must be completely clean and dry before placing it incontainer to prevent growth of bacteria that can cause respiratory infection.Container should also be cleaned occasionally to prevent bacterial growth.3. Instruction Booklet - a clinician’s guide to use of the PMV.Contains comprehensive technical information for use of the PMVboth on and off the ventilator as well as cleaning guidelines.4. Bedside Label - this nonadhesive durable label is designedto be placed near you, the PMV user (i.e. at the head of the bedor on the wall). It provides important information to caregiversabout the PMV.5. Chart Warning Label - this adhesive label can be placed inyour medical chart or care plan to alert all caregivers that you arecurrently using a PMV.853912746Fig. 3 PMV Patient Care Kit Contents: (1) PMV (2) PMV Storage Container(3) Instruction Booklet (4) Bedside Label (5) Chart Warning Labels (6) PilotBalloon Labels (7) Patient Parameters Chart Label (8) Patient Handbook(9) PMV Secure-It (with the PMV 2000 series only)Each PMV Patient Care Kit contains the following items (Fig. 3):1. PMV- One of the following: PMV 005 (white) Tracheostomy& Ventilator Swallowing and Speaking Valve, PMV 007(Aqua Color ) Tracheostomy & Ventilator Swallowing andSpeaking Valve, PMV 2000 (clear) Low Profile Tracheostomy &Ventilator Swallowing and Speaking Valve, or PMV 2001 (PurpleColor ) Low Profile Tracheostomy & Ventilator Swallowing andSpeaking Valve.6. Pilot Balloon Labels - if you have a cuffed tracheostomytube, these small durable stickers must be applied to the pilotballoon of your tracheostomy tube as a reminder that the cuff ofyour tracheostomy tube must always be completely deflated beforewearing the PMV.7. Patient Parameters Chart Label - this adhesive label is used inyour medical chart or care plan to alert all caregivers to your use ofthe PMV (i.e. how long you wear it, if oxygen or ventilator is used,level of supervision needed, etc.).8. Patient Handbook - the instruction booklet you are nowreading on use, care and cleaning of the PMV. Designed forpatient, family and caregiver use.9. PMV Secure-It - is designed for use with the PMV 2000(clear) and PMV 2001 (Purple Color ) only. A clear, flexible,rubber attachment that connects the PMV to the tracheostomy tubetie to prevent PMV loss. (Use of the PMV Secure-It is optional).2. PMV Storage Container - a small plastic cup to allow you tostore your clean PMV when it is not being used.45
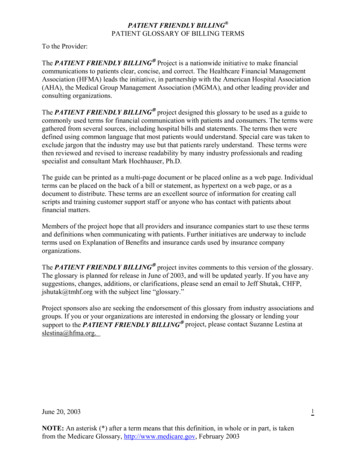
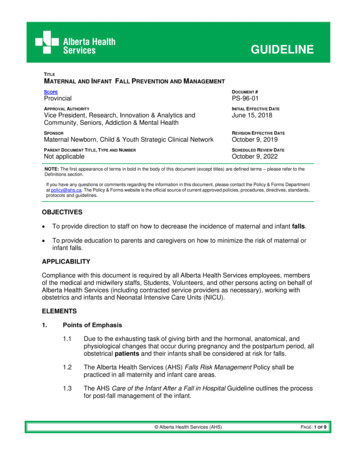
III. PLACEMENT OF THE PMV WARNING: YOU MUST BE EVALUATED AND MONITORED BY A QUALIFIEDHEALTHCARE PROFESSIONAL WHEN TRYING THE PMV FOR THE FIRST TIMETO ENSURE YOUR SAFETY AND PROPER USE OF THE PMV. NEVER ATTEMPTTO USE THE PMV UNTIL AFTER YOU HAVE BEEN EVALUATED AND TRAINEDTO USE IT BY A QUALIFIED HEALTHCARE PROFESSIONAL.The following are general guidelines. For specific instructions ask yourphysician and/or healthcare professional. These guidelines apply to bothtracheostomy and ventilator use of the PMV. Using the PMV with aventilator will require additional instructions found at the end of eachsection denoted by aFor Ventilator Use.Thorough hand washing and the use of gloves are necessary when workingwith the tracheostomy tube and when handling the PMV (includingplacement and removal of the PMV on/off the tracheostomy tube).1. PositioningBefore putting the PMV on the tracheostomy tube, place yourselfin a comfortable position as this will help air move freely aroundthe tracheostomy tube. The tracheostomy tube should be positionedstraight in the airway. This will promote good airflow and shouldhelp to make you comfortable.Before PMV During PMV After PMVMy heart rate range isMy respiratory rate isMy respiratory rate range isMy oxygen saturation isMy oxygen saturation range isFor Ventilator UsePeak Inspiratory Pressure (PIP)The measurement of Peak Inspiratory Pressure (PIP) can befound on the front panel of a ventilator. In most cases it is amanometer (gauge) with a needle that rises with each breath theventilator delivers (Fig. 4). It tells you how much pressure it takesto give you a ventilator breath. The reading on the manometershould be checked before deflating the cuff of your tracheostomytube and putting on the PMV. Record this number below in the“Before PMV” column.Before PMV Before PMV During PMV After PMV Off(Cuff Inflated) (Cuff Deflated) (Cuff Deflated) (Cuff Inflated)My PIP isMy PIP range is2. Checking Vital SignsMy heart rate isIt is important to take the following measurements before, duringand after PMV placement. This will help alert you to any possibleproblems you may be having before they become serious. Thefollowing are some of the vital signs that should be monitored:Heart Rate (number of beats per minute)Respiratory Rate (number of breaths per minute)Oxygen Saturation (measured with a pulse oximeter if available)Color of Skin (especially around the eyes and mouth)Work of BreathingConsult your doctor and/or healthcare professional to find outwhat range each of these vital signs should stay within when youuse the PMV and write them down in the space provided (page 7).If while using the PMV the vital signs do not stay in the normalrange recommended by your doctor and/or healthcare professional,remove the PMV immediately and consult your doctor.6Fig. 4 Manometer on a ventilator used to measure PIPThis Manometer is reading 23 cmH2OWARNING: REMOVE PMV IMMEDIATELY IF PIP GOES OUTSIDE OF RANGERECOMMENDED BY YOUR DOCTOR AND/OR HEALTHCARE PROFESSIONAL.CONTACT YOUR PHYSICIAN FOR FURTHER INSTRUCTION.7
3. SuctioningABSuction your tracheostomy tube and mouth (as needed) to removeexcess secretions before placing the PMV . Removing excesssecretions from your airway before using the PMV will allow air tomove more freely around the tracheostomy tube and will make youfeel more comfortable while wearing the PMV. These secretions cancause breathing difficulties and may cause excessive coughing if notremoved.4. Deflating the CuffIf you have a cuffed tracheostomy tube, please read thefollowing very carefully as the cuff must be completely deflatedbefore you use the PMV. A deflated cuff will allow air to beexhaled around the tracheostomy tube and out of the mouth andnose when the PMV is being used. Attach the Pilot Balloon Labelto the pilot balloon line of the tracheostomy tube, if not alreadyin place. If you have a cuffed tracheostomy tube you might wishto consider asking your doctor to evaluate you for a cufflesstracheostomy tube (described on page 26), so the need for cuffdeflation will be eliminated when using the PMV.Fig. 5 Cuffed Tracheostomy Tube (A) Inflated Cuff (air in cuff) and (B) DeflatedCuff (no air in cuff)If you have a cuffless (no cuff) tube, you may skip this stepand continue to step #5 (page 10) because you have no cuff to bedeflated. Your cuffless tube should allow you to exhale air aroundit and out of your mouth and nose while using the PMV.For Ventilator UseWARNING: TRACHEOSTOMY TUBE CUFF MUST BE COMPLETELY DEFLATEDBEFORE PLACING THE PMV. AN INFLATED CUFF WILL BLOCK THE SPACE INTHE AIRWAY AROUND THE TRACHEOSTOMY TUBE AND PREVENT THE PMVUSER FROM EXHALING. PMV USER WILL BE UNABLE TO BREATHE IF CUFFIS NOT COMPLETELY DEFLATED TO ALLOW AIR TO BE EXHALED AROUNDTHE TRACHEOSTOMY TUBE AND OUT OF THE MOUTH AND NOSE.Suctioning may be needed before and after cuff deflation boththrough the tracheostomy tube and in the mouth. Secretions canbuild up around the cuff of a tracheostomy tube and when deflatedthese secretions drop into the airway and may cause breathingdifficulties and/or persistent coughing if not removed.If you have a cuffed tracheostomy tube, (as described in Chapter VI,Use the PMVs with Different Types of Tracheostomy Tubes, page 25) you8must be able to tolerate cuff deflation before the PMV can beused (Figs. 5A and 5B). The cuff must be completely deflated toallow you to exhale around the tracheostomy tube and to have themost amount of room present in the trachea (airway). This willallow all air to be exhaled around the tracheostomy tube, throughthe vocal cords and out the nose and mouth. It may be helpful todeflate the cuff slowly in order to reduce coughing and to allowyou to get used to airflow in the throat, nose and mouth.When a cuffed tracheostomy tube is present and the tracheostomytube cuff is deflated, the seal that the cuff provided is lost and someof the air that is delivered by the ventilator may escape around thetube. To avoid large leaks, always deflate the cuff slowly over 2–3minutes which will allow your airway time to adjust to the airflow.Frequently, ventilator changes can be made to compensate for theescaping air so that you will continue to receive the same amountof support from the ventilator as you do when the PMV is not beingused. Each patient’s needs are different. Your doctor will determinewhat ventilator adjustments (if any) should be made.After cuff deflation and recommended/prescribed ventilatorchanges are made, check the PIP pressure again. Record this inthe space provided (Before PMV/Deflated Cuff, page 7). Ask yourdoctor and/or health care professional the range that the PIPshould remain in while you use the PMV and write it down in thespace marked “My PIP range is” (page 7).WARNING: ANY ADJUSTMENTS TO THE VENTILATOR MUST BE APPROVEDBY A DOCTOR.9
5. PMV PlacementRemoving the PMV Secure-It Allow yourself a few moments to recover from cuff deflation andsuctioning before placing the PMV on the tracheostomy tube.1. Unbutton the PMV Secure-It from the tracheostomy tube tie.Please note: If you are using the PMV 005 (white) or PMV 007(Aqua Color ), or are on a ventilator and using the PMV 2000(clear) or PMV 2001 (Purple Color ), you will not be using thePMV Secure-It . Skip to Part B below.Part A - Using the PMV Secure-ItIf you are using the PMV 2000 (clear) or PMV 2001 (PurpleColor) and are not on a ventilator, attach the PMV Secure-It tothe PMV before placing the PMV on the tracheostomy tube.Use the following steps (use of the PMV Secure-It is optional):1234Fig. 6 Placement of the PMV Secure-It 1. Thread the long thin end of the PMV Secure-It through the smallhole on the side of the PMV (Fig. 6.1).2. Pull it through the hole until the PMV rests between the twonotches on the PMV Secure-It (Fig. 6.2).3. Place the other (thicker) end of the PMV Secure-It around thetracheostomy tube tie, close to the neckplate of the tracheostomytube (Fig. 6.3).4. Fasten like a button in a button hole ( Fig. 6.4).102. Remove the PMV from the hub of the tracheostomy tube asdescribed in #6 Removing the PMV (page 16).3. Gently pull the PMV Secure-It out of the small hole on the sideof the PMV.Part B - Attaching the PMV to the Tracheostomy TubeAttach the PMV to the end of the tracheostomy tube (hub) using afirm 1/4 twist with one hand while holding on to the neckplate ofthe tracheostomy tube with the other hand (Fig. 7.1 and 7.2). The1/4 twist provides friction to help prevent the PMV from poppingoff. It may be helpful to use a mirror if you are putting the PMVon yourself. Chart Warning Labels, Bedside Label and PatientParameters Chart Label should be placed at the bedside and in thechart, if this has not already been done, in order to alert all caregiversof PMV use.12Fig. 7 1. Attaching the PMV to the tracheostomy tube using a 1/4 twistclockwise motion 2. PMV placed on hub of tracheostomy tube with optionalPMV Secure-It attachedCAUTION: Do not place the PMV forcefully onto the tracheostomy tube asthat may make it difficult to remove the PMV and may cause the PMV membraneto stick.After the PMV has been placed on the tracheostomy tube, changes invital signs should be checked. Record your vital signs while wearingthe PMV in the “During” column (page 7). Continue to monitor vitalsigns periodically while the PMV is in place. If these vital signs falloutside of the ranges recommended to you by your doctor and/orhealthcare professional, remove the PMV immediately and contactyour doctor. Note: For infants and children, restlessness, wheezing,grunting, unusual sleepiness, as well as changes in vital signs indicatethat the PMV should be removed immediately and the doctor contacted.11
WARNING: IF YOU ARE HAVING ANY DIFFICULTY BREATHING, REMOVE THEPMV IMMEDIATELY AND CONTACT YOUR DOCTOR AND/OR HEALTHCAREPROFESSIONAL.If you did not feel well while wearing the PMV and removed it, seeSection IV, Troubleshooting (page 18) before trying the PMV again.If you are breathing comfortably and vital signs are normal,continue to use the PMV per doctor’s instructions.WARNING:DO NOT WEAR THE PMV WHILE SLEEPING.Part C - PMV/Tracheostomy Tube Connections:The PMVs can be used with standard humidification devices usinga trach collar (Fig. 8a). Oxygen can be administered while the PMVis in place at the tracheostomy tube site via trach collar or use of thePassy-Muir PMA 2000 Oxygen Adapter (Fig. 8b). Please contactPassy-Muir Inc. for additional information about the PMA 2000.Fig. 8a PMV used with trach collarFor Ventilator UsePlacing the PMV In-line with the VentilatorThe PMV 005 (white), PMV 007 (Aqua Color ), PMV 2000 (clear)and the PMV 2001 (Purple Color ) can be used with most types ofventilators (Fig. 9) and in conjunction with most ventilator settings.Your doctor will give you specific instructions that will enable youto use the PMV safely in-line with the ventilator. Careful assessmentby your doctor must be made before using the PMV. Although mostpeople on ventilators can wear the PMV comfortably all day, somepeople may need more time and preparation before using the PMVand/or may only be able to wear it for short periods (minutes).In some cases, changes in the ventilator settings may be needed.If changes are necessary they will be prescribed by your doctor.Important information for your doctor and healthcare professional onuse of the PMV with a ventilator dependent person can be found in thePassy-Muir Instruction Booklet that comes packaged with each PMVin the Patient Care Kit.Fig. 8b PMA 2000 Oxygen Adapteron the PMV 2001 (Purple Color )WARNING: PLEASE USE CAUTION WHEN USING THE PMV WITH A HEATMOISTURE EXCHANGER (HME) OR HYGROSCOPIC CONDENSER HUMIDIFIER(HCH) AS THE AMOUNT OF HUMIDIFICATION DELIVERED WHEN THESEDEVICES ARE USED WITH THE PMV MAY BE REDUCED BECAUSE THESEDEVICES REQUIRE EXHALED AIR FROM THE TRACHEOSTOMY TUBE TO PASSTHROUGH THEM. WHEN THE PMV IS WORN, EXHALED AIR IS REDIRECTEDTHROUGH THE THROAT AND OUT THE NOSE AND MOUTH INSTEAD OF OUTTHE TRACHEOSTOMY TUBE.CAUTION: Remove the PMV before giving medicated nebulizer treatments. Ifthe PMV is accidentally used during a treatment it should be removed immediatelyand rinsed thoroughly to remove medication residue. If this is not done, residuefrom medication may cause the PMV to stick.12If you are not using the PMV with a ventilator, continue to page 16.Fig. 9 Barbara, a ventilator dependent PMV user with thePMV 005 (white) Speaking Valve in-line with her portable ventilatorIf you are going to use the PMV while on a ventilator, your doctorand other healthcare professionals (e.g., respiratory therapist) willalso need to determine and instruct you regarding the best way foryou to connect and use the PMV. There are many different types ofconnections that can be used to put the PMV in-line in the ventilatortubing. Some of these connections are shown in Figures 10.1 - 10.4.Although all of the PMVs can be used with a ventilator, the PMV 007(Aqua Color) is designed to be the most convenient PMV to use13
with a ventilator because it is tapered to fit directly into disposableventilator tubing. The PMV 2000 (clear), PMV 2001 (PurpleColor ) and PMV 005 (white) require the use of non-disposable,flexible, rubber ventilator tubing to place them in-line with theventilator (Fig. 9).WARNING: DO NOT USE THE PMV 005 (WHITE), PMV 2000 (CLEAR) OR PMV2001 (PURPLE COLOR) WITH DISPOSABLE VENTILATOR TUBING AS THEREIS A POTENTIAL FOR DISCONNECT.Aft
This handbook was designed for tracheostomized and/or ventilator . dependent patients, their caregivers and families. Each person involved with the care and use of the Passy-Muir Tracheostomy & Ventilator Swallowing and Speaking Valve (PMV ) requires the appropriate training to ensure patient safety an