Transcription
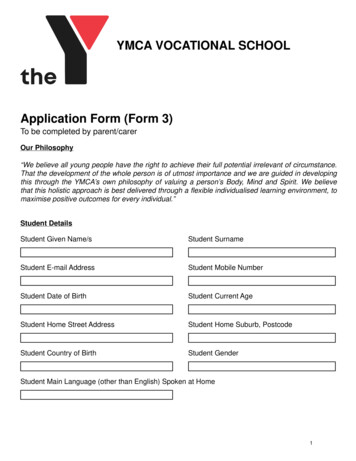
How to manage a student’sTimesheet?This document is a step-by-step guide to show you how to complete a student’stimesheet for the duration of the placementYou will learn how to: Add weeks Add scheduled hours Complete hours Sign off a completed week Understand notifications during a student’s placementAccessing your students timesheetTo access your student’s timesheet, login to the P@RE system and from your dashboardthere will be a section called “Student Timesheets”Edit LinkPlease note:This section only shows if you are assigned to at least 1 placement and a students iscurrently at that placementThe section shows each students active timesheet, along with the placement name andthe total number of hours accumulated to date.“Click” the edit link to the right of the students row to access their timesheetThe timesheet pageWhen a timesheet has been opened for the first time it looks some like the screenshotbelow. Here you can see the following: Information regarding students timesheet.1www.onlinepare.net info@onlinepare.net
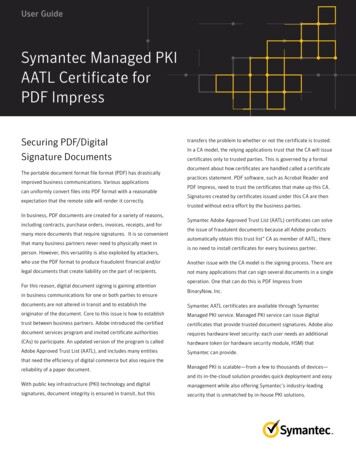
In the blue box after details of the student and the placement, at the bottom ofthis box shows the total hours and a link to download the students timesheet toa downloadable PDF.At the very bottom of the page is a link to “Add a week to the timesheet”, this isthe button we use to add any number of weeks the student is at your placementarea.Adding a new weekPlease note:This option is available to both yourself and the student, it will nearly always be thestudent doing this but if they ever fall behind or you want to help the student outthe option is here for you to do so.To add a new week we want to find the button called “Adda week to the timesheet” and click it, to bring up a popupbox to add our week commencing date.2www.onlinepare.net info@onlinepare.net
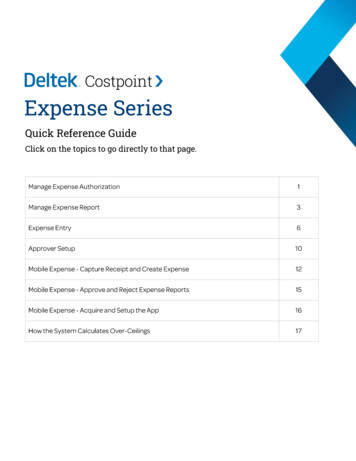
Within the popup box there is a text box for selecting a day for our new week, when youclick the text box a date picker will show up. This lets you select an available day to add.Things to consider are: You can only select a MondayAlways use the date picker to choose a date as we only accept the followingformat dd/mm/yyyyWeeks will be hidden if they have already been selected before to preventduplicationChange the monthClick when a Monday hasbeen selectedUnavailable daysWhen you have selected a week, click the green “Add week” button.Your new week will always appear in week order within all your weeks, so it is easy tofind any days shift in the placement cycle.The layout of the week is shown below:Hours forthe weekScheduled startand end timesDay type (blue refersto day type help box)3www.onlinepare.net info@onlinepare.netHours completedthat dayNotes aboutthe weekYoursignature
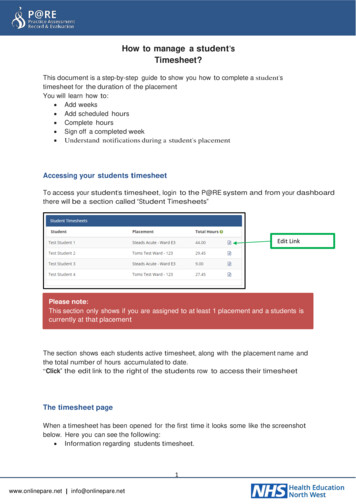
A breakdown of the week will help you understand this section in more detailDay TypeThe day type is coloured in blue to signify the correlation between this and the day typekey found at the top of the weeks in the timesheet.The example below shows some of the common day types used within the majority of HEIs.Select box for each day of the weekThe keyClicking one of the day types will show you in aclearer form what is been explained above.When you click a day type, a popup box appearsand offers you a dropdown box of day types thatcorrespond to the above key.When you select an option (for example“Practice”), the code will appear in the main fieldafter you click “Add”So for our first day in our week, we now see a “P” in the day type field,correlating to the key as a “Practice” day that has been added tothe week.Scheduled TimeThis is where we add the start and end time for the student’s shift for thatday. The format for the time is 00:00, when you click on either a start timeor end time a “time picker” box will appear (as shown to the right).This lets you select with the arrows the time you started your shift in 15minute intervals.When you have selected your desired time, click away from the box andthe time picker will disappear4www.onlinepare.net info@onlinepare.net
HoursBy default the hours box is disabled. Hours can only be selected when the day type hasbeen selected, as we only allow you to enter hours into the timesheet if you selecteither “Practice” or “Flexible Study Day”.The day types can change between HEIs and professionsThe reason for this is because we only want to record the hours the student is actuallyworking on placement or studying as part of their placement either at university or onthe ward.Disabled boxesEnabled boxesOnce you have selected a day type that requires hours to be recorded, you can click thehours box to enter the student’s practice hours.When you click the hours box, an “hour picker” will appearwhich allows you to select the hours and minutesaccordingly.As an additional feature, if the start and end time are prefilled, when you click on the hours box it will automaticallypre-fill the student’s hours for that shift (minus 30 minutesfor lunch for longer shifts), this can be adjusted at anytime.5www.onlinepare.net info@onlinepare.net
NotesThe notes are designed for both students and mentors toadd any timesheet related details for that week.For example, if the student was absent for 2 days from theplacement, they can then add a note to explain the reasonfor this absence.Adding a note is not mandatory.Click to amendTo add a note, click the text named “Add/Edit Note”This will open a popup box, from here you can enter any notes relating to the week intothe text box. When you have finished click the “Add” button.Your note is now added to the bottom of that week in the timesheet.Timesheet signaturesThe signature is an electronic method of signing off a timesheet week. Electronicsignatures are far more secure than paper-based signatures, which can be forged ordates falsified.Signatures on our system also have the security measure of locking any associatedcontent. For example, this prevents a student altering their hours after a mentor hassigned the week off.The signature changes depending if either you or your student is logged in, let’s gothrough both with you now.6www.onlinepare.net info@onlinepare.net
Signature from your own login (as a mentor)Signing a timesheet signature from your own account isvery simple indeed.Simply click the green “Add Signature” button and that’sit. As you are already logged in, your credentials areconfirmed so there is no need for you to do it again.Signature from student loginFrom the student screen, they can allow any mentor tosign off a timesheet week by handing over their deviceor using a PC. As a mentor you can then click the greenpencil icon.This will bring up a popup window which will promptyou for your username and password.(See screenshot below)Once you have entered your login credentials, our system will verify you are not only avalid mentor on the system but also check that you are allowed to sign this studentsPlease note:Validating your login credentials does not log you into the system, it only confirmsyou are a valid mentor. When you have finished you can pass the device back to thestudent and not worry about your details been used again.timesheet.If you enter you your details incorrectly this screen will stay open and a red warning boxwill show explaining why your login attempt failed.Once you have successfully confirmed your login details, your signature will be addedand we will lock down the timesheet week and no further changes can be made.7www.onlinepare.net info@onlinepare.net
Once a signature has been signed and the timesheet has been locked our week will nowlook like the following:As you can see all the text boxes can no longer changed, the signature box has nowdisplays the information about who signed the week and at what time.A locked symbol has been placed at the top rightsection of the week.To make a change to the week you need to unlockthe week which in doing so will remove thesignature and allow the details to be amended.The reason for this ability to unlock a previously signed entry is to allow amendmentspost signing in the unlikely event of an error being later discovered by the student ormentor. Once amended, a signature will again be required.The Declaration8www.onlinepare.net info@onlinepare.net
Recording the number of night shiftsStudents are required to record the number of night shifts theycomplete over the course of the placement. The timesheet app hasan “Estimate” feature which attempts to guess the number of nightshifts based on the start and end time given for each day.If the estimated number is incorrect the student can manually type over this to give theexact amount.Once recorded, always remember to click “Save” above it to ensurethis changed has been saved on the systemSigning off the timesheetOnce all the weeks have been completed and signed off, you will have the option to signoff and verify the entire timesheet at the end of the placement.If not there will be a message where the signature button is usually placed stating“Weeks must be signed off first”.The declaration includes the total number of hours for the whole timesheet, the hoursare split between the practice hours and the flexible study hours (HEI/Professiondependant).Underneath that is the total night shifts. This is an editable text box, please make surethat this has been accurately completed as this is important for the student’s records.Once you are happy that timesheet has been accurately completed you and yourstudent should sign-off the declaration.After this, no more action is required from either you or the student.Notifications during a student placement1. Timesheet week needing a signatureIf a student has been on placement for over 2 weeks and a timesheet week hasbeen filled in without a mentor signature for their completed weeks we send aweekly reminder to yourself to take a look and sign that week off.9www.onlinepare.net info@onlinepare.net
The section shows each students active timesheet, along with the placement name and the total number of hours accumulated to date. "Click" the edit link to the right of the students row to access their timesheet The timesheet page When a timesheet has been opened for the first time it looks some like the screenshot below.