Transcription
Mohawk Engineered Hardwood FlooringInstallation InstructionsMohawk Engineered Tongue and Groove Hardwood Flooring can be installed over most properly prepared subfloors and are engineered to bedimensionally stable, making them suitable for installation on all grade levels where moisture conditions do not exist.We continuously make technological advancements that improve product performance or installation techniques or methods. To confirm you havethe most recent installation instructions, please visit our website at www.mohawkflooring.com or contact Technical Services at 888-387-9881, Option3Caution: Wood DustCutting, sanding or machining wood products produces wood dust. While woodproducts are not hazardous under the OSHA Hazard Communication Standard(29 CFR 1910.1200), the International Agency for Research on Cancer (IARC) andthe State of California have classified wood dust as a human carcinogen.PROPOSITION 65 WARNING: This product produces wood dust when cut,sanded or machined. Wood dust is considered a carcinogen by the State ofCalifornia.Precautionary Measures: Airborne wood dust can cause respiratory, skin and eyeirritation. Power tools should be equipped with a dust collector. Use an appropriateNIOSH-designated dust mask. Avoid dust contact with skin and eyes.First Aid Measures in case of irritations: In case of irritation flush eyes with water. Ifneeded seek medical attention. If dermatitis occurs, seek medical attention.WARNING! DO NOT MECHANICALLY CHIP OR PULVERIZE EXISTING RESILIENTFLOORING, BACKING, LINING FELT, ASPHALTIC “CUTBACK” ADHESIVES OROTHER ADHESIVES.Previously installed resilient floor covering products and the asphaltic or cutbackadhesives used to install them may contain either asbestos fibers and/or crystallinesilica. The products in this carton DO NOT contain asbestos or crystalline silica.Avoid creating dust. Inhalation of asbestos or crystalline dust is a cancer and respiratorytract hazard. Smoking by individuals exposed to asbestos fibers greatly increases therisk of serious bodily harm. Unless positively certain that the product is a non-asbestoscontaining material, you must presume it contains asbestos. Regulations may requirethat the material be tested to determine asbestos content and may govern the removaland disposal of material. See current edition of the Resilient Floor Covering Institute(RFCI) publication “Recommended Work Practices for Removal of Resilient FloorCoverings” for detailed information and instructions on removing all resilient coveringstructures.To request a Material Safety Data Sheet, call 888-387-9881, Option 3INSTALLER / OWNER RESPONSIBILITY:It is the responsibility of the installer and owner to ensure that job site environmental,sub-floor and subsurface conditions involved meet or exceed all requirements asoutlined in installation instructions prior to installation. Manufacturer declines allresponsibility for product performance or installation failure due to sub-floor, substrateor environmental deficiencies or jobsite conditions.All work involving water or moisture (plumbing, masonry, painting, plastering) must becompleted prior to flooring being delivered. Building envelope must be complete andexterior doors and windows installed. Exterior grading and gutter downspouts shouldbe completed and permanent HVAC systems in operation for 14 days prior to flooringbeing delivered to job site. Measures should be taken to protect floors from other tradework. Do not cover floors with plastic, red rosin, felt or wax paper or previouslyused cardboard. Instead use a breathable material such as clean, dry, plainuncoated cardboard or Kraft paper. Inks from printed cardboard could damagethe hardwood floor The floor should be thoroughly cleaned before covering toremove grit and debris that would damage the finish. The floor must be completelycovered to eliminate uneven ambering from exposure to UV light.Manufacturer requires Engineered Hardwood products acclimate for 48 hours prior toinstallation. Acclimation allows flooring to achieve equilibrium moisture content (EMC)with the installation environment. All wood continually expands and contracts until itreaches moisture equilibrium with the environment in which it’s installed. As with allwood flooring, expansion and contraction will be minimized if climate control isconsistently maintained year round. This is especially important with tropicalspecies, because denser woods experience more significant shrinkage in lowmoisture / low humidity environments.Room temperature should be 60 – 800 F, with relative humidity between 35 –55%. These environmental conditions are specified as pre-installationrequirements and must be maintained for the life of the product.Building interiors are affected by two distinct humidity seasons – Heating and NonHeating. Care should be taken to maintain humidity levels between 35-55% yearround. Manufacturer warranties do not cover natural expansion and contractionwhich results in separation between planks, or damage caused by excessivelylow or high humidity. Seasonal gapping is not considered a manufacturingdefect.1-21-13Heating season – Low Humidity, Dry. All heating methods create dry, low humidityconditions. Humidifiers are recommended to prevent excessive shrinkage or gappingin wood floors due to seasonal periods of low humidity.Non Heating Season and Coastal or Waterfront Areas – High Humidity, WetDuring the non heating season proper humidity levels should be maintained by usingan air conditioner, dehumidifier or by turning on your heating system periodicallyduring the summer months.Do not install in full bathrooms or powder rooms.Examine flooring for color, finish and quality prior to installation. If material isunacceptable, contact the seller immediately. Wood is a natural product and containscharacteristics such as variations in color, tone and graining. Flooring is manufacturedin accordance with industry standards, which allows manufacturing and natural defecttolerances up to 5% of the total installation. Installer should work from several cartonsat the same time to ensure good color and shade blend. Installer should not installundesirable pieces.Flooring warranties DO NOT cover materials with visible defects once they areinstalled. Installer and Owner are responsible for final inspection of flooringmanufacture, grade and finish. Purchase an additional 5% of flooring to allow for cutsand an additional 10% if installing diagonally.WARRANTY NOTE: Installer should provide owner with one carton end labelfrom product installed for warranty purposes. Owner should retain carton endlabel and copy of invoice with product style name and style number for theirrecords. Excess flooring should be retained and stored for future repairs in the eventplanks are ever damaged.The use of stain, filler or putty for correction is considered a normal practice and aroutine part of installation.TOOLS: BASIC TOOLS AND ACCESSORIES:BroomMohawk Ultra Tack M959 Adhesive-SealerTerry Cloth TowelsPutty KnifeCoordinating transition strips or moldingMineral SpiritsCoordinating stain, filler or puttyHand or Electric Jam SawChalk linePower Circular saw or Miter SawPage 1
Thick felt or rubber padsWood/Concrete Moisture Meter or BothSafety Glasses½ Inch Wood SpacersStraight EdgeTable SawTape MeasureCarpenter’s SquarePry Bar or Trim PullerUtility KnifePencilPull Bar15 Lb. Saturated FeltMohawk D3 Rated Floating Floor GlueUniclic Tapping Block3M Blue #2080 TapePlastic ScraperMohawk ProTack M908 Urethane or Columbia Urethane AdhesiveMohawk ProTech M901 Moisture MembraneMohawk FloorCare Essentials Hardwood & Laminate Flooring Cleaner orColumbia Hardwood Flooring CleanerFor Floating Installation: Use Performance Accessories Underlayments or productsthat meet or exceed these products’ specifications. The use of accessories otherthan Performance Accessories might cause damage to the EngineeredHardwood Flooring. Therefore, we recommend products specifically designedand tested for use with Engineered Hardwood Flooring.For Direct Glue Installation: When using Mohawk’s ProTack M908 or ColumbiaUrethane Adhesives apply adhesive with a ¼” x 3/16” x ½” V Notch Trowel. Mohawk’sM959 Adhesive-Sealer has trowel clips inside the pail. For Mohawk’s ProTech M901Urethane Moisture Membrane, apply with a 5/32” x 3/16” V Notch Trowel for moistureretarder membrane application or products that meet or exceed manufacturer’sadhesive and sealer specifications. When installing on concrete subfloors, trowelsshould be replaced every 3000 ft. Never use a water based adhesive to installEngineered Hardwood Flooring.STORAGE AND HANDLING:Flooring should be delivered and stored at the jobsite for 48 hours prior to installationto allow the product to acclimate from prior transport or storage conditions. Flooringshould be stored with at least a four inch air space under cartons. Do not open cartonsbut remove any plastic wrap that may have been used to ship the material. This isespecially important if you live in a very humid or dry climate.PRE-INSTALLATION & JOB SITE CONDITIONSSUBFLOOR REQUIREMENTS:The following subfloor recommendations are intended to complement theinstallation of hardwood flooring as an interior finish. Hardwood flooring is nota structural component. These recommendations are not intended to supersedefederal, state or local building codes, but as with many other interior finishproducts, may require modifying existing structural components for asuccessful installation.NOTE: When joist spacing exceeds the traditional 16 on center, Mohawkrecommends you apply a thin bead of Mohawk Tongue & Groove D3 glue to thebottom side of the groove to lock the tongue and groove profile in place. Thiswill reduce the potential for movement of the tongue and groove, which maycontribute to squeaking or crackle. When using this new method of installation,you may continue to choose to staple or nail down the hardwood depending onyour preference. Using D3 T&G glue with the staple or cleat reduces movementas the subfloor deflects.SUBFLOOR PREPARATION RECOMMENDATIONS FOR ALLINSTALLATIONS:Engineered Hardwood Floors may be installed over any structurally sound subfloorthat is flat, clean and dry on all grade levels. Do not install in full bathrooms or powderrooms.All subfloors should be: CLEAN – Subfloor must be clean and free of dirt, curing compounds, drywall mud,wax, paint, oil, sealers, adhesives and other debris. These may be removedmechanically. FLAT – Within 3/16″ in 10′ radius (5 mm in 3 m) and/or 1/8″ in 6′ radius (3 mm in 2m). Sand high areas or joints. Fill low areas with a high compressive strength (min.3,000 psi) Portland base compound. DRY – Select the appropriate moisture indicator test specifically designed for usewith wood or concrete subfloors. Test and record moisture content results.1-21-13 STRUCTURALLY SOUND – Nail or screw any areas that are loose or squeak. Woodpanels should exhibit an adequate fastening pattern, glued/screwed or nailed as thatsystem requires, using an acceptable nailing pattern. Typical: 6” (15 cm) along bearingedges and 12” (31 cm) along intermediate supports. Flatten edge swell as necessary.Replace any water-damaged, swollen or delaminated subflooring or underlayment.Building codes establish requirements for structural support components of flooringsystems which may not provide adequate rigidity and support for proper installationand performance of a hardwood floor. Whenever possible, install flooringperpendicular to the floor joists for maximum stability.NOTE: Avoid subfloors with excessive vertical movement or deflection becausesubfloor movement will telegraph through to the finished installation. Indications ofexcessive deflection are uneven finish wear, fastener release, squeaking,compromised or damaged locking systems, sectional contours such as bowing ordipping in floors and uneven flooring material. Nail or screw subfloor panels to secureboards with excessive vertical movement or deflection. If the subfloor has excessivevertical movement (deflection) before installation of the flooring, it is likely it will do soafter installation of the flooring is complete. Our warranties DO NOT cover anyproblems caused by inadequate substructures or improper installation of saidsubstructures.Subfloor moisture checkNote: To increase reliability, moisture testing should be performed after the HVACsystem has been in operation for a minimum of 14 days. Excess moisture on anyflooring substrate if not identified and corrected prior to installation will cause floorcovering failure. Warranties DO NOT cover products installed over improperlyprepared subfloors, substrates or environmental related deficiencies.Acceptable conditions for above, on and below grade applications are:Concrete Subfloor Moisture ContentOn and below grade applications are susceptible to moisture and should be tested formoisture prior to installation in several locations within the installation area. Installershould record moisture test results in the space provided on the last page of thisdocument and leave with the owner as part of their records. Acceptable conditions forabove, on and below grade applications on concrete are: Less than 3 lbs./1000 sq. ft./24 hrs. Calcium Chloride Test (ASTM F1869)orLess than 75% RH Levels in Concrete Using In-situ Probes (ASTM F 2170-02)orNo greater than 5% on a Tramex Concrete Moisture Encounter meter orequivalent concrete moisture meter.DO NOT INSTALL FLOORING IF MOISTURE TESTS RESULTS EXCEEDRECOMMENDED LIMITS.NOTE:New concrete slabs require a minimum of 60 days drying time before covering themwith a wood floor. (Must be fully cured) Although initial moisture tests may indicate adry slab, the moisture content of slabs may increase due to seasonal fluctuation orweather patterns. New construction should have a minimum 10 mil poly membranebetween the ground and concrete.Wood Subfloor Moisture ContentTest both wood subfloor and wood flooring for moisture content using a reliable pintype moisture meter. The subfloor material must not exceed 12% moisture content.The difference between the moisture content of the wood subfloor and the hardwoodflooring must not exceed 4%.If subfloor moisture readings exceed recommended levels for concrete or wood, stepsMUST be taken to reduce subfloor moisture. Steps could include waiting for subfloorsto dry to acceptable levels or using an appropriate moisture barrier such as Mohawk’sProTech M901 Urethane Moisture Membrane.NOTE: Basements and crawl spaces must be dry. Use of a 6 mil black polyethylenemembrane is required to cover 100% of the crawl space earth. Crawl space clearancefrom ground to underside of joist should be no less than 18” and perimeter ventspacing should be equal to 1.5% of the total square footage of the crawl space area toprovide cross ventilation.Page 2
Mohawk’s M908 ProTack Urethane Adhesive or Columbia Urethane Adhesive andMohawk’s M959 Adhesive/Sealer are the recommended wood flooring adhesives thatmay be used for above, on, and below grade applications and on all commonsubstrates except particleboard and sheet vinyl.Sub-floors other than wood or concrete:To correct any subfloor conditions concerning moisture, either wait until thesubfloor dries to meet specifications or use an appropriate moisture barrier. Formore information concerning moisture conditions, contact Technical ServiceDepartment at 888-387-9881 Option 3.Note: Perimeter glued resilient vinyl and rubber tiles are unacceptable underlaymentsand must be removed.Concrete SubfloorTerrazzo, Vinyl, Resilient Tile, Cork and Linoleum or hard surfaces that are dry,structurally sound and level are suitable as a sub-floor. As above, the surface must besound, tight and free of paint, oil, existing adhesives, wax, grease and dirt. Terrazzoand ceramic tile must be scuffed to assure adhesion.Lightweight concreteTo test for lightweight or acoustical concrete, scrape a coin or key across the surfaceof the subfloor. If the surface powders easily or has a dry density of l00 pounds or lessper cubic foot, Engineered Hardwood flooring should be installed as floating only. Onlyengineered flooring 4 plies or thicker may be installed as floating.Warning! Do not sand existing resilient tile, sheet flooring, backing, or felt linings.These products may contain asbestos fibers that are not readily identifiable. Inhalationof asbestos dust can cause asbestosis or other serious bodily harm. Check with local,state and federal laws for handling hazardous material before attempting the removalof these floors.Wood SubfloorsDirect Glue Installation: Make sure the floor covering materials are well bonded toNOTE: As with many other interior finish products, modification of existingstructural components may be required for a successful installation.Solid Wood Subfloors - Direct Glue or Floating Installations Minimum 3/4″ (19 mm) thick with a maximum width of 6″ (15 cm) installed at a 45 angle to the floor joists. Group 1 dense softwood (Pine, Larch, Douglas fir, etc.) No. 2 common, kiln driedwith all board ends bearing on joists. For direct glue-down applications add 3/8″ (9.5 mm) approved floor panelunderlayment.Existing Wood Flooring – Direct Glue or Floating Installations Existing engineered flooring must be well bonded/fastened. When gluing overexisting wood flooring, the surface finish must be abraded or removed to allowadequate adhesive bond. Existing solid hardwood flooring that exceeds 6″ (15 mm) in width must be coveredwith 3/8″ (9.5 mm) approved underlayment and fastened as required. Do notinstall over solid or engineered flooring attached directly to concrete.Wood subfloors should be well nailed or secured with screws. Nails should be ringshank and screws need to be counter sunk. The wood subfloor needs to bestructurally sound (meaning subfloors without loose boards, vinyl or tile).If sub-floor panels are a single layer, less than ¾” thick, add another single cross layerfor strength and stability (minimum 3/8” thick for a total 1 1/8” thickness).Underlayment floor panels must be installed sealed side down. When used as asubfloor, allow 1/8″ (3 mm) expansion space between each panel. If spacing isinadequate, cut in with a circular saw. Do not cut in expansion space on tongue andgroove panels.When installing parallel to the floor joists it may be necessary to increase rigidity of thestructural subfloor system by installing an additional minimum of 3/8″ (9.5 mm)approved underlayment floor panel.Approved underlayment floor panels should meet or exceed the following: Plywood: Must be minimum CDX grade (exposure 1) and meet US VoluntaryProduct Standard PS1 performance standard or Canadian performance standardCAN/CSA 0325-0-92. The preferred thickness is 3/4″ (19 mm) as a subfloor[minimum 5/8″ (16 mm)] or 3/8″ (9.5 mm) as floor panel underlayment. Oriented Strand Board (OSB): Conforming to US Voluntary Product StandardPS2 or Canadian performance standard CAN/CSA 0325-0-92 constructionsheathing. Check underside of panel for codes. When used as a subfloor, thepanels must be tongue and groove and installed sealed side down. Minimumthickness to be 23/32″ (18 mm) thick when used as a subfloor or 3/8″ (9.5 mm) asfloor panel underlayment. Wafer board and Chipboard: Conforming to US Voluntary Product Standard PS2or Canadian performance standard CAN/CSA 0325-0-92. Must be 3/4″ (19 mm)thick when used as a subfloor and 3/8″ (9.5 mm) thick when used as floor panelunderlayment. Particleboard: Must be a minimum 40-lb. density, stamped underlayment gradeand 3/4″ (19 mm) thick. (Floating installation only)1-21-13the subfloor/underlayment with full spread adhesive and no more than two layers thick,not to exceed 3/16″ (5 mm).With approved wood/wood composite subfloors, if vinyl or tiles are loose, broken, or inpoor condition, install a 3/8″ (9.5 mm) approved subfloor panel directly over theflooring materials.Clean the flooring materials as necessary to remove waxes, sealers or cleaningresidues to allow a good adhesive bond.Cork floor sealers and surface treatments must be removed.Always check for adequate adhesive bond prior to beginning direct glue installation.Radiant Heat SubfloorsIt is important to follow these guidelines strictly. Failure to follow theseguidelines may produce unsatisfactory results.Only floating installations are approved for radiant heat systems. Direct gluedown and Nail Down are NOT RECOMMENDED.Before installing hardwood over radiant heat subfloors, determine if the radiant heatsystem is rated to be compatible with hardwood flooring. It is highly recommended theradiant heat system be designed specifically to accept hardwood flooring. Radiantheat systems designed for floor coverings with a higher resistance to heattransfer such as carpet will damage wood flooring. Single heat circuit systemsdesigned for use with multiple floor covering products must be adjusted to work attemperatures suitable for hardwood flooring. Use of an in floor temperature sensoras well as a separate thermostat for the individual room is required. An outdoortemperature sensor should be used to adjust water temperature according toanticipated heat loss.Note: When radiant heat is installed in concrete, mortar beds, or gypsum cement, it isvery important to operate the radiant heat system until these are completely dry beforeyou install your hardwood flooring on top. This may take several weeks. Also operatethe HVAC system to allow humidity levels in the area to stabilize (35-55% RH) for thearea in which the hardwood floor will be installed. Allow hardwood to acclimate to thishumidity level before installation. This will minimize dimensional changes due tomoisture.Before installing over a radiant heat floor turn off heat and wait until the floor hasreached room temperature (70 -75 F). After installing the floor, gradually return theheat in 5 degree increments. CAUTION: The floor surface must never exceed 85 F.Multi Width InstallationInstalling planks of multiple widths requires special consideration. Multi Width productsarrive in the same carton so measure material needs as you normally would.Always start installation with the widest plank width and install in descending widths(example 5” -3”, 5”-3”).Do not try to “mix” widths within a row.Page 3
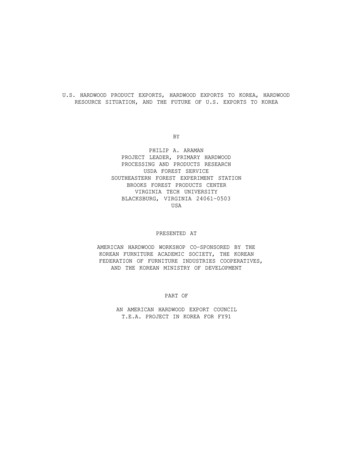
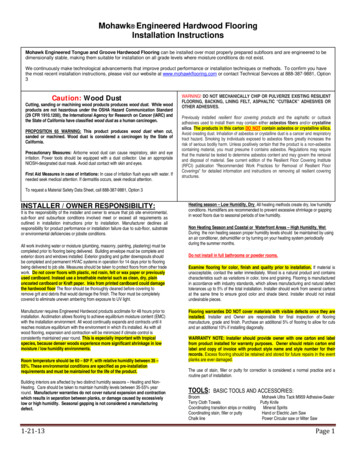
Before You Start Plan your layout and determine the direction of the installation in the room. Planksinstalled parallel to windows accent thehardwood best. Blending of Cartons: To achieve a uniforminstallation appearance, preselect and setaside hardwood planks that blend best with alltrims and moldings. Install these planks nextto best blended moldings. Remove all wall mounted moldings such asbase and quarter round. Floor should be installed blending planks fromseveral cartons at the same time to ensure good color and shade mixture throughoutthe installation. Be attentive to staggering the ends of the boards at least 4″-6″ (10-15 cm) whenpossible, in adjacent rows. The floating floor underlayment already has double-sided tape for ease of taping theprecut overlapping seams. If a non-adhesive underlayment is used, tape all seams. Do not install in areas of high moisture such as bathrooms and powder rooms.PREPARATION:Undercut Door Casings: Undercut all door casings 1/16" higher than the thickness ofthe flooring materials being installed. To do this, use a scrap piece of flooring as aguide. Lay it on the substrate and cut the casing with a handsaw or use a power jambsaw set at the correct height. Remove all moldings and wall-base, and undercut alldoor casings.length of the grooved side and end. This can be accomplished by inverting the plankand applying a bead of glue (3/32”) to the topside of the groove (side of the groovenearest the face of the plank), when the plank is turned back over the glue will flowdown the back of the groove allowing total coverage. Apply only a 3/32-inch bead ofglue; if the groove is filled with glue it will be difficult to close the seam not allowing atight fit.Getting Started:The installation begins with three rows of flooring glued together and held in place with3M blue painters tape (#2080) with the groove side facing the wall. Spacers must beused to establish the minimum ½” expansion space from the walls. These three rowsmust be straight, square and in rack because they establish the alignment of the restof the floor. After putting these three rows together allow the glue to set (15 to 45minutes) before proceeding with the installation. With the tongue facing out the plankscan be tapped together with a tapping block on the tongue to make a snug fit. Afterinstalling 8 or 10 rows of flooring, stand back and check for crowning or heaving due totension strapping or any damage caused by improper taping.CLEAN AS YOU GO:If any glue squeezes out of the seam between the planks allow it to dry for 10 to15 minutes and then lightly scrape it away with a plastic scraper or putty knife,any glue left may be cleaned with a damp cloth. Do not allow the glue to dry onthe face of the flooring; it will be very difficult to clean off.Starting Off - The First Three RowsRow One:Plank 1 should begin in the left hand corner of the room. Spacing around the wallperimeter of 1 2” can be maintained by using wood wedges. The planks are laid withthe groove side facing the wall. The first row starts with a full length board; workingfrom left to right will be required when installing engineered hardwood flooring. Slidethe end groove of the board being installed into the end tongue of the board youpreviously installed. Place each plank firmly against the wood wedges. After settingthe first row and making sure you are against a firm starting point, lay out three to fourrows before starting to install.(Figure 3) Plank 2 end tongue is connected to the end groove of Plank 1. Lay the rest,plank after plank, in this manner until you have completed the first row. Cut the lastplank accordingly. Please ensure that this first row is straight using the wedges tomaintain proper 1 2”expansion space from the wall.FLOATING INSTALLATIONNOTE: Only Engineered Hardwood Flooring with 4 plies or more are approvedfor floating installations.Underlayment:Use Performance Accessory Underlayments or equivalent underlayment with equalor better specifications. Underlayment requirements are very critical to a floatinginstallation. Excessive pad compression or compaction is a common cause of seamfailure.Lay the underlayment on the floor with the moisture barrier facing up. The direction ofthe underlayment should be parallel to the direction of the floor. For the first row offlooring the underlayment should be placed so that approximately 1 inch overlaps ontoall perpendicular walls. Place the following row next to the first row on top of the lowermoisture barrier overlap. Remove the adhesive strip and fold back the upper overlapon the second row. Make sure the underlayment fits together tightly (don’t leave gaps).On the last row, place the underlayment 1 inch up the wall. To join rolls on the shortside of the underlayment, use a moisture resistant tape to connect the 2 pieces sowater cannot penetrate the underlayment.Expansion Space:An expansion space of at least ½ inch must be maintained around the perimeter of theroom, all pipes, counters, cabinets, fireplace hearths, doorframes and any other fixedvertical objects in the room. Doorway or archways 4 feet or less and rooms largerthan a 26 X 33 are required to have a T-Molding.Glue and Glue Placement:The recommended glue for floating installation is Mohawk Tongue & Groove D3 RatedFloating Floor Glue. The glue must be placed along the topside of the groove the full1-21-13FIGURE 3Row Two:When possible use leftover plank from the first row to begin the second row. Theleftover piece from the first row should be considered for this starter piece to minimizewaste. Initial layout of material will allow you to check your end seams to ensure theyare not too close. End joints on adjoining rows should be offset by no less than 6”.Align this plank and lock the side into place against the first plank in row 1. The nextplank is aligned with the end joint first into the previously plank in row 2. The side ofplank is then tapped lightly against the previously laid row. Continue laying in this wayacross the entire row. Remove the fitting wedge and press in the row of planks with alight pressure on the long side. The planks lock into each other. The Uniclic TappingBlock square edge tapping block is needed to aid in the connection of the lockingsystem on the long side. The planks are now laid row after row in this sequence.Row Three and Remaining Rows:Move rows if necessary to ensure that you are not showing any undesirable jointpatterns. (Figure 2A) The rest of the row’s end joints should be random throughout thefloor. (Figure 1A) Your first three rows are staggered ensuring that offset of previousrow with end joints are no closer than 6” from one another. When the planks are beingtapped in place, a non-random pyramid or stair step pattern is used to ensure theplanks remain engaged through the force of the tapping. The numbered process isshown in Figure 3.Page 4
FIGURE 5Figure 2A Figure 1AMost often walls are not structurally square. Planks in the first row may need to bescribed and cut to contour the first row with the wall and to allow for 1 2” expansion.Allow 1 2” expansion space at all vertical obstructions. Use 1 2” wood wedges or shortcut ½” pieces of the floor against the wall to hold planks true to spacing. It is importantthat the planks follow the wall. Scribing is used if the wall is not straight. First, mark theplank with a scribing tool or other tool that will allow you to follow the shape of the walland then cut it lengthwise to follow the line.(Figure 2)FIGURE 6FIGURE 2NOTE: Another way to achieve a firm starting point is to screw down a straightlength of 1”x3” lumber, or another straight, firm material alon
being delivered to job site. Measures should be taken to protect floors from other trade work. Do not cover floors with plastic, red rosin, felt or wax paper or previousl y used cardboard. Instead use a breathable material such as clean, dry, plain uncoated cardboard or Kraft paper. Inks from printed cardboard could damage