Transcription
INSTRUCTION MANUAL7 Series WristBlood Pressure MonitorENGLISHModel BP6350
Table of ContentsIntroduction .3Important Safety Information .51. Know Your Monitor .92. Preparation .153. Using Your Monitor without a Smart Device .214. Using Your Monitor with a Smart Device .245. Using Memory Function .276. Other Settings .297. Error Messages and Troubleshooting.318. Maintenance .359. Specifications.3610. FCC Statement .3911. Limited Warranty.4012. Guidance and Manufacturer’s Declaration.422
IntroductionThank you for purchasing the OMRON BP6350 Wrist Blood Pressure Monitor. Thisblood pressure monitor is to be worn on your wrist. This monitor can be used bymultiple users.This new blood pressure monitor uses the oscillometric method of blood pressuremeasurement. When the cuff inflates, this monitor senses the pressure pulsations ofthe artery underneath the cuff. The pulses are called oscillometric pulses. Theelectronic pressure sensor displays a digital reading of blood pressure.Safety InstructionsThis instruction manual provides you with important information about the OMRONBP6350 Wrist Blood Pressure Monitor. To ensure the safe and proper use of thismonitor, READ and UNDERSTAND all of the safety and operating instructions. Ifyou do not understand these instructions or have any questions, contact 1800-634-4350 before attempting to use this monitor. For specific informationabout your own blood pressure, consult with your physician.Intended UseThe device is a digital monitor intended for use in measuring blood pressure andpulse rate in adult patient population with wrist circumference ranging from 5.3inches to 8.5 inches (13.5 cm to 21.5 cm). The device detects the appearance ofirregular heartbeats during measurement and gives a warning signal with readings.Environments of Use: HomePatient Population: AdultReceiving and InspectionRemove this monitor from the packaging and inspect for damage. If this monitor isdamaged, DO NOT USE and contact1-800-634-4350.Symbols GlossaryFor symbol information, visit:OmronHealthcare.com/symbols-glossary3
Contraindications This monitor is contraindicated for use in ambulatory environments. This monitor is contraindicated for use on aircraft.4
Important Safety InformationPlease read the Important Safety Information in this instruction manual beforeusing this monitor.Please follow this instruction manual thoroughly for your safety.Please keep for future reference. For specific information about your own bloodpressure, CONSULT WITH YOUR PHYSICIAN.Indicates a potentially hazardous situation which, if notWarning avoided, could result in death or serious injury. DO NOT use this monitor on infants, toddlers, children or persons whocannot express themselves. DO NOT adjust medication based on readings from this blood pressuremonitor. Take medication as prescribed by your physician. ONLY aphysician is qualified to diagnose and treat high blood pressure. DO NOT use this monitor on an injured wrist or a wrist under medicaltreatment. DO NOT apply the wrist cuff on your wrist while on an intravenous drip orblood transfusion. DO NOT use this monitor in areas containing high frequency (HF) surgicalequipment, magnetic resonance imaging (MRI) equipment, computerizedtomography (CT) scanners. This may result in incorrect operation of themonitor and/or cause an inaccurate reading. DO NOT use this monitor in oxygen rich environments or near flammablegas. Consult with your physician before using this monitor if you have commonarrhythmias such as atrial or ventricular premature beats or atrialfibrillation; arterial sclerosis; poor perfusion; diabetes; pregnancy; preeclampsia or renal disease. NOTE that any of these conditions in addition topatient motion, trembling, or shivering may affect the measurement reading. NEVER diagnose or treat yourself based on your readings. ALWAYS consultwith your physician. This product contains small parts that may cause a choking hazard ifswallowed by infants, toddlers or children.5
Data Transmission This product emits radio frequencies (RF) in the 2.4 GHz band. DO NOT usethis product in locations where RF is restricted, such as on an aircraft or inhospitals. Turn off the Bluetooth feature in this monitor and removebatteries when in RF restricted areas. For further information on potentialrestrictions refer to documentation on the Bluetooth usage by the FCC/IC.Battery Handling and Usage Keep batteries out of the reach of infants, toddlers or children.Indicates a potentially hazardous situation which, if notCaution avoided, may result in minor or moderate injury to the user orpatient, or cause damage to the equipment or other property. Stop using this monitor and consult with your physician if you experienceskin irritation or discomfort. Consult with your physician before using this monitor on a wrist whereintravascular access or therapy, or an arterio-venous (A-V) shunt, is presentbecause of temporary interference to blood flow which could result ininjury. Consult with your physician before using this monitor if you have had amastectomy. Consult with your physician before using this monitor if you have severeblood flow problems or blood disorders as cuff inflation can cause bruising. DO NOT take measurements more often than necessary because bruising,due to blood flow interference, may occur. ONLY inflate the wrist cuff when it is applied on your wrist. Remove the wrist cuff if it does not start deflating during a measurement. DO NOT use this monitor for any purpose other than measuring bloodpressure. During measurement, make sure that no mobile device or any otherelectrical device that emits electromagnetic fields is within 12 inches (30cm) of this monitor. This may result in incorrect operation of the monitorand/or cause an inaccurate reading. DO NOT disassemble or attempt to repair this monitor or other components.This may cause an inaccurate reading. DO NOT use in a location where there is moisture or a risk of watersplashing this monitor. This may damage this monitor.6
DO NOT use this monitor in a moving vehicle such as in a car. DO NOT drop or subject this monitor to strong shocks or vibrations. DO NOT use this monitor in places with high or low humidity or high or lowtemperatures. Refer to chapter 9. During measurement, observe the arm to ensure that the monitor is notcausing prolonged impairment to blood circulation. DO NOT use this monitor in high-use environments such as medical clinicsor physician offices. DO NOT use this monitor with other medical electrical (ME) equipmentsimultaneously. This may result in incorrect operation of the monitor and/orcause an inaccurate reading. Avoid bathing, drinking alcohol or caffeine, smoking, exercising and eatingfor at least 30 minutes before taking a measurement. Rest for at least 5 minutes before taking a measurement. Remove tight-fitting, thick clothing and any accessories from your wristwhile taking a measurement. Remain still and DO NOT talk while taking a measurement. ONLY use this monitor on persons whose wrist circumference is within thespecified range of the cuff. Ensure that this monitor has acclimated to room temperature before takinga measurement. Taking a measurement after an extreme temperaturechange could lead to an inaccurate reading. OMRON recommends waitingfor approximately 2 hours for the monitor to warm up or cool down whenthe monitor is used in an environment within the temperature specified asoperating conditions after it is stored either at the maximum or at theminimum storage temperature. For additional information of operating andstorage/transport temperature, refer to chapter 9. DO NOT crease the wrist cuff excessively. DO NOT use this monitor after the durable period has ended. Refer tochapter 9.Data Transmission DO NOT replace batteries while your reading is being transferred to yoursmart device. This may result in the incorrect operation of this monitor andfailure to transfer your blood pressure data.7
Battery Handling and Usage DO NOT insert batteries with their polarities incorrectly aligned. ONLY use 2 “AAA” alkaline batteries with this monitor. DO NOT use othertypes of batteries. DO NOT use new and used batteries together. DO NOTuse different brands of batteries together. Remove batteries if this monitor will not be used for a long period of time. If battery fluid should get in your eyes, immediately rinse with plenty ofclean water. Consult with your physician immediately. If battery fluid should get on your skin, wash your skin immediately withplenty of clean, lukewarm water. If irritation, injury or pain persists, consultwith your physician. DO NOT use batteries after their expiration date. Periodically check batteries to ensure they are in good working condition. ONLY use batteries specified for this monitor. Use of unsupported batteriesmay damage and/or may be hazardous to this monitor.8
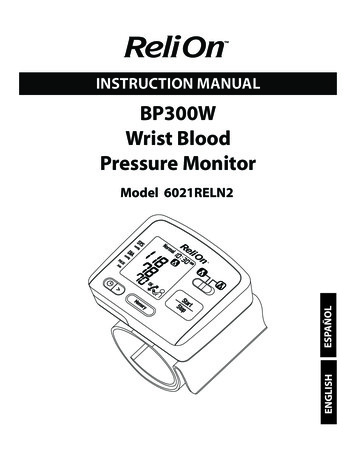
1. Know Your Monitor1.1ContentsMonitor, 2 “AAA” alkaline batteries, storage case, instruction manual, quick startguide1.2Monitorcadbefga. Wrist cuff(Wrist circumference 5.3" to 8.5" (13.5 cm to 21.5 cm))b. Displayc. [Memory] buttond. [Date/Time setting] buttone. [START/STOP] buttonf. [Connection] buttong. Battery compartment9
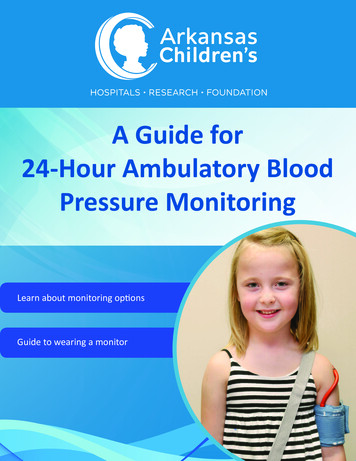
1.3Display and SymbolsABCDKLEMFNGOHPIJQ10
A Date and time displayAverage value symbolBCAppears when viewing the average readings of the latest 2 or 3readings taken within 10 minutes span.Memory symbolAppears when viewing readings stored in the memory.D Systolic blood pressure readingE Diastolic blood pressure readingPulse display / Memory numberFGHPulse rate appears after the measurement.When pressing thebutton, the memory number appears forapproximately one second before the pulse rate appears on the display.Deflation symbolAppears during cuff deflation.Heartbeat symbolFlashes while taking a measurement.Sync symbolIFlashes/appears when your data needs to be transferred because thestored memory is either almost, or completely full. Once you pair yourmonitor with a smart device, transfer your readings immediately beforethe monitor deletes the oldest readings. Up to 90 readings can bestored in the internal memory per user.OK symbolJFlashes when your monitor is connected to the smart device orreadings are transferred successfully.11
High symbolKAppears if your systolic blood pressure is 130 mmHg or above and/orthe diastolic blood pressure is 80 mmHg or above. Refer to section 1.4for more information.Heart zone indicatorYour monitor has a built-in heart zone indicator that is used as an aid indetermining if the monitor is at the correct height.LThe “” symbol lights in blue when your monitor is at the correctposition relative to your heart during a measurement. When yourmonitor is higher or lower position relative to your heart, the heartposition locator bar will appear up above, or below the heart symbol toguide correct wrist positioning.Irregular heartbeat symbolMNormal HeartbeatAppears along with readings when anPulseirregular rhythm is detected 2 or moretimes during a measurement.Blood pressureAn irregular heartbeat rhythm isdefined as a rhythm that is 25% lessor 25% more than the average rhythmIrregular HeartbeatShort Longdetected while your monitor isPulsemeasuring blood pressure. If itcontinues to appear, we recommend Blood pressureyou to consult with and follow thedirections of your physician.Movement error symbolNAppears along with readings when your body is moving during ameasurement. If it appears, remove the wrist cuff, and wait for 2 to 3minutes. Then, remain still and take another measurement.Cuff wrap guide symbolOAppears if the wrist cuff is wrapped around the wrist too loosely whiletaking a measurement. It also appears when viewing past readings.12
Battery symbol (low)PFlashes when batteries are low.Battery symbol (depleted)Appears when batteries are depleted.Bluetooth ON symbolQAppears when Bluetooth is enabled.Bluetooth OFF symbolAppears when Bluetooth is disabled.13
1.4Classification of BP (Blood Pressure)ACC/AHA 2017 Hypertension guidelines define categories of BP in adults as below.Categories of BP in Adults*BP CategoryNormalSystolic BP 120 mmHgElevatedDiastolic BPand 80 mmHg120 - 129 mmHg and 80 mmHgHypertensionStage 1Stage 2130 - 139 mmHg or 80 - 89 mmHg 140 mmHgor 90 mmHg* Individuals with Systolic BP and Diastolic BP in 2 categories should bedesignated to the higher BP category.BP indicates blood pressure (based on an average of 2 careful readings obtainedon 2 occasions).Source: ACC/AHA 2017 High Blood Pressure Clinical Practice GuidelineWarning NEVER diagnose or treat yourself based on your readings. ALWAYS consult withyour physician.14
2. Preparation2.1Installing Batteries1.Push down the hook of the battery coverand pull downward.2.Insert 2 “AAA” alkaline batteries as indicatedin the battery compartment.3.Close the battery cover.21Note When the “” symbol flashes on the display, it is recommended you replacebatteries. To replace batteries, turn your monitor off and remove all batteries. Then replacewith 2 new alkaline batteries at the same time. As soon as batteries are correctly installed, the year flashes on the date and timedisplay to set the date and time. Replacing batteries will not delete previous readings. The supplied batteries may have a shorter life than new batteries. Disposal of used batteries should be carried out in accordance with localregulations.15
2.2Setting the Date and TimeNote Set your monitor to the correct date and time before taking a measurement for thefirst time. As soon as batteries are correctly installed, the year flashes on the display of yourmonitor. The date and time will automatically be set when the monitor is paired with“OMRON connect US/CAN” app. Refer to section 4.1.1.2.Press theorbutton once to adjust the year.Press and hold thebutton to quickly advance the years.Press and hold thebutton to quickly go backwards through the years.Press the [START/STOP] button to confirm the year and the monthwill flash. Repeat the same steps to adjust the month, day, hour, andminute.YearMonthDayHourMinute16
3.Press the [START/STOP] button to store the setting.It automatically turns off after 3 seconds.Note If you need to reset the date and time, replace batteries or press and hold thebutton until the year flashes, and set the date and time as above steps.2.3Blood Pressure Measurement TipsTo help ensure an accurate reading, follow these directions: Stress raises blood pressure. Avoid taking measurements during stressful times. Measurements should be taken in a quiet place. It is important to take measurements at same times each day. Takingmeasurements in the morning and in the evening is recommended. Remember to have a record of your blood pressure and pulse readings for yourphysician. A single measurement does not provide an accurate indication of yourtrue blood pressure. You need to take and record several readings over a periodof time.Caution Avoid bathing, drinking alcohol or caffeine, smoking, exercising and eating for atleast 30 minutes before taking a measurement. Rest for at least 5 minutes before taking a measurement.17
2.4Applying the Wrist CuffNote Following steps are for applying the wrist cuff to your left wrist. When you take ameasurement on your right wrist, apply the wrist cuff using the same steps as onyour left wrist. The blood pressure can differ between the right wrist and the left wrist, and themeasured blood pressure values can be different. OMRON recommends toalways use the same wrist for measurement. If the values between both wristsdiffer substantially, please check with your physician as to which wrist to use foryour measurements.Caution Remove tight-fitting, thick clothing and any accessories from your wrist whiletaking a measurement.1.Apply the wrist cuff to your left wrist.Roll up sleeve. Make sure your sleeve is not rolledup too tightly on your arm. This may constrict theflow of blood in your arm.2.Put your wrist through the cuff loop.Your palm and monitor display should both face upward.Wrist cuff18
3.Position the wrist cuff leaving a clearance of0.5 inch (1 to 2 cm) between the cuff and thebottom of your palm.0.5 inch(1 to 2cm)4.Wrap the wrist cuff firmly around your wrist. Do not apply overclothing.Check to make sure that there is no gap between your wrist and the cuff.12Note Make sure the wrist cuff does not cover theprotruding part of the wrist bone on the outside ofyour wrist. If the wrist cuff comes out of the metalring, slide it back through as shown inthe figure to the right.19
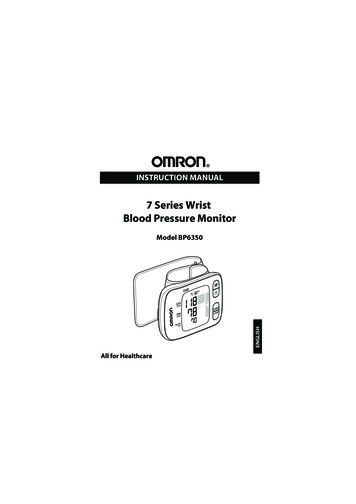
2.5Sitting CorrectlyTo take a measurement, you need to be relaxedand comfortably seated in a room with acomfortable temperature. Place your elbow onthe table to support your arm. Sit in a chair with your legs uncrossed and yourfeet flat on the floor. Sit with your back and arm being supported. The distance from the top of your seatmeasuring to the top of the table you are sittingat, should be 12 plus or minus 2 inches (30 5cm). If the distance measured between the topof your seat and table do not fall within thisparameter, correct your seat or table height.If you are unable to make any seat or tableadjustments, please turn off the heart zone indicator and position your wrist atheart level by yourself. Refer to section 6.1. Your monitor must be approximately the same level as your heart. If the monitor istoo high above your heart, your blood pressure will be artificially low. If the monitoris too low below your heart, your blood pressure will be artificially high. Relax your wrist and hand. Do not bend your wrist back, clench your fist, or bendyour wrist forward.20
3. Using Your Monitor without a Smart Device3.1Taking a MeasurementYou can use your monitor without pairing to a smart device. To pair your monitorwith a smart device, refer to section 4.1.Note To stop the measurement, press the [START/STOP] button once to deflate thewrist cuff.Caution DO NOT use this monitor with other medical electrical (ME) equipmentsimultaneously. This may result in incorrect operation of the monitor and/or causean inaccurate reading. Remain still and DO NOT talk while taking a measurement.1.Press the [START/STOP] button.All symbols appear on the display before starting the measurement.2.Check the heart zone indicator.Your monitor has a built-in heart zone indicator that is used as an aid indetermining if the monitor is at the correct height. It has been designed to workwith most people so that when your wrist is at the correct position relative toyour heart, the “” symbol will light in blue. When your wrist is higher orlower position relative to your heart, a locator bar will appear according to thewrist position. Due to difference in individual size and physique, this featuremay not be helpful in all cases and you may wish to disable this feature. If youfeel the position of the wrist according to heart zone indicator's guidance doesNOT match your heart level, disable this feature and follow your judgement. Todisable it, refer to section 6.1.21
Monitor heightHeart Zone IndicatorWrist is too highAny locator bar (-) above the “appears.Proper positionThe “Wrist is too lowAny locator bar (-) below the “appears.” symbol” symbol lights in blue.Note” symbol After 5 seconds from pressing the [START/STOP] button, even if yourmonitor is not positioned properly, your monitor will start the measurementand the wrist cuff will start to inflate.22
3.Remain still and do not move or talk until the entire measurementprocess is completed.As the cuff inflates, your monitor automatically determines your ideal inflationlevel. This monitor detects your blood pressure and pulse rate during inflation.The “” symbol flashes at every heartbeat.Note When the “” symbol is displayed, the wrist cuff is not applied correctly.Press the [START/STOP] button to turn your monitor off, then apply the cuffcorrectly.After your monitor has detected your blood pressure and pulse rate, the cuffautomatically deflates. Your blood pressure and pulse rate are displayed.If either the systolic or the diastolic reading is high (refer to section 1.3), the“” symbol appears.START4.INFLATINGCOMPLETEDPress the [START/STOP] button to turn your monitor off.Note Your monitor will automatically turn off after 2 minutes. Wait 2 - 3 minutes between measurements. The wait time allows the arteriesto decompress and return to their pre-measurement form. You may need toincrease the wait time depending on your individual physiologicalcharacteristics.23
4. Using Your Monitor with a Smart Device4.1Pairing Your Monitor with a Smart DeviceThe date and time on your monitor will automatically be set when you pair yourmonitor with your smart device.Review the list of compatible smart devices at OmronHealthcare.com.1.Enable Bluetooth on your smart device.2.Download and install the free “OMRON connect US/CAN” app ontoyour smart device.If you already have the “OMRON connect US/CAN” app and have createdyour account, open the app and add your new monitor.3.Open the app on your smart device and follow the instructions.24
4.Confirm that your monitor is connectedsuccessfully.When your monitor is connected successfully to yoursmart device, the “OK” symbol flashes.Note If the “Err” symbol appears, follow the instructions inthe “OMRON connect US/CAN” app Your monitor automatically turns off after 10 secondswithout any operations. Any readings currently saved in the memory of yourmonitor are automatically transferred to the app aftersuccessful completion of the pairing process. Please be aware that OMRON will not be responsible for the loss of dataand/or information in the app. “OMRON connect US/CAN” is the only app that we recommend to use withyour monitor to transfer data correctly.4.2Taking a MeasurementRefer to section 3.1 to start a measurement. The readings will be transferred to yoursmart device.25
4.3Disabling/Enabling BluetoothWarning This product emits radio frequencies (RF) in the 2.4 GHz band. DO NOT use thisproduct in locations where RF is restricted, such as on an aircraft or in hospitals.Turn off the Bluetooth feature in this monitor and remove batteries when in RFrestricted areas. For further information on potential restrictions refer todocumentation on the Bluetooth usage by the FCC/IC.Bluetooth is enabled as default.1.When your monitor is off, press and hold the [ ] button for more than10 seconds. “oFF” appears on the display. When the Bluetooth is disabled, the followingsymbol appears.Note To enable the Bluetooth, press and hold the [ ] button for more than 2seconds. “on” appears on the display. Your monitor will automatically turn off within 3 seconds after the completion.26
5. Using Memory FunctionYour monitor automatically stores up to 90 readings.Note This monitor can be used by multiple users. When you use memory function withother users, track (or manage) your own readings appropriately.5.11.Viewing the Readings Stored in MemoryPress thebutton.Alternatingdate/timedisplayThe Memory number appears for one second before the pulse rate isdisplayed. The most recent reading set is numbered “1”.Note If the heart zone indicator is enabled, the heart zone indicator is displayedwith the readings. If the reading is high (refer to section 1.3), the “”symbol appears. If there are no readings stored in the memory, the screen tothe right is displayed. If the memory is full, the monitor will delete the oldestreadings.2.Press thebutton repeatedly to scroll through the previousreadings stored in the memory.27
5.2Viewing the Average ReadingYour monitor can calculate an average reading based on the latest 2 or 3 readingstaken within 10 minutes span.1.When your monitor is off, press and hold the2 seconds.Note If there are only 2 readings in the memory for thatperiod, the average will be based on these 2readings. If the average reading is high (refer to section 1.3),the “” symbol appears.28button for more than
6. Other Settings6.1Disabling/Enabling Heart Zone IndicatorThe heart zone indicator is enabled as default.1.When your monitor is off, press and hold the10 seconds.button for more thanNote Your monitor will automatically turn off after 3 seconds from the completion. To enable the heart zone indicator, follow the same steps as above.6.2Deleting All Readings Stored in Memory1.Press the2.While holding thebutton down,press and hold the [START/STOP]button for more than 2 seconds.button, then the “Note” symbol appears. All readings will be deleted. You cannotpartially delete the readings stored in thememory.29
6.3Restoring Your Monitor to the Default SettingsTo delete all the information stored in your monitor, follow the instructions below.Make sure that your monitor is turned off.1.While holding thebutton down,press the [START/STOP] button within2 seconds. Hold both buttons for morethan 5 seconds.Note Reverting to its default setting of yourmonitor does not delete the information inthe app. Your monitor will automatically turn off after3 seconds. You will need to re-pair your monitor when using the monitor again. Withoutre-pairing, your readings will not be transferred to your app.30
7. Error Messages and TroubleshootingIn case of any of the below problems occur during measurement, first check that noother electrical device is within 12 inches (30 cm). If the problem persists, pleaserefer to the table below.Display/ProblemPossible CauseThe wrist cuff is not appliedcorrectly.appears or thewrist cuff does notAir is leaking from the wristinflate.cuff.appearsappearsApply the wrist cuff correctly,then take anothermeasurement. Refer tosection 2.4.Contact customer service.Refer to chapter 11.The wrist cuff is overinflatedexceeding 300 mmHg.Do not touch the wrist cuffwhile taking a measurement.You move or talk during ameasurement. Vibrationsdisrupt a measurement.Remain still and do not talkduring a measurement.appears/appearsSolutionThe pulse rate is not detectedcorrectly.Apply the wrist cuff correctly,then take anothermeasurement. Refer tosection 2.4.Remain still and sit correctlyduring a measurement.If the “” symbol continuesto appear, we recommend youto consult with your physician.appears31
Display/ProblemappearsPossible CauseYour wrist is moved up anddown during a measurement.Do not move your wrist, thentake another measurement.Refer to chapter 3.The monitor is malfunctioned.Press the [START/STOP]button again. If “Er” stillappears, contact customerservice. Refer to chapter 11.appearsappearsflashesflashesSolutionFollow the instructions shownin the “OMRON connect US/The monitor cannot connect toCAN” app. If the “Err” symbola smart device or transmit datastill appears after checking thecorrectly.app, contact customer service.Refer to chapter 11.Flashes when pairing to theThe [ ] button is pressed and smart device. Visit the “Help”section in the “OMRONheld to pair with a smartconnect US/CAN” app fordevice.pairing.The [ ] button is pressed totransfer your readings.32Flashes when transferring yourreadings to the “OMRONconnect US/CAN” app.
Display/ProblemPossible CauseSolutionMore than 70 readings are nottransferred.flashesappearsThis monitor is ready forpairing or transferring yourreadings.90 readings are nottransferred.heart symbolThe heart zone indicator isThe heart symbol disabled.in the heart zoneindicator does notlight and a locatorbar does notappear.flashesPair or transfer your readingsto the “OMRON connect US/CAN” app so you can keepthem in memory in the app,and this error symboldisappears.Enable the heart zoneindicator. Refer to section 6.1.Replacing all batteries with 2new alkaline batteries isrecommended. Refer tosection 2.1.Batteries are low.33
Display/ProblemPossible Causeappears or themonitor is turned Batteries are depleted.off unexpectedlyduring ameasurementNo power.Nothing appearson the display ofthe monitor.SolutionImmediately replace allbatteries with 2 new alkalinebatteries. Refer to section 2.1.Batteries are completelydepleted.Battery polarities are notproperly aligned.Check the battery installationfor proper placement. Refer tosection 2.1.Blood pressure varies constantly. Many factors includingReadings appearstress, time of day, and/or how you apply the wrist cuff, maytoo high or tooaffect your blood pressure. Review sections 2.3 - 2.5 andlow.chapter 3.Any othercommunicationissue occurs.Follow the instructions shown in the smart device, or visit the“Help” section in the “OMRON connect US/CAN” app for furtherhelp.If the problem still persists, contact customer service. Refer tochapter 11.Any otherproblems occur.Press the [START/STOP] button to turn the monitor off, thenpress it again to take a measurement. If the problem continues,remove all batteries and wait for 30 seconds. Then re-installbatteries.If the problem still persists, contact customer service. Refer tochapter 11
blood pressure monitor is to be worn on your wrist. This monitor can be used by multiple users. This new blood pressure monitor uses the oscillometric method of blood pressure measurement. When the cuff inflates, this monitor senses the pressure pulsations of the artery underneath the cuff. The pulses are called oscillometric pulses. The