Transcription
OWNER’S MANUALModel MH1230 Important Safety Instructions Assembly Instructions Parts and Hardware IdentificationPallet JackCAUTION:Read, understand and follow ALL instructions before using this productTricam International7677 Equitable DriveMinneapolis, MN 55344800-304-1316
IMPORTANT SAFETY INSTRUCTIONS1.2.3.4.5.Read and understand all warning and instructions prior to using the pallet jack.Always inspect the pallet jack for damage or excess wear prior to each use.Always use on an flat, level surface.Never lift or transport people using this pallet jack.Do not exceed maximum load capacity of 2500kg or 5500lbs.ASSEMBLY INSTRUCTIONSYour Pallet Jack requires assembly. Account for all parts and hardware before beginning assembly. If any parts aremissing, damaged or if you have questions or need additional instructions DO NOT RETURN THISPRODUCT TO THE RETAILER, call the manufacturer at 1-800-304-1316.Refer to the exploded drawing and the parts list on the following pages during assembly.ASSEMBLING THE HANDLE TO THE PUMPSTEP 1 Remove the 4 bolts (L111C) from the handle mounting bracket (L319C). Set the handle (L110C) on thebracket (L319C) allowing the chain (L103C) and the adjusting bolt (L102C) to pass through the hole in thecenter of the bracket (L319C) and axle (L331C).STEP 2 Insert the 4 bolts (L111C) through the handle flange into the handle mounting bracket (L319C) andtighten securely.STEP 3 Raise the lever (L345) and insert the adjusting bolt (L102C) into the front slot, keeping the adjusting nut(L101C) on the under side of the lever (L345).ADJUSTING THE RELEASE DEVICEOn the draw bar of the unit, you can find the control handle (L107C) which can be regulated in three positions:Lower to lower the forks; Neutral to move the load; and Lift to raise the forks. These three positions have been prepositioned at the factory. To adjust the factory-set positions follow these steps:STEP 1 If the forks elevate while pumping in the Neutral position, turn the adjusting nut (L101C) on the adjustingbolt (L102C) clockwise until pumping action does not raise the forks and the Neutral position functionsproperly.STEP 2 If the forks descend while pumping in the Neutral position, turn the adjusting nut (L101C) counterclockwiseuntil the forks do not lower.STEP 3 If the forks do not descend when the control handle (L107C) is in the Lower position, turn the nut (L101C)clockwise until raising the control handle (L107C) lowers the forks. Be sure to check the Neutral position tomake sure the nut is in the proper position.STEP 4 If the forks do not elevate while pumping in the Lift position, turn the nut (L101C) counterclockwise until theforks elevate while pumping in the Lift positions. Be sure to check the Lower and Neutral positions.CAUTIONDo not exceed maximum load capacity of2,500kgs or 5,500 lbs.
MAINTENANCEOIL AND LUBRICATIONCheck the fluid level every six months. If necessary, fill with standard hydraulic jack fluid. Total volume isapproximately 0.3 quarts. Use motor oil or grease regularly to lubricate all moving parts.BLEEDING AIR FROM PUMPDuring transportation, it is possible air may get in the pump causing the forks to not elevate properly while in the Liftposition. To remove the air, move the control handle (L107C) into the Lower position and pump the handle (L110C)several times.DAILY MAINTENANCE AND INSPECTIONTo limit wear and tear on your pallet jack, please inspect the unit prior to each use. Check for excess wear especiallyto the wheels, axles, and pump. Make sure to unload the forks after each use.TROUBLESHOOTINGTROUBLEForks will not reach maximum heightThe forks can not belifted up.The forks cannot bedescendedLeaksThe fork descendswithout the releasevalve closedPOSSIBLE CAUSERECOMMENDED ACTION The Hydraulic oil is low. Add oil. No hydraulic oil. Fill with oil. The oil has impurities. Change the oil. The nut (L101C) is too high, keepingthe pumping valve open. Adjust nut (L101C). Air in hydraulic oil. Bleed the air. The piston rod (L317) or pump body(L311) is deformed resulting frompartial loading slanting to one side oroverloading. Replace the piston rod (L317) or pumpbody (L311) The adjusting nut (L101C) is not inthe correct position Adjust the nut (L101C) Sealing parts wornor damaged. Replace with new seal Damaged or worn part Inspect and replace damaged orworn parts The release valve does not closeproperly do to impurities in the oil. Replace with new oil. Cracked or worn part in thehydraulic system. Inspect and replace damaged orworn part Air in hydraulic oil. Bleed the air. Worn or damaged seal. Replace seal The adjusting nut (L101C) is not incorrect position Adjust nut (L101C).
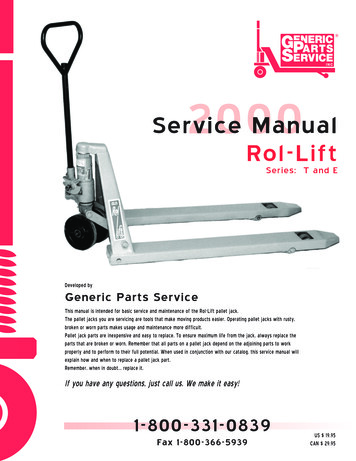
PARTS AND HARDWARE IDENTIFICATIONHANDLE PARTS 110CL111CL112CAdjusting Nut- (1)Adjusting Bolt - (1)Chain - (1)Pull Rod - (1)Elastic Pin - (1)Can - (1)Control Handle- (1)Steel Ball - (2)Spring - (1)Handle - (1)Bolt - (4)Elastic Washer- (4)FORK FRAME sis- (1)Lock Bolt - (1)Bushing - (4)Shoulder Bolt - (2)Bushing - (2)Torsion Tube- (1)Thrust Plate- (1)Elastic Pin - (4)Eye Bolt - (2)Nut- (2)Push Rod - (2)Axle for Eye Bolt- (2)Elastic Pin- (12)Axle for Torsion Tube - (2)Roller - (2)Bushing - (4)Axle - (2)Elastic Pin- (4)Bushing- (4)Frame of Roller - (4)Bolt - (2)Pin- (2)Washer- (4)L224L225L226L227L228L229L230L231Axle for Roller- (2)Bearing- (4)Load Roller- (2)Elastic Washer- (2)Nut- (2)Nut- (2)Entry Roller- (2)Bolt- (2)
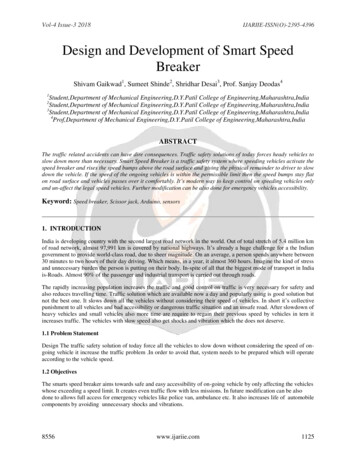
PARTS AND HARDWARE IDENTIFICATIONPUMP UNIT 350Retaining Ring - (2)Hub Cap - (2)Retaining Ring - (2)Shaft of Wheel - (1)Bearing - (4)Wheel - (2)Washer - (2)O-Ring- (2)Release Valve - (1)Spring - (1)Pump Body- (1)Seal Washer- (1)Bolt - (1)Y-Seal - (1)Y-Seal- (1)Wiper - (1)Lift Piston Rod - (1)Steel Ball - (1)Bracket- (1)Pump Piston Rod- (1)Cap - (1)Spring - (1)Wiper - (1)Y-Seal - (1)Axle of Roller - (1)Pressure Roller - (1)Bushing- (1)Elastic Pin - (1)Elastic Pin - (1)Bushing- (2)Axle with Hole - (1)Plug Bolt- (1)Spring- (1)Seal Washer - (1)Valve Pin - (1)Valve - (1)O-Ring - (1)Steel Ball - (1)Safe Valve Pin- (1)Spring - (1)Adjusting Bolt - (1)O-Ring - (1)Plug Bolt - (1)Elastic Pin- (1)Lever- (1)Elastic Pin- (1)Thrust Bearing- (1)Snap Ring - (1)
Pallet Jack OWNER'S MANUAL Model MH1230. IMPORTANT SAFETY INSTRUCTIONS 1. Read and understand all warning and instructions prior to using the pallet jack. 2. Always inspect the pallet jack for damage or excess wear prior to each use. 3. Always use on an flat, level surface. 4. Never lift or transport people using this pallet jack.