Transcription
INSTRUCTION MANUALHK-150 S ERIESINSTALLATION TOOLS10-28-2010HK1058
HK-150 Series ToolingAlcoa Fastening Systems2
HK-150 Series ToolingAlcoa Fastening SystemsC ONTENTSSAFETY . . . . . . . . . . . . . . . . . . . . . . . . . . . . . . . . . . . . . . . . . . . . . . . . . . .4PRINCIPLEOFOPERATION . . . . . . . . . . . . . . . . . . . . . . . . . . . . . . . . . . . .5TOOL SPECIFICATIONS . . . . . . . . . . . . . . . . . . . . . . . . . . . . . . . . . . . . . . .5OPERATING INSTRUCTIONS . . . . . . . . . . . . . . . . . . . . . . . . . . . . . . . . .6 - 7RIVET PINTAIL REMOVAL . . . . . . . . . . . . . . . . . . . . . . . . . . . . . . . . . . . . .7JAW INSTALLATION AND REMOVAL . . . . . . . . . . . . . . . . . . . . . . . . . . .8 - 9TOOL MAINTENANCE . . . . . . . . . . . . . . . . . . . . . . . . . . . . . . . . . . . . . . . .10TROUBLESHOOTING . . . . . . . . . . . . . . . . . . . . . . . . . . . . . . . . . . . . . . . .11OPTIONAL ACCESSORIES . . . . . . . . . . . . . . . . . . . . . . . . . . . . . . . . . . . .12RIVETERTONUTSETTER CONVERSION INSTRUCTIONS . . . . . . . . . . . .1390 DAY WARRANTY . . . . . . . . . . . . . . . . . . . . . . . . . . . . . . . . . . . . . . . .14AUTHORIZED TOOL SERVICE CENTER . . . . . . . . . . . . . . . . . . . . . . . . . .143
HK-150 Series ToolingAlcoa Fastening SystemsS AFETY8. Tools and hoses should be inspected for leaks atthe beginning of each shift/day. If any equipmentshows signs of damage, wear, or leakage, do notconnect it to the primary power supply.This instruction manual must be read,with particular attention to the followingsafety guidelines, by any person servicingor operating this tool.9. Mounting hardware should be checked at thebeginning of each shift/day.1. Glossary10. Make sure proper power source is used at all times.Product complies with requirementsset forth by the relevant Europeandirectives.11. Release tool trigger if power supply is interrupted.12. Tools are not to be used in an explosive environment unless specifically designed to do so.Read manual prior to usingequipment.13. Never remove any safety guards or pintail deflectors.Eye protection required whileusing this equipment.14. Ensure deflector or pintail collector is installed andoperating prior to use.Hearing protection required whileusing this equipment.15. Never install a fastener in free air. Personal injuryfrom fastener ejecting may occur.16. Always clear spent pintail out of nose assemblybefore installing the next fastener.WARNINGS - Must be understood toavoid severe personal injury.17. There is possibility of forcible ejection of pintails orspent mandrels from front of tool.CAUTIONS - show conditions that willdamage equipment and or structure.18. If there is a pinch point between trigger and workpiece, use remote trigger. (Remote triggers areavailable for all tooling).Notes - are reminders of required procedures.Bold, Italic type and underlining - emphasizes a specific instruction.19. Unsuitable postures may not allow counteracting ofnormal expected movement of tool.2. A half hour long hands-on training session withqualified personnel is recommended before usingHuck equipment.20. Do not abuse tool by dropping or using it as a hammer. Never use hydraulic or air lines as a handle orto bend or pry the tool. Reasonable care of installation tools by operators is an important factor inmaintaining tool efficiency, eliminating downtime,and in preventing an accident which may causesevere personal injury.3. Huck equipment must be maintained in a safeworking condition at all times. Tools and hosesshould be inspected at the beginning of eachshift/day for damage or wear. Any repair should bedone by a qualified repairman trained on Huck procedures.21. Never place hands between nose assembly andwork piece. Keep hands clear from front of tool.4. Repairman and Operator must read manual prior tousing equipment. Warning and Caution stickers/labels supplied with equipment must be understood before connecting equipment to any primarypower supply. As applicable, each of the sectionsin this manual have specific safety and other information.22. There is a risk of crushing if tool is cycled withoutNose Assembly installed.23. Tools with ejector rods should never be cycled without nose assembly installed.24. When two piece lock bolts are being used alwaysmake sure the collar orientation is correct. See fastener data sheet of correct positioning.5. Read MSDS Specifications before servicing thetool. MSDS Specifications are available from theproduct manufacturer or your Huck representative.6.25. There is a risk of whipping compressed air hose iftool is pneudraulic or pneumatic.When repairing or operating Huck installationequipment, always wear approved eye protection.Where applicable, refer to ANSI Z87.1 - 20037. Disconnect primary power source before performing maintenance on Huck equipment or changingNose Assembly.26. Tool is only to be used as stated in this manual. Anyother use is prohibited.4
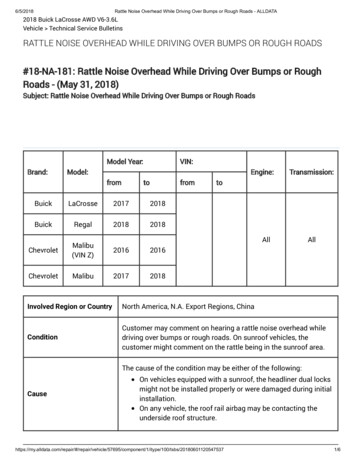
HK-150 Series ToolingAlcoa Fastening SystemsP RINCIPLEOFO PERATIONREAD INSTRUCTIONS THOROUGHLY PRIOR TO OPERATING THE RIVETER. THISRIVETER IS DESIGNED FOR INTERMITTENT DUTY AND MAINTENANCE WORK ONLY.The HK-150 is a hydraulic tool designed to set from 1/8 inch up to and including 1/4 inch diameter steel, stainless steel, aluminum and plastic rivets by changing only the nose piece. The HK-150 has a rated pull pressure of over 3,500 lbs and onehanded operation gives access to tight areas.The hydraulic system is sealed, oil cannot be added. If the HK-150 should become damaged and leaks oil from the tool, itshould be returned to an authorized service center.T OOL S PECIFICATIONSOperating Temperature Range: 32 - 125 F ( 0 - 51.7 C )Maximum Operating Temperature: 125 F ( 51.7 C )STROKE5/8”(1.58 cm)RIVET DIAMETER1/8”-1/4”(.32-.63 cm)RIVET MATERIALSStainless Steel,Aluminum, PlasticPULL PRESSURE3,500 lbs(15.6 kN)WEIGHT28 oz(.79 kg)FULL EXTENSIONTOOL BODY201050JAW HOLDER201061NOSE TUBENOSE PIECESEE PG. 5JAWS(3 PC.)-202929(2 PC.)-202122JAW PUSHERPULLER SHAFTRELEASINGBUTTON202124RETURN SPRING202312RESERVOIR SHIELDPUMP HANDLEFigure 15
HK-150 Series ToolingAlcoa Fastening SystemsO PERATING I NSTRUCTIONSWARNINGS: Read full manual before using tool. A half-hour training session with qualified personnel is recommended beforeusing Huck equipment. To avoid severe personal injury: Wear approved eye and ear protection. Be sure of adequate clearance for Operator’s hands before proceeding withfastener installation. Tool shall not be operated if directed toward the operator or any person. Beware of ejection of fastener; turn head in each operation to avoid exposure.READ INSTRUCTIONS THOROUGHLY PRIOR TO OPERATING THE RIVETER. THISRIVETER IS DESIGNED FOR INTERMITTENT DUTY AND MAINTENANCE WORK ONLY.The HK-150 hydraulic riveter installs fasteners by a pull and release system. Placing lever in “PULL” position,and pumping the handles (see figure 2 on the next page) will actuate the tool. After installing the fastener, thetool must be returned to its original position, which releases the pintail. To do this, point the tool downward,place lever in “RELEASE” position, and squeeze handles (see figure 3). The pintail should drop out.BODYPINTAIL(Typical Rivet)Nose Piece Installation:Fastener Installation:Install correct nose piece on tool (see Nose Pieceinstallation section).1. Insert pintail of rivet in to the Nose Piece.1. Select the proper Nose Piece for the correctinstallation of fastener and function of tool.2. Remove the Nose Piece in the tool byunscrewing it in a counterclockwise direction.2. Position the Rivet Body in to Work Piece tobe fastened.3. Hand tighten the Nose Piece into the NoseTube.3. Hold the tool steady against the work pieceand pump Handles until rivet is set and pintailis broken*. See figure 2CAUTIONS: Before operating tool, makesure that all Nose parts havebeen screwed in HAND TIGHT. Frequently check that nosecomponents do not vibrateloose during operation.*The HK-150 has a .625 inch work travel and will set most rivets in one cycle. If the tool reaches the end ofits travel before the rivet breaks, DO NOT continue pumping the handles on the tool. Release the tool bypressing RELEASE Button and then squeezing the handles. Next, regrip the rivet, and pump the HANDLESand finish the installation.6
HK-150 Series ToolingAlcoa Fastening SystemsO PERATING I NSTRUCTIONS (continued)RIVET PINTAIL(INSIDE NOSE PIECE)PUMPHANDLERIVET BODYWORK PIECEFigure 2R IVET P INTAIL R EMOVALHANDLES(SQUEEZE)Rivet PintailRemovalvet PintailRemoval:Once Rivet is installed, Pintail must beremoved.1. Point tool downward.RELEASINGBUTTON(PRESS)2. Squeeze the Handle while pressingthe Releasing Button.CAUTION: It is necessary toremove Pintail before attemptingto install another Rivet.Figure 4RIVETPINTAILFigure 37
HK-150 Series ToolingAlcoa Fastening SystemsJ AW I NSTALLATION1.R EMOVAL :The jaws are installed at the factory and should only need to be removed for periodic inspection and cleaning. Toremove the jaws unscrew the NOSE TUBE from the tool in a counterclockwise direction2. THREE PIECE JAW SYSTEM2. TWO PIECE JAW SYSTEMRemove the JAW HOLDER by unscrewing it in acounterclockwise direction. Drop JAWS out from SPRING side.Actuate tool by squeezing the ACTUATING TRIGGER (see fig3 above) until the jaw pusher is fully extended. Stop as soon asthe JAW PUSHER is in the extended position.Remove the JAW HOLDER by unscrewing it in acounterclockwise direction. Drop JAWS out fromSPRING side. Push JAW PUSHER flush with PULLERSHAFT while squeezing the RELEASING TRIGGER(See Figure 3 above).PULLERSHAFTPULLERSHAFTJAWPUSHER3.ANDTWO PIECE JAW SYSTEMTo replace JAWS, hold JAW HOLDER large end down and at aslight angle. Place jaws in one at a time. Add a small amount ofjaw lubricant to jaws and jaw holder prior to assembly.JAWPUSHER3. THREE PIECE JAW SYSTEMTo replace JAWS, hold JAW HOLDER large end down and at a slightangle. Hold finger over small opening and place jaws in one at a time.Add a small amount of jaw lubricant to jaws and jaw holder prior toassembly.8
HK-150 Series ToolingAlcoa Fastening SystemsJ AW I NSTALLATION ANDR EMOVAL ( CONT.):4. When jaws are in place, insert jaw holder into spring, being sure to keep large end of jaw holder pointing downward.SPRINGJAW HOLDER5. TWO JAW SYSTEM5.Hold tool with the PULLER SHAFT pointing down and screw thejaw holder on to the PULLER SHAFT. HAND TIGHTEN ONLY.THREE JAW SYSTEMHold tool with the PULLER SHAFT pointing down and the JAWPUSHER fully extended. Screw the jaw holder on to the PULLERSHAFT. HAND TIGHTEN FT6. Replace the NOSE TUBE and NOSE PIECE, HAND TIGHTEN ONLY. The tool is now ready to use.9
HK-150 Series ToolingAlcoa Fastening SystemsT OOL M AINTENANCESteps for Proper Tool Maintenance and Operation1. Disassemble and clean Nose components periodically orif the pintails do not drop out freely. Use a pick to cleanthe jaw grooves. Wash components in mineral spirits orisopropyl alcohol. Apply a small amount of lubricant tothe Jaws and inside of Jaw Holder prior to assembly.6. The tool has a 5/8" work travel, the completion of whichis indicated by a solid stop after approximately 12 pumps(one cycle). Do not force beyond this point to insurelong life of tool.7. The HK-150 should not be used at temperatures below35 F unless it is first brought to room temperature andcycled several times. Normal use of the tool after warming should keep it warm enough for proper operation.2. To ease Nose Tube and Nose Piece installation, extendtool by pumping Handles.3. Do not use tool as a lever if rivet pintail is jammedwhile regripping. Instead, squeeze Handles and pressthe Releasing Button while pushing tool nose againstwork piece for the jaws to get a deeper grip.8. If tool will not reverse, remove Nose Tube and inspect forany foreign matter that might have caused jammingbetween Jaw Holder and inside of Nose Tube.9. Frequently check that nose components do not vibrateloose during operation.4. If rivet pintail is stuck in tool after breaking, lightly tapnose against a hard surface while squeezing Handlesand pressing the Releasing Button with tool pointingdownward. Pintail should then fall out.10. Do not rock tool when pumping it. This may cause rivets to prematurely break.11. Large fasteners can be set one handed in tight areas byusing short pump strokes.5. Before operating tool, make sure that all Nose Partshave been screwed in hand tight.Nose PiecesPart No.DescriptionPart No.1/8" for Trim MoldingDescriptionAuto Split "T"202155 1/4"Rivets202156 Pop RivetsØ.160Ø.093202159'3/32" & 1/8"Pop Rivets1/4" Pop & Plastic202157 RivetsØ.160Ø.0982021901/8" Stand OffPop Rivets202169 1/4" MonoboltsØ.160Ø.0932021585/32" & 3/16" Pop& Plastic RivetsSpec. GM Glass Stop202193 Travel, Pop RivetsØ.130Ø.160202168202142 1/4" Magna Lok3/16" MonoboltsØ.125Ø.17210
HK-150 Series ToolingAlcoa Fastening SystemsT ROUBLESHOOTINGProblem1.) Rivet pintail is stuck in toolSolutionFirst Step:Lightly tap nose against a hard surface while after breakingsqueezing HANDLES and pressing down the RELEASING BUTTON with tool pointing downward Pintail should then fall out,see fig. 4. If that does not work try Second Step.Second Step: (Use this only if first step does not work)Remove NOSE TUBE and JAW HOLDER (for help see figure 5)take out pintail and reassemble.2.) Tool will not reversePush on the handles until you feel a slight give, then press theRELEASING BUTTON and continue pushing on the handles,the tool should then reverse. If this does not work RemoveNOSE TUBE and inspect for any foreign matter that may havecause the jamming between JAW HOLDER and the inside ofNOSE TUBE.3.) Fastener does not pull rivetThe JAW HOLDER is loose. Remove the NOSE TUBE andtighten the JAW HOLDER by turning it counterclockwise (see(See Three Piece Jaw Installation and Removal)).4.) The rivet does not fit into the toolThe rivet is to large, or the wrong NOSE PIECE is on the tool.To find the correct NOSE PIECE (see chart on page 11). If youdo not have the needed NOSE PIECE, See next page for howto order the correct one.5.) Premature breakingSee solution for problem 4. Also verify the grip of the fastenerand make sure you are not rocking the tool during installation.6.) Jamming of toolSee solution for problem 4. Also verify that you have the properjaw engagement and that all parts are hand tight and that thejaws are cleaned and properly assembled in jaw pusher (SeeThree Piece Jaw Installation and Removal)7.) Rivet not installed properlySee solution for problem 4. Also verify jaw grip and that theappropriate fastener is being used.8.) Jaws breakingSee solution for problem 4. Check to see all parts are properlyassembled and hand tight.9.) Damaged jaw pusherSee solution for problem 4. Check to see if all parts are properlyassembled.11
HK-150 Series ToolingAlcoa Fastening SystemsO PTIONAL A CCESSORIESNOSE PIECES202156 1/8” for Trim Molding Pop Rivets202159 3/32” & 1/8” Pop Rivets202190 1/8” Stand Off Pop Rivets202158 5/32” & 3/16” Pop and Plastic Rivets202168 3/16” Monobolts202155 1/4” Auto Split “T” Rivets202157 1/4” Pop and Plastic Rivets202169 1/4” Monobolts202193 Spec. GM Glass Stop Travel, Pop Rivets202142 1/4” Magna LokJAWS202122202929Two Piece JawsThree Piece JawsKITS205490205400205401205403126016Nose Extension KitNut Setter KitMetric Nut Setter KitRivnut Nut Setter KitRivet Stem Removal Tool “Punch Assy”Service Notes:12
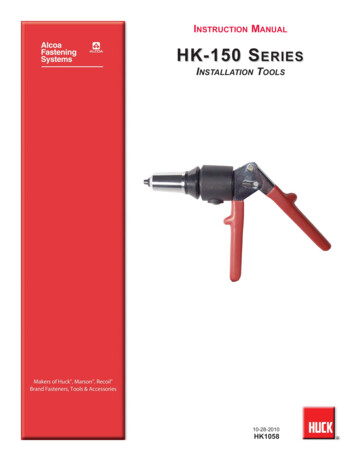
HK-150 Series ToolingAlcoa Fastening SystemsC ONVERTING A R IVETERTO A N UTSETTERThe HK-150 can be converted from ariveter to a nutsetter by changingseveral of the nose components. Notools required as parts require handtightening only.Tool BodyJaw HolderNose TubeR IVETERNosePieceReturnSpringPullerShaftJawsN UTSETTERMaster ShaftAssembly1. Completely retract the tool by squeezing HANDLESand pressing the RELEASING BUTTON. (Figure 3)2. Remove NOSE PIECE from NOSE TUBE. Remove NOSETUBE, JAWS and JAW HOLDER.NoseTubeTurnNutPull-UpStudAnvil4. Slide TURN NUT over the extended section of theMASTER PULLER SHAFT. Screw the appropriatePULL-UP STUD into MASTER SHAFT ASSEMBLY.(NOTE: this is a left hand thread and must bescrewed in counterclockwise.)The parts that were removed should be stored forfuture use as a riveter. The tool is ready to start addingNUTSETTER accessories as follows:5. Push appropriate ANVIL over PULL-UP STUD intoTURN-NUT.3. Screw MASTER SHAFT assembly on PULLER SHAFTand replace NOSE TUBE as shown.The HK-150 NUTSETTER sets 3mmthrough 3/8-24 threaded aluminum insertsand up to 1/4-20 steel inserts. Sizechanges are accomplished by changingthe PULL-UP STUD and ANVIL. No toolsrequired.HK-150 NutsetterTURN NUTNOSE TUBEInstalling threaded Inserts:1. Make sure proper Pull-up Stud andare Anvil in place.2. Thread the insert on the Pull-up Studuntil all threads on the insert areengaged.3. Position the Insert into workpiece withthe appropriate size hole and pumpthe Handles until the Insert is set.ANVILPULL-UP STUD(You will feel the tool come to a definitestop when the insert is properly set. STOPPUMPING HANDLES)THREADED INSERTRELEASING BUTTONReleasing the Tool: (After Insert has beenset in the workpiece)1. Press the Releasing Button whilesqueezing Handles.2. Rotate the Turn Nut in a counterclockwise direction until the Pull-up Stud isreleased from the Threaded Insert.figure 413
HK-150 Series Tooling90 D AY WARRANTYAlcoa Fastening SystemsONHK-150 R IVETERAll Alcoa Fastening Systems tools and parts have been carefully tested and checked at the factory andare guaranteed to be free from defects in material and workmanship, subject to the following conditions.A.) The tools manufactured by Alcoa Fastening Systems will be repaired free of charge or replaced at ourdiscretion within 90 days of sale to the first user if, upon examination at our service center, we find adefect in material or workmanship in the hydraulic system.B.) The tool must be returned intact and prepaid to one of our service centers. Proof of date of sale mustaccompany any tool returned. This warranty will be void if repairs have been made or attempted byothers, or if the tool has been subject to abuse, neglect, accident or improper application.C.) The foregoing obligation is Alcoa Fastening Systems’ sole liability under this or any implied warranty,and no one is authorized to vary its terms or conditions.D.) If you have any problems please contact Customer Service at the factory: (800) 278-4825.Before returning tools to the service center, please use the operation andmaintenance tips on page 9 of this manual. If the tool continues to malfunction call the Customer Technical Support at Alcoa Fastening Systems(888) 482-5435 for additional assistance.A UTHORIZED T OOL S ERVICE C ENTER :Central Fastening Systems801 McCann RoadRogers, AR 72758479 936 7577888 370 1894 (Toll Free)479 636 2119 (Fax)Universal Repair Shop1611 Boylston AvenueSeattle, WA 98122206 322 2726206 322 2126 (Fax)J.O. King1265 Alpharetta RoadAlpharetta, GA 30201770 751 1875800 241 2681 (Toll Free)770 442 0950 (Fax)Professional Tool Center2236 S.116th StreetWest Allis, WI 53227414 321 1234414 321 2524 (Fax)FSI1206 East Mac Arthur StSonoma, CA 95476707 935 1170800 344 2394 (Toll Free)707 935 1828 (Fax)Alcoa Fastening Systems5436 W 78th StreetIndianapolis, IN 46268800 343 3633 (Toll Free)14
HK-150 Series ToolingAlcoa Fastening SystemsLIMITED WARRANTIESTooling Warranty: Huck warrants that tooling and otheritems (excluding fasteners, and hereinafter referred as"other items") manufactured by Huck shall be free fromdefects in workmanship and materials for a period of ninety (90) days from the date of original purchase.Warranty on "non standard or custom manufacturedproducts": With regard to non-standard products or custom manufactured products to customer's specifications,Huck warrants for a period of ninety (90) days from thedate of purchase that such products shall meet Buyer'sspecifications, be free of defects in workmanship andmaterials. Such warranty shall not be effective withrespect to non-standard or custom products manufacturedusing buyer-supplied molds, material, tooling and fixturesthat are not in good condition or repair and suitable fortheir intended purpose.THERE ARE NO WARRANTIES WHICH EXTENDBEYOND THE DESCRIPTION ON THE FACE HEREOF.HUCK MAKES NO OTHER WARRANTIES ANDEXPRESSLY DISCLAIMS ANY OTHER WARRANTIES,INCLUDING IMPLIED WARRANTIES AS TO MERCHANTABILITY OR AS TO THE FITNESS OF THETOOLING, OTHER ITEMS, NONSTANDARD OR CUSTOM MANUFACTURED PRODUCTS FOR ANY PARTICULAR PURPOSE AND HUCK SHALL NOT BE LIABLEFOR ANY LOSS OR DAMAGE, DIRECTLY OR INDIRECTLY, ARISING FROM THE USE OF SUCH TOOLING, OTHER ITEMS, NONSTANDARD OR CUSTOMMANUFACTURED PRODUCTS OR BREACH OF WARRANTY OR FOR ANY CLAIM FOR INCIDENTAL ORCONSEQUENTIAL DAMAGES.Huck's sole liability and Buyer's exclusive remedy for anybreach of warranty shall be limited, at Huck's option, toreplacement or repair, at FOB Huck's plant, of Huck manufactured tooling, other items, nonstandard or customproducts found to be defective in specifications, workmanship and materials not otherwise the direct or indirectcause of Buyer supplied molds, material, tooling or fixtures. Buyer shall give Huck written notice of claims fordefects within the ninety (90) day warranty period for tooling, other items, nonstandard or custom productsdescribed above and Huck shall inspect products for whichsuch claim is made.Tooling, Part(s) and Other Items not manufactured byHuck.HUCK MAKES NO WARRANTY WITH RESPECT TOTHE TOOLING, PART(S) OR OTHER ITEMS MANUFACTURED BY THIRD PARTIES. HUCK EXPRESSLY DISCLAIMS ANY WARRANTY EXPRESSED OR IMPLIED,AS TO THE CONDITION, DESIGN, OPERATION, MER-CHANTABILITY OR FITNESS FOR USE OF ANY TOOL,PART(S), OR OTHER ITEMS THEREOF NOT MANUFACTURED BY HUCK. HUCK SHALL NOT BE LIABLEFOR ANY LOSS OR DAMAGE, DIRECTLY OR INDIRECTLY, ARISING FROM THE USE OF SUCH TOOLING, PART(S) OR OTHER ITEMS OR BREACH OFWARRANTY OR FOR ANY CLAIM FOR INCIDENTALOR CONSEQUENTIAL DAMAGES.The only warranties made with respect to such tool, part(s)or other items thereof are those made by the manufacturer thereof and Huck agrees to cooperate with Buyer inenforcing such warranties when such action is necessary.Huck shall not be liable for any loss or damage resultingfrom delays or nonfulfillment of orders owing to strikes,fires, accidents, transportation companies or for any reason or reasons beyond the control of the Huck or its suppliers.Huck Installation EquipmentHuck International, Inc. reserves the right to makechanges in specifications and design and to discontinuemodels without notice.Huck Installation Equipment should be serviced by trainedservice technicians only.Always give the Serial Number of the equipment when corresponding or ordering service parts.Complete repair facilities are maintained by HuckInternational, Inc.Authorized Tool Service Centers (ATSC's) offer repairservices, spare parts and nose inserts and acceserories.
For the Long Haul A Global OrganizationAlcoa Fastening Systems (AFS) maintainscompany offices throughout the United Statesand Canada, with subsidiary offices in manyother countries. Authorized AFS distributorsare also located in many of the world’sIndustrial and Aerospace centers, where theyprovide a ready source of AFS fasteners,installation tools, tool parts, and applicationassistance.Alcoa Fastening Systems world-wide locations:AmericasFar EastEuropeAlcoa Fastening SystemsAlcoa Fastening SystemsAlcoa Fastening SystemsAlcoa Fastening SystemsAerospace ProductsTucson Operations3724 East ColumbiaTucson, AZ 85714800-234-4825520-747-9898FAX: 520-748-2142Industrial ProductsKingston Operations1 Corporate DriveKingston, NY 12401800-278-4825845-331-7300FAX: 845-334-7333Industrial ProductsAustralia Operations14 Viewtech PlaceRowville, VictoriaAustralia 317803-764-5500Toll Free: 008-335-030FAX: 03-764-5510Industrial ProductsUnited Kingdom OperationsUnit C, Stafford Park 7Telford, ShropshireEngland TF3 3BQ01952-290011FAX: 0952-290459Alcoa Fastening SystemsAlcoa Fastening SystemsAerospace ProductsCarson OperationsPO Box 5268900 Watson Center Rd.Carson, CA 90749800-421-1459310-830-8200FAX: 310-830-1436Industrial ProductsLatin America OperationsAvenida Parque Lira. 79-402Tacubaya Mexico, D.F.C.P. 11850FAX: 525-515-1776TELEX: 1173530 LUKSMEAlcoa Fastening SystemsNOTICE: The information contained in this publication is only for general guidance with regard toproperties of the products shown and/or theAerospace ProductsFrance OperationsClos D’AssevilleBP495450 Us Par VignyFrance33-1-30-27-9500FAX: 33-1-34-66-0600Certified toISO 9001:2008Industrial ProductsWaco OperationsPO Box 81178001 Imperial DriveWaco, TX 76714-8117800-388-4825254-776-2000FAX: 254-751-5259For The Long Haul, The Future of FasteningTechnology, The Future of Assembly Technology,The Future of Tooling Technology, and Tools ofProductivity are service marks of HuckInternational. Huck provides technical assistanceregarding the use and application of Huck fasteners and tooling.Alcoa Fastening ed toISO 14001:2004means for selecting such products, and is notintended to create any warranty, express,implied, or statutory; all warranties are containedonly in Huck’s written quotations, acknowledgements, and/or purchase orders. It is recommended that the user secure specific, up-to-date dataand information regarding each applicationand/or use of such products.HWB898 1003-5MOne Great ConnectionSM 2003 Alcoa Fastening Systems1 Corporate Drive, Kingston, NY 12401 Tel: 800-431-3091 Fax: 845-334-7333 www.alcoafasteningsystems.com
in this manual have specific safety and other infor-mation. 5. Read MSDS Specifications before servicing the tool. MSDS Specifications are available from the product manufacturer or your Huck representative. 6. When repairing or operating Huck installation equipment, always wear approved eye protection. Where applicable, refer to ANSI Z87.1 .