Transcription
Kaltura CaptureSpace Lite User GuideVersion: 1.0
Table of ContentsSystem Requirements & Supported MS Office Versions. . 3First time using CaptureSpace . . 3Launching CaptureSpace Lite from Ember . . 6Launching CaptureSpace Lite from Your Desktop . . 9CaptureSpace RecorderRecord Tab . .10Library Tab . 11Settings Tab . .12Help Tab . .13CaptureSpace Recording OptionsRecord Screen and Voice . 14Record Screen and Video . 17Record Video Only . .20Record Audio Only .22Editing a videoTrimming a Video . . 23Chopping a Video . .25Adding a Title Slide to a Video . .28Adding a Credits/end Slide to a Video . .30Uploading Video to Kaltura . .32KALTURA CAPTURESPACE USER GUIDE2
System Requirements & Supported MSOffice VersionsSystem RequirementsThe following are the minimum system requirements required to set up the Kaltura CaptureSpaceDesktop Recorder: Windows 7,8, 8.1, 10 32/64 bit with .NET Framework 4.0 and Visual Studio runtime toolsSupported Microsoft Office VersionsThe Kaltura CaptureSpace Desktop Recorder supports the following Microsoft Office versions: Microsoft PowerPoint 2007 32 bitMicrosoft PowerPoint 2010 32/64 bitMicrosoft PowerPoint 2013 32/64 bitMicrosoft PowerPoint for Mac 2011Microsoft PowerPoint for Mac 2016Screen RecordingFirst time using CaptureSpace Lite1. Login to Ember2. Select a course you wish to record a video forKALTURA CAPTURESPACE USER GUIDE3
3. Select “My Media”4. If you have not used the My Media feature before, you will need to authorize the Kaltura Appaccess to your account. Click on the Authorize buttonKALTURA CAPTURESPACE USER GUIDE4
5. Click on the “Add New” button and select CaptureSpace Lite6. When using the application for the first time you may be prompted by the browser to approvethe application. Each browser may prompt you with a unique message.7. Click Launch Application to download the CaptureSpace Desktop Recorder.8. After the Kaltura CaptureSpace Desktop Recorder downloads, click Install.KALTURA CAPTURESPACE USER GUIDE5
9. A message will appear “Please Launch the Kaltura CaptureSpace Desktop Recorder from the‘Add New’ menu on your website.” Click OK and return to Ember.10. Click on the “Add New” button and select CaptureSpace LitePLEASE NOTE: The initial launch of the Kaltura CaptureSpace Desktop Recorder client MUSTbe done via the website.Launching CaptureSpace Lite from Ember1. Login to Ember2. Select a course you wish to record a video forKALTURA CAPTURESPACE USER GUIDE6
3. Select “My Media”4. Click on the “Add New” button and select CaptureSpace LiteKALTURA CAPTURESPACE USER GUIDE7
5. The Kaltura CaptureSpace Desktop Recorder opens.KALTURA CAPTURESPACE USER GUIDE8
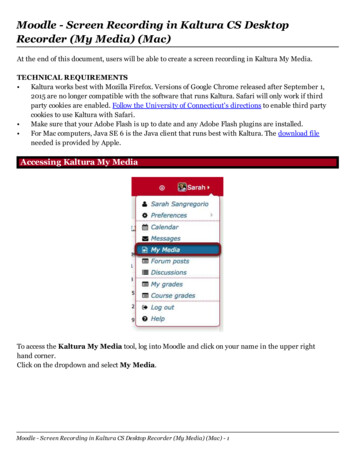
Launching CaptureSpace Lite from YourDesktop1.From your desktop or Start Menu, click on the Kaltura CaptureSpace Lite Desktop Recordericon.KALTURA CAPTURESPACE USER GUIDE9
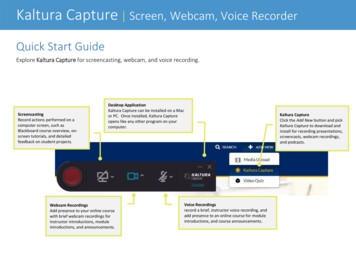
CaptureSpace RecorderRecord TabThe Record tab enables you to select from the different recording options available in CaptureSpace LiteDesktop Recorder: Capture presentations and lectures, using all available features such as screen, presentation,camera, and voice.Record the screen and voice.Record the screen and video.Record only video.KALTURA CAPTURESPACE USER GUIDE10
Library TabThe Library tab enables you to browse through previous recordings. You can use the search box toquickly find recordings.KALTURA CAPTURESPACE USER GUIDE11
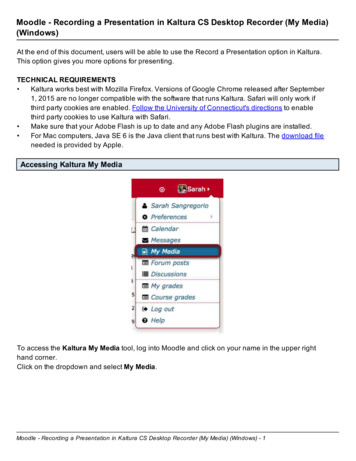
Settings TabThe Settings tab is a centralized screen that enables you to manage the CaptureSpace Desktop Recorder.Here you can: Determine the location where your video files are stored before they are uploaded to Kaltura.Select any webcam from the drop down list and see the preview.Select the recording quality: 480p or 720p for webcam, 720p or 1080p for screen recording.Select any microphone from the drop down list and gauge the voice level using the microphonemeter.KALTURA CAPTURESPACE USER GUIDE12
Help tabThe Help tab provides you with the following information: Information about the logged in user.Recorder version number.Website where the user will be able to find their recordings3. Click “Delete” to confirm thedeletion.The Help tab also provides an option to collect logs to aid in troubleshooting any technical issues.KALTURA CAPTURESPACE USER GUIDE13
CaptureSpace Recording OptionsRecord Screen and Voice1. Click on Screen in the Record tab.KALTURA CAPTURESPACE USER GUIDE14
2. Select whether to record the entire screen or only a selected area. If you'd like to record theentire screen select Full screen. If you'd like to record a specific area of the screen, click onSelect Area. To select an area – drag your mouse over the area you want to capture and release.KALTURA CAPTURESPACE USER GUIDE15
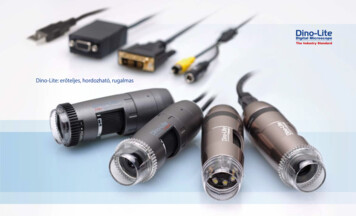
3. When ready, click on Record to start the recording.4. Drawing tools are available when recording the screen. The drawing tools can be used to drawfreely on the screen during the recording. You can stress important points by drawing a circlearound them, or highlight important aspects. Anytime during a recording, you can click on Drawto use the drawing tools.KALTURA CAPTURESPACE USER GUIDE16
5. Click Done when finished recording.Record Screen and Video1. Click on Screen & Webcam in the Record tab.KALTURA CAPTURESPACE USER GUIDE17
2. Select whether to record the entire screen or only a selected area. If you'd like to record theentire screen select Full screen. If you'd like to record a specific area of the screen, click onSelect Area. To select an area – drag your mouse over the area you want to capture and release.\KALTURA CAPTURESPACE USER GUIDE18
3. When ready, click on Record to start the recording.4. Drawing tools are available when recording the screen. The drawing tools can be used to drawfreely on the screen during the recording. You can stress important points by drawing a circlearound them, or highlight important aspects. Anytime during a recording, you can click on Drawto use the drawing tools. You will also see a box with your image on the screen from thewebcam. You can position that box anywhere on the screen by drag n drop.KALTURA CAPTURESPACE USER GUIDE19
5. Click Done when finished recording.Record Video Only1. Click on Webcam in the Record tab.KALTURA CAPTURESPACE USER GUIDE20
2. You are presented with a preview for about 5 seconds. The recording then starts.3. Click Done when finished recording.KALTURA CAPTURESPACE USER GUIDE21
Record Audio Only1. Click on Voice in the Record tab. You will see a countdown before the recording begins.2. Control the recording using the recording player.3. Click Done when finished.KALTURA CAPTURESPACE USER GUIDE22
Editing a videoPLEASE NOTE: All edits made to the recording will be made to the original file.Trimming a VideoThis option allows you to trim the beginning and ending of a video, to remove a part in between thevideo see the option Chopping a video.1. In the Library tab, select the recording you would like to edit.KALTURA CAPTURESPACE USER GUIDE23
2. Click on the Preview Media icon and then click on the Preview button at the bottom of thescreen.3. Select Trim from the menu on the left. Two blue markers are displayed on the video strip.KALTURA CAPTURESPACE USER GUIDE24
4. Use the Start and End markers to highlight the part of the recording you want to retain. Theregion to the left and right of the markers is greyed out. Trimming is only possible if the resultingvideo is longer than 10 seconds.5. Click Apply and then click Done.Chopping a VideoThis option allows you to chop parts of the video, to trim the beginning and ending of a video, see theoption Trimming a video.1. In the Library tab, select the recording you would like to edit.KALTURA CAPTURESPACE USER GUIDE25
2.Click on the Preview Media icon and then click on the Preview button at the bottom of thescreen.3. Select Chop from the menu on the left. Two blue markers are displayed on the video strip.KALTURA CAPTURESPACE USER GUIDE26
4. Use the Start and End markers to highlight the part of the recording you want to retain. Theregion to the left and right of the markers are greyed out.5. Click Apply and then click Done.PLEASE NOTE: Chopping is only possible if the resulting video is longer than 10 seconds.\KALTURA CAPTURESPACE USER GUIDE27
Adding a Title Slide to a Video1. In the Library tab, select the recording you would like to edit.2. Click on the Preview Media icon and then click on Preview at the bottom of the screen.3. Select Add Title from the menu on the left. You can edit the text on the titles. You can also addmultiple titles to a video.KALTURA CAPTURESPACE USER GUIDE28
4. Click Apply and then click DonePLEASE NOTE: Adding a title is NOT supported on Windows 8.1 or on recordings of Lectures &Presentations using a presentation.KALTURA CAPTURESPACE USER GUIDE29
Adding a Credits/end Slide to a Video1. In the Library tab, select the recording you would like to edit.2. Click on the Preview Media icon and then click on Preview at the bottom of the screen.KALTURA CAPTURESPACE USER GUIDE30
3. Select Add Credits from the menu on the left. You can edit the text on the credits. You can alsoadd multiple credits to a video.4. Click Apply and then click DonePLEASE NOTE: Adding credits is NOT supported on Windows 8.1 or on recordings of Lectures& Presentations using a presentation.KALTURA CAPTURESPACE USER GUIDE31
Uploading Video to KalturaWhen ready, You can upload your recording to “My Media”. Your recording will be avaliable inMediaSpace and Ember.Upload Options screen Add or edit the recording title.Add a description to the video (optional).Add tags to the video (optional)KALTURA CAPTURESPACE USER GUIDE32
Upload media to “My Media”1. Select the Library tab.2. Select the recording you would like to upload and click Upload now.KALTURA CAPTURESPACE USER GUIDE33
3. Enter metadata for your media and click Save.KALTURA CAPTURESPACE USER GUIDE34
4. Click on Upload to begin uploading to the website.KALTURA CAPTURESPACE USER GUIDE35
5. After the video finishes uploading, a notification with a link to the recording is displayed.PLEASE NOTE: It may take several minutes for the media to appear in "My Media".KALTURA CAPTURESPACE USER GUIDE36
KALTURA CAPTURESPACE USER GUIDE 6 9. A message will appear "Please Launch the Kaltura CaptureSpace Desktop Recorder from the 'Add New' menu on your website." Click OK and return to Ember. 10. Click on the "Add New" button and select CaptureSpace Lite Launching CaptureSpace Lite from Ember