Transcription
En d p o in t Man ag erCo n so leVer sio n 8.1Op erat o r's Gu id eOp er at o r 's Gu id e1
Note: Before using this information and the product it supports, read the information in Notices. Copyright IBM Corporation 2003, 2011.US Government Users Restricted Rights – Use, duplication or disclosure restricted by GSA ADPSchedule Contract with IBM Corp.2Tivo li En d p o in t Man ag er Co n so le
Co n t en t sPart One 4In t r o d u cin g Tivo li En d p o in t Man ag er 4A Typical Installation 6Fixlets and Tasks 12Actions 24Sites 36Domains 45Operators 56Client Computers 59Computer Groups 67Analyses 70Baselines 76Relays and Servers 80Displays and Reports 85Part Two 91Men u s 91File MenuEdit MenuView MenuGo MenuTools MenuHelp Menu919194959697Part Three 99Th e Dialo g s 99Part Four 215Su p p o r t 215Part Five 216No t ices 216Part Six 219In d ex 219Op er at o r 's Gu id e3
Par t On eIn t r o d u cin g Tivo li En d p o in tMan ag erTivoli Endpoint Manager solves the increasingly complex problem of keeping your critical systemsupdated, compatible, and free of security problems. The Tivoli Endpoint Manager Console usespatented Fixlet technology to identify vulnerable or aberrant computers on your network and thenallows authorized personnel to correct these issues across any subset of the network with a few simplemouse-clicks.Rolling out a security patch or a software update can be accomplished in minutes, allowing you to keep astep ahead of potential network problems while maintaining a standardized operating environment. Youcan track the progress of each computer as updates are applied, making it easy to gauge the level ofcompliance across your entire enterprise.Tivoli Endpoint Manager allows you to create and print an audit trail of each issue and its resolution tomeet regulatory or policy guidelines. At any time and from any browser, you can view or print graphs andreports summarizing conditions across hundreds of thousands of networked computers. Using an exhaustive library of Windows , Macintosh, UNIX , and Linux Inspectors, Tivoli EndpointManager can retrieve useful computer properties from each of the Clients. Along with prepackagedcontent, these properties allow you to create and target your own Fixlet messages, tasks, and actions.You can also use these retrieved properties to generate customized, continuously updated reports,graphs, and 3-dimensional maps of your network.You can also communicate directly with all your networked users through the Tivoli Endpoint ManagerClient interface. You can offer them a menu of authorized choices where they can customize theirsolutions within corporate guidelines. For exampleexample, you might offer a collection of approved,compatible graphics programs and let your users choose the one that best suits their needs.4Tivo li En d p o in t Man ag er Co n so le
Tivoli Endpoint Manager has the following main components: Tivoli Endpoint Manager Clients are installed on every computer that you want to manage.They access a collection of Fixlet messages that seek out security problems, vulnerabilities, anddeviations from the desired operating environment. If a vulnerability is found, the Tivoli EndpointManager Client can then implement corrective actions received from the Console. In most cases,the Tivoli Endpoint Manager Client operates silently, without any direct intervention from the user.However, if you need to solicit user response, The program also allows you to provide screenprompts.Tivoli Endpoint Manager Servers are collections of interacting server applications that form theheart of the Tivoli Endpoint Manager system. They coordinate the flow of information to and fromindividual Clients and store the results in the databases. Redundancy is enabled by employingmultiple servers.Tivoli Endpoint Manager Relays increase the efficiency of the system. Instead of requiringevery networked computer to directly access the Tivoli Endpoint Manager Server, relays can beused to offload much of the burden. Hundreds of Clients can point to a Relay for downloads,which in turn makes only a single request of the server. Relays can connect to other relays aswell, further increasing efficiency. Tivoli Endpoint Manager can also automate the relay setup,dynamically determining the best configuration for the current state of your network.The Tivoli Endpoint Manager Console ties all these components together to provide a systemwide view of your networked computers, along with their vulnerabilities and suggested remedies.If you are an Operator with the correct privileges, the Console allows you to quickly and simplydistribute a fix to exactly those computers that need –it, with zero impact on the rest of thenetwork. The Console is subject to certain minimal requirements, among them network access tothe Tivoli Endpoint Manager Server.Web Reports let you produce charts and graphs of your data, providing you with hard copy andhelping you to maintain an audit trail of all the Fixlet activity on your network. It allows you toexport this data for further manipulation in a spread sheet or database. The Web Reportsprogram also allows you to aggregate information from additional Tivoli Endpoint ManagerServers that you might have installed in your organization. This important feature allows anorganization with hundreds of thousands of computers to be quickly and easily monitored. Alsoimportant to note is that Web Reports users cannot change computers. The interface runs in aweb browser and provides a set of users with visibility into the state of the computers, but norights to alter those computers.Op er at o r 's Gu id e5
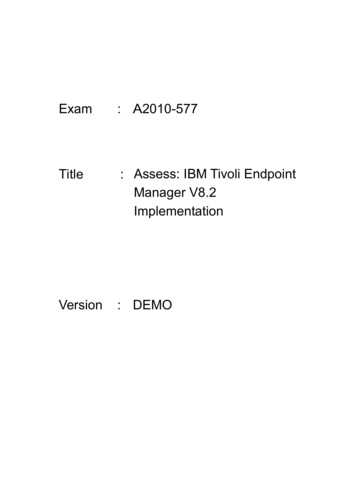
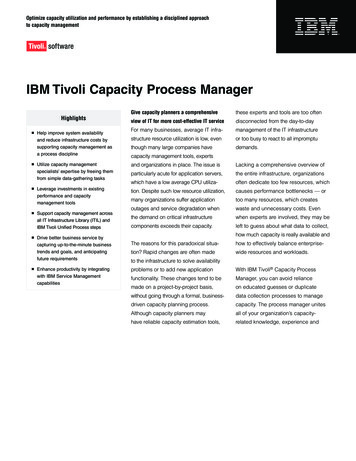
A Typical InstallationA typical installation has at least one Tivoli Endpoint Manager Server that gathers Fixlet messages fromthe Internet. These messages can be viewed by the Console operator and distributed to the Relays,which forward the data on to the Clients. Each Client inspects its local computer and reports any relevantFixlet messages back to the Relays, which compress the data and pass it back up to the servers.The Console oversees this activity. It connects to the Server and periodically updates its display to reflectchanges or new knowledge about your network. When vulnerabilities are discovered, the Consoleoperator can then target patches or other fixes to the appropriate computers. The progress of the fixescan be followed in near real-time as they spread to all the relevant computers and, one by one, eliminatebugs and vulnerabilities.Tivoli Endpoint Manager is flexible enough to connect to a distant office over a VPN and even allowshome-based workers or on-the-road sales staff to connect over the Internet to a firewall-protected Relayin a DMZ. This simple hierarchy can be extended and deepened to accommodate networks of virtuallyany size.6Tivo li En d p o in t Man ag er Co n so le
A typical deployment of the Tivoli Endpoint Manager.Getting StartedThe Console is the visible face of Tivoli Endpoint Manager, used by the operator to monitor and repairnetworked computers running the Tivoli Endpoint Manager Client. To begin using the Console, youmustmust be authorized. There are two kinds of Console user: Operators, who manage the day-to-day operation of the program, including Fixlet managementand action deployment, subject to the management rights assigned by a Site Administrator orMaster Operator.Master Operators, who are operators with the added authority to assign management rights toother Console operators. Master Operators can also: Create new computer settings, which allow Clients to be labeled for various groupings. Create or edit retrieved properties, which are used to filter and sort computers. Change the Tivoli Endpoint Manager Client heartbeat, to optimize the program'sperformance. Subscribe or unsubscribe from Sites. Create Custom Actions (if that option was selected for this deployment).When you have your credentials, you are ready to operate the Console:1. Start the Console by double-clicking its desktop icon or select it from the Programs menu: Start /Programs / Tivoli Endpoint Manager / Tivoli Endpoint Manager Console.2. toTo establish an ODBC connection, the Console prompts for credentials for the default TivoliEndpoint Manager Database. Enter the Username and Password you created when youinstalled the program. If you have NT Authenticated access to the database, you are not asked totype in a password.3. The first time you launch the Console, it asks you for your action site password and privatekey. Insert the disk (or browse to the file) with your private site key to initialize the site.4. After you initialize the action site, the Console opens and begins to import Fixlet messages. Afterit finishes, it forwards the Fixlet messages to the installed Clients, which evaluate them and returnthe results. This process can take a few minutes.Op er at o r 's Gu id e7
Introducing the Tivoli Endpoint Manager ConsoleThe Main Console window for Tivoli Endpoint Manager has a panel on the left containing buttons andnavigation trees called the Domain Panel. It is designed to group content into collections pertaining tospecific operator domains, such as software patching, malware protection, power management, and soon. After a domain has been chosen and topics are selected from the navigation tree, a list of relatedcontent is shown on the right. From this list, specific items can be selected for a more detailed view in theWork Area beneath the list. Here is a simplified breakdown of some of the features you might encounterin a typical session: 8Domain Panel: This vertical panel on the left provides a high-level view of the extensive content,allowing you to quickly subdivide the information by major IT functions. Within each domain, thispanel presents navigation trees that make it easy to zoom in on Fixlet Messages, Reports,Analyses, and other content. This panel might be subdivided into sections, depending on the styleof the domain. Some of these sections might include: Content Filters: If it exists, this section is at the top and provides various content filtersand reports that are a part of the selected domain. Clickthe disclosure icon to the left(either a triangle or a plus sign) to produce a navigation tree to refine your choices. General Content: This section lets you navigate all the content in the domain. Thecontent might include Fixlet Messages, Tasks, Actions, Analyses, and Computers, allcollected from various sites. Clickthe disclosure icon to the left (either a triangle or a plussign) to open up the tree.Domain Buttons: At the bottom of the Domain Panel, these buttons represent the set ofDomains that are currently available to you. When you subscribe to a site, it is automaticallyentered into the correct domain. If a new domain is required, a button for it isis added to thisgroup. At the bottom of the buttons is a control that allows you to adjust the number of buttons todisplay.Console Toolbar: This toolbar allows you to navigate back and forth through the items you haveselected from the Domain navigation tree. These Back and Forward buttons act like theircounterparts in a browser, and are an important method for navigating through your content. Inaddition there are buttons that allow you to display items you might have hidden and items thatare not currently relevant to any of your Clients (this allows you to view all the available contentfor research or cloning purposes). There is also a refresh button that reloads content from thedatabase for the Console display.List Panel: This is a listing of the items specified by the content filters and the navigation trees inthe Domain Panel. You can sort this list by clicking the column headers and you can rearrangethe headers by dragging them left or right. In addition, you can right-click the headers to see apop-up menu containing a list of all the possible fields. Check those you want to use as headers.Context Menu: This is the menu that opens when you right-click any item in a list. Different listshave different context menus.Work Area Toolbar: This bar contains context-sensitive buttons that can run various actionsbased on the content of the current work area. It also contains two icons, upper right, that let youmaximize or detach a specific document. Detaching allows you to examine more than onedocument at a time.Work Area: Below the List Panel and the Work Area Toolbar is the Work Area. When you clickan item from the List Panel, the Console opens a detailed document in this window. The followinglist describes the elements of one particular document -- the Fixlet message: Document tabs: Each type of document has a unique set of tabs to go along with it. Fora Fixlet message, the tabs include items such as Description, Details, ApplicableComputers, and Action History. Fixlet Message: When a Fixlet message is opened from the list, the default Descriptiontab is selected and the Fixlet document explains the issue in plain English.Tivo li En d p o in t Man ag er Co n so le
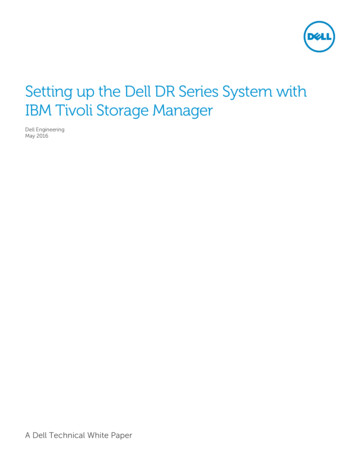
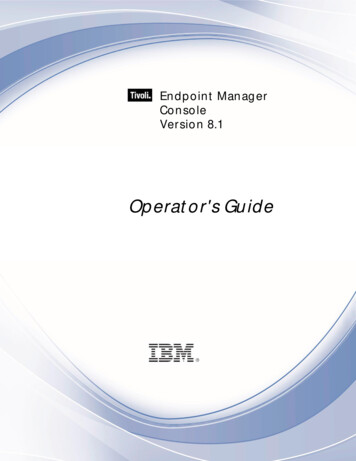
Action Button: A Fixlet document typically contains at least one Action, represented bya link in the Work Area (also available from the Take Action button in the Work AreaToolbar). Click it to deploy the Action across your network.Below is a screen shot from a typical session. A subset of Fixlets and Tasks have been selected from theDomain navigation tree, and the user is viewing the description of a Task opened from the list panel:Domain PanelConsole ToolbarList PanelDomain ButtonsWork Area ToolbarWork AreaContext MenuIn general, your workflow proceeds first from the Domain Panel to the List Panel. After selecting an itemfrom that list, you follow the instructions in the Work Area to complete the task.How you proceed depends on the content type. Fixlet messages describe problems that have beendiscovered on one or more Clients. Analyses present you with information collected from the Clients onyour network. The Computer branch of the tree allows you to examine specific Clients under your control.For example, if you select Fixlets from the Domain Panel, a list of the relevant Fixlets is shown in the ListPanel. Select one from the list and it is shown in the Work Area below. The Fixlet document presents youwith a short, clear explanation of a problem that is currently affecting your Clients. If you want, you canOp er at o r 's Gu id e9
inspect the underlying code used in the Relevance Expression and the proposed Actions by clicking theDetails tab. When you have decided to deploy the action to the affected computers, click the Action(represented by a button in the Work Area Toolbar or a hyperlink in the Work Area) and follow theprompts. After deploying the action, the affected Clients isare remediated and no longer report theproblem. At that point, the Fixlet message is removed from the relevant Fixlet list.You can set preferences that govern how responsive and secure you want your network to be. To adjustthe default values, select Preferences from the File menu.Operating BasicsTivoli Endpoint Manager is a powerful and feature-packed program that might seem overwhelming to anew user. However, when you understand the typical workflow, the operation becomes straightforwardand intuitive. Let's run through a sample session:1. Start up the Tivoli Endpoint Manager Console.2. From the Domain Panel on the left, click the button labeled All Content, which lets us view allsubscribed sites. Then click the Fixlets and Tasks item at the top of the Domain panel. This thendisplays a list of the Fixlet messages and Tasks that are currently applicable to your network in theList Panel to the right.10Tivo li En d p o in t Man ag er Co n so le
3. From the List Panel, click a Fixlet message of interest. The corresponding document opens in theWork Area below the list. This is the text of the Fixlet message, which gives you the information youneed to decide on deployment, along with the specific Actions to take.4. At the bottom of the message you find one or more links that initiate Actions to fix the afflictedcomputers. Clickthe Action that seems most appropriate. A Take Action dialog box opens.5. Use the Target tab to select any subset of affected computers you want to target with the Action.There are several techniques for deploying Actions:Op er at o r 's Gu id e11
Specific computers selected in the list below. The first targeting button lets you select thecomputers you want from the panel below right, which lists all those computers for which theFixlet message is currently relevant. The right-click menu allows you to select all thecomputers in the list. This technique limits the Fixlet action to the specified list. All computers with the property values selected in the tree below. Choose the secondbutton to take actions on computers with a set of specified properties. Until the expiration ofthe action period, whenever a computer satisfies the given properties it isis targeted. As withall actions, only the affected computers actually receive the action. The computers specified in the list of names below. Choose the third button to specify alist of computers.6. Use the rest of the tabs to prepare your action, including execution schedules, client messages, extrascripting and more, then click the OK button. For more information, see the article on the TakeAction dialog.7. When you supply your password, the Fixlet action isis deployeded throughout your network, and isisapplied specifically to each computer that needs it, subject to any filters you put in place.This is the process that you use for typical computer maintenance and remediation. As you explore theinterface, you will discover that it can also help you remediate security issues, inventory your computers,manage your users, and maintain a detailed audit trail of every patch and upgrade. As varied as thesetasks are, they are all accomplished with a similar workflow. You should experiment to learn more aboutthe power of this interface.Fixlets and TasksIntroducing Fixlets and TasksFixlets and Tasks are central to Tivoli Endpoint Manager. Using Relevance statements, they targetspecific computers, remediating only those Tivoli Endpoint Manager Clients affected by an issue. Theyare both packaged with an Action script that can resolve the issue with a simple mouse-click.Fixlets and Tasks differ mainly in how they get resolved. A Fixlet is triggered by a Relevance clause that detects a vulnerability. When an Action isinvoked to remediate the vulnerability, the Fixlet automatically loses relevance and isthus no longer applicable on that specific Tivoli Endpoint Manager Client. As a FixletAction propagates through your network, you can track its progress with the Console,Web Reports, and the Visualization Tool. When every Tivoli Endpoint Manager Client inyour network has been remediated, the Fixlet is no longer relevant and it is removed fromthe list. If the issue returns, the Fixlet is shown again in the list, ready to address theissue again. A Task comes with one or more Action scripts that help you adjust settings or runmaintenance tasks. It generally stays relevant after its Action script has been run. Tasksare designed for reapplication and as a consequence, they are often persistent.Both Fixlets and Tasks might have a Default Action, allowing you to simply click from the list to deploy it.They can both be grouped into Baselines, allowing higher levels of automation. If you create a Baseline ofFixlets or Tasks which all contain default Actions, you can turn the tedious chores of maintaining a12Tivo li En d p o in t Man ag er Co n so le
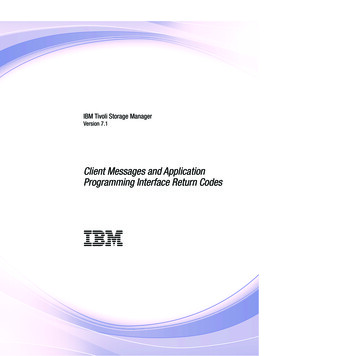
corporate policy or common operating environment into a single-click operation. In typical operation,Fixlet relevance contributes to the overall baseline relevance; Task relevance does not. Similarly, Actionscreated from a Baseline can be composed of both Fixlet and Task Actions, and typically only therelevance of the Fixlet Actions contributes to the decision to run the group. These are defining features ofFixlets and Tasks. The following table summarizes the differences:Fixlet messageTaskMachine is inremediable stateAction is available torun in this contextTo establish success ofremediation:Relevance becomesfalseAction runs tocompletionContributes to BaselineRelevance?YesNoContributes to GroupAction execution?YesNoRelevanceinterpretation:At any time, you can open a Fixlet or Task to inspect the underlying Relevance expressions that are usedto target the Clients, as well as the Action scripts that are designed to address the issue. The language ishuman-readable to give you a high degree of confidence in both the applicability of the trigger andefficacy of the remedial Action. You can also see exactly which computers in your network are affected byeach Fixlet or Task. When propagated, you can then view the progress and ultimate history of eachAction taken on a Client-by-Client basis.Viewing Fixlets and TasksTo display a Fixlet or Task,1. From the navigation tree in the Domain Panel, click the icon labeled Fixlets and Tasks.2. From the resulting List Panel on the right, click an item to open it.The body of the Fixlet message is shown in the Work Area (click the Description tab if not alreadyselected).Op er at o r 's Gu id e13
When selected, each Fixlet or Task has a window of its own.Each Fixlet or Task comes with four tabs in the Work Area: Description: This is a page providing a descriptive explanation of the problem and one or moreActions to fix it. The Actions are represented by links at the bottom of the description page.Clickan Action to open the Take Action dialog, which allows you to further target or schedule theAction. Do notIf you accidentally click an Action hyperlink, before the actual deployment, youalways get a chance to modify (or cancel) the Action.Details: This dialog contains the Fixlet/Task properties such as category, security ID, downloadsize, source, severity, and date. It also lists the code behind the Relevance expressions and theActions. At the bottom of this dialog there is a text box for you to enter a comment that remainsattached to this item.Applicable Computers: This is a filter/list of all the computers targeted by the selected Fixlet orTask. You can filter the list by selecting items from the folders on the left, and sort the list byclicking the column headers.Action History: This is a filter/list of any Actions that have been deployed from this Fixlet orTask. If the item is new, there are no Actions in the list. Like the other filter/lists in the Console,you can filter the Actions using the left panel, and sort them by clicking the column headers abovethe right-hand list.Monitoring Fixlets and TasksWhen a Fixlet or Task becomes relevant somewhere in your network, Tivoli Endpoint Manager adds it tothe list available under the Fixlets and Tasks icon in the Domain Panel navigation tree. You can filter this14Tivo li En d p o in t Man ag er Co n so le
list by opening the icon and clicking the subcategories underneath. Each icon represents data groupingsthat you can use to narrow down the items in the List Panel on the right. Then, in the listing area itself,you can sort the items by clicking a column heading.The list headers include the following information: Name: The name assigned to the Fixlet message by the author.ID: A numerical ID assigned to the Fixlet message by the author.Source Severity: A measure of how serious a Fixlet message is, assigned by the Fixlet author.Typical values are Critical, Important, Moderate, or Low.Site: The name of the site that is generating the relevant Fixlet message.Applicable Computer Count: The number of Tivoli Endpoint Manager Clients in the networkcurrently affected by the Fixlet message.Open Action Count: Number of distinct actions open for the given Fixlet message.Category: The type of Fixlet message, such as a security patch or update.Unlocked Computer Count: The number of unlocked computers affected by the Fixlet.Download Size: The size of the remedial file or patch that the action downloads.Source: The name of the source company that provided the Fixlet information.Source ID: An identification number assigned to the Fixlet to relate it back to its source.Source Release Date: The date this Fixlet message was released.For example, you might filter the Fixlet list by opening the Source Severity folder and selectingImportant to filter out less urgent Fixlet messages.Op er at o r 's Gu id e15
Then you could sort the Fixlet messages by Applicable Computer Count (which shows the number ofaffected computers) to find which Fixlet messages are relevant to the greatest number of computers. Ifyou do not see one of the columns listed above, right-click in the Fixlet header and select it from the popup menu.Commenting on Fixlets and TasksYou can attach a comment to a Fixlet or Task that other operators can read.1. From the Domain Panel, select Fixlets and Tasks from the navigation tree.2. Select a Fixlet or Task from the List Panel on the right by clicking it.3. From the document panel below, select the Details tab and scroll to the bottom.4. Type your comment into the text box and click the Add Comment Button.Your comment isis name- and time-stamped for other operators to view it. In addition to Fixlets andTasks, you can attach comments to Actions, Computers, and Analyses.Creating or Customizing Fixlets and TasksTo create your own custom Fixlet or Task message from scratch,1. Select Tools Create New Fixlet or Task. This opensopens a creation dialog with blank fieldsfor you to fill in.16Tivo li En d p o in t Man ag er Co n so le
You might also want to customize a Fixlet or Task. You can do this by cloning and modifying anexisting one. To do this, first select the desired Fixlet or Task from the List Panel, then select Edit Create Custom Copy (or right-click the item and select Create Custom Copy from the contextmenu). The appropriate creation dialog opens, but this time it is filled with the original content.Op er at o r 's Gu id e17
Either way, the Create dialog provides the same options. Enter the name of your customizedmessage in the top left text box. This serves as the title when the Fixlet or Task is displayed. Youcan use the name for sorting and filtering, so create a consistent naming convention to make yourcontent more manageable.2. Choose the Site and Domain to host it from the drop-down menus, upper right.Next, click through each of the tabs to further define your Fixlet or Task.3. Description: Enter your descriptive text in this box. You can use the text manipulation toolbar atthe top of the dialog to enhance the formatting.4. Actions: Define your action in this dialog. Use the buttons at the right to add, delete, or changethe position of the action. Below that is an area to customize the properties of the action. Choosethe Script Type from the drop-down menu. Below that is a text box where you can enter a newaction script or modify the original.There are three check boxes you can use to modify the action: This action is the default action. Click this box to create a default action. Include action settings locks. Click the Edit box to the right of this check box tocustomize the action setting locks, including start time, end time, day exclusions, andmore. This panel also includes failure and reapplication behaviors. Include custom success criteria, which allows you to specify the conditions that definethe success of the action.Relevance: Leave the default of applying to All computers, or click a different button and enter acondition or a relevance statement in the dialog below. This is how you target your Fixlet or Task torelevant computers. For more information aboutabout the relevance language, seesee the InspectorLibraries.18Tivo li En d p o in t Man ag er Co n so le
Properties: Set the properties of your Fixlet or Task, including the category, download size, date,severity, and more. You can also include the SANS (SysAdmin, Audit, Network, Security) or CVE(Common Vulnerabilities and Exposures) ID numbers.When you are satisfied with your definitions, click OK. Because your Fixlet or Task must bepropagated, you isare prompted for your private key password. When you enter it and click OK, it isis sentto
the Tivoli Endpoint Manager Client operates silently, without any direct intervention from the user. However, if you need to solicit user response, The program also allows you to provide screen prompts. Tivoli Endpoint Manager Servers are collections of interacting server applications that form the heart of the Tivoli Endpoint Manager system.