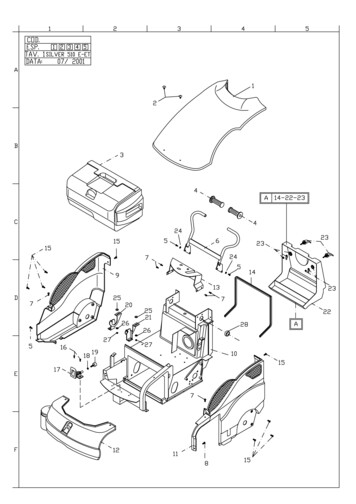
Transcription
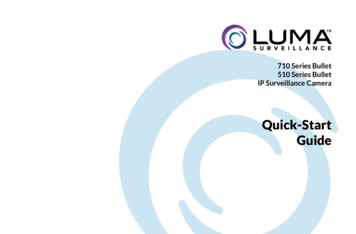
710 Series Dome510 Series DomeIP Surveillance CameraQuick-StartGuide
Luma 510/710 Series Dome CameraBox Contents} Camera} Silicone plug} 3 wall anchors with screws} Hex wrench} CC tester cable} Plastic “needle” for cables} Desiccant packYou must provide:} A network connection (and an NVR, if desired) with admin rights to the network} Mobile device with Luma Surveillance mobile app (recommended) or CCTV tester} Power source: PoE or 12V DC} Phillips screwdriverWARNING: This product can expose you to chemicals including cadmium, whichis known to the State of California to cause cancer. For more information go towww.P65Warnings.ca.gov.2
Luma 510/710 Series Dome CameraRead this before you go on site!Install your camera with a connection to the Internet via your NVR or through a networkrouter. This allows you to use OvrC, a powerful remote maintenance tool (see OvrC.com)and lets you use the Luma Surveillance mobile app to check on the camera from anywhere.For installation using this guide, you must be able to access this camera through a personalcomputer. If your surveillance system is not on a network, you’ll have to use the NVR’s localinterface for installation. See the NVR user’s manual for details.The web UI manual and other materials can be found on the product page at SnapAV.com.} Ensure that the device is in good condition and all the assembly parts are included.} Make sure that all equipment is powered off during installation.} Ensure the mounting surface is strong enough to hold three times the weight of thecamera and the mount.} If the mounting surface is cement, use the included expansion screws to install thecamera. If mounting to a wood surface, use self-tapping wood screws (not included).} If the product does not function properly, please contact technical support. Do notdisassemble the camera for repair or maintenance.3
Luma 510/710 Series Dome CameraSafety Tips} Handle this device with care.} Do not strike or shake this device.} Protect the power cord from being stepped on or pinched, particularly where it connectsto the device and the power outlet.} Do not operate this device beyond its specified power ratings.} Do not use this device near any heat sources such as radiators, heat registers, stoves, orother such heat-generating equipment.} The performance and lifespan of the camera is affected by temperature. For best results,use this device in temperatures ranging from -14–140 F.} Clean this device with a dry cloth. Do not use strong or abrasive detergents when cleaningthe device, especially the lens. If dirt is hard to remove, use a mild detergent and wipegently.} Make a note of the configuration settings and save them. This helps when changingthe configuration, when upgrading the device, or with recovery if unexpected failure ortrouble occurs.4
Luma 510/710 Series Dome CameraYour CameraBefore installing, familiarize yourself with the parts of your camera.CameraBody(top)WaterproofHousingLens andIR m)MountingPlate5
Luma 510/710 Series Dome CameraYour Camera’s Utility PortResetButtonSD CardSlot6
Luma 510/710 Series Dome CameraPreserving Your CameraFoam RingCAUTION: Do not throw away the foam ring around the camera lens! It protects the camerafrom glare from its infrared lights.Dome Tether and Base TetherWe recommend you do not remove the security tether that holds the dome cover to thecamera base. However if you must get rid of it, please cut it at both ends. Do not unscrew thescrews on the dome or the dome cover, or you may damage the camera’s weatherproofing.The same recommendations apply to the tether that you can use to hang your camera to thewaterproof housing while you attach the cables.Protective FilmThe dome cover comes with a protective film. Do not remove this until you are done installingyour camera; it is there to prevent the dome from getting scratched if it accidentally hits thewall during installation.7
Luma 510/710 Series Dome CameraInstallation with an NVRIf you are installing with an NVR, follow these instructions. Otherwise, follow the instructionsstarting on the next page.1. Ensure your NVR has the latest firmware. If it does not, your NVR may be unable to locateand activate your camera.2. Perform the physical installation of your camera by following the instructions given onpages 11–14.3. Plug your camera into your recorder. The NVR autodetects your camera, activates it (givingit the same admin password that it has), and assigns it an IP address.4. Complete the installation using the instructions given in your NVR manual. You do notneed to continue using this guide. Where possible, we recommend changing settings usingyour NVR.8
Luma 510/710 Series Dome CameraInstallation Without an NVRIf you are using this camera on a network without an NVR, use the Luma Utility to locateyour camera and set it up.Visit your product page at SnapAV.com and download the Luma Utility installerfrom the Support tab. You must use v3.0.0.53 build 20170426 or later! Earlierversions of the utility will not work!Run the installer, accepting all defaults.Pre-Installation Camera ConfigurationYou’ll find it easiest to connect the camera directly to your PC, making most adjustments tothe camera from the convenience of your table (prior to physical installation), rather thanfrom atop a ladder.Connect the camera to your PC and run the Luma Utility. It searches for attachedLuma Surveillance devices. If your camera does not appear, check the connection,ensure the camera is powered up, then click the Refresh button.9
Luma 510/710 Series Dome CameraActivate the CameraClick on the entry for your camera to view its details. If the camera is inactive, use the textboxes at the lower right of the Luma utility window to activate the camera by creating a newsecure password.} Passwords cannot be longer than 16 characters. To ensure compatibility with the localinterface, only use numbers, letters, spaces, and these special characters: . , : - /} Use a password that is long and easy to remember. A password like parisinthespring ismore secure and easier to remember than a password like D3x-7b.10
Luma 510/710 Series Dome CameraPhysical Installation1. Drill pilot holes for your screws in the mounting surface.2. Attach the mounting plate and run the cables through it.3. Thread the cables through the waterproof housing as shownbelow left and below right. Place your terminated categorycable into the plastic needle and push the needle throughone of the rubber nipples in the waterproof housing. Repeatfor 12V power and/oraudio wires as needed.4. Clip the waterproofhousingtothemounting plate, thensecure it with screws.11
Luma 510/710 Series Dome Camera5. Connect all cabling to the camera.You can use the lanyard on thecamera base to hang the cameraon the hook inside the waterproofhousing.6. Place the supplied silica packinside the waterproof housing.7. Secure the camera body to thewaterproof housing.8. Adjust the camera’s aim (page 14).9. Once you have finished aiming thecamera, secure the dome.If your cable runs along the wallrather than inside it, use the conduit port on the side of the housing. You can remove theplug and replace it with a threaded conduit cable. Be sure to seal all cracks around thiscable access when installation is complete12
Luma 510/710 Series Dome CameraStart the Web InterfaceOpen your browser and navigate to the camera’s IP address. Below the login area, you maysee: “Please click here to download and install the plug-in. Close the browser when installingthe plug-in.” If so, download the plug-in and close all browser windows.Install the LumaWebComponents plug-in, restart your browser and log in to your camera asadmin using the password you created. You may get a pop-up that asks if you want to runthe Luma Web Componentsplug-in. You must allow theplug-in to access your systemover the web.Be sure to save your camera’sweb page as a favorite in yourbrowser.SettingsMenuIcon13
Luma 510/710 Series Dome CameraCheck the CameraAfter logging in, your screen shows the live page, similar to the illustration at left. If it doesnot appear, check the connection to your NVR or network, and ensure that the camera ispowered up. Click the Settings icon to access the web interface and finish setup.Adjust the CameraThis camera can spin 360 around the base. It can be angled up to 90 . In addition, the cameracan rotate 360 within its housing.1. Swivel the camera so it faces the desireddirection.2. Angle the camera to face the target surveillancearea.3. Rotate the camera within its housing so that theresulting image is upright.140 –360 0 –90 0 –360
Luma 510/710 Series Dome CameraAdditional Setup Best PracticesBe sure to complete customization of the camera using the NVR’s web interface:} Set up DDNS} Add additional users} Calibrate the time settings} Set up recording schedule} Enable motion detectionSee your NVR’s manual for full details.15
Luma 510/710 Series Dome CameraSupportIf you need help, email support@SnapAV.com. For information, instructional videos, supportdocumentation, or ideas, visit our website.Warranty & RegulatoryFind details of this product’s 3-Year Limited Warranty at snapav.com/warranty, or request a paper copyfrom Customer Service at (866) 424-4489. Find other legal resources, such as regulatory notices and patentinformation, at snapav.com/legal.Copyright 2021, Wirepath Home Systems, LLC. All rights reserved. Control4 and SnapAV and theirrespective logos are registered trademarks or trademarks of Wirepath Home Systems, LLC, dba “Control4”and/or dba “SnapAV” in the United States and/or other countries. 4Store, 4Sight, Control4 My Home, SnapAV, Araknis Networks, BakPak, Binary, Dragonfly, Episode, Luma, Mockupancy, Nearus, NEEO, Optiview,OvrC, Pakedge, Sense, Strong, Strong Evolve, Strong Versabox, SunBriteDS, SunBriteTV, Triad, Truvision,Visualint, WattBox, Wirepath, and Wirepath ONE are also registered trademarks or trademarks of WirepathHome Systems, LLC. Other names and brands may be claimed as the property of their respective owners.All specifications subject to change without notice.Version 200-LUM-510 710-DOM-IP-XX-B 210413 TW16
3 Luma 510/710 Series Dome Camera Read this before you go on site! Install your camera with a connection to the Internet via your NVR or through a network router. This allows you to use OvrC, a powerful remote maintenance tool (see OvrC.com) and lets you use the Luma Surveillance mobile app to check on the camera from anywhere.