Transcription
User Guide:Datto AP840Version 1.11
Table of Contents1. General Warnings .32. Product Specifications .43. Creating a Network on Network Manager.64. Mounting and Installation Instructions .135. Configuring a network .17Monitoring, Management and Troubleshooting .24Additional Resources .26Appendix A: FCC Professional Installation instruction.27Appendix B: FCC Statement .28Appendix C: IC Professional Installation Instruction.29Appendix D: IC Statement .3012. Appendix E: Declaration of Conformity .3113. Appendix F: CE Statements .326.7.8.9.10.11.2
WarningsWARNING: 24V Passive PoE is not supported on this device, do notattempt to use, Damage can result.AVERTISSEMENT: le PoE passif 24 V n'est pas pris en charge sur cetappareil, n'essayez pas de l'utiliser, des dommages peuvent enrésulterThermal Hazard:Exposed Metal heatsink can be hot to the touch. Avoid direct physical contact with the heatsink when systemis or has been operating.Risque thermique:le radiateur en métal exposé peut être chaud au toucher. Évitez tout contact physique direct avec ledissipateur thermique lorsque le système fonctionne ou a fonctionné.PoE Adapter is not included with UnitIf you need a PoE Injector or Adapter, please contact your local dealer or manufacturer.Power Supply Cord shall be connected to a socket-outlet with Earth grounding connection.L'adaptateur PoE n'est pas inclus avec l'unitéSi vous avez besoin d'un injecteur ou d'un adaptateur PoE, veuillez contacter votre revendeur oufabricant local.Le cordon d'alimentation doit être connecté à une prise de courant avec mise à la terre.3
Product SpecificationsOFDMA Data rate (aggregate)3584 Mbps (2.4GHz - 1182 Mbps, 5GHz - 2402 Mbps)OFDM Data rate (aggregate)2333.3 Mbps (2.4GHz - 600 Mbps, 5GHz – 1733.3 Mbps)Transfer Rate802.11b: up to 11 Mbps802.11a/g: up to 54 Mbps802.11n: up to 600 Mbps802.11ac: up to 1733.3 Mbps802.11ax: up to 2402 MbpsRadio2.4 GHz: 4 stream, 802.11 b/g/n/ax5 GHz: 4 stream, 802.11 a/b/g/n/ac/axScanning Dual Band Radio: 1 StreamBluetooth Radio: 1 StreamAntennaOFDM Max users (recommended)Internal: 4x 2.4GHz, 4x 5GHz,1x Scanning Dual band,1x BLE75—150 per APOFDMA Max users (recommended)WLAN standardProcessorMemoryEthernet PortsPoEDC Power e watchdog CPUSizeMountingWarrantyCertificationsWiF6 - 802.11a/b/g/n/ac/axQuad Core CPU @ 2.2GHz1GB DDR41 x 2.5 Gigabit Ethernet and 1x 1Gigabit EthernetStandard 802.3af/at**Difference Performance based on Power Source48V 0.625A**Difference Performance based on Power SourceYes, USB 2.0, 5V 0.5A0—40 CIndoorsTri-color LED status indicatorYes8.66” x 8.66” x 1.2” 2.05 LbsEthernet or junction box (EU, UK, US, AU), solid wall, solid ceiling,(universal installation kit included)LifetimeFCC, IC, CE, RCM4
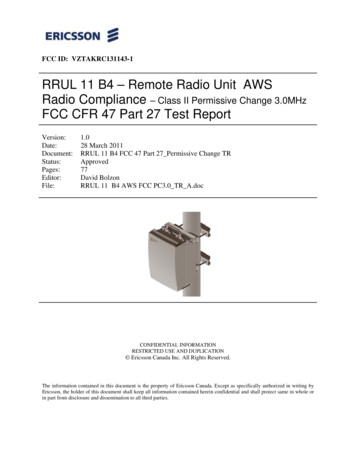
Product Specifications4SSIDsSSID to VLAN taggingYesBridge to LANYesSeamless roamingYesCloud managementYesFree iOS/Android appsYesZero config plug and playYesSelf-forming, self-healing meshYesCaptive portal w/ bandwidth throttling,splash pages and user controlsYesAccess Point Overview1G Ethernet2.5G Ethernet802.3at PoELED indicatorUSB 2.0 Reset Button DC Power Input48V - 0.625AWall Mount ScrewsWall AnchorsUS Single Gang BoxUS Dual Gang BoxT-Rail Clip slots option 1T-Rail Clip slots Option 2Rubber Feet locationKensington lock pointRubber FeetMounting PlateWhat’s in the Box(1) Access Point(2) Sets of T-Rail Clips (ceiling rail mount) with ScrewsSlimEthernet Cable(1) Slim Ethernet Cable (for wall or junction box mount)(1) Mounting Plate(1) Blank LED Indicator TabRail Clip screw set9/16" Rail Clip set(4) Wall Mount Screws with anchors(4) Rubber FeetAccess Point15/16" Rail Clip set5
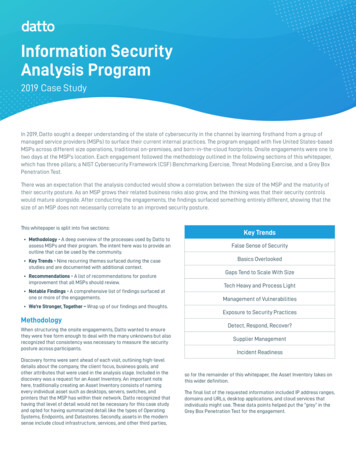
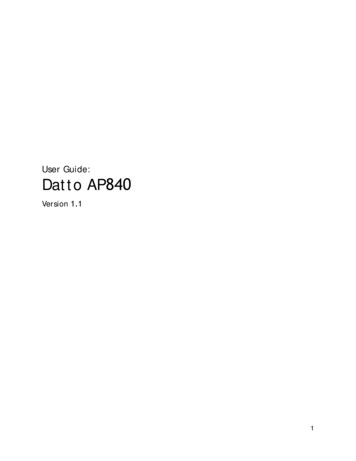
Mounting Screw and Wall Anchor Specifications(Included)6
Creating a Network on Network ManagerOverview: what we’re doingThis guide is intended to help you set up your first cloud-managed wireless mesh networkwith Datto Network Manager. Network Manager is a cloud-based network controller that makesit easy for anyone to build, manage, and monitor wireless networks from anywhere in the world.This guide will assist you in setting up a new network on the Datto Network Manager webapplication. For easier, faster setup, use the Datto Networking for iOS or Datto Networkingapps. No matter which version you start with, you can switch between the web and mobileapps seamlessly.Here’s what’s about to happen:1. Log into your Datto Partner Portal2. We’ll create a new network on Network Manager.3. We’ll add access points to the network.4. We’ll physically install the access points.5. We’ll do some basic network configuration.7
This guide is not intended to cover every aspect of Network Manager. To learn more aboutplanning your network, view the Datto Knowledge Base (kb.datto.com)What you’ll needTo set up your network, you’ll need the following:1. One or more Datto Network Manager-compatible wireless devices, such as the AP840 orAP840E2. An Internet connection with at least one Ethernet port available on your modem orrouter3.one Ethernet cable and either a 802.3at POE source or a 48V DC Power Supply4. A computer with a browser pointed to datto.com, or an iOS or Android device running the Datto NetworkManager AppTerminologyWe’ll make this process as easy and nontechnical as possible. Here are a few key words that will help.Network: A group of computers or devices that can talk to each other (in our case, wirelessly).Gateway: A Network Manager-compatible router that is connected to the Internet (usuallythrough a DSL, cable, or LAN connection).Repeater: A Network Manager-compatible router that is not connected to the Internet thatrepeats the signals from local computers and other access points to the gateway.Access point: A generic name for an Network Manager-compatible router/access point which canbe either a Gateway or a Repeater. You may also see these called "Nodes."All Datto Networking Access Points configure themselves: they become gateways or repeatersdepending on if they are connected to the Internet or not.8
Step 1: Log into the Datto Partner Portal(datto.com) and Navigate to the Network Status PageThen Select to Add Device, as shown in the Diagram below in the top right corner of the screenYou will now be automatically redirected to the Datto Networking Manager webpage, as seenbelowbelow:Now you may create new network to add this device to, or navigate to the network you wouldlike to add this device to. For this guide we will be setting up a new Network. So click "CreateNetwork"9
Step 2: Create a new networkYou’ll automatically be taken to a page, similar to the one below, to create your first network.Fill in the following information:Network name: This is the name you want to give this specific network. You will use this name tomake changes to the network, display reports, etc.Password: This is the password for local administrators and should be different from your masteraccount login. This limits access and prevents users from making changes to your network.Email: Enter your email address or the address of a local administrator to contact. We will nevershare this with others.10
Network Location: Enter a street address for the first access point. To add access points, you willbe shown a map that you click on to place access points. By entering an address here, you will becentered on the correct location for your network.Email for Notifications: Enter the email addresses, separated by spaces, for all people you’d liketo receive “outage” notifications. These are sent hourly.When finished, click “Create” to save your new network settings.Step 3: Add access points to your networkIt’s time to let Network Manager know which access points you want to include in the network.Adding them to Network Manager will allow you to manage and monitor the access points fromanywhere.Navigate to the Manage Access Points screen.There are three options to add access points to your network: click the "Add New" button to addaccess points one at a time by clicking on a map, or use the down arrow to the right of that toadd access points in bulk.If you add access points the default way, you’ll be taken to the Map tab of the Access Points page.A Google map, centered on the address you entered when you created the network, will show apopup to enter your first access point. You can often (depending on location) click the “Satellite”view button and zoom in for a closer look.11
Fill in the following information:Name: Enter a name for this access point. This name is used to reference its location and will bedisplayed in reports. It does not affect users.MAC address: A MAC address is a sequence of 12 numbers and the letters A-F often separated bycolons (Eg: 00:02:6F:8A:B2:6E). This can be found on a label on the bottom of the router and onthe side of the product box.Description: You can enter optional descriptive text that will be shown on the reports. This istypically used to keep notes on where the access point is installed, etc.Click “Add” and repeat the process for each additional access point.If you need to add a large number of access points, you may want to add them in bulk. You can doso two ways: by entering the MAC addresses in a text field (one per line), or by uploading a list ofaccess points (along with optional name, location, channel overrides, etc.) in a CSV file.12
For both of these options, your access points will be added to the map based on your networklocation (similar to how the Datto Networking iOS and Android apps add access points). You canreposition these access points on the map after adding them.When adding by CSV, the CSV file must be in a specific format. You can download a sample CSV filehere.Step 4: Install the access pointsOnce your access points are added to Network Manager, it’s time to install them. If you're using anenclosure, video installation guides are available here.First, connect your Gateway unit to the Internet with an Ethernet cable. This can be plugged indirectly to your high-speed modem (if it has a single Ethernet port, power cycle it first), or it canbe fed from a router or switch. If it can get an Internet connection through the cable, it’ll connectto the Datto cloud. Once the Ethernet cable is plugged in, connect power.The Ethernet cable (PoE device) must be connected only to PoE networks that is SELV circuit andwithout routing to the outside plant.Next, plug in additional access points as either gateways (connected to Ethernet) or repeaters,connected only to power.When mounting Datto access points directly onto a wall, use a minimum 30 mm screw length.To ensure strong, consistent signal coverage, follow these guidelines:1. Place your gateway in the center of the network. For most devices, every time data istransmitted over one repeater hop, it loses half its speed. A central gateway minimizes thenumber of hops required.2. Never go through more than three to four walls or floors.3. Never go more than 50-150 feet (depending on building materials) between access points.4. Install no more than about five repeaters to every one gateway.Once all access points are plugged in, you should see them turn green on the Network ManagerStatus page in about 5 to 15 minutes. For more detailed information on planning and optimizingyour network, see the Network Planning Guide.13
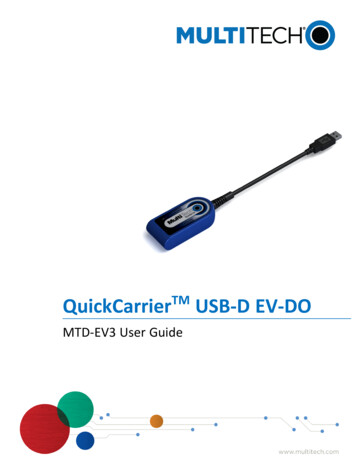
Ethernet or Junction Box MountThis access point can be mounted to any junction box for secure installations in hotel andresort guest rooms, dorms, care facilities and more.(1) Mount flat side of plate to junctionbox.(2) Connect included slim 2 cable from andpower cable if no PoE2.5G Ethernet port 1, 802.3at PoE Or DC Power(2) Connect included slim Ethernet cableto connection in wall.4) Slide device down plate to lock inplace.14
planning your network, view the Datto Knowledge Base (kb.datto.com) What you'll need To set up your network, you'll need the following: 1. One or more Datto Network Manager-compatible wireless devices, such as the AP840 or AP840E 2. An Internet connection with at least one Ethernet port available on your modem or router