Transcription
MEONDED FROMNBRECNTELSTRAT-VOICE 503DECT CORDLESSPHONE
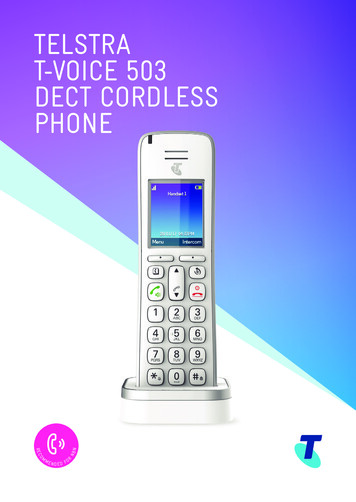
GETTING TO KNOW YOUR PHONEOverview of your handsetRing indicator LEDEarpieceDisplayMenu / OKBack / Clear / MuteNavigation key / VolumeScroll Right / Redial keyScroll Left / Contacts / RecallTalk key / speaker phoneNavigation key / Volume /Call list“End Call” / Power key / ExitActivating / deactivatingthe handset ringer / Change case /Pulse to tone diallingActivating / deactivatingthe key lockPause / Space keyMicrophoneSymbolFunctionB (t)Scroll left / Contacts / Recall - For scrolling left. Access tophonebook. Press and hold to use Recall feature when connectedto a PABX, and with some Telstra Calling Features e.g. Call WaitinguNavigational key / Volume / Call List - For scrolling up. In callvolume adjustment during calls.tTalk key/Speakerphone - Make or answer a call. Activate anddeactivate hands-free during a call.2
Asterisk key / Ringer on/off - For entering asterisks. Press andhold down to switch handset ringer on/off. When entering names,switch between upper and lower case lettering.r (u)Redial - Open the redial list.O“End call”/Power Key - Press briefly to end a call or return tostandby mode. Press and hold down to switch the handset on/off.dNavigational key / Volume / Call List - For scrolling down. Accessto Call List. In call volume adjustment during calls.0-9#0Alphanumerical keypad - For dialling telephone numbers.Hash key / Keypad lock - In standby mode press and hold to lock/unlock the keypad. For entering the hash symbol.Space key - When entering name, insert space. While dialling,insert a dialling pause.3
Handset displayDisplay iconsSignal iconDisplays when in hands-free modeMute is activatedRinger is switched offIndicates a missed callAlarm is setBattery is fully chargedBattery is partially chargedBattery is running lowBattery is almost fully dischargedBattery is empty4
Overview of the chargerCharging contacts5
WHAT’S 17171717192020Getting to know your phoneOverview of your handsetHandset displayDisplay iconsOverview of the chargerSafety precautionsGetting startedHD VoiceTM callsLocationHandset rangeSignal strengthContents of the packageSetting upConnecting the chargerPower up the handsetCharging the batteriesSelect a languageRegistering the handsetDate and timeNavigating the menusMenu mapMaking and receiving callSwitch the handset on / offCallsAdjust the earpiece orhands-free volumeAdjust the ringer volumeMuteHoldIntercom, second calls,transferring calls and conferencecallsLock/unlock the keypadPhonebookStore a name and 293030313131313232336View the details or dial an entryEdit a name and numberDelete an entryDelete all entriesPredial an entryCheck the memory status(Local contacts only)Caller ID and call listNew calls alertDial a number in the Call ListCopy a Call List numberto the phonebookView the details of an entryDelete an entryDelete the entire Call ListPredial an entry in the Call ListClock and alarmSet the date and timeSet the alarmCall featuresAdd a speed dial numberEdit / Delete a speed dial numberHandset settingsSoundDisplayLanguageDe-registering a handsetHandset nameAuto hang-upAuto answerRestore to default settingsHandset versionUpgrade handset softwareAdvance settings
33343436363739DECT settingsInternal namesLine settingsLine selectionDefault settingsHelpAppendix7
SAFETY PRECAUTIONSYour new Telstra T-Voice 503 handset is intended for use within Australia forconnection to a gateway network. Please read the safety precautions and userguide carefully before installing the handset.The user guide is a part of the product package and must be passed on to a newowner.Caution: Warning/danger statement, follow safety precautions! The ambient temperature must be between 0 C and 40 C. Please note that the ringer for incoming calls as well as signal tones areemitted on the handset loudspeaker. Do not therefore hold the handset closeto your ear while one of these functions is on, otherwise your hearing may beaffected. Use only the following supplied power supply:S004AGS0750030 This product requires an electrical supply of 100 - 240 volts AC. The mains power plug must always be easily accessible. To disconnect the device from mains, separate the plug from the wall socketfirst.Rechargeable batteriesUse the two supplied rechargeable batteries:1.2V AAA 750mAh HighpowerUsing other rechargeable batteries or non-rechargeable batteries/primary cellscan be dangerous and cause malfunctions in or damage to the telephone.Product dimensions and weight (without battery)Handset: (L) 175.0 x (W) 50.4 x (H) 31.5 / 132.4gCharger: (L) 70.0 x (W) 70.0 x (H) 21.3 / 64.2gPlease Note: Do not immerse batteries in water or throw in the fire. Rechargeable batteries can become warm while recharging. This is normal and not dangerous. Do not use any other type of charger since this may damage the batteries. Before using the handset, wearers of hearing aids should note that radiosignals can be picked up by the hearing aid and cause an unpleasant buzzingnoise. Do not use your cordless handset in environments at risk from explosion (e.g.paintworks, petrol stations etc.) Do not position the handset in bathrooms or showers. The radio signals may influence the working of medical equipment. In the event of a power cut or if the batteries are discharged, your handset willnot function!8
The handset must not be charged up without batteries or the battery cover inplace.Do not touch open contacts.Small Metal ObjectsSmall metal objects may stick to the handset due to the presence of magneticfields on the handset.Exercise caution when used where metal objects can be picked up.Environmental impactAt the end of the product’s life cycle, the telephone must not be disposed ofin normal domestic waste. Please take it to a collection point for processingelectrical and electronic equipment.Some materials used in this product can be recycled if you take it to a recyclingdepot.By recycling parts or raw materials from used products you will be making animportant contribution to environmental protection. Please contact your localauthority if you require information about collection points in your neighbourhood.9
GETTING STARTEDIMPORTANTDo not place your T-Voice 503 in the bathroom or other humid areas.HD VoiceTM callsHD Voice technology has revolutionised the telephone industry. Callers can nowfeel better connected. The rich quality of HD VoiceTM calls is more effective andoffers a superior listening experience.LocationYou need to place your T-Voice 503 charger within 2 metres of the mains powersocket so that the cable will reach. The socket-outlet should be installed near theequipment and should be easily accessible.Make sure that it is at least 1 metre away from other electrical appliances toavoid interference. Your T-Voice 503 works by sending radio signals between thehandset and gateway.Handset rangeThe unit has a range of up to 300 metres outdoors when there is a clear line ofsight between the gateway and handset. Any obstruction between the gatewayand handset will reduce the range significantly. With the gateway indoors and thehandset either indoors or outdoors, the range will normally be up to 50 metres.Thick concrete and stone walls can severely affect the range.Signal strengthThe icon on your handset indicates that you are within range of the gateway.When out of range of the gateway, the icon will show. If you are on a call, and theout of range tone is set to on, you will hear a warning beep.The line will hang up if the handset moves out of range of the gateway. Movecloser to the gateway and the handset will automatically reconnect.10
Contents of the packageHandsetMainspoweradaptorCharger2 x AAArechargeablebatteries (alreadyin handset)QuickStartGuideSetting upIMPORTANTUse only the power adaptor supplied with the product.Connecting the charger1. Plug the power adaptor into the socket markedon the rear ofthe charger and plug the other end into the mains power wall socket. Switchon the mains power.Power up the handset1. The bottom part of the handset contains a battery compartment for housingtwo type AAA batteries.2. Remove the battery cover from the back of the handset and insert the 2 x AAANiMH rechargeable batteries supplied. Please note the ’ ’ and ’-’ markingsinside the battery compartment and insert in the correct direction.11
1Press down2Slide3. Slide the battery cover back into place.4. Place the handset on the charger to charge, see below.Charging the batteriesIf the battery charge status has reached its lower limit, the battery symbol ( ) isdisplayed and a warning signal is heard every 60 seconds while on a call.You have only a few minutes of talk time left.When charging, thestop.icon will scroll on the display. Once charged scrolling willYou can use the telephone for up to 17.5 hours with fully charged batteries. Thehandset has a standby time of up to 300 hours.After you have inserted the batteries for the first time, the battery display willindicate the correct information on the charging status only after a completecharging cycle. Use only approved rechargeable batteries NiMH AAA. Never usedisposable batteries/primary cells.To keep your batteries in the best condition, leave the handset off the charger fora few hours at a time. Running the batteries right down at least once a week willhelp them last as long as possible.The charge capacity of the rechargeable batteries will reduce with time, giving thehandset less talk / standby time. Eventually it will need to be replaced.Batteries and the handset may become warm during charging. This is normal.Select a languageWhen the handset is first set up it will list the different languages, useto the required language and press Select.d to scrollRegistering the handsetOn the gateway:1. Press the Pair button on the gateway for 5 seconds till the led flashes. Followstep 2 below.On the handset:2. If the handset is not registered to a gateway, press Register. The screen12
displays Registering and once successful Registered will be displayed.3. If the handset is already registered to another gateway, press Menu, scrollto Handset Settings and press Select.4. Scrolldd to Registration and press Select.5. Register is highlighted, press Select.6. The screen displays Registering and once successful Registered will bedisplayed.NoteA beep will be heard if the registration is successful. The handset is automaticallyassigned an available handset number. Use this number when making internalcalls.If registration is not successful the first time, please repeat the process again incase the gateway registration period ran out of time.If you still cannot register a handset to the gateway please check how manyhandsets are already registered. The total number of handsets that can beregistered to a gateway is dependent on the gateway.Date and timeNoteThe phone can be set so that the gateway or handset can be the clock master,once set this will sync across all handset.If Clock Master is set to Base, the date and time is set automatically whenregistered to the gateway. See page 33.If Clock Master is set to Handset, you can also set the date and time manually. Seepage 33.1. Press Menu, scroll u to Clock & Alarm and press Select.2. Date/Time is highlighted. Press Select.3. To change the date format, scrolleither DD/MM or MM/DD.d to Date Format and scroll t or u to selectu4. Scrollto Enter Date, enter the date, e.g. when set to DD/MM, 27/08/17 for 27August 2017 and press Ok.5. Once the date is set, to change the time format, scrollscroll t or u to select either 12 Hours or 24 Hours.ud to Time Format and6. Scroll to Enter Time, enter the time, e.g. when set to 24 Hours, 1430 for2:30pm and press Save.If the current time format setting is 12 hour, scroll t or u to select AM or PM.7. PressO to return to standby.Your T-Voice 503 is now ready for use.13
Navigating the menusYour T-Voice 503 has an easy to use menu system on the handset.Each menu has a list of options, which you can see on the menu map on thefollowing page.When the handset is in standby:Scrolling through menus1. From the standby screen, press Menu.The main menu is opened.2. Use theu /d / B (t) / r (u) keys to scroll through the menu.3. Left softkey - press to action the corresponding word prompt shown in thelower left corner of the display.Right softkey - press to action the corresponding word prompt in the lowerright corner of the display.4. Press O to return to standby.14
Menu mapContactsLocal ContactsAddClock & AlarmRegistrationDate/TimeHandset NameAlarmAuto Hang-upEdit 1Call FeaturesView 1VoicemailDelete 1Call ForwardDelete All 1Call WaitingAdvance SettingsPredial 1Call ReturnDECT SettingsMemory StatusVoice AssistantChange PINSpeed DialClock MasterBase ContactsAddEdit1Handset SettingsSoundAuto AnswerHandset SetbackHandset VersionECO Base VersionView 1Ringer VolumeDelete 1RingtoneInternal NamesDelete All 1Key BeepLine SettingsPredial 1Out Range ToneLine SelectionCall ListMissed CallCradle ToneDisplayOutgoing Calls 2ContrastAccepted CallsWallpaperAll Calls 2Base SetbackBacklight TimeoutLanguage1These options will only be available if there is an entry stored.2These options are dependent on the gateway.15
MAKING AND RECEIVING CALLSNoteYour phone will automatically time the duration of all external calls, the call timerwill display on the screen. When the call ends, the total duration of your talk timeis shown for 1 second.Switch the handset on / off1. To power the handset off, press and holdO for about 5 seconds.2. Confirm?,is displayed, press Yes to confirm or No to cancel.3. PressO to turn the handset back on.CallsWhen making calls you can pre set the line selection to auto, manual or individualline selection, see page 36. The default setting is auto, when a call is made thegateway will automatically select the line.1. Press t.2. Dial the number.If the line selection is set to manual, press t scrollorto highlight Autoor Line Name and press Select, if Line Name is selected scrollorto the desired line and press Select, then dial the number.u dud3. Press t again to switch to hands-free call.Preparatory dialling2. Press t to dial.If the line selection is set to manual, press t scrollorto highlight Autoor Line Name and press Select, if Line Name is selected scrollorto the desired line and press Select.1. Dial the number first. If you make a mistake press Clear to delete the last digit.u dud3. Press t again to switch to hands-free call.1. Press and hold the relevant keypad number, press t the number will bedialled automatically.If the line selection is set to manual, press t scrollorto highlight Autoor Line Name and press Select, if Line Name is selected scrollorto the desired line and press Select.Make a call using speed dial keysu dudNoteTo assign a speed dial number, see page 27.16
End a callPressO, or place the handset back on the charger.NoteYou can end calls simply by placing the handset on the charger. To turn thisfeature off, see Auto hang-up, see page 31 .Receive a callWhen you receive an external call, the phone rings,, the line information andthe phone number (or name if stored in the phonebook) is displayed.1. Press t to answer the call and press t again to switch to hands-free.NoteIf you prefer for the call to be automatically answered when you lift the handsetoff the charger, you will need to switch Auto answer on, see page 31.Adjust the earpiece or hands-free volumeud1. During a call, pressto increase andto decrease the volume level. Thereare 5 levels to choose from, volumes 1-5.Adjust the ringer volumeIn standby, pressu and then scroll u or d to select the desired volume level.u or d to select the desired volume level.While the phone is ringing, pressPress and holdin standby to turn the ringer off. Press and hold again to turnthe ringer back on.Mute1. During a call press Mute, m is displayed.2. To turn mute off, press Unmute.HoldYou can place your caller on hold. When on hold theicon will be red.1. During a call press Option, Hold is highlighted, press Select.2. To turn hold off, press Option, Unhold is highlighted, press Select.Intercom, second calls, transferring calls and conference callsMaking an internal callIf more than one handset is registered to the gateway, an internal call can bemade between handsets and a second call can also be made.1. If 2 handsets are registered to the gateway, press Intercom and the otherhandset rings automatically.17
2. If 2 or more handsets are registered to the gateway, press Intercom and scrollto select the handset that is to be called, press Select.dReceiving an internal callWhen an internal call is received, the handset name or number that is calling isdisplayed.1. Press Silence to stop the handset ringing.2. Press Reject to reject the call.3. Press t to answer the call.Making a second callWhen on an internal or external call you can make a second internal or externalcall without ending the first call.Second internal callDuring a call:1. Press Option and scrolld Intercom and press Select.2. If 3 handsets are registered to the gateway the other handset ringsautomatically.d3. If 3 or more handsets are registered to the gateway, scrollto select thehandset that is to be called, or select All Handsets to ring all handsets, pressSelect.4. When the third handset answers you can have an internal conversion.u d5. Press Option, then scrollorto the required option.Switch Calls - to switch between the 2 calls.Conference - to join the 2 calls to make a 3-way call.Transfer - to transfer the call to the second handset.Release Active - to end the active call.Second external callDuring a call:1. Press Option and scrolld to Add Call, press Select.2. You can then either:Dial the number manually.Press B - to dial a number in the phonebook.Press- to dial a number in the Call List.d18
3. If the line selection is set to manual, press t scrollorto highlight Autoor Line Name and press Select, if Line Name is selected scrollorto thedesired line and press Select.Press Dial to dial.u du d4. When the second call answers you can have a conversion.u d5. Press Option, then scrollorto the required option.Switch Calls - to switch between the 2 calls.Conference - to join the 2 calls to make a 3-way call.Transfer - to transfer the call to the second handset.Release Active - to end the active call.Conference callsIf intrusion calls is set to allowed, see page 36, when a handset is on a call a2nd handset can initiate a conference call. Press t on the 2nd handset and it willtake the same line and a conference call will begin.Transferring callsIf when transferring calls the 2nd handset doesn’t answer then you can pressOption, Transfer is highlighted, press Select to transfer the call to the secondhandset unannounced.Receiving a second call (call waiting)When on an internal or external call you can receive a second internal or externalcall without ending the first call.When there is a second call the call waiting screen will be displayed, you caneither press Accept to accept the second call and put your 1st caller on hold orReject to reject the second call.u d to the required option.If the call is accepted, press Option, then scrollorSwitch Calls - to switch between the 2 calls.Conference - to join the 2 calls to make a 3-way call.Transfer - to transfer the call to the second handset.Release Active - to end the active call.Lock/unlock the keypadThe keypad can be locked so that it cannot be operated accidentally.NoteWhen the keypad is locked an incoming call can still be answered and the handsetwill operate as normal. When the call ends, the keypad lock comes on again.1. Press and hold #, Keys Locked is displayed.2. Press and hold # again to unlock the keypad.19
PHONEBOOKThe handset gives you access to 2 phonebooks:Local contacts - The contacts are saved locally on the handset.Base contacts - The contacts are saved on the gateway. All the handsets registered to thegateway can access these shared contacts.The local phonebook can store up to 100 contacts. Names can be up to 16characters and numbers up to 24 digits. The number of contacts in the gateway, isdependent on the gateway the handset is registered to.Every entry contains a first and last name and up to 3 telephone numbers (e. g.home, mobile, office).There are 2 ways to enter the phonebooks, either press B to go directly to the lastphonebook accessed, then press B to switch between base and local contacts, oryou can go through the handset menu.Store a name and numberIf the T-Voice 503 is connected to a switchboard, you may need to enter a pausein a number. This gives the switchboard time to find an outside line. A pauseis normally stored after the switchboard access code (e.g. 9). When storing anumber, press and hold 0 until the display shows P. You can then continuestoring the phone number.If you wish to display the name of your caller instead of the number, save the fulltelephone number including the area code to your phonebook.1. Press Menu, Contacts is displayed, press Select.2. Scrollu or d to select the desired phonebook and press Select.3. Press Option, Add is highlighted, press Select.4. First Name is highlighted, enter the first name.5. Scrolld to Last Name, enter the last name.d6. Scrollto select the number category you want to store the number under,either Home, Mobile or Office.7. Enter the number and press Save.8. PressO to return to standby.NoteCancel storing an entry by pressingO at any time during the process.ENTERING NAMESUse the alphanumeric keypad to enter names in the phonebook.For instance to enter the name PaulP Press 7 onceA Press 2 once20
U Press 8 twiceL Press 5 three timesTo enter a space, press 0.WRITING TIPSTo change the text from Abc to ABC, abc or 123, press.Press t or u to move between characters/digits.Press Clear to delete a character, or press and hold Clear to delete all characters.View the details or dial an entry1. Press Menu, Contacts is displayed, press Select.2. Scroll3. Scrollu or d to select the desired phonebook and press Select.u or d to the entry you want or search alphabetically.3. Press t to dial.If the line selection is set to manual, press t scrollorto highlight Autoor Line Name and press Select, if Line Name is selected scrollorto the desired line and press Select.u dud4. Or to see the details, press Option scrolld to View and press Select.Edit a name and number1. Press Menu, Contacts is displayed, press Select.2. Scroll3. Scroll4. Scrollu or d to select the desired phonebook and press Select.u or d to the entry you want or search alphabetically and press Option.d to Edit and press Select.5. First Name is highlighted, press Clear to delete a character, or press and holdClear to delete all characters. Edit the name.d6. Scrollto Last Name, press Clear to delete a character, or press and holdClear to delete all characters. Edit the name.d7. Scrollto the number you want to edit, press Clear to delete a digit, or pressand hold Clear to delete all digits. Edit the number and press Save.8. PressO to return to standby.Delete an entry1. Press Menu, Contacts is displayed, press Select.2. Scroll3. Scroll4. Scrollu or d to select the desired phonebook and press Select.u or d to the entry you want or search alphabetically and press Option.d to Delete and press Select.21
5. Display shows Delete?.6. Press Yes to confirm or No to cancel.7. PressO to return to standby.Delete all entries1. Press Menu, Contacts is displayed, press Select.2. Scrollu or d to select the desired phonebook and press Select.3. Press Option, scrolld to Delete All and press Select.4. Display shows Delete All?.5. Press Yes to confirm or No to cancel.6. PressO to return to standby.Predial an entry1. Press Menu, Contacts is displayed, press Select.2. Scroll3. Scroll4. Scrollu or d to select the desired phonebook and press Select.u or d to the entry you want or search alphabetically and press Option.d to Predial and press Select.5. If the entry has more than one number stored,press Select.d to the number you require,7. Press t to dial.If the line selection is set to manual, press t scrollorto highlight Autoor Line Name and press Select, if Line Name is selected scrollorto the desired line and press Select.6. The number is displayed.u dudCheck the memory status (Local contacts only)You can check how much phonebook memory you have on your phone.1. Press B.u2. Press Option and scrollto Memory Status and press Select. The displayshows the number of used phonebook entries.3. PressO to return to standby.22
CALLER ID AND CALL LISTProvided the identity of the caller is not withheld, the number of the caller will bedisplayed together with the date and time of the call (if provided by the network).A subscription to this service may be required.NoteIf the caller’s number is stored in your phonebook along with a name, when youreceive a call the name will also be displayed.New calls alertWhen you have new missed calls (incoming calls that you haven’t answered), thedisplay shows X Missed Call(s) and the icon flashes.NoteYou can either enter the Call List by pressingd or through the handset menu.Dial a number in the Call Listdu d1. Press , scrollorto highlight the Call List (Missed Calls, Outgoing Calls,Accepted Calls, All Call) you want.2. Press Select, the most recent number or name if stored in the phonebook ishighlighted.u or d to the entry you want to dial.u or d to select the desired line and press Select.4. Press t scroll3. ScrollCopy a Call List number to the phonebookdu d1. Press , scrollorto highlight the Call List (Missed Calls, Outgoing Calls,Accepted Calls, All Call) you want.2. Press Select, the most recent number or name if stored in the phonebook ishighlighted.3. Scrollu or d to the entry you want and press Option.4. Save Number is highlighted, press Select.5. Scrollu or d to select the desired phonebook and press Select.d6. Scrollto select the number category you want to store the number under,either Home, Mobile, or Office and press Select.7. First Name is highlighted, enter the first name and scrolld.8. Last Name is highlighted, enter the last name and press Save.9. PressO to return to standby.23
View the details of an entrydu d1. Press , scrollorto highlight the Call List (Missed Calls, Outgoing Calls,Accepted Calls, All Call) you want.2. Press Select, the most recent number or name if stored in the phonebook isdisplayed.3. Scrollu or d to the entry you want and press Option.d4. Scrollto View and press Select. The number (and name if stored in thephonebook), and the time and date of the call are displayed.5. PressO to return to standby.Delete an entrydu d1. Press , scrollorto highlight the Call List (Missed Calls, Outgoing Calls,Accepted Calls, All Call) you want.2. Press Select, the most recent number (or name if stored in the phonebook) isdisplayed.3. Scroll4. Scrollu or d to the entry you want and press Option.d to Delete and press Select. The display shows Delete?.5. Press Yes to delete or No to cancel.6. PressO to return to standby.Delete the entire Call Listdu d1. Press , scrollorto highlight the Call List (Missed Calls, Outgoing Calls,Accepted Calls, All Call) you want.2. Press Select, the most recent number (or name if stored in the phonebook) isdisplayed.3. Press Option, scrollAll?.d to Delete All and press Select. The display shows Delete4. Press Yes to delete or No to cancel.5. PressO to return to standby.24
Predial an entry in the Call Listdu d1. Press , scrollorto highlight the Call List (Missed Calls, Outgoing Calls,Accepted Calls, All Call) you want.2. Press Select, the most recent number (or name if stored in the phonebook) isdisplayed.3. Scrollu or d to the entry you want and press Option.d to Predial and press Select. The number is displayed.5. Press t to dial.If the line selection is set to manual, press t scrollorto highlight Autoor Line Name and press Select, if Line Name is selected scrollorto the desired line and press Select.4. Scrollu dud25
CLOCK AND ALARMIf you have subscribed to your network’s Caller ID service, if Clock Master is setto Base the gateway automatically sets the date and time of the handset whenregistered. If the Clock Master is set to handset, you can also manually set thetime on the individual handsets.Set the date and time1. Press Menu, scroll u to Clock & Alarm and press Select.2. Date/Time is highlighted. Press Select.3. To change the date format, scrolleither DD/MM or MM/DD.d to Date Format and scroll t or u to selectu4. Scrollto Enter Date, enter the date, e.g. when set to DD/MM, 27/08/17 for 27August 2017 and press Ok.5. Once the date is set, to change the time format, scrollscroll t or u to select either 12 Hours or 24 Hours.d to Time Format andu6. Scrollto Enter Time, enter the time, e.g. when set to 24 Hours, 1430 for2:30pm and press Save.If the current time format setting is 12 hour, scroll t or u to select AM or PM.7. PressO to return to standby.Set the alarm1. Press Menu, scroll u to Clock & Alarm and press Select.2. Scrolld to Alarm and press Select.3. Activation is highlighted, scroll t or u to Off, Once or Daily.4. Scrolld to highlight Enter Time.5. Enter the time (HH:MM).If the current time format setting is 12 hour, scroll t or u to select AM or PM.6. ScrollSave.7. Pressd to highlight Ringtone t or u to select the desired ringtone and pressO to return to standby.NotesIf the alarm is set to Once,sounded once.If the alarm is set to Daily,sounded.will disappear from the screen after the alarm haswill remain on the screen after the alarm hasWhen the alarm rings, press Off orO to stop the ring.26
CALL FEATURESAdd a speed dial numberd to Call Features and press Select.d to Speed Dial and press Select.Scroll u or d to select the key where you want to store the number, press1. Press Menu, scroll2. Scroll3.Select.If the entry is empty No Numb
31 Auto hang-up 31 Auto answer 31 Restore to default settings 32 Handset version 32 Upgrade handset software 33 Advance settings. WHAT'S INSIDE. 2 Getting to know your phone 2 Overview of your handset 4 Handset display 4 Display icons 5 Overview of the charger 8 Safety precautions 10 Getting started 10 TMHD Voice calls 10 Location 10 Handset .