Transcription
REFRIGERATIONREFRIGERATORDMC4101 & DMC4081ENDMC RefrigeratorsInstallation and Operation Manual. . . . . . . . 2FRRéfrigérateurs DMCManuel d’installation et d’utilisation . . . . . 18WARNINGCancer and Reproductive Harmwww.P65Warnings.ca.govForm No. 3317363.000 A 07/20 2020 Dometic Corporation
ContentsDMC RefrigeratorsService Center & Dealer LocationsVisit: www.dometic.comRead these instructions carefully. These instructionsMUST stay with this product.Contents17 Operation. . . . . . . . . . . . . . . . . . . . . . . . . . . . . . 137.1Storing Refrigerated Goods. . . . . . . . . . . . . . 137.2Using the Control Panel . . . . . . . . . . . . . . . . . 137.3Adjusting the Shelves . . . . . . . . . . . . . . . . . . . 148 Care and Maintenance . . . . . . . . . . . . . . . . . . . 14Explanation of Symbols and SafetyInstructions . . . . . . . . . . . . . . . . . . . . . . . . . . . . . 28.1Defrosting the Refrigerator. . . . . . . . . . . . . . . 158.2Cleaning the Refrigerator . . . . . . . . . . . . . . . . 151.1Recognize Safety Information. . . . . . . . . . . . . 28.3Storing the Refrigerator. . . . . . . . . . . . . . . . . . 151.2Understand Signal Words. . . . . . . . . . . . . . . . 21.3Supplemental Directives. . . . . . . . . . . . . . . . . 31.4General Safety Messages. . . . . . . . . . . . . . . . 32 General Information. . . . . . . . . . . . . . . . . . . . . . 32.19 Troubleshooting . . . . . . . . . . . . . . . . . . . . . . . . 1510 Disposal . . . . . . . . . . . . . . . . . . . . . . . . . . . . . . . 17LIMITED ONE-YEAR WARRANTY . . . . . . . . . . . . . . 17Component Descriptions. . . . . . . . . . . . . . . . 43 Intended Use. . . . . . . . . . . . . . . . . . . . . . . . . . . . 44 Specifications . . . . . . . . . . . . . . . . . . . . . . . . . . . 45 Installation. . . . . . . . . . . . . . . . . . . . . . . . . . . . . . 55.1Removing the Existing Refrigerator. . . . . . . . . 55.2Preparing for Installation. . . . . . . . . . . . . . . . . 55.3Positioning the Refrigerator . . . . . . . . . . . . . . 65.4Securing the Refrigerator . . . . . . . . . . . . . . . . 65.5Making the Electrical Connections. . . . . . . . . 71 Explanation of Symbols andSafety InstructionsThis manual has safety information and instructions tohelp you eliminate or reduce the risk of accidents andinjuries.1.1 Recognize Safety Information 6 Door Swing Reversal. . . . . . . . . . . . . . . . . . . . . . 86.1Removing the Upper Hinge . . . . . . . . . . . . . . 86.2Removing the Middle Hinge. . . . . . . . . . . . . . 96.3Removing the Lower Hinge. . . . . . . . . . . . . . . 96.4Reinstalling the Lower Hinge Pin . . . . . . . . . . 106.5Removing the Handles . . . . . . . . . . . . . . . . . . 106.6Reinstalling the Handles. . . . . . . . . . . . . . . . . 116.7Changing the Door Stop Bushing . . . . . . . . . 116.8Reinstalling the Fresh Food Door, Lock, andMiddle Hinge . . . . . . . . . . . . . . . . . . . . . . . . . 126.91.2 Understand Signal WordsA signal word will identify safety messages and propertydamage messages, and also will indicate the degree orlevel of hazard seriousness. Reinstalling the Upper Hinge. . . . . . . . . . . . . 12 2This is the safety alert symbol. It is used to alertyou to potential physical injury hazards. Obey allsafety messages that follow this symbol to avoidpossible injury or death.DANGER!Indicates a hazardous situation that, if not avoided,will result in death or serious injury.WARNINGIndicates a hazardous situation that, if not avoided,could result in death or serious injury.CAUTIONIndicates a hazardous situation that, if not avoided,could result in minor or moderate injury.EN
DMC RefrigeratorssNOTICE: Used to address practices not related tophysical injury.additional information that is not relatedIIIndicatesto physical injury.General Information Do not store or use gasoline or other flammablevapors and liquids in the vicinity of this or any otherappliance. Do not leave the refrigerator in extreme cold or warmtemperatures.1.3 Supplemental Directives Do not allow the appliance to be exposed to rain.To reduce the risk of accidents and injuries, pleaseobserve the following directives before proceeding toinstall, operate, or service this appliance: This refrigerator must be grounded. Consulta qualified electrician or service person if thegrounding instructions are not completelyunderstood or if doubt exists as to whether theappliance is properly grounded. In the event of anelectrical short circuit, grounding reduces the risk ofelectric shock by providing an escape wire for theelectric current. Read and follow all safety information andinstructions. Read and understand these instructions beforeinstalling, operating, or servicing this product. The installation must comply with all applicable localor national codes, including the latest edition of thefollowing standards: Do not damage the refrigerant circuit when handling,moving, or using the refrigerator. U.S.A.–– ANSI/NFPA70, National ElectricalCode (NEC)–– ANSI/NFPA 1192, Recreational Vehicles CodeCanada–– CSA C22.1, Parts l & ll, Canadian Electrical Code–– CSA Z240 RV Series, Recreational Vehicles1.4 General Safety Messages WARNING: ELECTRICAL SHOCK, FIRE, AND/OR EXPLOSION HAZARD. Failure to obey thefollowing warnings could result in death orserious injury: Use only Dometic replacement parts andcomponents that are specifically approved for usewith the appliance. Avoid improper installation, adjustment, alterations,service, or maintenance of the appliance. Service andmaintenance must be done by a qualified serviceperson only. Do not modify this product in any way. Modificationcan be extremely hazardous.EN WARNING: HEALTH HAZARD.This refrigerator is not intended for the properstorage of medicine. It is only suitable for coolingand storing foodstuffs. Failure to obey this warningcould result in death or serious injury.WARNING: TIPPING HAZARD. Failure to obeythe following warnings could result in deathor serious injury: Do not allow children to climb, stand on, or hang onthe refrigerator. Do not allow a long cord to drape over the countertop or table top where it can be pulled on by childrenor tripped over unintentionally. Failure to obey thiswarning could result in death or serious injury.2 General InformationThis section provides reference information regardingthe recommended tools for installation.images used in this document are for referenceIIThepurposes only. Components and componentlocations may vary according to specific productmodels. Measurements may vary 0.38 in.(10 mm).Dometic recommends that you have the following toolson-hand during installation, which are required for dooradjustments and installation.3
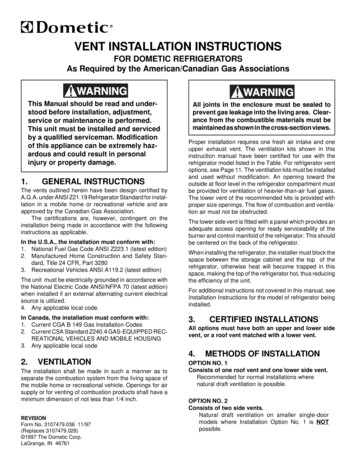
Intended UseDMC Refrigeratorss3 Intended UseRecommended ToolsPhillips Screwdriver10 Mm Socket WrenchFlathead ScrewdriverLevelPliersT15 Torx Driver/BitPutty Knife2.1 Component DescriptionsFigure 1 provides information about the internalcomponents of the refrigerator.The DMC refrigerators are designed and intended foruse only inside the recreational vehicle (hereinafterreferred to as “RV”) for which they are supplied. Usethese instructions to ensure correct operation of therefrigerators.refrigerators are only suitable for coolingIITheseand storing foodstuffs. The refrigerators are notintended for the proper storage of medicine.The manufacturer accepts no liability for damage in thefollowing cases: Faulty assembly or connection Damage to the product resulting from mechanicalinfluences and excess voltageiqw Alterations to the product without express permissionfrom the manufactureri Use for purposes other than those described in theoperating manualeDometic Corporation reserves the right to modifyappearances and specifications without notice.art4 Specificationstotoyuua1 Internal Component Locationsq Freezer Shelfy Clear Glass Crisperw Freezer TemperatureControlu Clear Crispere Adjustablei Full-Width Freezer Shelfr LED Lightt Glass Shelf1o Small Door Shelfa Full-Width Door ShelfTemperature ControlCoverThe following table provides the exterior dimensionsand power specifications for the refrigerators.DMC4101Dimensions(H x W x D)59.6 in. (1514.0 mm) x23.6 in. (600.0 mm) x27.5 in. (698.0 mm)DMC4081Dimensions(H x W x D)53.6 in. (1360.0 mm) x23.6 in. (600.0 mm) x27.5 in. (698.0 mm)Voltage Range210.5 VDC–17.0 VDCPower SupplyRequirements10.5 VDC–17.0 VDC, 15 A2 Note: The compressor will stop running when the voltage is lower than10.5V. Direct connection with an AC power source is forbidden.1Note: DMC4101 quantity 3; DMC4081 quantity 24EN
DMC RefrigeratorssInstallationThe following table provides the recommendedelectrical wiring lengths for the refrigerators.Wire SizeMaximumLengthWire SizeMaximumLength13 AWG38.0 ft (2.4 m)8 AWG33.0 ft (10 m)12 AWG13.0 ft (4.0 m)6 AWG50.0 ft (15.2 m)10 AWG20.0 ft (6.1 m)3N ote: 14 AWG wire is not recommended. 13 AWG or larger isrecommended. The DC refrigerators are not equipped with a powersource. A power source is available at your authorized Dometic Dealer.5 Installation WARNING: ELECTRICAL SHOCK, FIRE, AND/OR EXPLOSION HAZARD. Failure to obey thefollowing warnings could result in death orserious injury: Do not install the refrigerator where there is excessivemoisture or where water can splash onto theappliance. Do not install the refrigerator in a location where theventilation openings in the appliance enclosure or inthe built-in structure might become obstructed. Do not install the refrigerator near heat sources oropen flames. WARNING: TIPPING HAZARD.Do not allow a long cord to drape over the countertop or table top where it can be pulled on by childrenor tripped over unintentionally. Failure to obey thiswarning could result in death or serious injury.NOTICE: Do not place heavy items on top of therefrigerator. Failure to obey this notice can result indamage to the refrigerator.This section describes how to install the refrigerator.5.1 Removing the ExistingRefrigeratora refrigerator is not already present, skip to sectionIIIf"Preparingfor Installation" on page 5.EN1. Disconnect the 120 VAC power cord from thereceptacle at the rear of the refrigerator enclosure, ifapplicable.2. Disconnect the 12 VDC leads from the refrigeratorand cap the lead ends, if applicable.3. Turn off the LP gas supply to the refrigerator, ifapplicable.4. Disconnect the LP gas line from the refrigerator.5. Cap the line and verify there are no LP gas leaks.6. Remove the mounting screws anchoring therefrigerator to the enclosure.7. Slide the refrigerator from the enclosure and removeit from the RV.5.2 Preparing for InstallationVerify the enclosure meets the following requirementsbefore installation:1. Utility hookups are present and comply with allapplicable codes.2. Holes do not exist inside the enclosure, exceptventilation holes.3. Objects do not protrude into the enclosure, exceptutility connections for the refrigerator.4. The enclosure must be free of materials that maydamage the refrigerator.5. The floor must be level and able to support theweight of the refrigerator and its contents.6. The refrigerator must be level and installed in a sturdyenclosure.7. A wood strip must be placed above the upperopening and below the lower opening of theenclosure. The top and bottom refrigerator mountingbrackets are anchored to the wood strips withscrews.8. The refrigerator must not be installed directly oncarpeting.9. Adjacent heat sources must not affect the ventilationof the refrigerator.5
InstallationDMC Refrigeratorss5.3 Positioning the Refrigerator5.4 Securing the RefrigeratorNOTICE: If the refrigerator is not leveled duringinstallation, the doors may not close or seal properly,causing cooling, frost, or moisture problems. It is veryimportant for the refrigerator to be level in order tofunction properly.This section describes how to secure the refrigerator inthe enclosure.This section describes proper positioning for therefrigerator before installation.the door swing will be reversed, complete theIIIfreversalprocedure before securing the refrigeratorinside the enclosure. Refer to "Door SwingReversal" on page 8 for details.securing the refrigerator, ensure theIIBeforerefrigerator is positioned correctly. Refer to"Positioning the Refrigerator" on page 6 fordetails.eweqqw(Top View)3 Installing the Top Mounting Bracket(Side View)2 Enclosure Dimensionsq DMC4101 59.9 in. (1523.0 mm)DMC4081 53.9 in. (1369.0 mm)Enclosure Heightq Top Mounting Bracketw Mounting Screw1. Secure the top mounting bracket to the refrigeratorusing the two M5 x 20 mounting screws provided.2. Place the refrigerator completely into the enclosure.w 24.0 in. (610.0 mm) Enclosure Widthe 24.0 in. (610.0 mm) Enclosure Depth1. Position the refrigerator away from heat sources suchas stoves, radiators, and direct sunlight.2. Place the refrigerator in a stable, flat location.3. Level the refrigerator by turning the leveling legsclockwise (to raise the refrigerator) or counterclockwise (to lower the refrigerator).4. Leave the refrigerator in an upright position for at leastfour hours before turning it on.4 Installing the Bottom Mounting Bracketq Bottom MountingBracket6wqw Mounting ScrewEN
DMC RefrigeratorssInstallation3. Opening the fresh food door, secure the bottommounting bracket to the refrigerator using the screwsprovided.qrwire length specifications, refer toIIFor"Specifications" on page 4. – GNDqwe6 Connecting the Wires1. Ensure the voltage and frequency indicated on thedata plate correspond to those of the electricalmains. This refrigerator requires a10.5–17.0 VDC 15 A power supply.2. Connect the " " terminal to the positive 12 VDC wire.we5 Securing the Refrigerator to the Enclosureq Top Mounting Brackete Mounting Screww Bottom Mounting Bracket r Enclosure4. Secure the refrigerator within the enclosure using thesix self-tapping screws that will go through the topand bottom mounting brackets.3. Connect the "-" terminal to the negative 12 VDC wire.4. Connect the "GND" wire to the converter ground orbus ground.5. Reconnect and turn on the refrigerator.6. Wait three to five minutes before restarting therefrigerator as it might fail to operate properly ifrestarted too quickly.5.5 Making the ElectricalConnections WARNING: ELECTRICAL HAZARD. Failure toobey these warnings could result in death orserious injury. Before wiring the refrigerator, turn off and disconnectthe refrigerator from the main power supply. Before making the electrical connection to therefrigerator, ensure that you read and understand thegrounding-related warning provided on page 3.EN7
Door Swing ReversalDMC Refrigeratorss6 Door Swing Reversal ewCAUTION: TIPPING HAZARD.Take care when tilting the refrigerator backwards.Failure to obey this caution could result in minor ormoderate injury.NOTICE: It is necessary to tilt the refrigerator backwardsto take the bottom hinge off. Rest the refrigerator againstsomething solid, just below the top panel. Do not laythe appliance completely flat, as this may damage thecoolant system.NOTICE: If the location requires removing therefrigerator from the enclosure, be sure the wiring andthe power cord are long enough, or disconnect thewiring and power cord before moving. Failure to do socould damage the wiring connections.This section describes the process to change thedirection in which the door opens.Dometic recommends that you obtain assistance beforecompleting the door reversal process.Before beginning the door reversal process:1. Remove any refrigerator contents.2. Turn the breaker off or unplug the 12 VDC power tothe appliance.qr7 Removing the Upper Hinge Bracketq Upper Hinge Coverw Upper Hinge Brackete Hinge Screwsr Plastic Screw Cover2. In a front to back motion, pop the upper hinge coveroff the upper hinge bracket.3. Use a 10 mm socket wrench to remove the threescrews that secure the upper hinge bracket to therefrigerator, and then remove the bracket.4. Gently use a putty knife to pry up the reusable plasticscrew cover from the opposite side where the upperhinge bracket will be installed. Reserve the cover foruse later.q3. Remove the three screws at the top and the threescrews at the bottom of the refrigerator that securethe mounting brackets to the cabinet.6.1 Removing the Upper HingeThis section describes removing the freezer door andupper hinge bracket.IIKeep all the hardware and screws for reinstallation.1. Slide the refrigerator out several inches from theenclosure to access the upper hinge bracket.w8 Removing the Freezer Doorq Freezer Doorw Middle Hinge Bracket5. Depress the freezer door handle. Gently pull the doorupward off the middle hinge to release the magneticseal and remove the door.6. Lay the door on a soft surface, finish side down.8EN
DMC RefrigeratorssDoor Swing Reversal6.2 Removing the Middle Hinge6.3 Removing the Lower HingeThis section describes removing the fresh food door,middle hinge bracket, and lock assembly.This section describes removing the lower hinge bracketand leveling feet.weeqqwrrqr9 Removing the Middle Hinge Bracket, Lock Assembly, and Door10 Removing the Lower Hinge Bracket and Leveling Feetq Lock Assemblye Fresh Food Doorw Middle Hinge Bracket r Lower Hinge Bracketq Hinge-Side Leveling Foot e Door Stop Bushingw Lower Hinge Bracketr Mounting ScrewsIIKeep all the hardware and screws for reinstallation.IIKeep all the hardware and screws for reinstallation.2. Pull up on the hinge to remove it from the door.2. Use a 10 mm socket wrench to remove all the screwssecuring the lower hinge to the door stop bushing.1. At the top of the fresh food door, use a Phillipsscrewdriver to remove the two screws that secure thelock assembly, and the two screws that secure themiddle hinge bracket.3. Depress the door handle. Gently pull the doorupward off the lower hinge to release the magneticseal and remove the door.1. With the refrigerator tilted back slightly to access thebottom, remove the front leveling feet by turningthem counter-clockwise until they fully disengage.the hinge-side leveling foot with the lowerIIKeephinge bracket.4. Lay the door on a soft surface, finish side down.EN9
Door Swing ReversalDMC Refrigeratorss6.4 Reinstalling the Lower Hinge Pin6.5 Removing the HandlesThis section describes reinstalling the lower hingebracket.This section describes removing the handles and decorwell covers.qweqrww11 Reinstalling the Lower Hinge Bracket and Hinge Pin12 Removing the Handles and Decor Well Coversq Hinge-Side Leveling Foote Mounting Screwsw Lower Hinge Bracketr Hinge PinIIKeep all the hardware and screws for reinstallation.1. On the lower hinge bracket, use a flatheadscrewdriver to remove the hinge pin. Place the hingepin into its new bracket slot, immediately next to itsoriginal position.hinge pin must change slots to remain in anIITheouter edge position after swapping swing sides.2. Holding the lower hinge bracket in its new location,use the hinge-side leveling foot to hold the hingebracket loosely to the bottom of the refrigerator. Turnthe foot clockwise until secure.3. Install the mounting screws, using the outer edge topand lower slots, and the inner middle slot. Tightensecurely.4. Install the remaining leveling foot on the oppositeside of the refrigerator.10q Door Handlew Decor Well CoverIIKeep all the hardware and screws for reinstallation.1. Depress the freezer door handle latch to remove thetwo Phillips head screws that secure the handle.2. While using a screwdriver to push in the handle'splunger pin completely and depressing the handlelatch, lift the handle out of the handle well.3. On the opposite edge of the door, pop off the freezerdecor well cover.4. Snap the decor well cover onto the original handlewell location. Align the cover under the edge of thedoor cap.5. Repeat steps 1 through 4 for the fresh food door.reinstallation, the freezer handle will rotate 180 IIAtto becomethe fresh food handle. The fresh foodhandle will rotate 180 to become the freezer doorhandle.EN
DMC RefrigeratorssDoor Swing Reversal6.6 Reinstalling the HandlesThis section describes swapping and reinstalling thehandles.q6.7 Changing the Door StopBushingThis section describes removing and replacing the doorstop bushing.wwq14 Reinstalling the Bushing13 Reinstalling the Handles and Decor Well Coversq Door Handlew Decor Well Cover1. Rotate the original freezer handle 180 .2. While using a screwdriver to push in the handle'splunger pin in completely and depressing the handlelatch, place the handle into the fresh food doorhandle well.sure the handle's plunger pin is inserted in theIIBeformer hinge hole.q Door Stop Bushingw New Door Stop Bushing1. Remove the door stop bushing from the bottom ofthe fresh food door.2. Use a Torx driver to install the new replacement doorstop bushing and new screws on the opposite side ofthe fresh food door.3. Repeat steps 1 and 2 for the freezer door.new door stop bushing should not hang overIIThethe door edge.3. Depress the handle latch to reinstall the two Phillipshead screws to secure the handle.4. Repeat steps 1 through 3 to secure the original freshfood door handle to the freezer door.EN11
Door Swing ReversalDMC Refrigeratorss6.8 Reinstalling the Fresh FoodDoor, Lock, and Middle Hinge8. Lower the freezer door into position by aligning thehole from the door stop bushing onto the middlehinge bracket pin.This section describes reinstalling the fresh food doorand middle hinge bracket.door’s magnetic seal should hold the door inIITheplace to install the upper hinge bracket.w6.9 Reinstalling the Upper HingeThis section describes reinstalling the freezer door andupper hinge bracket.qerqewtr15 Reinstalling the Fresh Food Door, Lock, and Middle Hingeq Middle Hinge Bracket e Fresh Food Doorw Lock and Lock Screws r Pin on Lower HingeBracket1. Lower the fresh food door into position by aligningthe hole from the door stop bushing onto the pin onthe lower hinge bracket.door’s magnetic seal should hold the door inIITheplace to install the middle hinge bracket.2. Align the middle hinge bracket at the edge of thefresh food door, above the lower hinge bracket.3. Reinstall the middle hinge bracket, but do not fullytighten the screws.4. Align the lock assembly on the other edge of thefresh food door, above the new handle location.16 Reinstalling the Freezer Door and Upper Hingeq Upper Hinge Coverw Upper Hinge Brackete Hinge Screwsr Plastic Screw Covert Freezer Door1. Align the new upper hinge bracket at the edge of thefreezer door, above the middle hinge bracket.2. Install the new upper hinge bracket, using the threehinge screws, but do not fully tighten.3. Ensure the door aligns horizontally and vertically,swings freely, and seals properly on all sides.4. Fully tighten the hinge screws on the upper hingebracket and snap the upper hinge cover in place.5. Reinstall the plastic screw cover on the top where theold upper hinge was removed.5. Reinstall the lock assembly, but do not fully tightenthe screws.necessary, reconnect the wiring, plug in theIIIfpowercord, or turn the breaker on.6. Ensure the door aligns horizontally and vertically,swings freely, and seals properly on all sides.6. Return the refrigerator to the enclosure as describedin "Securing the Refrigerator" on page 6.7. Tighten all middle hinge and lock assembly screws.7. Level the refrigerator as described in "Positioning theRefrigerator" on page 6.12EN
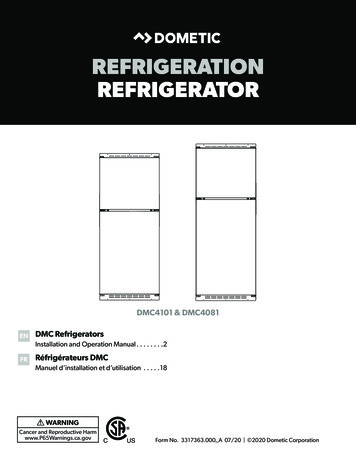
DMC Refrigeratorss7 Operation WARNING: ELECTRICAL SHOCK, FIRE, AND/OR EXPLOSION HAZARD. Failure to obey thefollowing warnings could result in death orserious injury: This refrigerator must be properly installed andlocated in accordance with the instructions outlinedin "Installation" on page 5 before it is used. Do not allow persons (including children) withreduced physical, sensory, or mental capabilities tooperate this refrigerator unless they have been givensupervision or instruction concerning use of theappliance by a person responsible for their safety. Do not store gasoline or other flammable vapors andliquids in this refrigerator. Do not store explosive substances, such as aerosolcans with a flammable propellant, in this refrigerator. CAUTION: BURN HAZARD.Do not touch the interior of the chillercompartment with wet hands. Failure to obey thiscaution could result in minor or moderate injury.This section provides considerations regarding theoperation of the refrigerator and describes how tooperate the control panel.Operation7.2 Using the Control PanelThis section describes how to use the control panel toset the desired cooling temperature.qwPERFORMANCE3sSILENTECOre17 Understanding the Control Panelq Mode Selection Buttonw Temperature AdjustButtone Mode Indicatorr TemperatureIndicator7.2.1 Turning on the RefrigeratorThis section describes how to turn the refrigerator on.1. Press and hold the mode selection button for threeseconds to turn on the refrigerator.2. Ensure that the refrigerator is cooled completelybefore adding food (24 hours is recommended).7.1 Storing Refrigerated Goods3. Set the refrigerator mode by pressing the modeselection button to select from the following choices:For optimal use of the refrigerator compartment,observe the following instructions:–– Performance Mode: The refrigerator works inAUTO status with five available temperature levels. Never put hot liquids or food in the refrigerator.–– Silent Mode: The compressor works at aconstant speed while the outer fan works at lowspeed. The temperature level is limited to levelthree and below. The total amount of goods placed into therefrigerator compartment should not exceed itsstorage volume. Cover or wrap food prior to storage. Arrange food so that air can circulate freely inside thecompartment.–– ECO Mode: The refrigerator works in AUTOstatus, but the temperature is limited to level one.7.2.2 Changing the RefrigeratorTemperatureTo adjust the refrigerator temperature, press and releasethe temperature adjust button until the temperatureindicator light displays at the desired level. The smallsnowflake is level one and the large snowflake is level five.EN13
Care and MaintenanceDMC Refrigeratorss7.3 Adjusting the Shelves7.3.2 Installing the ShelfThis section describes how to remove and install therefrigerator shelves.7.3.1 Removing a Shelfwqwq19 Installing a Refrigerator Shelfq Groove in Wall Liner18 Removing a Refrigerator Shelfq Shelf Lockw Screwdriver1. Disengage both shelf locks underneath the shelf:a. Insert the tip of a flathead screwdriver into the slotbetween the left shelf lock and the wall liner.NOTICE: Do not rest the screwdriver against the linerfor leverage, or force the screwdriver against the liner, asdamage to the liner may occur.b. Gently rotate the screwdriver to slide the lockaway from the wall liner.c. Repeat steps a and b for the right shelf lock.2. Pull on the front edge to slide the shelf out.w Shelf Lock1. Be sure both shelf locks are disengaged.2. Align the shelf with the grooves in the wall liner, andslide the shelf into the grooves.3. To engage the left lock, push the end of the left locktoward the left refrigerator wall until it is flush with theend of the shelf bracket and against the wall liner.4. Repeat step 3 for the right lock.8 Care and Maintenance WARNING: ELECTRICAL SHOCK, FIRE, AND/OR EXPLOSION HAZARD. Failure to obey thefollowing warnings could result in death orserious injury: Always disconnect the refrigerator from power beforecleaning and/or servicing. Maintenance not included in this Care andMaintenance section must be done by a qualifiedservice person only.14EN
DMC Refrigeratorss WARNING: HEALTH HAZARD.Do not use toxic or hazardous chemicals toaccelerate the defrosting process. Failure to obeythis warning could result in death or serious injury.NOTICE: Do not use abrasive cleaning agents or hardobjects during cleaning, and do not allow water to dripinto the seals, as this can damage the refrigerator.Troubleshooting8.3 Storing the RefrigeratorIf you do not intend to use the refrigerator for anextended period of time, complete the following steps:1. Empty the contents of the refrigerator compartment.2. Clean the refrigerator, if needed, as described in"Cleaning the Refrigerator" on page 15.NOTICE: Never use mechanical tools to remove ice orto loosen objects stuck to the interior of the refrigerator.The only exceptions are devices that are approved forthis purpose by the manufacturer.NOTICE: The maintenance and cleaning instructionsprovided in this section should be performed oncea year, or as needed depending on the use of theappliance. Failure to properly maintain the appliancemight void the warranty and could result in unsafeoperation. Preventive maintenance is not covered underthe warranty.8.1 Defrosting the RefrigeratorThe refrigerator has an auto-defrost feature that willautomatically start a heating device to assist defrostingafter a certain period of run time.8.2 Cleaning the RefrigeratorNOTICE: The exterior surface should only be cleanedwith soap and water. Failure to obey this notice couldresult in damage to the refrigerator's finish.Complete these steps to properly clean the refrigerator:1. Clean the interior regularly, and as soon as itbecomes dirty, using a damp cloth. Wipe dry.2. Clean dust and debris from the condenser fanregularly, and ensure that the fan moves freely withoutobstruction.20 Swinging out the Airing Feature3. To prevent mold, mildew, or unpleasant odors fromdeveloping, leave the door slightly ajar. Use the airingfeature to prevent the door from closing:a. Open both the freezer and fresh food door toaccess the lock.b. Swing the airing feature out from the lock.c. Close the doors until they gently rest against theairing feature on the door lock.9 Troubleshoo
source. A power source is available at your authorized Dometic Dealer. 5 Installation WARNING: ELECTRICAL SHOCK, FIRE, AND/ OR EXPLOSION HAZARD . Failure to obey the following warnings could result in death or serious injury: Do not install the refrigerator where there is excessive moisture or where water can splash onto the appliance.