Transcription
ARMSTRONG FLOORING – LAMINATEArchitectural Remnants Coastal Living PatinaRustics PremiumNew England Long PlankForest Select XLTimberland ClassicsWarranty Against DefectsInstallation InstructionsMaintenance Instructions
WARRANTY AGAINST DEFECTSArmstrong Flooring – LaminateArchitectural Remnants Coastal Living PatinaRustics PremiumNew England Long PlankForest Select XL25 Year Residential10 Year Light Commercial25 Year Residential8 Year Light CommercialTimberland Classics20 Year Residential3 Year Light CommercialWHAT WILL WE DO IF ANY OF THE COVERED EVENTS OCCUR?replacement of the floor, at our option, but not including installation costs.If there are visible defects before the product is installed, any uncut piecesthat appear to have defects should be returned to the original place ofpurchase; those pieces that do not meet our specifications will be replaced.This pre-installation defects warranty expires upon installation.In the unlikely event that we are unable to correct the problem after areasonable number of attempts, we will refund the portion of the purchaseprice for the section of failed flooring.If any of the covered events occur within the warranty periods specifiedfor the respective flooring product, we will at our cost recoat, refinish, fillor furnish comparable flooring (of our manufacture and of similar colour,pattern and quality), for either the repair of the defective area or theIf your floor was professionally installed, we will also pay reasonable labourcosts for the direct repairs or replacement as noted within the relevantwarranty period. This does not include labour involved in removal orreplacement of cabinets and other fixtures.Years from Date ofOriginal PurchaseWhat we will doPrior to installationAny uncut pieces that appear to have defects should be returned to the original place of purchase; those pieces that donot meet our specifications will be replaced.One (1)Armstrong Flooring will replace/repair at its discretion the defective product including reasonable labour charges forinstallation. If replaced, Armstrong will replace it with similar quality first grade material. This replaced material will beWarranted for a further Fifteen (15) years on the same terms as this Defects Warranty and subject to the same conditions(in each case, to the extent permissible by law at that time). If repaired, the material is Warranted for the time thenremaining under this original Warranty.Two (2)Armstrong Flooring will replace/repair at its discretion the defective product and pay 50% of a reasonable labour chargefor installation (including any GST payable to an installer who is registered for GST) on receipt of a tax invoice from theinstaller.Residential Three (3) –Twenty Five (25)*2,3Armstrong Flooring will replace/repair at its discretion defective material only (excluding cost of installation).Residential Three (3) –Twenty (20)*1Armstrong Flooring will replace/repair at its discretion defective material only (excluding cost of installation).Light CommercialThree (3)*1 – Ten (10)*3Armstrong Flooring will replace/repair at its discretion defective material only (excluding cost of installation).Light CommercialThree (3)*1 – Eight (8)*2Armstrong Flooring will replace/repair at its discretion defective material only (excluding cost of installation).*1Timberland Classics, *2Forest Select and New England, *3Architectural Remnants , Coastal Living Patina, Rustics PremiumWhere the purchaser is not a ‘consumer’ for the purposes of the Australian Consumer Law (which will depend upon a variety of factors including theprice of the goods, the purchaser’s purpose in acquiring the goods, and the categorisation of the goods), or where the products to which this Warrantyapplies are not goods ‘of a kind ordinarily acquired for personal, domestic or household use or consumption’, then to the extent permitted under theAustralian Consumer Law, Armstrong Flooring will not be liable for any direct or indirect consequential loss in relation to any product defects. Nothingin this paragraph or the Warranty is intended to, or attempts to, exclude or limit the operation of the Australian Consumer Law in any respect.
USE AREA CLASSIFICATIONSUse areas for Laminate products are defined by testing to DIN EN 13329 (2009-01) Laminate floor coverings – Elements with a surface layer based onaminoplastic thermosetting resins – Specifications, requirements and test methods (includes Amendment A1:2008).For the purpose of this warranty the following are Armstrong recommended use areas for the listed products.PRODUCTUSE AREA CLASSIFICATIONResidentialHeavy 23CommercialCommercial 31 Light/Moderate3123*1Timberland Classics,*2Forest Select and New EnglandHeavy traffic; suitable for all areas.(not bathrooms, shower rooms or laundries).Not applicable*2Forest Select and New England,*3Architectural Remnants ,Coastal Living Patina,Rustics PremiumHeavy traffic; suitable for all areas.(not bathrooms, shower rooms or laundries).Light/Moderate traffic;Boutique, hotel room, small office.(not bathrooms, shower rooms or laundries).WHAT IS NOT COVERED BY THESE WARRANTIES? Use of the floor covering in an outside / external location. Without limited or restricting the other rights and remedies that may beavailable to you under the Australian Consumer Law or any other lawin relation to the flowing product, these warranties do not cover: Floors that are installed in other than owner-occupied or tenantoccupied residences. Any other person (the warranties are not transferable). Damage caused by fire, flooding and other natural disasters and Actsof Nature. Damage caused by negligence, accidents, misuse or abuse. Damage caused by lack of proper maintenance or failure to follow allof our written maintenance instructions. Use of floor care products otherthan those specially formulated for use on Armstrong flooring maydamage your floor and may void the warranty. Damage caused by vacuum cleaner beater bar or hard heads (seeProduct Care and Maintenance Guidelines). Damage caused by appliances, furniture and castors (see Product Careand Maintenance Guidelines). Damage caused by cutting from sharp objects (see Product Care andMaintenance Guidelines). Reduction in gloss, scratches or indentation due to sand, pebbles orother abrasives, spiked heel shoes, pets, insects, construction traffic,water, moisture, or failure to maintain the floor as required (see ProductCare and Maintenance Guidelines). Minor colour, shade or texture variations between samples, printedcolour photography or replacement flooring and the actual material. Commercial installations of residential products unsuitable forcommercial traffic. Delivery, construction or installation-related damage includinginstallations made: (i) in breach of applicable local housing or buildingcodes or standards, or (ii) contrary to written instructions furnished withthe project. Floors damaged or adhesive breakdown caused by subfloor moistureof water damage, including without limitation, due to broken or leadingwater pipes or gutters, flooding, water spills or weather conditions oracts of Nature.FALSE OR EXAGGERATED CLAIMSWe may refuse to action a claim in relation to these Warranties, or reducethe benefits available to you in respect of the claim, if, in our reasonableopinion, you make any misrepresentation or commit any fraudulent dishonest act or omission in connection with the claim. Nothing in this paragraph limits our consumer guarantee obligations to you.THESE WARRANTIES CANNOT BE VARIEDNone of our installers, retailers, distributors or employees has the authorityto alter the obligations, limitations, disclaimers or exclusions under any ofthese warranties.PRIVACY Minor colour variations between flooring and or samples and otherflooring or wood products, which you wish to, match (e.g. cabinets, stairrailings, trim, etc.).We may use and disclose your contract and related warranty informationto our insurers, claims managers, repairers and suppliers (including to anyperson situated outside Australia) for the purpose of: Deficiencies related to subfloor/floor joist assemblies, subfloorpreparation materials and fasteners including, but not limited to, unevensubfloor surfaces, floor deflection or voids in the subfloor. Processing claims in relation to your Warranty Noises (squeaks, etc.) associated with anything other than the incorrectmanufacture of the flooring. Changes in colour due to exposure to sunlight and age. Repairing or replacing the flooring product under your Warranty.You consent to these parties contacting you, including sending email, mailor making contact by telephone, for the purposes set out above. You confirmyou have the necessary authority to provide the information and to givethese consents.
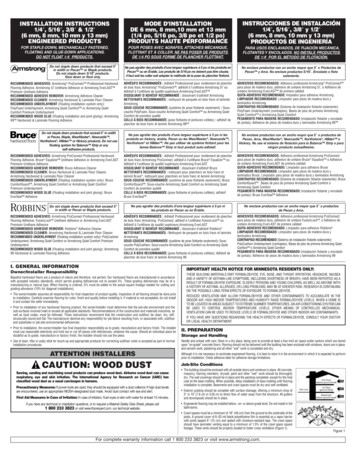
INSTALLATION INSTRUCTIONSArmstrong Flooring – LaminateGENERAL INFORMATIONINSTALLATION TOOLS REQUIREDInstaller Responsibility Armstrong Flooring – Laminate is a ‘floating floor’. These LaminateFloors are intended for indoor use only and can be installed over mostexisting floor structures. Since these floors are composed of naturalcellulose fibres, they will expand and contract with changes in relativehumidity. Prior to installation, the installer has final inspection responsibility as tomanufacture and factory finish. The installer must use reasonableselectivity and hold out or cut off pieces with deficiencies, whatever thecause. Should the individual piece be doubtful, the installer should notuse the piece. This inspection of all flooring should be done before installation.Carefully examine flooring for colour, finish and quality before installingit. If material is not acceptable, do not install it and contact the sellerimmediately. Prior to installation, the installer must determine that the job-siteenvironment and the subfloors involved meet or exceed all applicablestandards. Recommendations of the construction and materials industries as wellas local codes must be followed. These instructions recommend thatthe construction and subfloor be dry, stiff, structurally sound and flat. The manufacturer declines any responsibility for job failure resultingfrom or associated with subfloor and substrates or job-siteenvironmental deficiencies. Use of stain, filler or putty stick for touch-up andappropriate products for correcting subfloor voids is accepted as partof normal installation procedures.Floating Laminate Floor Structure Do not attach to the subfloor at any point. The installation of cabinets or island benches over the top of the flooringand fixed to the floor and subfloor void manufacturer’s warranty. Thiscan lead to the floor failing to contract and expand when environmentalchanges occur.· Do not fit flush against any fixed vertical surfaces likewalls, permanent fixtures, door frames, pipes, staircases and where thefloor meets other floor coverings. For most installations, where the relative humidity isbetween 50 and 65%, a minimum 10mm expansion gap is requiredaround the perimeter of the room as well as against any fixed objects.This gap accounts for the normal movement of the floor system. Where the room is longer than 8m in length or wider than 6m acrossthe width of the room, expansion joints must be provided to allowcontraction and expansion with environmental changes. When installingthe floor into several adjoining rooms, expansion joints must be providedat every doorway. Any expansion joint in the subfloor must be provided with a matchingexpansion joint directly above in the Armstrong Flooring Laminateproducts Do not install Armstrong Flooring Laminate products in areas such asbathrooms, showers and wash rooms, steam rooms, saunas or wherethe floor is normally/frequently wet. The room temperature should be at a minimum of 18 C for 48 hoursprior to, during and 48 hours after installation.Armstrong Flooring - LaminatePolyethylene plastic sheeting for moisture barrierFoam underlay with attached moisture barrier(2mm)50mm wide water resistant tapeTapping blockPull barSpacers/wedgesTape measureCarpenter’s squareHammerPencilSaw (such as Jig, Circular, Table, Undercut, Drop, Hand)DividersMouldings/finishing trimsSUBFLOOR REQUIREMENTSArmstrong Flooring Laminate products can be installed over most subfloorsand existing floors on all grade levels.E.G. Over smooth, well bonded vinylfloors; over concrete, ceramic tile,terrazzo, and marble; and overfirmly secured strip timber flooringand board type underlayment’s.All sub-floors must; meet applicable building codes be structurally sound be dry, clean and flat.The subfloor must not deviate by more than 2mm in 1.5m. All depressionsgreater than 2mm must be filled with a suitable levelling compound or thehump removed by grinding (Diamond grinding is preferable).The slope should not exceed 30mm in 2 metres.NEW AND EXISTING CONCRETE SUB-FLOORSConcrete sub-floors must be dry. Concrete sub-floors, regardless of theirage, MUST always be tested prior to the installation of laminate flooring.Follow the ASTM 2170 as a guide for testing. If the concrete sub floor isshowing high moisture vapour readings, floating laminate wood floorsshould not be installed until the problem has been rectified. ArmstrongFlooring recommend to install 200 micron Polyethylene plastic sheetingoverlapping joints by 200mm and securing with a 50mm water resistanttape and lapped up the wall 10 to 15mm as a moisture barrier.NEW AND EXISTING TIMBER SUB-FLOORSNew and Existing Timber sub-floorsmust be inspected prior to installation.The timber floor should be suspendedand have a minimum of 450mm wellventilated crawl space as shown indiagram on right.The acceptable moisture content range of a timber floor is 10 to 14%, thiscan be checked following the ATFA moisture test guide lines for timberflooring.
If the timber sub floor is showing high moisture vapour readings, floatinglaminate wood floors should not be installed until the problem has beenrectified.– it is recommended to install Polyethylene plastic sheetingoverlapping joints by 200mm and securing with a water resistanttape and lapped up the wall 10 to 15mm as a moisture barrier.All boards must be properly fixed to the substrate. Loose or creaking boardswill result in a squeaking floor after installation and must be securely fixed.All protruding nail heads are to be punched below the surface.EXISTING FLOOR COVERINGSAll existing floor coverings MUST be securely bonded to the acceptablecondition sub-floor.Any loose sections MUST be re-fixed, replaced or the floorcoveringremoved.All sub-floors MUST be tested for moisture content.1. CONDITIONING/ACCLIMATISATIONStore Armstrong Flooring Laminate products flat in unopened package inthe centre (protected dry place) of the room in which it will be installed fora period of 24 hours prior to installation.The room temperature should be at a minimum of 18 C for 48 hours priorto, during with an ideal relative humidity of 55% and 48 hours afterinstallation.During installation, the room temperature should not exceed 38 C.Can be installed over under-floor heating systems. The surface of thesub-floor must not exceed 28 C.The packages should only be opened just before the start of installation.Each board should be carefully inspected prior to installation, never installany damaged board.The floorboards are supplied pre-finished. Open the packages as workprogresses to minimise their exposure to humidity.If any obvious defects or damage are found when opening a package,call your flooring retailer or place of purchase.2. INSTALLATION2.1 PREPARATIONEnsure sub-floor is toacceptable standard (seesub-floor requirements).finish wall. Divide this measurement by the width of the board. Ifthe remainder is less than 60mm, allow to cut off 60mm from thewidth of the first row.2.4 INSTALL FOAM UNDERLAYMENTUse a 2mm foam underlay withattached moisture barrier, followingmanufacturer’s instructions. Theexcess should be cut to the height ofthe installed flooring after the floorhas been installed. Tape joins with50mm water resistant tape.2.5 INSTALL THE FIRST ROWInspect each piece prior to installation for damaged boards orocking systems.Always pull from at least 3 cartons while installing to minimizepattern repeats.Lay first row with the small tongue side facing the wall.If the starting wall is crooked, make sure the first row is square tothe rest of the installation and trace the contour of the wall on thefirst row of planks allowing for any adjustments needed for the lastrow, trim as needed. Put spacers around theentire perimeter of the roomto maintain minimum 10mmexpansion zone (as perdiagram), remove wheninstallation is complete. Lay pieces from left to right. Lock the end joints by overlappingthe ends and align corners creating a continuous board. When measuring the last piece in therow, subtract minimum10mm from end of board to maintain expansion zone. Cut decorative side up if using hand saw or decorative sidedown if using power saw to minimize chipping. If the cut-off piece from the first row is 200mm or longer, use itto start the second row. If it is shorter than 200mm, cut a fullboard in half and use that to start the next row.2.6 INSTALL ALL SUBSEQUENT ROWS Continue laying boards, one row at a time, staggering the endjoints.Remove any existing wallbase or trim.Door trims and architraves must be undercut to allow the floor tomove freely. Use a piece of floor and foam underlay to supportthe saw blade at the correct height for undercutting. It may benecessary to plane or cut the bottom of the door to accommodatethe change in floor height.Use a Vacuum to remove all the dust and debris from under thearchitraves walls and off the sub floor.2.3 LAYOUTThe boards should preferablybe installed in the direction ofincoming light. Avoid narrowpieces at the finish wall.Measurethedistancebetween the starting wall and Be attentive to staggering theends of boards in adjacent rows ata minimum of 150mm (Figure#2).This will help ensure a morefavourable overall appearance ofthe floor. Install the long end of the first board in the second row at anangle to the board in the first row. Press flat to subfloor to lockinto place. Angle the long end of the next board in the second row to lockinto the first row.
Follow the order described tocontinue laying the boards in thesecond and additional rows. If necessary use a pull bar totighten joins.2.8 INSTALL MOULDINGS & TRANSITION STRIPS Remove spacers and install finish mouldings and transitionstrips. Attach mouldings and transition strips with nails, screws orconstruction adhesive (follow manufacturer’s instructions) Pre-drill mouldings and transition strips prior to nailing orscrewing.2.7 INSTALLING THE LAST ROW The last row mayneed to be cutlengthwise to fit. Never fasten the mouldings or transition strips to the laminateflooring and always maintain 10mm expansion zone. T-mouldings (to allow expansion/contraction) must be usedwhere the room is larger than 24.38m in board length or widerthan 15.85m in board width. Place the row ofboards to be installedon top of the last rowof installed boards. Use a divider or pieceof the board as a scribe to trace the contour of the wall. T-mouldings (to allow expansion/contraction) must be usedwhere the flooring continues through a doorway or passagewayinto another room (install beneath door). Use a spacer between the marker and the piece of board.– This adds the expansion gap required. Install the last row. Insert spacers to hold the row in place.MAINTENANCE INSTRUCTIONSArmstrong Flooring – LaminateDAILY/REGULAR MAINTENANCEResidential/Light Commercial Foot Traffic: Soap-based detergents or “mop and shine” products are notrecommended for use on laminate floors as these may leave a dullfilm on your floor. Vacuum, dust/micro fibre mop or sweep to remove debris on a frequentbasis. Do not apply wax or polish your floor. Regularly spray clean your floor with Peerless JAL Hardwood andLaminate (or similar) floor cleaner, process as follows. For added protection, use floor protectors (such as felt) on chairs andother furniture. The heavier the item, the wider the floor protector shouldbe.1. Spray light film of Hardwood and Laminate floor cleaner over smallarea approx. 2 metre square.2. Immediately wipe flooring with micro fibre mop to remove residue. When using a vacuum cleaner, disengage the beater bar and use thebare floor setting.3. Do not allow excess cleaner to remain on the floor surface as excesswill damage the flooring. Place a natural or colourfast mat at outside entrances to collecttracked-in dirt and absorb excess moisture. Also place wipe off matsat the inside of every entrance.4. Spot clean stubborn soils by spraying Peerless JAL Hardwood andLaminate floor cleaner and wiping with micro fibre cloth. Repeat ifnecessary. Metal caster wheels can damage the floor. Instead, we recommendusing soft white or grey wheels wide enough to support the load.FOR BEST RESULTS Clean up liquid spills immediately.DO NOT Wet Mop laminate floor. Use steam mops on laminate floor. Use mops with oil treated covers. Place black rubber blacked mats, wheels or tyres on laminatefloors. These will stain your floor. Surface dirt, grit, grease or high heel marks should be addressedimmediately. Remove tough spots like shoe polish, tar and asphalt driveway seal withadhesive cleaner, low-odour mineral spirits or nail polish removercontaining acetone (follow instructions on label). For minor abrasions or scratches, use a touch-up kit or acrylic fillerto repair. Major damage can be repaired with a plank replacement.
CAUTION: WOOD DUSTSawing, sanding and machining wood products can produce wood dust. Airborne wood dust can cause respiratory, eye and skin irritation.The International Agency for Research on Cancer (IARC) has classified wood dust as a nasal carcinogen in humans.Precautionary Measures: If power tools are used, they should be equipped with a dust collector. If high dust levels are encountered, usean appropriate designated dust mask. Avoid dust contact with eyes and skin.First Aid Measures in case of Irritation: flush eyes or skin with water for at least 15 minutes.ARMSTRONG FLOORING PTY LTDFLOORCOVERINGS, ADHESIVES & ACCESSORIES MANUFACTURED IN AUSTRALIA AFTER 1st JANUARY, 1984 DO NOT CONTAIN ASBESTOS!WARNINGVinyl flooring and adhesives manufactured in Australiaprior to 1st January, 1984 may contain asbestos.Do not sand, dry sweep, dry scrape, drill, saw, beadblast, or mechanically chip orpulverise existing resilient flooring, backing, lining felt or asphaltic ‘cut-back’adhesives.These products may contain either asbestos fibres or crystalline silica.Avoid creating dust. Inhalation of such dust is a cancer and respiratory tract hazard.Unless positively certain that the product to be removed is a non-asbestoscontaining material, you must presume it contains asbestos. Regulations mayrequire that the material be tested to determine asbestos content.Where do I go to find out more about asbestos?Asbestos Awareness www.asbestosawareness.com.au – provides informationon a state by state basis about the dangers of asbestos, asbestos removal, who tocontact and other important information.NOTE: Vinyl flooring manufactured in Australia after January 1, 1984, DOES NOTcontain asbestos. However, regulations, codes and directives as to the best methodof handling asbestos do exist and it is the obligation of the installer to ensure thatpractices used are safe, without risk to health, and meet all legal requirements.Disclaimer—Asbestos issuesThe warnings and guidance contained in these instructions in relation to thepotential for asbestos in floorcovering materials are given in good faith. However,regulations, codes and directives as to the best method of handling asbestos areunder continual revision. It is the obligation of the installer to ensure that practicesused are safe, without risk to health, and meet all legal requirements.Armstrong Flooring Pty Ltd accepts no liability for any loss, costs, expense or injury,however incurred, arising from the presence of any asbestos in any floorcoveringmaterials or asphaltic ‘cut-back’ adhesives and/or any reliance placed upon theprocedures and recommended practices contained in these instructions.
Armstrong Flooring Pty Ltd29 – 39 Mills Road, Braeside, 3195 Victoria AustraliaFor further information and samples:Australia Freecall 1800 800 518Email customer services@armstrongflooring.com or contact us on the webwww.armstrongresidentialfloors.com.auJanuary 2016
installation. If replaced, Armstrong will replace it with similar quality first grade material. This replaced material will be Warranted for a further Fifteen (15) years on the same terms as this Defects Warranty and subject to the same conditions . Armstrong Flooring Laminate products can be installed over most subfloors and existing floors .