Transcription
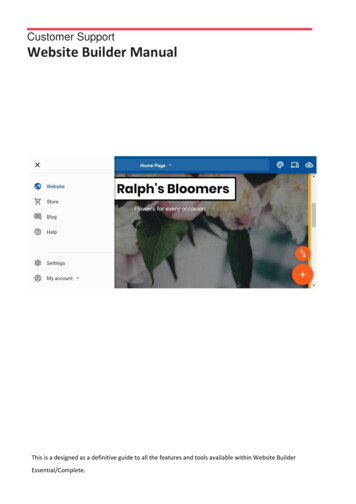
Fasthosts Customer SupportWebsiteBuilderEssential/Complete ManualThis is a designed as a definitive guide to all the featuresand tools available within Website BuilderEssential/Complete.
Customer Support Website Builder Essential/Complete ManualContentsIntroduction . 6Getting Started . 6Choose a theme . 6Complete your site profile . 7The Feature Widget . 11Adding Content . 14Adding Text . 14Editing Text . 15Removing Text . 15Formatting a block of Text . 16Creating Links . 18Images . 21Best Practices . 22Uploading images . 23Add an Image. 24Using the Photo Editor . 24Additional Image settings . 46Finding the URL of an image you have added . 51Adding downloadable files via Dropbox . 52Adding an audio stream using SoundCloud . 56Themes - Changing the look and feel of your site . 58Colours . 58Changing all the colours in a theme. 59Background . 61Page 1
Customer Support Website Builder Essential/Complete ManualChanging background colour . 63Adding a two colour background. 64Choose a background Image . 67Fonts . 70Changing your website fonts. 70Page Layout Widgets . 73Button. 73Divider . 76Spacer. 78Columns . 79Favicons . 81Creating a Favicon . 81Uploading your Favicon . 81Page management . 84Add a new page . 84Page Settings . 86Rename a page . 86Remove a page. 87Choosing your home page . 88Choosing what to publish . 89Add JavaScript to your page . 91Organising your pages (Page Folders) . 93Page redirects . 95Adding a redirect . 95Removing a redirect . 97Navigation . 99Page 2
Customer Support Website Builder Essential/Complete ManualChanging the order of pages . 99Create a sub navigation menu . 100Choosing which pages to display in the Navigation Menu . 102Displaying Pages in the Navigation Menu . 102Hiding Pages in the Navigation Menu . 103Changing the font in your Navigation menu . 104Shop . 108Quick Setup. 108Shop Credentials . 108Payment setup . 109Shipping Setup. 110Add your first product . 111Add your Payment Details . 117Shipping Options. 118Settings . 120Status, Name, Address . 120Ecommerce Widgets . 124Product List . 124Basket . 126Featured Products . 127Categories List . 129Products . 131Adding a product . 131Editing a product . 132Removing a product . 133Changing product visibility . 135Page 3
Customer Support Website Builder Essential/Complete ManualImporting a product . 137Blog . 139Setting up your blog . 139Adding a blog post . 141Social . 145Twitter . 145Twitter Widget . 145Add a tweet button . 147Facebook . 149LinkedIn. 151LinkedIn Personal . 151LinkedIn Business . 152Disqus . 154Yelp Reviews . 156Add ons and Widgets . 158Forms . 158Creating a contact form. 158Creating a signup form. 161Testing a form . 164Adding Video . 165Map . 168Call Me . 170Embed . 172Slideshow . 174SEO, Sitemaps and Google Analytics . 178SEO – Optimise your site . 178Page 4
Customer Support Website Builder Essential/Complete ManualGoogle SiteMaps . 178SEO Settings . 178Google analytics . 181Google AdSense . 183Page 5
Customer Support Website Builder Essential/CompleteIntroductionWebsite Builder Essential/Complete is a powerful and feature rich application thatallows you to create websites without the need to learn the HTML language orweb design skills. It comes with ready-made templates that can be modified withtext or images, allowing you to create a website that suits your needs.Getting StartedChoose a themeWhen you first login, you will be asked to pick a theme to use.Step 1Click on one of themes you want to preview.Page 6
Customer Support Website Builder Essential/CompleteStep 2To use the template, click the Template ready button, otherwise you can click Alltemplates to go back to the template list.Complete your site profileStep 1Click the Manage icon from the main menu in the left hand side.Step 2Select Profile from the menu that appears.Page 7
Customer Support Website Builder Essential/CompleteStep 3Drag and drop a logo onto the area shown or upload one using the choose animage button.Step 4Enter a Business name, Headline, Strap line and Company Description in theboxes provided.Page 8
Customer Support Website Builder Essential/CompleteStep 5Enter copyright statement and enter your PayPal email address in the boxesprovided. Then select a currency from the Currencies drop down menu.Page 9
Customer Support Website Builder Essential/CompleteStep 6Enter your Email and postal address along with any social network details youwant to add.Quick tip: Any social network details added in here will addsocial icons at the bottom of your pages. These will link toyour social profiles.Once finished, click the Save button at the bottom of the page.Page 10
Customer Support Website Builder Essential/CompleteThe Feature WidgetBy default, there will be a Feature widget on your theme, you can customise ithow you want it or hide it completely.Step 1Click on the Feature widget to bring up the settings next to the left hand menu.Step 2Select from the following options: Use template image: Use the default image for the background. Use your own image: Add a custom image for the background. Hide the feature: Hide the feature widget completely.Page 11
Customer Support Website Builder Essential/CompleteStep 3 (optional)If you have selected Use your own image, click the Choose image button andselect an image from the galley or upload a new one.Step 4Enter text for the header.Choose the style for the header.Enter text for your strapline.Choose the style for the strapline.Choose whether the show the button.Select where the button will link to.Enter the text for the button.Page 12
Customer Support Website Builder Essential/CompleteOnce finished, click the Save button at the top of the settings.Page 13
Customer Support Website Builder Essential/CompleteAdding ContentAdding TextNote: Some software (such as Microsoft word) will addhidden formatting code to your text. If want to copy andpaste text into your website, make sure that you “Paste asPlain Text”.To add new text, expand the Add Content menu and drag either the P or H1widget onto the section of the page you want it to appear on.A new text box will appear where you dropped it.Page 14
Customer Support Website Builder Essential/CompleteEditingError! Bookmark not defined. TextClick the text box you want to edit; a text editor will appear.Edit the text that you want to change within the text editor and click Save.Removing TextClick on text box you want to remove. An options menu will appear above thetext. Click the Cross to remove it.Page 15
Customer Support Website Builder Essential/CompleteFormattingError! Bookmark not defined. a blockof TextQuick tip: This will show you how to change one block oftext. To change the styles of text across your site please seeFont Sets, and Font Styles.Step 1Double click the text box you would like to format.Page 16
Customer Support Website Builder Essential/CompleteStep 2Select the text you want to re-format and choose how you would like to re-formatyour textStyles: Choose a theme style for your text. This is useful to preserve asingle feel across your website. Our chapter on font styles will show how to editor create new font styles on your website.Font Size: Adjust the font size of your text.Justify Text: Choose how to align your text within the text box.Format Text: Make your text bold, italic or add a strikethrough.Lists: Turn your selected text into an ordered or unordered list (bulletpoints).Colours: Change the text and background colour.Page 17
Customer Support Website Builder Essential/CompleteCreating LinksStep 1Double click the text box and highlight the text you want to turn into a link.Step 2Click the Add Link icon and select the type of link you want to add. These aredocumented in the following sections.Internal: Add a link to another page on your websiteStep 3If you select Internal from the drop down menu another window will appear. Fromthis select the page you want the link to go to and click SavePage 18
Customer Support Website Builder Essential/CompleteExternal: Add a link to another locationStep 3If you select External from the drop down menu another window will appear Enterthe URL of the page you want your link to navigate to.Step 4From the Target window dropdown, choose if you want the target link to open ina new window, or in the current window.Generally, it’s better to open external links in a new window so that visitors canremain on your site.Step 5Click the Save button once finished.Page 19
Customer Support Website Builder Essential/CompleteMail: Add an email linkStep 3If you select Mail from the drop down menu another window will appear Enter theemail address you want to use and click SavePage 20
Customer Support Website Builder Essential/CompleteImagesClick an Image to open the image options.Copy: Copy the image into the clipboard.Choose Image: Choose another image to use.Edit: Open the image in an image editor.Columns: Choose a different column layout.Move image: Remove the image from your website.Remove: Remove the image.Page 21
Customer Support Website Builder Essential/CompleteBestError! Bookmark not defined.Error!Bookmark not defined. PracticesError!Bookmark not defined.Error! Bookmark notdefined.Images are important on a website, however large images (in file size, ratherthan area) can slow your website down and use up your visitor’s data transferquotas (if they have any).When you add an image to your website you should always look at reducing thefile size of the image before you upload it. There are two main ways of reducingan images file size: How large is the image? Reduce the image to the size that you need it. What quality do you need? A camera may take a high resolution photo,but your visitors will not need that level of details, and their screens may notbe able to display that much detail. You can reduce the quality ofphotographs without any reduction to the quality of your visitor’sexperience.While many photo and image editing software will be able to do this for you. Ifyou don’t have access to any existing software, there are still plenty of freealternatives (such as http://webresizer.com/resizer/) available online.Important: http://webresizer.com is a third party websitewith no affiliation with Fasthosts.Page 22
Customer Support Website Builder Essential/CompleteUploading imagesStep 1Click in the Images icon in the left hand side of the page, then click Add images.Step 2You can either drag and drop a JPG or PNG image from your computer into thebox or click Choose files to upload your image manually.Page 23
Customer Support Website Builder Essential/CompleteAdd an ImageOnce your image is listed, simply drag it to the location you want it on yourwebsite.Error! Bookmark not defined.Using the Photo EditorError! Bookmark notdefined.Edit an image on your pageError! Bookmark not defined.Step 1Click on the image you want to edit and select the Edit icon. The image will nowopen within the editor.Page 24
Customer Support Website Builder Essential/CompleteEdit an image from the galleryError! Bookmark not defined.Step 1Click the Images icon from the left hand toolbar.Step 2Hover over the image you want to open in the editor and click the Edit icon. Theimage will now open within the editor.Page 25
Customer Support Website Builder Essential/CompletePhoto Editor: EnhanceError! Bookmark not defined.Step 1Open your image in the Photo Editor and click the Enhance icon.Step 2Select from one of the three options. Hi-Def: Sharpens your photo and make it clearer. Illuminate: Automatically adjusts the lighting in your photo. Color Fix: Automatically adjusts the colours in your photo.Step 3Click the Apply button to save the changes.Page 26
Customer Support Website Builder Essential/CompletePhoto Editor: EffectsError! Bookmark not defined.Step 1Open your image in the Photo Editor and click the Effects icon.Step 2Select one of the effects to apply to your photo and click the Apply button tosave the changes.Page 27
Customer Support Website Builder Essential/CompletePhoto Editor: FramesError! Bookmark not defined.Step 1Open your image in the Photo Editor and click the Frames icon.Step 2Select a frame to apply to your image and click the Apply button to save thechanges.Page 28
Customer Support Website Builder Essential/CompletePhoto Editor: StickersError! Bookmark not defined.Step 1Open your image in the Photo Editor and click the Stickers icon.Step 2Drag to sticker you want to a position on your image.Page 29
Customer Support Website Builder Essential/CompleteStep 3You can then resize and rotate the image how you want it by dragging the roundicon in the bottom left of the sticker.You can also drag the sticker itself to reposition it on your image.Step 4Click the Apply button to save your changes.Page 30
Customer Support Website Builder Essential/CompletePhoto Editor: CropError! Bookmark not defined.Step 1Open your image in the Photo Editor and click the Crop icon.Step 2Either select a preset crop or use the round icons to select a custom area to crop.Step 3Once you have selected the area you want to crop from your image, select theApply button to make the changes.Page 31
Customer Support Website Builder Essential/CompletePhoto Editor: ResizeError! Bookmark not defined.Step 1Open your image in the Photo Editor and click the Resize icon.Step 2Click on the Padlock icon to toggle Maintain proportions on or off. If Maintainproportions is on, this will keep the image proportions in place meaning that yourimage will not become distorted.Step 3Edit your width and or height by changing the numbers in the respective boxes.Once done, click the Apply button to save the changes.Page 32
Customer Support Website Builder Essential/CompletePhoto Editor: OrientationError! Bookmark not defined.Step 1Open your image in the Photo Editor and click the Orientation icon.Step 2Rotate and/or Mirror your image. Rotate: Use the Rotate buttons to rotate your image 90 left or right. Mirror. Use the Mirror buttons to flip your image vertically or horizontally.You can also use the round icon to rotate your image manually.Step 3Click the Apply button to save your changes.Page 33
Customer Support Website Builder Essential/CompletePhoto Editor: FocusError! Bookmark not defined.The Focus tool allows you to select an area of your image to be in focus leavingany part of the image outside this area blurred.Step 1Open your image in the Photo Editor and click the Focus icon.Step 2Select either a circle or rectangle for your focus area.Step 3Drag the shape to the area of your image you want to focus on.Page 34
Customer Support Website Builder Essential/CompleteStep 4Use the round icon to expand and rotate your focus area. Once done, click theApply button to save your changes.Photo Editor: BrightnessError! Bookmark not defined.Step 1Open your image in the Photo Editor and click the Brightness icon.Step 2Move the slider left to decrease brightness or right to increase brightness. Oncedone, click the Apply button to save your changes.Page 35
Customer Support Website Builder Essential/CompletePhoto Editor: ContrastError! Bookmark not defined.Step 1Open your image in the Photo Editor and click the Contrast icon.Step 2Move the slider left to decrease contrast or right to increase contrast. Once done,click the Apply button to save your changes.Photo Editor: SaturationError! Bookmark not defined.Step 1Open your image in the Photo Editor and click the Saturation icon.Page 36
Customer Support Website Builder Essential/CompleteStep 2Move the slider left to decrease saturation or right to increase saturation. Oncedone, click the Apply button to save your changes.Photo Editor: WarmthError! Bookmark not defined.Step 1Open your image in the Photo Editor and click the Warmth icon.Step 2Move the slider left to decrease warmth or right to increase warmth. Once done,click the Apply button to save your changes.Page 37
Customer Support Website Builder Essential/CompletePhoto Editor: SharpnessError! Bookmark not defined.Step 1Open your image in the Photo Editor and click the Sharpness icon.Step 2Move the slider left to decrease sharpness or right to increase sharpness. Oncedone, click the Apply button to save your changes.Photo Editor: SplashError! Bookmark not defined.Step 1Open your image in the Photo Editor and click the Splash icon.Page 38
Customer Support Website Builder Essential/CompleteStep 2Choose your brush type and size. You can select from the following brush types: Free Color: Freely applies the splash effect to the area being painted. Smart: Avoids any bleed through of colour towards the edge of the areabeing painted. Eraser: Erases any applied splash effect to the area being painted.Your image will be in black and white, use your chosen Splash brush to makecertain areas of your image in colour.Page 39
Customer Support Website Builder Essential/CompletePhoto Editor: DrawError! Bookmark not defined.Step 1Open your image in the Photo Editor and click the Draw icon.Step 2Pick a colour from the Color Picker and a Brush Size.Quick tip: You can use the Eraser brush to remove anydrawings from your image.Step 3Create your drawing and click the Apply button to save your changes.Page 40
Customer Support Website Builder Essential/CompletePhoto Editor: TextError! Bookmark not defined.Step 1Open your image in the Photo Editor and click the Text icon.Step 2Select a colour and a font from the drop down menus.Step 3Click on the text box and enter your text.Step 4Drag the text box to position the text to where you want it on your image.Page 41
Customer Support Website Builder Essential/CompleteStep 5You can also use the round icon to rotate and resize the text.Step 6Click the Apply button to save your changes.Quick tip: You can use Add Text button to create additionaltext boxes.Page 42
Customer Support Website Builder Essential/CompletePhoto Editor: RedeyeError! Bookmark not defined.Step 1Open your image in the Photo Editor and click the Redeye icon.Step 2Select a brush size and paint the area of your image containing the Redeye youwant to remove.Step 3Click the Apply button to save your changes.Page 43
Customer Support Website Builder Essential/CompletePhoto Editor: WhitenError! Bookmark not defined.Step 1Open your image in the Photo Editor and click the Whiten icon.Step 2Select a brush size and paint the area of your image that you want to whiten.Step 3Click the Apply button to save your changes.Page 44
Customer Support Website Builder Essential/CompletePhoto Editor: BlemishError! Bookmark not defined.Step 1Open your image in the Photo Editor and click the Blemish icon.Step 2Select a brush size and paint the area of your image that you want to remove ablemish from.Step 3Click the Apply button to save your changes.Page 45
Customer Support Website Builder Essential/CompleteAdditional Image settingsThere are a number of additional options you can create with images. These areavailable within the image settings panel.Step 1Click on your image. Image options will appear next to the left navigation bar.Scaling your imageError! Bookmark not defined.You can scale down your image to a preset size while keeping the aspect ratio inplace.From the left hand menu, click the Scale dropdown menu and select which scaleto apply to your image.Page 46
Customer Support Website Builder Essential/CompleteImage AlignmentError! Bookmark not defined.Align your image to the left, right or center by selecting the alignment you want toapply from the Image Alignment section of the left hand menu.Image LinksError! Bookmark not defined.You can add links to images within the Image settings panel.Step 1Click the Link to drop down in the left hand menu.Page 47
Customer Support Website Builder Essential/CompleteAdd a link to another page on your websiteStep 2Select Internal from the drop down menu.Step 3Select the page you want the image to link to from the drop down menu and clickthe Save button.Page 48
Customer Support Website Builder Essential/CompleteAdd a link to another locationStep 2Select External from the Link to drop down menu.Step 3Enter your external link into the box provided and select an option from theTarget window drop down menu.Generally, it’s better to open external links in a new window so that visitors canremain on your site.Step 4Click the Save button to apply the changes.Page 49
Customer Support Website Builder Essential/CompleteAdding image tagsError! Bookmark not defined.Alt Tag: Enter an alternative description of your image. This tag is used byspeech reading devices, and browsers that are unable to display your image.Title Tag: Used to give your image a title, this may be displayed in SearchEngines.Page 50
Customer Support Website Builder Essential/CompleteFinding the URL of an image you haveaddedError! Bookmark not defined.From time to time you may need to find the URL of an image you have uploaded(if you want to link to it from another site for example).Step 1Click Images, then hover over the image you want the URL for. An Informationicon will appear, click this.The image URL will be displayed; you can copy this link for use elsewhere.Page 51
Customer Support Website Builder Essential/CompleteAdding downloadable files viaDropboxError! Bookmark not defined.You can use the Dropbox widget to allow users to download files uploaded toDropbox.Step 1Click the Add Content icon and scroll to the Media section.Step 2Drag the Dropbox widget onto the section of the page where you want it todisplay.Step 3Page 52
Customer Support Website Builder Essential/CompleteClick the Dropbox widget on your page to bring up the settings next to the lefthand menu.Page 53
Customer Support Website Builder Essential/CompleteStep 4Click the Choose From Dropbox button.Step 5Sign in to your Dropbox account, select the file you want to use and click theChoose button.Page 54
Customer Support Website Builder Essential/CompleteStep 6Configure the remaining Dropbox widget settings.Choose whether to show the file name.Enter the text you want the button to display.Align the widget to the left, centre or right.Once finished, click the Save button at the top of
Customer Support Website Builder Essential/Complete Page 7 Step 2 To use the template, click the Template ready button, otherwise you can click All templates to go back to the template list. Complete your site profile Step 1 Click the Manage icon from the main menu in the left hand side. Step 2 Select Profile from the menu that appears.