Transcription
Customer’s Guide toAvtec Scout Integrationswww.niceincontact.com
IntroductionCustomer’s Guide to Avtec Scout IntegrationsVersion: Avtec versions 4.4-4.7 are supported. This guide should be used withNICE Uptivity versions 18.x and higher.Copyright: 2020 NICE inContactContact: Send suggestions or corrections regarding this guide ’s Guide to Avtec Scout Integrations2
IntroductionTable of ContentsIntroduction . 5Audience . 5Goals . 5Assumptions . 5Need-to-Knows . 5Terminology. 6Customer Responsibilities . 6Avtec Scout Integration Overview . 7Avtec Scout Requirements . 8Hardware . 8Software . 8Software & Licensing . 8NICE Uptivity Requirements . 8Hardware . 8Licensing . 8Customer Configuration Overview . 8Customer Integration Tasks . 9Channel Port Mappings . 9Configure a Console . 9Configure Endpoints . 11Customer Administration Tasks . 13Metadata Reference . 13Customer’s Guide to Avtec Scout Integrations3
IntroductionReferences . 14Customer’s Guide to Avtec Scout Integrations4
IntroductionIntroductionAudienceThis document is written for customers and prospective customers interested inusing Uptivity Call Recording in an Avtec telephony environment. Readers who willperform procedures in this guide should have a basic level of familiarity with IPtelephony, general networking, the Windows operating system, Avtec Scout andUptivity.GoalsThe goal of this document is to provide knowledge, reference, and proceduralinformation necessary to understand a proposed Avtec-Uptivity integration usingAvtec Scout, and to configure the Avtec equipment to support the integration. Thisdocument is NOT intended as a specific system or network design document. Iffurther clarification is needed, consult with your telephony vendor(s).AssumptionsThis document assumes the reader has access to an Uptivity Sales Engineer,Project Manager, or other resource to assist in applying this information to thereader's environment.Need-to-KnowsTo facilitate ease of use, this document takes advantage of PDF bookmarks.By opening the bookmark pane, readers can easily refer to the portion(s) ofthe guide that are relevant to their needs. For example, the Uptivityapplication administrator can click the Customer Administration Tasksbookmark to jump directly to that section.To expand and collapse the bookmark pane, click the bookmark icon on the left sideof the document window.For information and procedures related to Uptivity configuration, consult theUptivity installation team.The customer is expected to have a working environment with Avtec Scout.Customer’s Guide to Avtec Scout Integrations5
IntroductionTerminologyTo ensure a common frame of reference, this guide uses the following terms inconjunction with this Avtec integration: Console –A collection of endpoints (radios or phones) that can be used by thedispatcher. Endpoint – A radio or phone within the Avtec system.Customer ResponsibilitiesYou are responsible for supplying any necessary physical and IP connection(s) toyour telephone system and data network, as well as any licensing required byAvaya.You may also be responsible for configuring Avtec system components to supportthe recording integration. See your specific integration in the Customer IntegrationTasks section for additional information.Customer’s Guide to Avtec Scout Integrations6
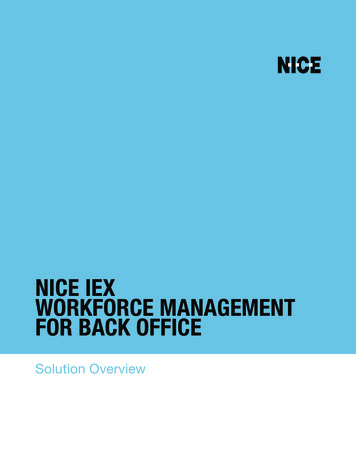
Avtec Scout Integration OverviewAvtec Scout Integration OverviewThrough collaboration with Avtec, NICE Uptivity’s certified Avtec Scout callrecording solution records voice interactions from endpoints through the VPGate ordirectly from the Avtec Scout Console using VoIP. The combined solution providesaffordable, reliable technology for dispatch communications centers of all sizes.Leveraging open architecture, this solution integrates seamlessly into the existingand evolving infrastructure of Public Safety emergency communications centers.Organizations that employ Avtec Scout Dispatch Console systems can now reliablycapture and more effectively leverage their audio recordings to evaluate, analyzeand improve interactions.Recording FlowWith Avtec, you have the ability to record either by console or by endpoint. Ineither recording scenario, audio resources are managed on an IP-basis by Avtec'ssoftware. If audio is active, Avtec forwards Audio/RTP to the recorder along withany available metadata. This direct recording integration results in capture of theentire voice transmission. The recording starts at the beginning of the voicetransmission and is automatically terminated when the transmission ends.An endpoint is defined as a radio or phone within the Avtec System. A console isused by a dispatcher which contains a collection of endpoints that a dispatcher canuse. The same endpoint can be configured to appear on multiple dispatcherconsoles. When setting up recording you can choose to record the individualendpoints, a console, or a combination of both.The above diagram illustrates where Endpoint and Console logging recorders reside in a Scout installation. [1]Customer’s Guide to Avtec Scout Integrations7
Avtec Scout Integration OverviewAvtec Scout RequirementsHardwareThis is a software-only integration, so no action needs to be taken for systemhardwareSoftwareAvtec Scout 4.6Software & LicensingAvtec does not charge for licenses, so no action needs to be taken for AvteclicensingNICE Uptivity RequirementsHardwareUptivity hardware requirements vary depending on system configurations.Appropriate hardware is identified during the system implementation process. Formore information, search online help for keyword site requirements.Licensing One (1) Voice seat license per named agent orOne (1) Voice concurrent session license for each simultaneous call to berecordedAdditional licensing may be required if the system includes optional features (forexample, Uptivity Screen Recording)Customer Configuration OverviewThe following table provides a high-level overview of the customer configurationsteps in Avtec Scout integrations.Customer Configuration Steps for Avtec Scout Integrations1Review information about Channel Port Mappings.2Configure a Console.3Configure Endpoints.Customer’s Guide to Avtec Scout Integrations8
Customer Integration TasksCustomer Integration TasksThese configuration tasks should be performed by your Avtec Administrator.Detailed steps for configuring Avtec Scout can be found in Avtec’s documentation,which is available on the Avtec’s website or from your Avtec vendor. You shouldalways use the appropriate guides from Avtec to install and configure Avteccomponents.Instructions in these procedures assume that your Avtec environment uses thedefault settings. You should note any non-default settings and discuss them withyour Uptivity installation team.Channel Port MappingsEach recording channel in NICE Uptivity will “listen” for RTP/UDP packets on twoports (Uptivity will be setting the starting port at 7000). This means that UptivityChannel 1 will be listening on ports 7000 and 7001, Uptivity Channel 2 on ports7002 and 7003 – this pattern continues until you reach your channels limit.Uptivity recommends that each endpoint’s TX and RX are both sent to the samechannel. For example, TX using the channels first port 7000 and RX using thechannels second port 7001. The next endpoint that needs to be configured woulduse 7002 and 7003.For consoles, Uptivity recommends setting the Select Recorder to the channels firstport and the Unselect Recorder to the channels second port.Important: Do not add more than one console or endpoint to a channel. If youaccidentally add more than one console or endpoint to a channel, calls willoverlap.Configure a ConsoleA console contains a collection of endpoints (radios or phones) that a dispatchercan use. To configure a console:Customer’s Guide to Avtec Scout Integrations9
Customer Integration Tasks1. Open a web browser and navigate to the Avtec console that you want toconfigure. For example:http://0.0.0.0:3082(Change 0.0.0.0 to the IP address of your console.)2. On the Avtec login page, log in with your Avtec username and password.3. Click Audio Devices.4. In the New Device drop-down menu, select Console Select Recorder.5. Click Add.6. On the Console Select Recorder page, configure the following settings:a. For the Destination setting, select NETWORK in the drop-down menu.b. In the IP Address field, enter the IP address of the recorder.c. In the Port field, enter the port number of the channel that the consolewill use to record.d. For the Send Metadata? setting, select YES in the drop-down menu.7. Click Add. The Console Select Recorder is displayed in the AP Ports list.8. In the New Device drop-down menu, select Console Unselect Recorder.Customer’s Guide to Avtec Scout Integrations10
Customer Integration Tasks9. Click Add.10.On the Console Unselect Recorder page, configure the following settings:a. For the Destination setting, select NETWORK in the drop-down menu.b. In the IP Address field, enter the IP address of the recorder.c. In the Port field, enter the port number of the channel that the consolewill use to record.d. For the Send Metadata? setting, select YES in the drop-down menu.11.Click Add. The Console Unselect Recorder is displayed in the AP Ports list.Configure EndpointsAvtec Endpoint recording is achieved by configuring an Audio Forwarding Driver,which is part of Avtec’s VPGate service.1. Open a web browser and navigate to the Avtec Console that you want toconfigure.http://0.0.0.0:3082(Change 0.0.0.0 to the IP address of your console.)2. On the login page, log in with your Avtec username and password.3. Click Endpoints.4. On the Endpoint Summary page, select the endpoint that you want to record.Customer’s Guide to Avtec Scout Integrations11
Customer Integration Tasks5. On the Endpoint Configuration page, in the Drivers section, select a driver fromthe drop-down menu.6. Click Add driver.Note: If you use the Audio Forwarding Driver, you must specify 1 for theDriver Processing Order setting.7. In the Metadata Settings section, select YES for Send Metadata (General)and for Send ANI Alias settings.8. In the Audio Transmitted Toward the Endpoint section, enter the IP addressof the recorder in the IP Address field.9. In the UDP Port field, enter the first port number of the channel that theconsole will use to record.10. Select YES for Send Metadata.11. In the Audio Received From the Endpoint section, enter the IP address ofthe recorder in the IP Address field.12.In the UDP Port field, enter the second port number of the channel that theconsole will use to record.13. Select YES for Send Metadata.14. Click Add. The endpoint that you configured should appear on the EndpointSummary page.Customer’s Guide to Avtec Scout Integrations12
Customer Administration TasksCustomer Administration TasksDuring ongoing use of the system, your Uptivity administrator may need toconfigure new channels or reconfigure existing channels. This section providesinformation needed to perform these integration-specific tasks.Metadata ReferenceList of Metadata Uptivity can collect from Avtec. Some events are only availablewhen using console recording:Uptivity FieldAgentGroupACD GateCalled Number (DNIS)Caller ID (ANI)Device/Port IDAgent Number Device AliasCall DirectionUser 1User 2User 3User 4User 5User 6User 7User 8User 9User 10User 11User 12User 13User 14User 15Avtec ValueUser Login (Console Only)Talk GroupVDNUnit ID DNISCaller ID (ANI)PhoneACDAudio Direction (Console Only)Account NumberFrequencyEmergency StateTX/RX Analog/Digital ModeTX/RX Clear/Encrypt ModeTX/RX Encryption KeyP25 NACKEY StateTalker ListPatch NumberConsole IDEndpoint State (Console Only)VOX (Console only)Call Type (Console Only)End Point NameIt is best practice to modify the Terminology section within Uptivity’s Web PortalSettings to map the values.Customer’s Guide to Avtec Scout Integrations13
ReferencesReferences[1]"Metadata Protocol v1.0 Specification, Document Version: 2.4," Avtec Inc.,Lexington, SC, USA, Mar. 2016.Customer’s Guide to Avtec Scout Integrations14
Customer's Guide to Avtec Scout Integrations 3 Table of Contents . Voice concurrent session license for each simultaneous call to be . It is best practice to modify the Terminology section within Uptivity's Web Portal Settings to map the values. References Customer's Guide to Avtec Scout Integrations 14